There used to be a tiny apple orchard café off the old county highway, the one with the wooden sign that creaked in the wind, that made a caramel apple dip you could practically write home about. When they closed three summers ago—just a handwritten note on the door saying “Thanks for the memories”—I honestly felt a little lost. That dip was my go-to for every fall gathering, every casual get-together, every time I needed to show up with something that looked like I tried way harder than I actually did. After twelve tries—twelve, let me tell you, some of them were downright soupy disasters—I finally got it.
This cream cheese caramel apple dip is the exact recreation of that café magic. The first time I nailed it, I was standing in my kitchen at 11 PM on a Tuesday, dipping a Granny Smith slice into the bowl, and I actually let out a little cheer. My neighbor probably thought I’d finally lost it. But honestly, that first bite brought me right back to that creaky wooden bench by the orchard window. It’s creamy, it’s rich, it’s got that perfect balance of tangy cream cheese and sweet, buttery caramel, and it comes together in about fifteen minutes flat.
Maybe you’ve been there—you find a dish somewhere, and it becomes your secret weapon for every party, every potluck, every family dinner. Then one day, poof, it’s gone. You spend months trying to chase that flavor, tweaking ratios, testing different brands of caramel, wondering if you’ll ever get it right. Well, this is that recipe. This is the one that made me stop obsessing and start sharing. And let me be honest with you—the first time I made this for a Friendsgiving, I watched three people fight over the last apple slice. That’s when I knew I had to write it down.
Why You’ll Love This Recipe
This isn’t just another dip recipe you’ll scroll past and forget. This is the kind of thing that makes people hover around the snack table, pretending to have casual conversations while they’re really just waiting for you to walk away so they can grab another scoop. I’ve tested this version at least a dozen times—for birthday parties, game nights, casual Sunday afternoons—and it never fails to disappear faster than anything else on the table.
- Quick & Easy: You’re looking at about 15 minutes of actual work. No baking, no candy thermometer, no complicated steps. Just mix, spread, drizzle, and serve.
- Simple Ingredients: I bet you already have most of these in your fridge and pantry. Cream cheese, caramel sauce, a few mix-ins—that’s really it. No fancy grocery store runs required.
- Perfect for Hosting: This dip was practically made for gatherings. It sits beautifully on a dessert board, pairs with all kinds of fruit and snacks, and doesn’t require any last-minute fussing while your guests are arriving.
- Crowd-Pleaser: I’ve served this to kids, grandparents, picky eaters, and self-proclaimed dessert snobs. Every single person goes back for seconds. It’s genuinely one of those rare recipes that appeals to everyone.
- Unbelievably Delicious: The combination of smooth cream cheese, rich caramel, and a hint of cinnamon and vanilla creates this flavor that just works. It’s not too sweet, not too tangy—it’s exactly right.
What sets this recipe apart from the dozens of other caramel apple dips you’ll find online is the technique. Most versions just dump a block of cream cheese in a dish and pour caramel on top. That’s fine, but it’s not great. This version beats the cream cheese until it’s impossibly light and fluffy, then layers in the caramel so every bite has that perfect balance. It’s a small extra step that makes a huge difference. Trust me on this one.
This is the dip that makes you close your eyes after the first bite. It’s comfort food at its finest—simple, nostalgic, and completely satisfying. And when you bring it to your next gathering, you’ll be the hero of the snack table without breaking a sweat.
What Ingredients You Will Need
This recipe uses straightforward, everyday ingredients to create something that tastes far more impressive than it should. The magic is in how they come together, not in any exotic shopping list. Here’s what you’ll need:
For the Cream Cheese Base
- 16 ounces cream cheese, softened to room temperature — This is the foundation of the dip. Full-fat cream cheese gives the best texture and flavor. I personally use Philadelphia brand, but any good-quality block cream cheese works. Make sure it’s truly softened—leave it on the counter for at least an hour, or microwave it in 10-second bursts until it yields to gentle pressure. Cold cream cheese will leave you with a lumpy dip, and nobody wants that.
- 1/2 cup powdered sugar — This adds just enough sweetness to balance the tanginess of the cream cheese without making it cloying. Sift it if you’re feeling fancy, but honestly, I’ve skipped that step plenty of times and it turns out fine.
- 1 teaspoon vanilla extract — Pure vanilla extract makes a noticeable difference here. The artificial stuff has a chemical edge that you’ll taste in the final dip. Splurge on the real thing for this one.
- 1/2 teaspoon ground cinnamon — This is optional, but I never skip it. The cinnamon adds a warmth that ties the cream cheese and caramel together beautifully. It’s subtle enough that nobody will identify it, but they’ll notice something’s missing if you leave it out.
For the Caramel Layer
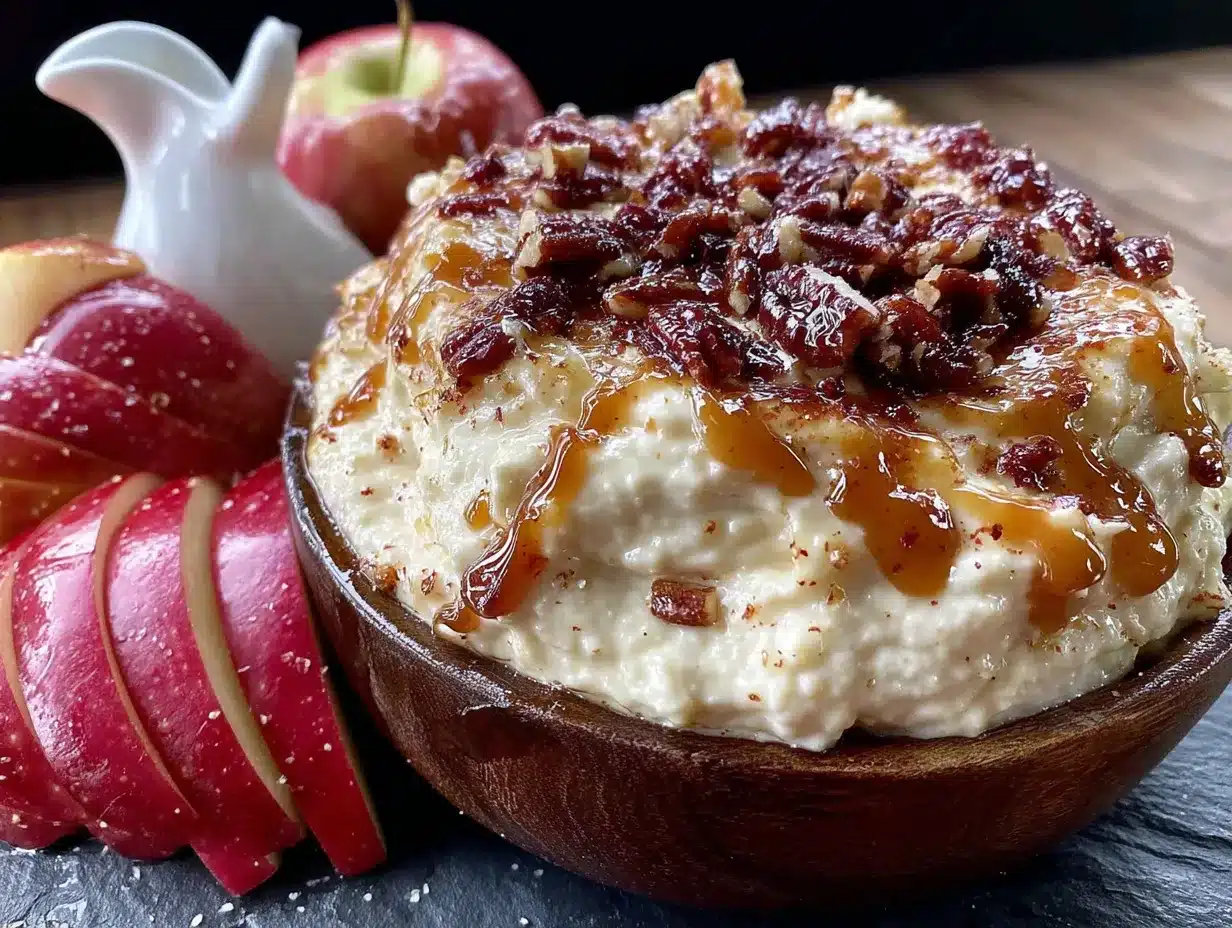
- 1 cup caramel sauce, divided — This is where you have options. You can use homemade caramel sauce if you’re ambitious, but I’ve had excellent results with store-bought. I recommend Mrs. Richardson’s or Ghirardelli brand for consistency. You’ll use about half mixed into the cream cheese and half drizzled on top.
- 1/2 cup toffee bits — The little crunchy bits of buttery toffee add texture and visual appeal. Look for the bits in the baking aisle, or crush up some Heath bars if you’re in a pinch.
- 1/4 cup chopped pecans or walnuts (optional) — For extra crunch and a slightly savory note that plays beautifully with the sweet caramel. Toast them lightly in a dry pan for even more flavor.
- Flaky sea salt, for finishing — This is non-negotiable in my book. A tiny sprinkle of flaky salt on top transforms this dip from good to unforgettable. It cuts through the sweetness and makes every flavor pop.
For Serving
- Assorted apple slices — Granny Smith apples are my top pick because their tartness balances the sweet dip perfectly. Honeycrisp and Fuji are also excellent. Slice them just before serving and toss with a little lemon juice to prevent browning.
- Additional dippers (optional) — Pretzel rods, graham crackers, shortbread cookies, and even salted potato chips all work wonderfully with this dip. The salty-sweet combination is absolutely addictive.
Equipment Needed
The beauty of this recipe is that it doesn’t require any specialized equipment. You probably have everything you need already sitting in your kitchen drawers and cabinets.
- Electric hand mixer or stand mixer — You can technically do this by hand with a wooden spoon and some elbow grease, but a mixer makes the cream cheese impossibly light and fluffy in about two minutes. I use my trusty KitchenAid hand mixer that I’ve had for years. It’s nothing fancy, but it gets the job done.
- Medium mixing bowl — Any bowl will work, but a wider, shallower bowl makes it easier to spread the dip into a serving dish later.
- Rubber spatula — Essential for scraping every last bit of that creamy goodness out of the bowl. I’m partial to the silicone ones that won’t scratch your bowls.
- Serving dish or pie plate — A 9-inch pie plate works perfectly for this. The shallow, wide shape lets you create those beautiful layers and gives dippers plenty of surface area to work with.
- Small offset spatula or butter knife — For spreading the cream cheese mixture evenly. Not strictly necessary, but it makes the process cleaner and more precise.
If you don’t have an electric mixer, you can absolutely do this by hand. Just make sure your cream cheese is extremely soft—leave it out for two hours instead of one—and beat it vigorously with a wooden spoon until it’s smooth and fluffy. It’ll take about five minutes of solid effort, but it works. I’ve done it myself when my mixer was on the fritz, and the dip still turned out fantastic.
Preparation Method
This comes together so quickly that you’ll want to have your serving dish and dippers ready before you start. Here’s exactly how to make it:
- Soften the cream cheese. Take the cream cheese out of the refrigerator at least one hour before you plan to make the dip. Cut it into smaller cubes to speed up the process if you’re short on time. You want it to be soft enough that when you press it with your finger, it leaves an indent without resistance. Trust me on this—rushing this step is the number one reason people end up with lumpy dip.
- Beat the cream cheese. Place the softened cream cheese in a medium mixing bowl. Using an electric hand mixer on medium speed, beat it for about 2 minutes until it’s completely smooth and fluffy. Scrape down the sides and bottom of the bowl with your rubber spatula halfway through. You’re looking for a texture that’s light and airy, almost like a thick frosting. This is where the magic happens.
- Add the dry ingredients. Add the powdered sugar and ground cinnamon to the beaten cream cheese. Start mixing on low speed so the powdered sugar doesn’t fly everywhere, then increase to medium and beat for another minute until everything is fully incorporated. The mixture should be smooth, sweet, and slightly spiced. Taste it here—if you want more cinnamon, add another pinch. It’s your dip, after all.
- Mix in the vanilla and half the caramel. Add the vanilla extract and about 1/2 cup of the caramel sauce to the cream cheese mixture. Beat on medium speed for about 30 seconds until the caramel is fully incorporated. You’ll see the mixture take on a beautiful pale tan color. The caramel adds sweetness and that unmistakable buttery flavor throughout the entire dip, not just on top.
- Spread the mixture into your serving dish. Use your rubber spatula to transfer the cream cheese mixture to a 9-inch pie plate or similar shallow serving dish. Spread it into an even layer, making sure to get it right to the edges. The surface should be smooth and level. Take your time with this—a nice even base makes the final presentation look polished and intentional.
- Drizzle the remaining caramel. Warm the remaining 1/2 cup of caramel sauce slightly if it’s thick—about 10 seconds in the microwave should do it. Drizzle it over the cream cheese layer in a decorative pattern. I like to do concentric circles starting from the center and working outward, but zigzags or random drizzles work too. Don’t overthink it; rustic looks great here.
- Add the toppings. Sprinkle the toffee bits evenly over the caramel layer. If you’re using nuts, scatter those on top as well. Finish with a light sprinkle of flaky sea salt—just a pinch or two, scattered evenly across the surface. The salt is the secret weapon here, so don’t skip it. It makes the caramel taste deeper and more complex.
- Chill briefly (optional but recommended). If you have time, pop the dip in the refrigerator for about 15-20 minutes before serving. This allows the layers to set slightly, making it easier to scoop without everything running together. If you’re serving immediately, it’s still delicious—just a little looser.
- Serve with apple slices and dippers. Arrange your apple slices and any other dippers around the dip or on a separate platter. I like to fan the apple slices in a circle around the dish for a pretty presentation. Toss the apple slices with a little lemon juice to keep them from browning if you’re making them ahead of time.
A quick note about timing: This dip is best served within a few hours of making it. The cream cheese layer firms up as it chills, which is actually nice for scooping, but you don’t want to make it a full day ahead or the texture will become too dense.
Cooking Tips & Techniques
After making this dip more times than I care to count, I’ve picked up a few tricks that make the process smoother and the results more consistent. Here’s what I’ve learned the hard way so you don’t have to:
Temperature is everything. I cannot stress this enough—your cream cheese needs to be truly at room temperature. Not just out of the fridge for ten minutes. Not microwaved until it’s hot in spots and cold in others. Give it a full hour on the counter, unwrapped, cut into cubes. Cold cream cheese will give you a lumpy, streaky dip that no amount of beating can fully fix. I learned this the hard way when I was rushing to make this for a potluck and ended up with a dip that looked like cottage cheese. It still tasted okay, but the texture was off, and I was embarrassed to put it out.
Beat it longer than you think you need to. The secret to that impossibly light, fluffy texture is giving the cream cheese a full two minutes of beating before you add anything else. Set a timer if you have to. You want it to look almost like whipped cream cheese, with visible air pockets and a soft, billowy texture. This extra step makes the final dip feel luxurious rather than dense and heavy.
Warm your caramel slightly for better drizzling. Cold caramel sauce is thick and gloopy, and it tends to pool in one spot rather than spreading evenly. A quick 10-second zap in the microwave makes it pourable and gives you much better control over your drizzle pattern. Just don’t overheat it—you want it warm, not hot. Hot caramel will melt the cream cheese layer and create a muddy mess.
Layer strategically for the best eating experience. Here’s a mistake I made the first few times: I’d pour all the caramel on top and call it done. The problem is that the first few scoops are all caramel, and by the time you get to the bottom, you’re just eating plain cream cheese. Mixing half the caramel into the cream cheese base ensures every single bite has that caramel flavor, while the drizzle on top gives you that beautiful presentation and an extra hit of sweetness.
Toast your nuts for maximum flavor. If you’re adding pecans or walnuts, take the extra two minutes to toast them in a dry skillet over medium heat. Just keep them moving and watch closely—they go from golden to burnt in about 30 seconds. Toasted nuts have a deeper, richer flavor that stands up to the sweetness of the caramel much better than raw nuts.
Variations & Adaptations
One of the best things about this dip is how easily it adapts to different tastes, dietary needs, and occasions. Here are some variations I’ve tried and loved:
Chocolate Caramel Apple Dip: Add 1/4 cup of unsweetened cocoa powder to the cream cheese mixture along with the powdered sugar. The chocolate and caramel combination is absolutely divine, and it makes the dip look gorgeous with its darker color. I made this version for a Halloween party and it was gone in twenty minutes flat.
Peanut Butter Caramel Apple Dip: Beat 1/3 cup of creamy peanut butter into the cream cheese mixture. The peanut butter adds a savory richness that pairs beautifully with both the caramel and the apples. If you’re feeling extra indulgent, sprinkle some chopped peanut butter cups on top instead of toffee bits. This version is dangerously addictive.
Dairy-Free Version: Use dairy-free cream cheese—I’ve had good results with Kite Hill brand—and a dairy-free caramel sauce. The texture will be slightly different, a bit less firm, but the flavor is still excellent. Just make sure your dairy-free cream cheese is softened properly, as some brands take longer to come to room temperature.
Spiced Apple Dip: Increase the cinnamon to 1 full teaspoon and add 1/4 teaspoon each of nutmeg and allspice to the cream cheese mixture. This version tastes like fall in a bowl and pairs especially well with Honeycrisp apples. I made this for Thanksgiving last year and it was a hit with the adults.
Baked Caramel Apple Dip: For a warm, gooey version, spread the cream cheese mixture in an oven-safe dish, drizzle with caramel, and bake at 350°F for about 10-12 minutes until warmed through. Top with toffee bits and serve immediately with apple slices. The warm dip is especially comforting on cold days, and the contrast with cold, crisp apple slices is incredible.
Serving & Storage Suggestions
This dip is incredibly versatile when it comes to serving. Here’s how to make it look and taste its best:
Serving Temperature: This dip is best served chilled or at room temperature. If you’ve made it ahead and refrigerated it, let it sit on the counter for about 15 minutes before serving to take the chill off. The cream cheese softens slightly, making it easier to scoop and spreading the flavors more evenly across your dippers.
Presentation Tips for Hosting: For parties and gatherings, I like to serve this dip in a shallow dish surrounded by a colorful array of apple slices. Fan the slices out in a sunburst pattern around the dish—it looks impressive but takes only about two minutes to arrange. Add a small bowl of extra toffee bits and another of chopped nuts on the side so guests can customize their scoops. A few cinnamon sticks tucked into the arrangement add a nice visual touch.
What to Serve Alongside: Beyond apple slices, this dip pairs beautifully with pretzel rods (the salty crunch is amazing), graham crackers, vanilla wafers, shortbread cookies, and even thick-cut kettle chips. For a healthier option, pear slices and celery sticks work surprisingly well. If you’re building a dessert board, arrange this dip alongside a cheese selection, dried fruits, and dark chocolate pieces for a stunning spread.
Storage Instructions: Store any leftover dip in an airtight container in the refrigerator for up to 4 days. The texture will firm up as it chills, which is fine—just let it sit at room temperature for about 20 minutes before serving again. I don’t recommend freezing this dip, as the cream cheese becomes grainy and watery when thawed.
Make-Ahead Tips: You can prepare the cream cheese base up to two days in advance and store it in the refrigerator. When you’re ready to serve, let it come to room temperature, spread it in your serving dish, and add the caramel and toppings fresh. This is a great strategy for party hosting—you do the work ahead of time and just finish it off right before guests arrive.
Nutritional Information & Benefits
Let’s be real—this is a treat, not a health food. But that doesn’t mean it can’t fit into a balanced lifestyle. Here’s what you’re looking at per serving (based on about 2 tablespoons of dip):
- Calories: Approximately 180-200 calories per serving
- Fat: 12-14g (mostly from cream cheese and butter in the caramel)
- Carbohydrates: 18-20g (from sugar and caramel)
- Protein: 3-4g (from cream cheese)
- Calcium: About 6% of your daily value (from the dairy)
On the positive side, cream cheese does provide some calcium and protein, and if you’re serving it with fresh apple slices, you’re getting fiber and vitamin C from the fruit. The cinnamon in this recipe has antioxidant properties and may help with blood sugar regulation. And that sprinkle of flaky sea salt? Well, your body does need sodium to function—just maybe not quite as much as this dip delivers.
For those with dietary concerns, please note that this recipe contains dairy and gluten (the toffee bits may contain wheat). The nuts are optional and can be omitted for those with allergies. I’ve included a dairy-free variation above if that’s relevant to you.
My personal philosophy? Life is short. Enjoy the dip. Eat an extra apple slice if you’re feeling virtuous. Balance is everything.
Conclusion
This cream cheese caramel apple dip is one of those recipes that proves you don’t need fancy techniques or exotic ingredients to create something truly memorable. It’s simple, it’s quick, and it delivers every single time. Whether you’re hosting a fall gathering, bringing a dish to a potluck, or just treating yourself on a random Tuesday night, this dip will not let you down.
I love this recipe because it brings people together. Every time I make it, I watch conversations pause as someone takes that first bite, followed by that little “mm” sound that says everything. It’s the kind of food that makes gatherings feel special without making the host feel stressed. And honestly, that’s the sweet spot we’re all looking for, isn’t it?
I’d love to hear how this dip turns out for you. Did you try one of the variations? Did you come up with your own twist? Drop a comment below and let me know—I read every single one, and your ideas might just inspire my next batch. And if you loved this recipe as much as I think you will, share it with a friend who loves to host. Trust me, they’ll thank you.
Now go make some dip. Your apple slices are waiting.
Frequently Asked Questions
Can I use low-fat cream cheese for this recipe?
You can, but I wouldn’t recommend it. Low-fat cream cheese has a higher water content, which makes the dip less stable and more likely to separate. The texture won’t be as rich and creamy, and the flavor won’t be as satisfying. If you’re watching calories, I’d suggest using full-fat cream cheese but serving it with more apple slices and fewer other dippers.
How far in advance can I make this dip?
You can make the cream cheese base up to two days ahead and store it in the refrigerator. Just let it come to room temperature, spread it in your serving dish, and add the caramel and toppings fresh. The fully assembled dip is best within 4-6 hours of making it, as the caramel can start to soak into the cream cheese layer if it sits too long.
Can I use homemade caramel sauce?
Absolutely! Homemade caramel sauce takes this dip to another level. Just make sure it’s cooled to room temperature before mixing it into the cream cheese, and warm it slightly before drizzling on top. A good homemade caramel should be thick enough to hold its shape but pourable enough to drizzle beautifully.
What if my dip turns out too runny?
This usually happens if the cream cheese wasn’t fully softened or if you added too much caramel to the base. If your dip is runny, try refrigerating it for 30-60 minutes to let it firm up. You can also beat in an extra tablespoon of powdered sugar to help thicken it. Next time, make sure your cream cheese is truly at room temperature and measure your caramel carefully.
What are the best apples to serve with this dip?
Granny Smith apples are my top choice because their tartness balances the sweet dip perfectly. Honeycrisp, Fuji, and Pink Lady are also excellent choices. Avoid Red Delicious apples—they’re mealy and lack the crisp texture you want for dipping. Slice your apples just before serving and toss them with a little lemon juice to prevent browning.
Pin This Recipe!

Best Cream Cheese Caramel Apple Dip Recipe

This cream cheese caramel apple dip is the exact recreation of that café magic. It’s creamy, rich, and has the perfect balance of tangy cream cheese and sweet, buttery caramel, coming together in about fifteen minutes flat.
- Prep Time: 15 minutes
- Cook Time: 0 minutes
- Total Time: 15 minutes
- Yield: 8 servings 1x
- Category: Appetizer
- Cuisine: American
Ingredients
- 16 ounces cream cheese, softened to room temperature
- 1/2 cup powdered sugar
- 1 teaspoon vanilla extract
- 1/2 teaspoon ground cinnamon
- 1 cup caramel sauce, divided
- 1/2 cup toffee bits
- 1/4 cup chopped pecans or walnuts (optional)
- Flaky sea salt, for finishing
- Assorted apple slices (Granny Smith, Honeycrisp, or Fuji)
- Additional dippers (optional): pretzel rods, graham crackers, shortbread cookies, salted potato chips
Instructions
- Soften the cream cheese: Take the cream cheese out of the refrigerator at least one hour before making the dip. Cut into smaller cubes to speed up the process if needed.
- Beat the cream cheese: Place the softened cream cheese in a medium mixing bowl. Using an electric hand mixer on medium speed, beat for about 2 minutes until completely smooth and fluffy. Scrape down the sides and bottom of the bowl halfway through.
- Add the dry ingredients: Add the powdered sugar and ground cinnamon to the beaten cream cheese. Mix on low speed to avoid flying sugar, then increase to medium and beat for another minute until fully incorporated.
- Mix in the vanilla and half the caramel: Add the vanilla extract and about 1/2 cup of the caramel sauce to the cream cheese mixture. Beat on medium speed for about 30 seconds until fully incorporated.
- Spread the mixture into your serving dish: Use a rubber spatula to transfer the cream cheese mixture to a 9-inch pie plate or similar shallow serving dish. Spread into an even layer, making sure to reach the edges.
- Drizzle the remaining caramel: Warm the remaining 1/2 cup of caramel sauce slightly (about 10 seconds in the microwave) if thick. Drizzle over the cream cheese layer in a decorative pattern.
- Add the toppings: Sprinkle the toffee bits evenly over the caramel layer. If using nuts, scatter them on top. Finish with a light sprinkle of flaky sea salt.
- Chill briefly (optional but recommended): Refrigerate for 15-20 minutes before serving to allow layers to set slightly.
- Serve with apple slices and dippers: Arrange apple slices and other dippers around the dip or on a separate platter. Toss apple slices with lemon juice to prevent browning if making ahead.
Notes
Temperature is everything—cream cheese must be truly at room temperature. Beat the cream cheese longer than you think you need to for a light, fluffy texture. Warm caramel slightly for better drizzling. Layer strategically by mixing half the caramel into the cream cheese base. Toast nuts for maximum flavor. The dip is best served within a few hours of making; store leftovers in an airtight container in the refrigerator for up to 4 days.
Nutrition
- Serving Size: 2 tablespoons
- Calories: 190
- Sugar: 16
- Sodium: 200
- Fat: 13
- Saturated Fat: 8
- Carbohydrates: 19
- Protein: 3
Keywords: cream cheese caramel apple dip, caramel apple dip, easy apple dip, fall dessert, party dip, cream cheese dip