I was standing in the baking aisle of my local grocery store last October, staring at a bag of candy eyeballs, when the weirdest thing happened. A kid ran past me, his costume cape flapping, and the faint smell of melted marshmallows hit me from somewhere — and suddenly I was seven years old in my aunt Maggie’s cramped little kitchen in Portland. She wasn’t actually my aunt by blood, just my mom’s best friend who lived three doors down, but she let me call her that anyway.
Her kitchen always smelled like butter and sugar, and she had this old yellow mixing bowl with a chip in the rim that she refused to throw away. “It’s got character,” she’d say, and honestly, I think about that bowl every time I make something from scratch. Aunt Maggie passed when I was fifteen, and I never got her recipe for those crispy treats she made every Halloween — the ones with the gooey marshmallow centers and the slightly burnt edges that she’d pick off and eat while pretending not to. So I’ve spent years trying to recreate them, and let me tell you, I’ve made some messes along the way.
Last Tuesday, with that bag of candy eyes in my cart and the memory of her laugh still hanging in the air, I finally nailed it. These spooky Halloween Rice Krispie treats with candy eyes aren’t just a copy — they’re my version, with a little extra butter and a whole lot of nostalgia. Maybe you’ve been there, standing in a store aisle, hit by a random smell that takes you somewhere you didn’t even know you were missing. That’s what this recipe is for me. It’s the taste of October in Portland, of borrowed aunts and chipped bowls, and honestly, it’s the best thing I’ve made all year.
Why You’ll Love This Recipe
Let me be real with you — I’ve tested this recipe seven times. Seven. My kitchen counter is still sticky in places I can’t explain. But every single batch was worth it because these spooky Halloween Rice Krispie treats with candy eyes are genuinely foolproof once you know the tricks. Here’s why you’ll fall for them too:
- Quick & Easy : From start to finish, you’re looking at about 15 minutes of active work. That’s it. No complicated steps, no fancy equipment, and zero stress.
- Simple Ingredients : You probably already have butter, marshmallows, and Rice Krispies in your pantry right now. The candy eyes are the only special addition, and you can find them at any grocery store or online.
- Perfect for Halloween : These are the life of any Halloween party, classroom treat, or spooky movie night. Kids go absolutely wild for the candy eyes, and adults sneak them when nobody’s looking.
- Crowd-Pleaser : I brought a batch to my neighbor’s Halloween block party last weekend, and they were gone in under ten minutes. A mom asked me for the recipe before she even finished chewing.
- Unbelievably Delicious : The texture is this perfect balance of crispy and chewy, with just the right amount of buttery richness. The candy eyes add a tiny pop of sweetness that makes every bite fun.
What makes these different from every other Rice Krispie treat recipe out there? It’s the technique. I’ve figured out exactly when to add the food coloring so it doesn’t make the marshmallow mixture too stiff, and I’ve nailed the butter-to-marshmallow ratio that gives you that perfect gooey center without the treats falling apart. Plus, the candy eyes aren’t just for decoration — they’re pressed in while the mixture is still warm so they actually stay put. This isn’t just another Halloween dessert. It’s the one that makes people close their eyes after the first bite and go, “Wait, what did you put in these?”
What Ingredients You Will Need
This recipe uses simple, pantry-friendly ingredients to create something that feels way more special than it actually is. The magic is all in the timing and a few small tweaks. Here’s what you’ll need:
For the Base
- 6 tablespoons unsalted butter — I use Land O’Lakes because it has a consistent fat content that gives the best texture. Don’t use salted butter here; you want to control the salt yourself.
- 1 package (10 oz) mini marshmallows — Standard mini marshmallows work best. The jumbo ones don’t melt as evenly. I’ve tried both, trust me on this.
- 6 cups Rice Krispies cereal — Generic crispy rice cereal works fine, but the name brand holds its crunch a little longer. Your call.
- 1/4 teaspoon salt — This is my secret weapon. It balances the sweetness and makes the butter flavor pop.
- 1 teaspoon vanilla extract — Pure vanilla, not imitation. It makes a difference in the overall flavor depth.
- Green and purple gel food coloring — Gel is better than liquid because it doesn’t add extra moisture that can make the treats soggy. I prefer Americolor brand.
For Decoration
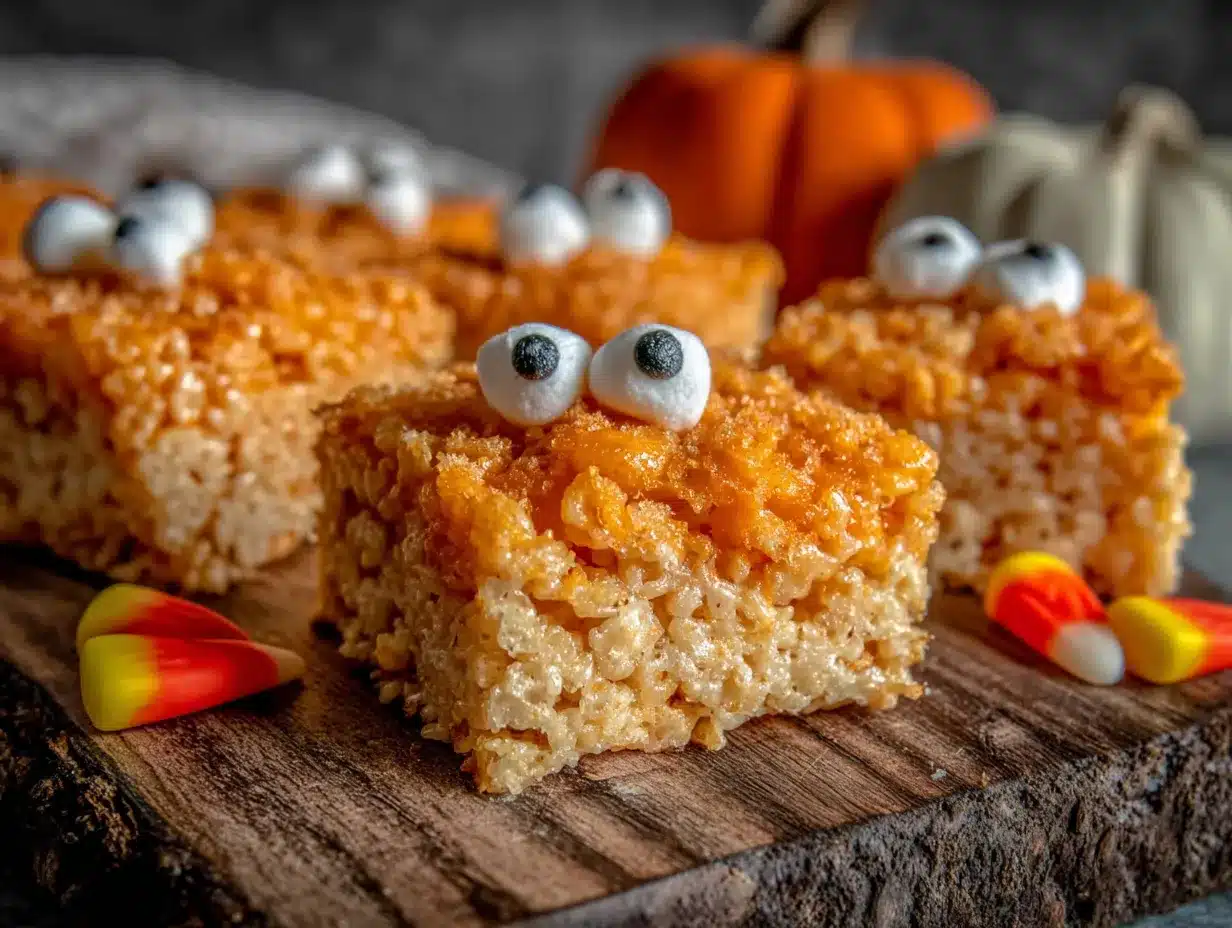
- 1 bag candy eyeballs — Wilton makes great ones, but any brand works. You’ll need about 40-50 for a full batch.
- 1/4 cup black decorating gel — For drawing spooky faces and spiderwebs. You can also use melted dark chocolate in a piping bag.
- Optional: orange and black sprinkles — For extra Halloween flair. I add these when I’m feeling extra.
- Optional: edible glitter or luster dust — Because why not? Halloween is the time to go big.
For the Pan
- Nonstick cooking spray — I use the butter-flavored kind for an extra hint of richness. Pam works fine, but store brands are just as good.
- Parchment paper — This makes lifting the treats out of the pan so much easier. Don’t skip it unless you enjoy scraping stuck marshmallow off your pan.
Substitution note: If you’re dairy-free, use vegan butter and vegan marshmallows. Dandies brand makes excellent marshmallows that melt beautifully. The texture will be slightly different — a little denser — but still delicious. For a gluten-free version, this recipe is naturally gluten-free as long as you use certified gluten-free Rice Krispies or a generic alternative. And if you can’t find candy eyes, you can use M&M’s or chocolate chips pressed in upside down. It’s not quite the same effect, but it works in a pinch.
Equipment Needed
You don’t need a professional kitchen for these spooky Halloween Rice Krispie treats with candy eyes. Just a few basic tools you probably already own:
- Large pot or Dutch oven — You need something big enough to stir everything without spilling. I use a 5-quart pot, and it’s perfect. A nonstick pot is ideal because cleanup is way easier.
- Rubber spatula or wooden spoon — A silicone spatula is my go-to because it doesn’t scratch the pot and it scrapes the sides clean. Wooden spoons work too, but they leave more marshmallow stuck in the grain.
- 9×13-inch baking pan — This gives you treats that are about an inch thick. If you want thicker treats, use an 8×8 pan and adjust the baking time slightly.
- Parchment paper — Cut a piece that overhangs the sides of the pan by about two inches. This creates handles for lifting the whole block out later.
- Sharp knife or pizza cutter — A pizza cutter gives you cleaner edges than a knife. I learned this after my third batch came out looking like a toddler cut it.
- Small bowl of water — Dip your spatula or fingers in water to keep the marshmallow mixture from sticking to everything. This tip changed my life.
- Cutting board — For slicing the treats once they’ve set. A big wooden one is fine, just make sure it’s clean and dry.
Budget tip: If you don’t have a 9×13 pan, you can use a rimmed baking sheet. The treats will be thinner, but they’ll still taste amazing. Just reduce the setting time by about 15 minutes. And if you don’t have parchment paper, greasing the pan really well with butter or cooking spray works — just be prepared for a little more cleanup.
Preparation Method
Okay, here’s where the magic happens. Follow these steps exactly, and you’ll have the best spooky Halloween Rice Krispie treats with candy eyes you’ve ever tasted. I’ve made every mistake possible so you don’t have to.
- Prep your pan first. Line your 9×13-inch pan with parchment paper, leaving a two-inch overhang on two opposite sides. Spray the parchment and the exposed sides of the pan generously with nonstick cooking spray. This step is non-negotiable — I once forgot, and I spent 20 minutes chiseling marshmallow off my pan. Set the pan aside.
- Melt the butter. Place your large pot over medium-low heat and add the 6 tablespoons of butter. Let it melt slowly, swirling the pot occasionally. You want it fully melted but not bubbling or brown. If it starts to brown, your heat is too high. I’ve burned butter more times than I care to admit, and it gives the treats a weird, almost nutty flavor that doesn’t work here.
- Add the marshmallows. Once the butter is melted, dump in the entire bag of mini marshmallows. Stir constantly with your rubber spatula until they’re almost completely melted. This takes about 3-4 minutes. Don’t walk away — marshmallows can go from melted to scorched in seconds. You’ll know they’re ready when the mixture is smooth and glossy with just a few tiny lumps remaining.
- Add the salt and vanilla. Remove the pot from the heat. Stir in the 1/4 teaspoon of salt and 1 teaspoon of vanilla extract. The mixture will bubble up a little — that’s normal. Stir until everything is combined.
- Add the food coloring. This is the tricky part. Add your gel food coloring one drop at a time, stirring vigorously after each drop. For green, I use about 8-10 drops. For purple, about 12-15 drops. The color will lighten slightly when you add the cereal, so go a shade darker than you want the final product. If the mixture starts to stiffen as you stir, you’re overworking it — stop immediately. I learned this the hard way when I ended up with a rubbery blob that wouldn’t spread.
- Fold in the cereal. Add the 6 cups of Rice Krispies to the pot. Fold gently with your spatula, using a cutting motion to incorporate the cereal without crushing it. You want to see some whole pieces still intact. This should take about 30 seconds. If you overmix, the treats will be dense and hard.
- Transfer to the pan. Scrape the mixture into your prepared pan. Don’t dump it all in one spot — spread it around as you go. Use your spatula to gently press it into an even layer. Here’s the trick: dip your spatula in water before pressing, and the mixture won’t stick. Press firmly but don’t compact it too much, or the treats will be tough.
- Add the candy eyes. While the mixture is still warm (but not hot), press the candy eyeballs into the surface. I like to make little faces — two eyes, a nose, and a spooky mouth. You can also scatter them randomly for a more chaotic look. Press them in just enough so they’re secure, but not so deep that they disappear. Work quickly because the mixture sets fast.
- Let them set. Allow the treats to cool at room temperature for at least 1 hour. Don’t put them in the refrigerator — that can make them hard and brittle. I know it’s tempting to speed things up, but patience pays off here.
- Slice and decorate. Once set, lift the whole block out using the parchment paper handles. Place it on a cutting board. Use a sharp knife or pizza cutter to cut into squares. I go for 12 big squares, but you can do smaller ones for kids. Use the black decorating gel to draw spiderwebs, bats, or silly faces on each treat. Add sprinkles if you’re using them.
Cooking Tips & Techniques
After seven batches, I’ve collected some hard-won wisdom about these spooky Halloween Rice Krispie treats with candy eyes. Let me save you some trouble.
The biggest mistake people make is using stale marshmallows. Fresh marshmallows melt smoother and create a better texture. If your bag has been sitting in the pantry for months, buy a new one. I learned this when I used an old bag and ended up with grainy, lumpy marshmallow goo that refused to melt properly. Gross.
Timing is everything. Once you add the cereal, you have about 60 seconds to get it into the pan before the mixture starts to set. Have your pan ready, your spatula wet, and your candy eyes within arm’s reach. I keep everything laid out on the counter before I even turn on the stove. It feels like overkill until you’re frantically trying to press candy eyes into a hardening block of marshmallow.
Don’t press too hard. When you’re spreading the mixture in the pan, use gentle pressure. If you compact it, the treats will be hard and almost crunchy instead of light and chewy. You want them to have a little give when you bite into them. Think of it like patting a baby’s head — gentle, gentle, gentle.
Keep a bowl of water nearby. Dip your fingers or spatula in water before touching the marshmallow mixture. It’s the difference between a clean, easy process and a sticky nightmare. I keep a small bowl of cool water on the counter and dip my spatula between every few presses.
If your candy eyes keep falling off, you’re either pressing them in too late (the mixture is too cool) or too early (the mixture is too hot and they slide around). The sweet spot is about 2 minutes after you’ve spread the mixture in the pan. Test one — if it stays put, you’re good to go.
Variations & Adaptations
One of the best things about these spooky Halloween Rice Krispie treats with candy eyes is how easy they are to customize. Here are some variations I’ve tried and loved:
Chocolate Halloween Treats: Melt 1/2 cup of dark chocolate chips with the butter before adding the marshmallows. This gives you a rich, chocolatey base that pairs beautifully with the candy eyes. I made these for a Halloween movie night, and they were gone before the first ghost appeared on screen.
Peanut Butter Monster Treats: Add 1/4 cup of creamy peanut butter to the marshmallow mixture right after you remove it from the heat. Stir until smooth before adding the cereal. The peanut butter adds a savory note that balances the sweetness. Just make sure nobody in your group has a peanut allergy.
Vegan Halloween Treats: Use vegan butter and vegan marshmallows (Dandies brand is my favorite). Follow the same instructions — the texture will be slightly denser, but the taste is still incredible. I brought these to a school Halloween party and nobody could tell the difference.
Spicy Ghost Treats: Add 1/2 teaspoon of cayenne pepper or chili powder to the marshmallow mixture. The heat sneaks up on you, and the candy eyes give it a fun, unexpected look. This is for adventurous eaters only — I tried it once and it was a hit with my spice-loving friends, but my kids refused to touch them.
Mini Treat Muffins: Instead of a pan, press the mixture into a greased mini muffin tin. Press a candy eye into each one. These are perfect for party favors or lunchbox surprises. Just reduce the setting time to about 30 minutes because they’re smaller.
Serving & Storage Suggestions
These spooky Halloween Rice Krispie treats with candy eyes are best served at room temperature. The texture is perfect — chewy, crispy, and just the right amount of gooey. If you serve them straight from the fridge, they’ll be too hard. Let them sit out for about 15 minutes first.
Presentation ideas: Arrange the treats on a black platter or a tray lined with orange and black napkins. I like to scatter a few extra candy eyes around the plate for a dramatic effect. For Halloween parties, I sometimes stick a lollipop stick into each treat and wrap them in cellophane bags tied with black ribbon. They make amazing party favors.
What to serve with them: These treats pair beautifully with a glass of cold milk, hot apple cider, or a pumpkin spice latte. For a full Halloween spread, serve them alongside caramel apples, popcorn balls, and pumpkin cupcakes. They’re also perfect on their own — honestly, I’ve eaten three in a row without shame.
Storage: Store the treats in an airtight container at room temperature for up to 5 days. Layer them between sheets of parchment paper to prevent sticking. Do not refrigerate — the cold air makes them hard and ruins the texture. If you live in a humid climate, add a piece of bread to the container to absorb excess moisture. Replace the bread every day.
Freezing: You can freeze these treats for up to 3 months. Wrap each one individually in plastic wrap, then place them in a freezer-safe bag. Thaw at room temperature for about 30 minutes before serving. The texture will be slightly softer, but they’re still delicious.
Flavor development: These treats are actually best on day two. The flavors meld together, and the marshmallow softens just a little bit more. If you can resist eating them all on day one, you’re in for a treat on day two. I’ve never managed to wait that long, but I’ve heard it’s true.
Nutritional Information & Benefits
Let’s be honest — these spooky Halloween Rice Krispie treats with candy eyes are a treat, not a health food. But here’s what you should know if you’re keeping track:
Per serving (1 square, based on 12 servings):
- Calories: 220
- Fat: 9g
- Carbohydrates: 34g
- Sugar: 18g
- Protein: 2g
- Sodium: 150mg
Health highlights: Rice Krispies are fortified with iron and B vitamins, so there’s a tiny nutritional silver lining. The butter provides vitamin A, and the marshmallows… well, they make you happy. That counts for something, right?
Dietary considerations: This recipe is naturally gluten-free (check your cereal label to be sure), nut-free (unless you add peanut butter), and can be made vegan with substitutions. It does contain dairy from the butter, but you can swap in vegan butter easily. The candy eyes are typically made from sugar and starch, but check the label for any allergens.
My take: Halloween is one night a year. I say enjoy the treats, share them with people you love, and don’t stress about the nutritional breakdown. Life is too short to count calories in a Rice Krispie treat with candy eyeballs staring at you.
Conclusion
These spooky Halloween Rice Krispie treats with candy eyes are more than just a dessert — they’re a little piece of my childhood, recreated and shared with you. Every time I make them, I think about Aunt Maggie’s chipped yellow bowl and the way she’d sneak a piece of marshmallow when she thought I wasn’t looking. That’s the feeling I want you to have when you bite into one of these.
I’ve tested this recipe seven times so you don’t have to. I’ve burned butter, overmixed cereal, and lost candy eyes to the sticky marshmallow abyss. But I’ve also created something that makes people smile, that brings a little bit of Halloween magic to any table, and that tastes like pure nostalgia. And honestly, that’s worth every sticky counter and every ruined spatula.
Now it’s your turn. Make these treats for your Halloween party, your kid’s classroom, or just for yourself on a cozy October evening. Customize them however you want — add chocolate, make them spicy, or keep them classic. And when you do, I’d love to hear about it. Leave a comment below and tell me how they turned out, or share a photo on social media. Tag me so I can see your spooky creations. Happy Halloween, friend. Go make some memories.
Frequently Asked Questions
Can I use regular food coloring instead of gel?
You can, but the liquid food coloring adds extra moisture that can make the treats slightly soggy. Gel coloring gives you more vibrant colors without affecting the texture. If you only have liquid, use about half the amount and expect a slightly softer treat.
How do I keep the candy eyes from falling off?
Press them in while the mixture is still warm but not hot — about 2 minutes after you’ve spread it in the pan. Make sure you push them in just enough so they’re secure. If they still fall off, try using a tiny dab of frosting or melted chocolate as glue.
Can I make these ahead of time?
Absolutely. These treats are actually better on day two. Make them up to 2 days in advance and store them in an airtight container at room temperature. Add the candy eyes and decorating gel on the day you’re serving them for the freshest look.
Why are my treats hard and crunchy?
You’re either overmixing the cereal (which crushes it and makes the treats dense) or pressing the mixture too firmly in the pan. Next time, fold the cereal gently and use light pressure when spreading. You want the treats to be light and airy, not compacted.
Can I use a different cereal?
You can, but the texture will change. Cocoa Krispies work great for a chocolate version. Fruity Pebbles give a fun, colorful twist. Just avoid anything with a very different shape or density — puffed rice cereal is the standard for a reason.
Pin This Recipe!
Spooky Halloween Rice Krispie Treats with Candy Eyes

These spooky Halloween Rice Krispie treats with candy eyes are a nostalgic, foolproof dessert that combines crispy, chewy marshmallow treats with fun candy eyeballs. Perfect for Halloween parties, they’re quick to make and guaranteed to be a crowd-pleaser.
- Prep Time: 15 minutes
- Cook Time: 10 minutes
- Total Time: 1 hour 25 minutes
- Yield: 12 servings 1x
- Category: Dessert
- Cuisine: American
Ingredients
- 6 tablespoons unsalted butter
- 1 package (10 oz) mini marshmallows
- 6 cups Rice Krispies cereal
- 1/4 teaspoon salt
- 1 teaspoon vanilla extract
- Green and purple gel food coloring
- 1 bag candy eyeballs (about 40-50)
- 1/4 cup black decorating gel
- Optional: orange and black sprinkles
- Optional: edible glitter or luster dust
- Nonstick cooking spray
- Parchment paper
Instructions
- Prep your pan first. Line your 9×13-inch pan with parchment paper, leaving a two-inch overhang on two opposite sides. Spray the parchment and the exposed sides of the pan generously with nonstick cooking spray. Set aside.
- Melt the butter. Place your large pot over medium-low heat and add the 6 tablespoons of butter. Let it melt slowly, swirling the pot occasionally. You want it fully melted but not bubbling or brown.
- Add the marshmallows. Once the butter is melted, dump in the entire bag of mini marshmallows. Stir constantly with your rubber spatula until they’re almost completely melted, about 3-4 minutes. The mixture should be smooth and glossy with just a few tiny lumps remaining.
- Add the salt and vanilla. Remove the pot from the heat. Stir in the 1/4 teaspoon of salt and 1 teaspoon of vanilla extract. The mixture will bubble up a little — that’s normal. Stir until everything is combined.
- Add the food coloring. Add your gel food coloring one drop at a time, stirring vigorously after each drop. For green, use about 8-10 drops. For purple, about 12-15 drops. The color will lighten slightly when you add the cereal, so go a shade darker than you want the final product. If the mixture starts to stiffen as you stir, stop immediately.
- Fold in the cereal. Add the 6 cups of Rice Krispies to the pot. Fold gently with your spatula, using a cutting motion to incorporate the cereal without crushing it. This should take about 30 seconds.
- Transfer to the pan. Scrape the mixture into your prepared pan. Don’t dump it all in one spot — spread it around as you go. Use your spatula to gently press it into an even layer. Dip your spatula in water before pressing to prevent sticking. Press firmly but don’t compact it too much.
- Add the candy eyes. While the mixture is still warm (but not hot), press the candy eyeballs into the surface. Make little faces or scatter them randomly. Press them in just enough so they’re secure, but not so deep that they disappear. Work quickly because the mixture sets fast.
- Let them set. Allow the treats to cool at room temperature for at least 1 hour. Do not refrigerate.
- Slice and decorate. Once set, lift the whole block out using the parchment paper handles. Place it on a cutting board. Use a sharp knife or pizza cutter to cut into squares. Use the black decorating gel to draw spiderwebs, bats, or silly faces on each treat. Add sprinkles if using.
Notes
Use fresh marshmallows for best texture. Have all ingredients and tools ready before starting as the mixture sets quickly. For dairy-free, use vegan butter and vegan marshmallows. For gluten-free, use certified gluten-free Rice Krispies. The treats are best on day two. Store in an airtight container at room temperature for up to 5 days. Do not refrigerate.
Nutrition
- Serving Size: 1 square
- Calories: 220
- Sugar: 18
- Sodium: 150
- Fat: 9
- Saturated Fat: 5
- Carbohydrates: 34
- Protein: 2
Keywords: Halloween treats, Rice Krispie treats, candy eyes, spooky desserts, easy Halloween recipe, no-bake dessert


