The smoke from the grill was still clinging to my shirt, and the potato salad was officially running low. I was standing in my kitchen, staring at a mountain of fresh berries I’d bought on a whim, wondering what on earth to do with them. My mom had just texted, “Dessert?” with a question mark that felt more like a demand. I had no plan, no cake mix, and honestly, no energy for anything fussy. But I did have a bag of store-bought angel food cake, a tub of heavy cream, and a whole lot of ripe, juicy berries staring back at me from the counter. That’s when this red white and blue berry trifle was born—not from a fancy recipe book, but from pure, last-minute necessity. It was the kind of happy accident that makes you wonder why you ever stressed about dessert in the first place. Now, it’s the only thing I bring to the block party.
This isn’t just a pretty bowl of fruit and cream. This is the dessert that gets that reaction—the one where people stop mid-bite, look at the bowl, and then look at you like you’re a kitchen wizard. And the best part? You don’t have to be one. It’s the perfect blend of sweet, tangy, creamy, and crunchy, all stacked up in a way that looks way more impressive than the effort it actually takes. Honestly, it might just become your new go-to for every summer celebration.
Why You’ll Love This Recipe
Let’s be real—we all want a dessert that looks like it took hours but actually lets us enjoy the party. This red white and blue berry trifle checks every single box. I’ve tested this exact method through three different Fourth of July parties, and it never fails to disappear first. Here’s why you’re going to love it:
- No-Bake & Stress-Free: You don’t even need to turn on the oven. On a hot summer day, that alone is a win. This comes together in about 20 minutes of active work.
- Simple, Fresh Ingredients: We’re talking store-bought cake, fresh berries, and a simple homemade cream. No weird extracts or hard-to-find items.
- Perfect for a Crowd: This recipe makes a massive trifle—easily 12 to 15 servings. It’s the ultimate side dish for a summer BBQ, except it’s the main event.
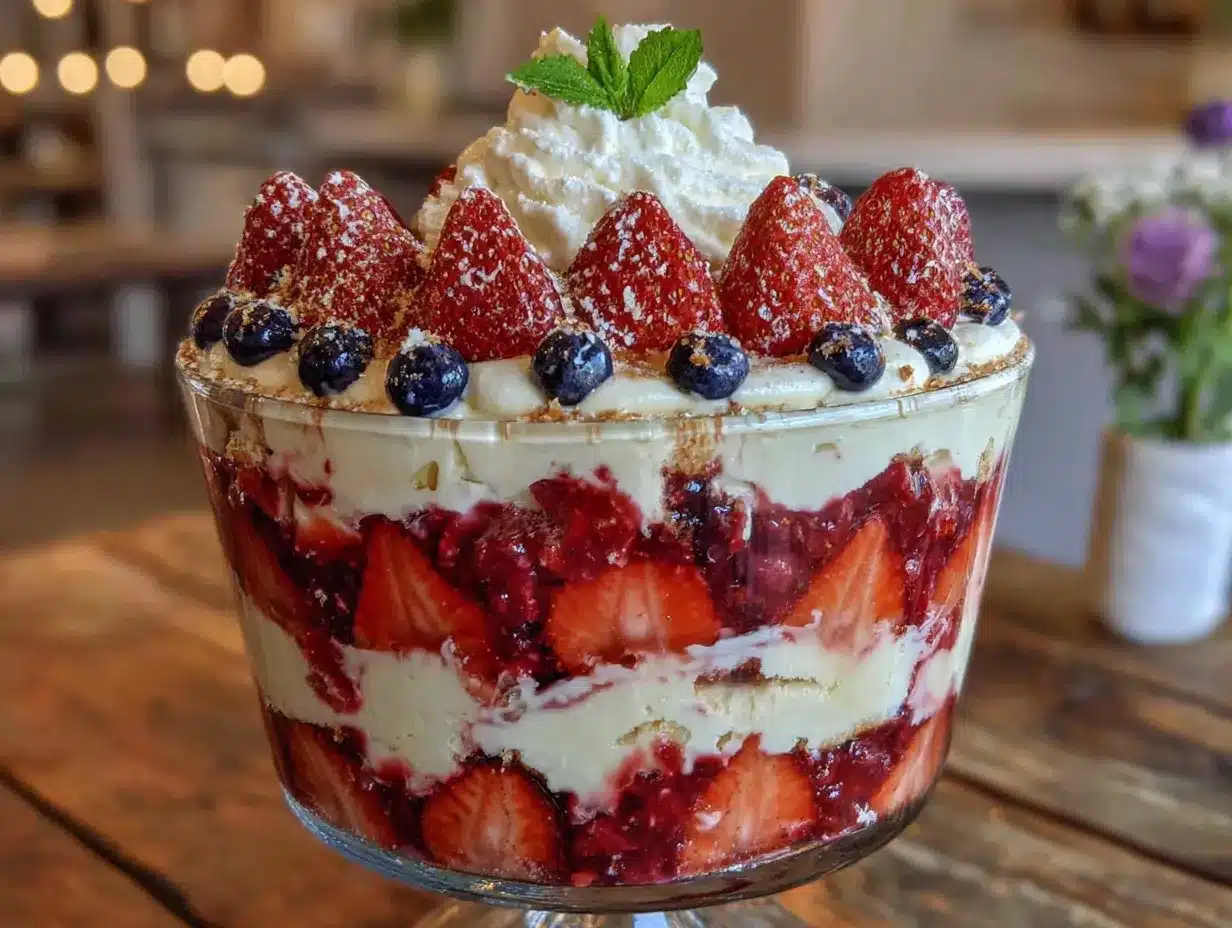
- Visually Show-Stopping: The layers of red, white, and blue are naturally stunning. You get that “wow” factor without any food coloring or complicated decorating.
- Make-Ahead Magic: This is one of those rare desserts that actually gets better after a few hours in the fridge. The flavors meld, the cake softens, and everything becomes perfectly spoonable.
What makes this version different from the rest? It’s the texture. I use a stabilized cream that doesn’t weep or get runny, and I layer in a secret crunch that keeps every bite interesting. It’s not just another trifle—it’s the one you’ll get asked for year after year.
What Ingredients You Will Need
This recipe keeps things wonderfully simple. You’ll find most of these items in your pantry or produce drawer, which is exactly how a stress-free holiday dessert should be. Here’s what you need to grab:
For the Berry Layers
- Fresh strawberries (2 lbs): Look for bright red, fragrant berries. You’ll wash, hull, and slice them into even pieces. (Pro tip: if they’re not super sweet, a tiny sprinkle of sugar helps them release their juices.)
- Fresh blueberries (1 lb): These little guys are for the “blue” in our red, white, and blue. Pick ones that are firm and dusty-blue, not soft or shriveled.
- Fresh raspberries (12 oz): These add a gorgeous pop of deep red and a slightly tart flavor that cuts through the sweetness. Handle them gently—they’re delicate.
- Granulated sugar (2 tablespoons): Just a touch to macerate the berries and draw out their natural juices. This creates a lovely syrup that soaks into the cake.
- Fresh lemon juice (1 tablespoon): This brightens up the berries and balances the sweetness. Don’t skip it—it makes a big difference.
For the Cream Layer
- Heavy whipping cream (2 cups): Make sure it’s cold. I like to stick my bowl and beaters in the freezer for 10 minutes before whipping for the fluffiest results.
- Powdered sugar (1/2 cup): This dissolves easily into the cream, giving it sweetness without the grittiness of granulated sugar.
- Vanilla extract (1 teaspoon): Pure vanilla is best, but imitation works in a pinch. It adds that classic, comforting flavor.
- Instant vanilla pudding mix (3 tablespoons): This is my secret weapon for stabilized cream. It keeps the layers firm and sliceable, even after sitting out for a bit.
For the Cake Layer & Crunch
- Store-bought angel food cake (1 large loaf or ring): This is your shortcut. It’s light, airy, and soaks up the berry juices perfectly. You can use pound cake or even ladyfingers if you prefer.
- Shortbread cookies (1 cup, crushed): This is the surprise element! A layer of buttery, crunchy shortbread crumbs adds the most incredible texture contrast to the soft cake and cream. (Graham crackers or vanilla wafers work great too.)
Equipment Needed
You don’t need a professional kitchen to pull this off. Here’s what you’ll need:
- A large trifle bowl or glass dish (4-quart capacity): A clear glass bowl is best so you can see those beautiful patriotic layers. A large glass baking dish (9×13) works in a pinch.
- Electric hand mixer or stand mixer: Whipping cream by hand is possible but exhausting. A mixer makes it quick and foolproof.
- Large mixing bowl: For whipping the cream. A metal or glass bowl that’s been chilled works best.
- Sharp knife and cutting board: For prepping the strawberries. A serrated knife is great for cutting the angel food cake.
- Small bowl: For macerating the berries with sugar and lemon juice.
- Measuring cups and spoons: For accuracy, especially with the pudding mix.
- Spatula: For folding the cream and spreading layers evenly.
If you don’t have a trifle bowl, don’t stress. I’ve made this in a large glass punch bowl and even in individual mason jars for a grab-and-go option. The layers still look fantastic.
Preparation Method
Alright, let’s get to the fun part. Follow these steps, and you’ll have a dessert that looks like it belongs on a magazine cover.
- Prep the berries (10 minutes): Wash and dry all the berries. Hull and slice the strawberries into even, bite-sized pieces. Leave the blueberries and raspberries whole. In a large bowl, gently toss the strawberries with 1 tablespoon of sugar and the lemon juice. In a separate bowl, toss the blueberries and raspberries with the remaining 1 tablespoon of sugar. Let them sit for 10-15 minutes. This is called macerating, and it creates a beautiful, natural syrup.
- Make the stabilized cream (5 minutes): In your chilled mixing bowl, add the cold heavy cream, powdered sugar, vanilla extract, and the instant vanilla pudding mix. Start mixing on low speed to avoid a sugar cloud, then gradually increase to high speed. Whip until stiff peaks form—this means when you lift the beaters, the cream stands up straight without flopping over. Be careful not to over-whip, or you’ll end up with butter!
- Cut the cake (5 minutes): Using a serrated knife, cut the angel food cake into 1-inch cubes. Don’t worry about being perfect—rustic cubes look great in a trifle. You should have about 6-8 cups of cake cubes.
- Crush the cookies (2 minutes): Place the shortbread cookies in a zip-top bag and crush them with a rolling pin. You want a mix of fine crumbs and small, pea-sized pieces for the best texture.
- Layer 1 – The Base (2 minutes): Spread about one-third of the cake cubes in an even layer at the bottom of your trifle bowl. This creates the foundation.
- Layer 2 – The Berries (2 minutes): Spoon half of the macerated strawberries (with their juices) evenly over the cake cubes. Then add half of the blueberry-raspberry mixture.
- Layer 3 – The Cream (2 minutes): Dollop about one-third of the whipped cream over the berries. Use a spatula to gently spread it into an even layer. Don’t press down—you want it to stay light and fluffy.
- Layer 4 – The Crunch (1 minute): Sprinkle half of the crushed shortbread cookies over the cream layer. This is the secret crunch I was talking about!
- Repeat the Layers: Add another third of the cake cubes, the remaining strawberries, and the remaining blueberry-raspberry mixture. Add another third of the cream, and then the rest of the cookie crumbs.
- Top it Off (2 minutes): Arrange the final third of the cake cubes on top. Spread the remaining whipped cream over the top, creating a smooth, cloud-like finish. For the final patriotic touch, arrange a few reserved fresh berries (a few strawberries, blueberries, and raspberries) in a pattern on top—maybe a little star or just a beautiful scattered design.
- Chill (at least 2 hours, ideally 4): This is the most important step! Cover the trifle loosely with plastic wrap and refrigerate for at least 2 hours. This allows the cake to soak up the berry juices and the cream to set, making it easier to serve and infinitely more delicious.
Cooking Tips & Techniques
I’ve made this red white and blue berry trifle about a dozen times, and I’ve learned a few things the hard way. Here are my best tips to guarantee success:
- Don’t skip macerating the berries: I know it seems like an extra step, but this is what creates that gorgeous, ruby-red syrup that soaks into the cake. If you skip it, your trifle will be drier and less flavorful.
- Stabilized cream is a game-changer: Regular whipped cream will start to weep and deflate after a few hours. The instant pudding mix acts as a stabilizer, keeping your layers tall, firm, and beautiful for hours. It’s the trick professional bakers use.
- Keep everything cold: Cold cream whips better. A cold bowl whips better. A cold trifle sets better. Temperature is your friend here.
- Don’t over-mix the cream: Watch it closely. You want stiff peaks, but the second it starts to look grainy, you’ve gone too far. Stop as soon as it holds its shape.
- Make it the night before: This is the ultimate make-ahead dessert. The flavors actually meld and improve overnight. Just wait to add any delicate garnish (like extra fresh berries on top) until right before serving to keep them looking their best.
- One mistake I made: The first time I made this, I used a store-bought whipped topping instead of real cream. It was fine, but it didn’t have the same rich, luxurious mouthfeel. Real whipped cream is worth the extra two minutes of effort.
Variations & Adaptations
This recipe is incredibly flexible. Here are a few ways to make it your own:
- For a boozy kick: Brush the cake cubes with a little limoncello, orange liqueur, or even a splash of bourbon before layering. It adds a sophisticated adult twist that’s perfect for a late-night party.
- Dairy-Free & Vegan: Swap the heavy cream for a can of full-fat coconut cream (chilled overnight) and whip it with the powdered sugar and vanilla. Use a vegan shortbread cookie or graham cracker for the crunch layer. The angel food cake is typically vegan, but check the label.
- Gluten-Free: This is super easy! Angel food cake is naturally gluten-free (it uses only egg whites and sugar). Just make sure to use certified gluten-free shortbread cookies or skip the crunch layer entirely.
- Different Fruits: Not a fan of raspberries? Use blackberries or sliced kiwi. In the summer, I’ve swapped the strawberries for sliced peaches and nectarines. The blue layer can be made with blackberries too.
- Cake Swap: If you don’t have angel food cake, use a store-bought pound cake, lemon loaf, or even sliced brioche. Each will give a slightly different texture and flavor profile.
- Individual Servings: For a party, make these in small mason jars or clear plastic cups. They’re portable, mess-free, and everyone gets their own perfect little trifle. This is my go-to for picnics.
Serving & Storage Suggestions
This trifle is best served chilled, straight from the fridge. The cold cream and juicy berries are incredibly refreshing on a hot summer day. I like to bring it out about 10 minutes before serving so it loses the chill just a bit, but it’s perfectly fine straight from the fridge.
What to serve with it: A scoop of vanilla bean ice cream on the side is never a bad idea. It also pairs beautifully with a glass of sparkling wine or a cold glass of lemonade. For a full patriotic spread, serve it alongside some creamy classic deviled eggs with crispy bacon crumbles and some comforting BBQ pulled pork sliders with creamy coleslaw.
Storage: Cover the trifle tightly with plastic wrap and store it in the refrigerator. It will keep well for up to 2 days. The flavors actually get better on day two, though the cookie crunch will soften over time. If you want to keep the crunch, store the crushed cookies separately and add them just before serving.
Can you freeze it? I don’t recommend freezing this trifle. The cream will separate and become watery upon thawing, and the berries will turn mushy. It’s best made fresh and enjoyed within a couple of days.
Nutritional Information & Benefits
While this is definitely a treat, it’s not without its redeeming qualities! Here’s a rough estimate per serving (based on 12 servings):
- Calories: ~320-380
- Fat: ~18g
- Carbohydrates: ~42g
- Protein: ~4g
- Sugar: ~28g
Health Highlights: The star of the show here is the fruit. Strawberries, blueberries, and raspberries are packed with antioxidants, vitamin C, and fiber. They’re some of the healthiest fruits you can eat. The angel food cake is low in fat compared to other cakes, and the shortbread adds a little bit of joy. It’s a dessert that feels indulgent but has a surprising amount of nutritional value hidden in those beautiful layers.
Frequently Asked Questions
Can I use frozen berries for this trifle?
You can, but I really recommend fresh berries for the best texture. Frozen berries release a lot of water as they thaw, which can make the trifle soggy and watery. If you must use frozen, thaw them completely in a colander first and pat them very dry before using. The flavor will still be good, but the texture won’t be as perfect.
How far in advance can I make this red white and blue berry trifle?
You can make it up to 24 hours in advance. In fact, it’s better after a few hours in the fridge. If you’re making it the night before, hold back a few fresh berries for the top garnish so they look bright and beautiful when you serve it. Add those right before bringing it to the table.
Why did my whipped cream deflate?
This usually happens for one of three reasons: your cream wasn’t cold enough, you over-whipped it, or you didn’t use a stabilizer. The instant pudding mix in this recipe is specifically designed to prevent that. Make sure your bowl and cream are very cold, and stop whipping as soon as you see stiff peaks.
Can I use a different type of cake?
Absolutely! Pound cake, lemon loaf, vanilla cake, or even ladyfingers all work wonderfully. Each will give a slightly different flavor. If you use a denser cake like pound cake, you might want to brush it with a little simple syrup or extra berry juice to help it soften.
How do I get such clean, beautiful layers?
The secret is patience and a gentle hand. Use a large spoon or spatula to carefully dollop and spread each layer. Don’t just dump everything in at once. Also, using a clear glass bowl lets you see your work, so you can adjust as you go. Chilling the trifle before serving helps the layers set and makes them more distinct when you cut into it.
Conclusion
This red white and blue berry trifle is more than just a dessert—it’s the centerpiece of your celebration. It’s the thing people gather around, take photos of, and ask for the recipe. And the best part? You can actually enjoy the fireworks instead of being stuck in the kitchen. It’s simple enough for a beginner, impressive enough for a pro, and delicious enough to become a new tradition. Whether you’re hosting a big backyard bash or just having a quiet family dinner, this trifle brings a little bit of magic to the table. I’d love to hear how yours turns out! Leave a comment below and tell me what variations you tried or how you decorated the top. Happy cooking, and happy Fourth of July!
Pin This Recipe!

Show-Stopping Red White & Blue Berry Trifle: Best Easy 4th Dessert

This no-bake, stress-free berry trifle is the perfect 4th of July dessert. Layers of fresh strawberries, blueberries, raspberries, angel food cake, and stabilized whipped cream create a stunning patriotic centerpiece that’s easy to make and even better when made ahead.
- Prep Time: 20 minutes
- Cook Time: 0 minutes
- Total Time: 2 hours 20 minutes (includes chilling)
- Yield: 12-15 servings 1x
- Category: Dessert
- Cuisine: American
Ingredients
- 2 lbs fresh strawberries, hulled and sliced
- 1 lb fresh blueberries
- 12 oz fresh raspberries
- 2 tablespoons granulated sugar
- 1 tablespoon fresh lemon juice
- 2 cups heavy whipping cream, cold
- 1/2 cup powdered sugar
- 1 teaspoon vanilla extract
- 3 tablespoons instant vanilla pudding mix
- 1 large loaf or ring store-bought angel food cake (about 6–8 cups cubed)
- 1 cup crushed shortbread cookies
Instructions
- Prep the berries: Wash and dry all berries. Hull and slice strawberries into even, bite-sized pieces. Leave blueberries and raspberries whole. In a large bowl, gently toss strawberries with 1 tablespoon sugar and lemon juice. In a separate bowl, toss blueberries and raspberries with remaining 1 tablespoon sugar. Let sit for 10-15 minutes to macerate.
- Make the stabilized cream: In a chilled mixing bowl, add cold heavy cream, powdered sugar, vanilla extract, and instant vanilla pudding mix. Start mixing on low speed, then increase to high speed. Whip until stiff peaks form. Be careful not to over-whip.
- Cut the cake: Using a serrated knife, cut angel food cake into 1-inch cubes. You should have about 6-8 cups.
- Crush the cookies: Place shortbread cookies in a zip-top bag and crush with a rolling pin to a mix of fine crumbs and small pieces.
- Layer 1 – The Base: Spread about one-third of the cake cubes in an even layer at the bottom of a 4-quart trifle bowl.
- Layer 2 – The Berries: Spoon half of the macerated strawberries (with juices) over the cake cubes. Then add half of the blueberry-raspberry mixture.
- Layer 3 – The Cream: Dollop about one-third of the whipped cream over the berries and gently spread into an even layer.
- Layer 4 – The Crunch: Sprinkle half of the crushed shortbread cookies over the cream.
- Repeat the Layers: Add another third of the cake cubes, the remaining strawberries, and the remaining blueberry-raspberry mixture. Add another third of the cream, then the rest of the cookie crumbs.
- Top it Off: Arrange the final third of the cake cubes on top. Spread the remaining whipped cream over the top, creating a smooth finish. Garnish with a few reserved fresh berries in a pattern.
- Chill: Cover loosely with plastic wrap and refrigerate for at least 2 hours, ideally 4 hours or overnight.
Notes
For best results, chill the trifle for at least 4 hours or overnight. The flavors meld and the cake softens. If making ahead, reserve some fresh berries for garnish and add just before serving. Store covered in the refrigerator for up to 2 days. The cookie crunch will soften over time; for maximum crunch, add crushed cookies just before serving.
Nutrition
- Serving Size: 1 serving (based on
- Calories: 350
- Sugar: 28
- Sodium: 180
- Fat: 18
- Saturated Fat: 11
- Carbohydrates: 42
- Fiber: 4
- Protein: 4
Keywords: red white and blue trifle, 4th of July dessert, berry trifle, no-bake dessert, patriotic dessert, summer dessert, angel food cake trifle


