My niece asked why I couldn’t just use store-bought pudding cups and crush up some cookies on top. I started to explain why that wouldn’t work — then stopped. Honestly? I had no good reason. I was about to overcomplicate a Halloween treat for her class party, and this seven-year-old had just called my bluff with a question so simple it almost hurt.
I mean, let me tell you, I love from-scratch desserts. There’s something satisfying about making pudding on the stove, watching it thicken, knowing exactly what went into it. But here’s the thing — I was running late, the kitchen was already a mess from dinner, and Halloween week is chaos for everyone. So I tried it her way. Instant pudding mix, store-bought whipped topping, and crushed Oreos. And you know what? It worked perfectly. Better than perfectly, actually. The kids devoured them, the teachers asked for the recipe, and I stood there feeling like I’d learned more from my niece than she learned from me.
That night, I realized something important. Quick Halloween dirt cups with Oreo crumbs and gummy worms don’t need to be complicated to be amazing. Sometimes the best recipes come from letting go of the idea that homemade has to mean hard. These little cups of chocolatey, creamy goodness come together in about five minutes flat, and they’re exactly the kind of treat that makes Halloween feel special without making you want to pull your hair out. Let me show you how simple this really is.
Why You’ll Love This Recipe
I’ve tested this recipe about six different ways, and honestly, the simplest version wins every time. Here’s why this one stands out:
- Five Minutes Flat: No kidding. From start to finish, you’re looking at about five minutes of active work. The rest is just chilling time.
- No Special Ingredients: You probably already have instant chocolate pudding mix, milk, and Oreos in your pantry. The gummy worms might be the only thing you need to grab.
- Perfect for Halloween Parties: Whether it’s a classroom celebration, a trunk-or-treat event, or just a fun Friday night before Halloween, these fit right in.
- Kids Can Help: My niece crushed the cookies (in a bag with a rolling pin — highly recommended for stress relief), stirred the pudding, and placed the worms. Zero cooking required.
- Totally Customizable: Gluten-free cookies, dairy-free pudding, different candy toppings — you can make these work for almost any dietary need.
What makes this recipe different from the dozens of dirt cup recipes out there? It’s the texture. Most versions end up soupy or separated after a few hours. My trick — letting the pudding set for just five minutes before layering — gives you that perfect creamy consistency that holds up beautifully. Plus, using crushed Oreos with the cream filling still attached creates a richer, more authentic “dirt” texture than plain chocolate cookies.
These quick Halloween dirt cups with Oreo crumbs and gummy worms are the kind of dessert that makes you feel like a hero with almost no effort. And honestly, after the week I had last Halloween, that’s exactly what I needed.
What Ingredients You Will Need
This recipe uses simple ingredients you can find at any grocery store. Here’s what you’ll need and why each one matters:
For the Pudding Base
- 1 box (3.9 ounces) instant chocolate pudding mix: I prefer Jell-O brand for consistent results, but store brands work fine too. Make sure it’s instant, not cook-and-serve — that’s the whole point of quick Halloween dirt cups.
- 2 cups cold milk: Whole milk gives the creamiest texture, but 2% works great too. For dairy-free versions, use oat milk or unsweetened almond milk. Avoid skim milk — the pudding won’t set as firmly.
- 1 cup whipped topping, thawed: Cool Whip is the classic choice. If you want to make your own, whip 1 cup of heavy cream with 2 tablespoons of powdered sugar until stiff peaks form. Both work beautifully.
For the Dirt Layer
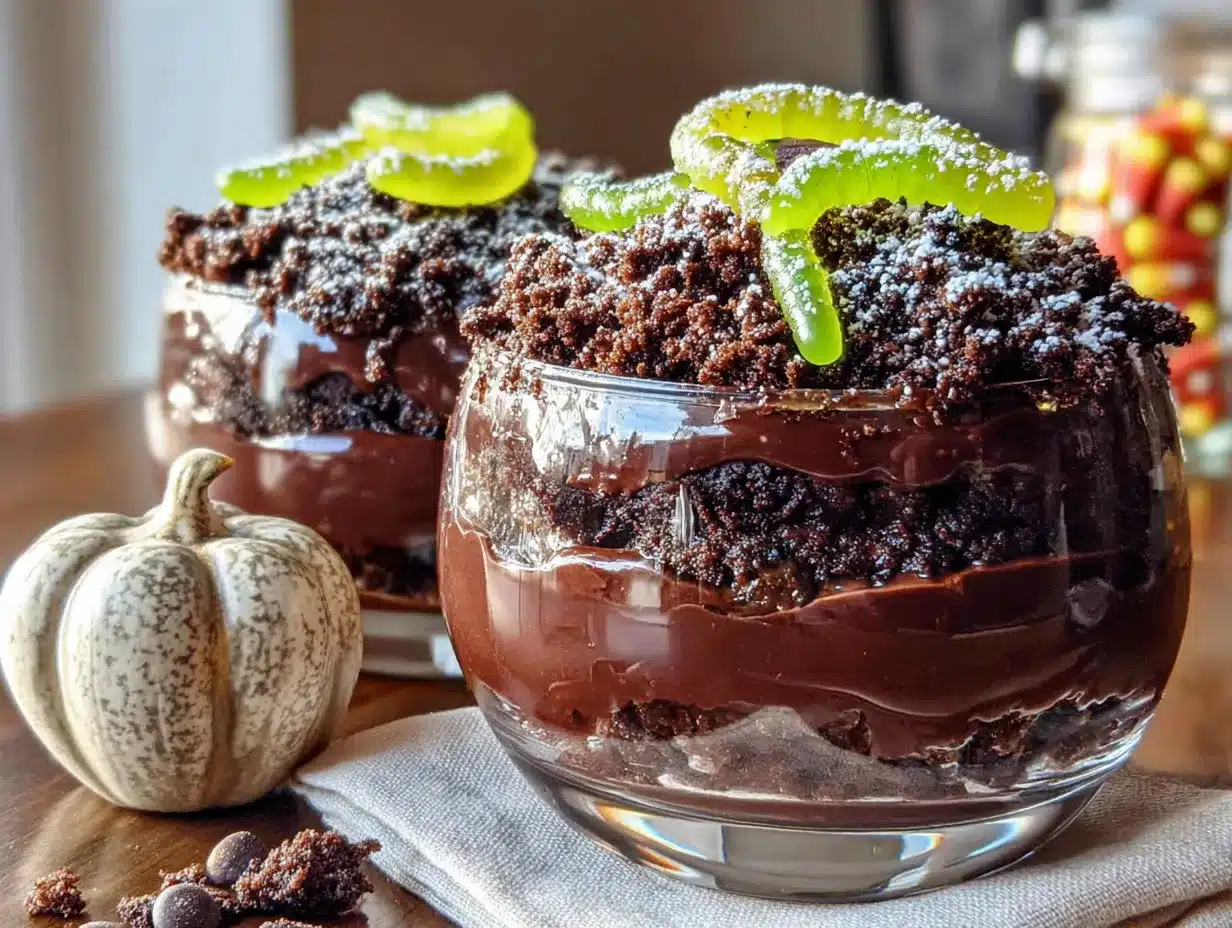
- 12 Oreo cookies: Regular Oreos work best because the cream filling adds richness. Double Stuf works too, but you’ll get a slightly sweeter crumb. For gluten-free, use Glutino chocolate sandwich cookies — they crush up almost identically.
- Optional: 2 tablespoons melted butter: This is my little secret. Mixing a tiny bit of melted butter into the crushed Oreos gives them a slightly clumpy, realistic dirt texture. Totally optional, but I love it.
For Decoration
- Gummy worms: About 3-4 per cup. Trolli brand has the best texture and flavor, but any gummy worms work. Pro tip: cut a few in half so they look like they’re crawling out of the dirt.
- Optional toppings: Chocolate shavings, candy pumpkins, edible flowers (for a less spooky vibe), or crushed chocolate graham crackers for extra texture.
One thing I learned the hard way — don’t skip the whipped topping. It lightens the pudding and makes the texture feel more like a mousse than a heavy pudding. Without it, these quick Halloween dirt cups with Oreo crumbs and gummy worms end up dense and a little flat. The whipped topping gives them that airy, cloud-like quality that makes people go back for seconds.
Equipment Needed
You don’t need fancy equipment for this recipe, which is honestly my favorite part. Here’s what you’ll need:
- Mixing bowls: One medium bowl for the pudding, one small bowl for crushing cookies.
- Whisk: For combining the pudding mix and milk. A hand whisk works great — no electric mixer required.
- Ziploc bag and rolling pin: This is my go-to method for crushing Oreos. Put the cookies in a bag, seal it, and go to town with a rolling pin. It’s oddly satisfying and keeps the mess contained.
- Small cups or glasses: Clear plastic cups (like the 9-ounce Solo cups) are perfect because you can see the layers. Small mason jars work beautifully too. I’ve used everything from juice glasses to repurposed yogurt containers — anything works.
- Spatula: For folding the whipped topping into the pudding. A rubber spatula makes this much easier than a spoon.
- Measuring cups and spoons: For accurate pudding and milk measurements.
If you don’t have a rolling pin, a heavy can of beans or a wine bottle works just as well. I’ve definitely used a cast iron skillet in a pinch. The key is crushing the cookies evenly — you want a mix of fine crumbs and small chunks for that realistic dirt texture.
Preparation Method
Let me walk you through exactly how to make these quick Halloween dirt cups with Oreo crumbs and gummy worms. I’ve made these about twenty times now, so I know where things can go wrong.
- Crush the Oreos: Place 12 Oreo cookies in a ziploc bag. Seal it tight — I learned this the hard way after cookie crumbs exploded across my kitchen. Use a rolling pin to crush them into fine crumbs with some small chunks remaining. You want a texture that looks like actual potting soil. Set aside.
- Make the pudding: In a medium bowl, whisk together the instant chocolate pudding mix and 2 cups cold milk. Whisk for about 2 minutes until the mixture thickens. It should look glossy and start to hold its shape. Don’t overwhisk — that can make the pudding grainy.
- Let the pudding set: This is the step most people rush, and it makes a difference. Let the pudding sit for 5 minutes at room temperature. It will continue to thicken as it rests. If you add the whipped topping too early, the mixture will be too thin and your layers will blur together.
- Fold in the whipped topping: Add 1 cup of thawed whipped topping to the pudding. Use a rubber spatula to gently fold it in — cut through the center, scrape the bottom, and turn the mixture over. Repeat until no white streaks remain. The mixture should be light, airy, and uniform in color.
- Layer the cups: Spoon about 2 tablespoons of the crushed Oreos into the bottom of each cup. This creates the first “dirt” layer. Then add the pudding mixture, filling each cup about three-quarters full. Use the back of a spoon to smooth the top.
- Top with more dirt: Sprinkle another 1-2 tablespoons of crushed Oreos over the pudding. You want a thick enough layer that you can’t see the chocolate pudding underneath — that’s what creates the surprise when someone digs in.
- Add the gummy worms: Gently press 3-4 gummy worms into the top layer of crumbs. Position some so they look like they’re crawling out. I like to leave a few partially buried and let others sit completely on top. It adds visual interest.
- Chill before serving: Refrigerate for at least 30 minutes before serving. This allows the layers to set and the flavors to meld. If you’re making these ahead, they’ll keep in the fridge for up to 2 days.
A quick note about timing — the pudding mixture itself takes about 5 minutes to prepare. The chilling time is the only wait, and you can absolutely skip it if you’re in a rush. They’ll just be a bit softer and more spoonable. My niece actually prefers them that way, so there’s no wrong answer here.
Cooking Tips & Techniques
After making these quick Halloween dirt cups with Oreo crumbs and gummy worms more times than I care to admit, I’ve picked up a few tricks worth sharing.
Temperature matters more than you think. Cold milk is non-negotiable for instant pudding. If your milk is even slightly warm, the pudding won’t set properly and you’ll end up with a soupy mess. I keep a carton of milk in the fridge specifically for this reason. Room temperature milk? Don’t do it — I made that mistake once and ended up with pudding soup.
Crush the cookies right before you use them. If you crush the Oreos too far ahead, they absorb moisture from the air and lose that crunchy texture. The contrast between the creamy pudding and the crunchy crumbs is what makes these so satisfying. Crush them while the pudding is setting, and you’ll get perfect texture every time.
Don’t skip the whipped topping. I know it’s tempting to just use straight pudding, but trust me on this. The whipped topping lightens the texture and makes these feel more like a dessert than just chocolate pudding in a cup. Plus, it helps the layers stay distinct instead of bleeding into each other.
Use clear cups. This is more about presentation than taste, but it matters. When you can see the layers of dirt, pudding, and more dirt, the visual effect is part of the fun. I’ve used opaque cups in a pinch, and they just don’t have the same wow factor. Clear plastic cups are cheap at any party supply store.
One mistake I made early on — I tried to use reduced-fat Oreos to save calories. Don’t do it. The texture is off, they don’t crush as well, and the “dirt” ends up looking more like sand. Full-fat, full-sugar Oreos are the way to go here. You’re already making a Halloween treat, so embrace it.
Variations & Adaptations
These quick Halloween dirt cups with Oreo crumbs and gummy worms are endlessly adaptable. Here are some of my favorite variations:
Gluten-Free Version
Swap the Oreos for gluten-free chocolate sandwich cookies. Glutino brand makes an excellent version that crushes up almost identically to regular Oreos. Everything else in the recipe is naturally gluten-free, so this is an easy swap that nobody will notice.
Dairy-Free Version
Use unsweetened oat milk or full-fat coconut milk for the pudding. Swap the whipped topping for a dairy-free version — So Delicious makes a coconut-based whipped topping that works beautifully. The texture will be slightly different, but still delicious.
Spooky Spider Version
Instead of gummy worms, use black licorice strings for spider legs and place a chocolate-covered caramel in the center for the spider body. It’s a fun twist that looks impressive with almost no extra effort. My nephew requested this version last year and it was a hit.
Pumpkin Patch Version
Use candy pumpkins instead of gummy worms. Arrange them so they look like tiny pumpkins growing out of the dirt. Add a few green candy leaves for extra effect. This works great for Thanksgiving too.
Low-Sugar Version
Use sugar-free instant chocolate pudding and sugar-free whipped topping. Swap the Oreos for low-sugar chocolate cookies. The texture stays the same, and the taste is still satisfying. I’ve made this version for friends watching their sugar intake, and they loved it.
Honestly, the best part about this recipe is how forgiving it is. You can swap almost any component and still end up with something delicious. The only non-negotiable is the instant pudding — don’t try to use cook-and-serve pudding here. It won’t set properly and you’ll end up with a mess.
Serving & Storage Suggestions
These quick Halloween dirt cups with Oreo crumbs and gummy worms are best served cold, straight from the fridge. The contrast between the chilled pudding and the crunchy cookie crumbs is pure magic. If you’re serving them at a party, keep them refrigerated until right before serving.
For parties: Arrange the cups on a tray lined with fake spiderwebs or orange and black napkins. Add a few plastic spiders scattered around for extra spooky vibes. I like to label them with a small sign that says “Worm Dirt” or “Halloween Mud” — kids get a kick out of it.
Storage: Cover each cup with plastic wrap or a lid and refrigerate for up to 3 days. The texture changes slightly after the first day — the cookie crumbs soften and the pudding firms up more. Some people prefer them this way, actually. If you’re making them ahead, I recommend waiting to add the gummy worms until just before serving so they stay chewy.
Freezing: I don’t recommend freezing these. The pudding gets icy and the texture is off when thawed. If you need to make them far in advance, prepare the pudding mixture and crushed Oreos separately, then assemble the day of your event.
Reheating: These are meant to be served cold, so no reheating needed. If they’ve been sitting out for more than 2 hours, though, toss them. The dairy in the pudding can spoil at room temperature.
One thing I love about this recipe — the flavors actually get better after a few hours in the fridge. The Oreo crumbs absorb a tiny bit of moisture from the pudding and become almost cake-like. It’s a different texture than fresh, but equally delicious in its own way.
Nutritional Information & Benefits
Let’s be real — these quick Halloween dirt cups with Oreo crumbs and gummy worms are a treat, not a health food. But here’s what you should know:
| Nutrient | Per Serving (1 cup) |
|---|---|
| Calories | 280-320 |
| Total Fat | 12-15g |
| Saturated Fat | 6-8g |
| Carbohydrates | 40-45g |
| Sugar | 30-35g |
| Protein | 4-6g |
| Calcium | 8-10% DV |
The milk and whipped topping provide a small amount of calcium and protein, but honestly, this is a dessert. It’s meant to be fun and indulgent, especially around Halloween. If you’re looking for a healthier option, try the low-sugar version with sugar-free pudding and low-sugar cookies.
For what it’s worth, I think there’s something to be said for treating yourself without guilt. These dirt cups are about joy and celebration, not nutrition. Make them, enjoy them, and don’t overthink it.
Conclusion
These quick Halloween dirt cups with Oreo crumbs and gummy worms have become a tradition in my house, and I think they deserve to be one in yours too. They’re fast, fun, and forgiving — everything a Halloween dessert should be.
I love that my niece taught me something that night. She reminded me that good food doesn’t have to be complicated, and that sometimes the best recipes come from letting go of perfection. These dirt cups are proof that simple can be spectacular.
So grab some Oreos, pick up a box of pudding, and make these with your kids, your friends, or just for yourself. Customize them however you want — add sprinkles, use different candies, make them spooky or silly. That’s the beauty of this recipe. It’s yours to play with.
I’d love to hear how yours turn out. Drop a comment below and tell me what variations you tried, or tag me in your photos on Pinterest. Happy Halloween, friend. Go make some dirt.
Frequently Asked Questions
Can I make these dirt cups ahead of time?
Absolutely. You can assemble them up to 2 days in advance. Just wait to add the gummy worms until right before serving so they stay chewy and don’t get soggy.
Can I use homemade pudding instead of instant?
I don’t recommend it for this recipe. Instant pudding has a specific texture that sets quickly and holds up well in layers. Homemade pudding is thinner and won’t give you the same clean layers.
How many servings does this recipe make?
This recipe makes about 6-8 servings, depending on the size of your cups. If you’re using standard 9-ounce cups, you’ll get 6 generous servings. For smaller cups, you might get 8-10.
Can I use different cookies instead of Oreos?
Yes! Chocolate wafer cookies, chocolate graham crackers, or even crushed chocolate chip cookies work well. Just avoid anything with a soft texture — you want cookies that crush into a crumbly, dirt-like consistency.
My pudding didn’t set properly. What went wrong?
Most likely, your milk wasn’t cold enough. Instant pudding requires cold milk to activate the thickeners. Also, make sure you’re using instant pudding, not cook-and-serve. If all else fails, try adding an extra tablespoon of pudding mix and whisking again.
Pin This Recipe!
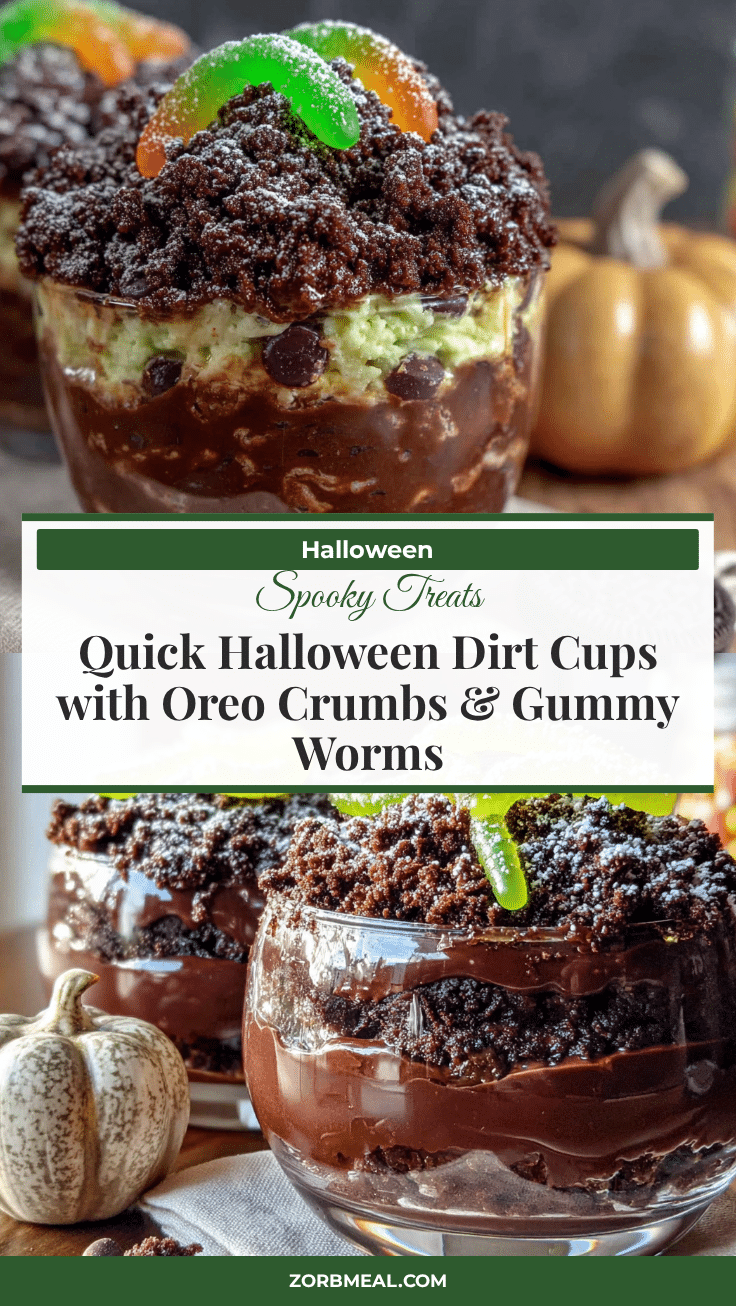
Quick Halloween Dirt Cups: 5-Minute Oreo & Gummy Worm Dessert

These quick Halloween dirt cups with Oreo crumbs and gummy worms come together in about five minutes flat. They’re the perfect no-fuss treat for Halloween parties, classroom celebrations, or a fun family dessert.
- Prep Time: 5 minutes
- Cook Time: 0 minutes
- Total Time: 35 minutes (including chilling time)
- Yield: 6-8 servings 1x
- Category: Dessert
- Cuisine: American
Ingredients
- 1 box (3.9 ounces) instant chocolate pudding mix
- 2 cups cold milk
- 1 cup whipped topping, thawed
- 12 Oreo cookies
- 2 tablespoons melted butter (optional)
- Gummy worms (about 3-4 per cup)
- Optional toppings: chocolate shavings, candy pumpkins, edible flowers, crushed chocolate graham crackers
Instructions
- Crush the Oreos: Place 12 Oreo cookies in a ziploc bag. Seal it tight and use a rolling pin to crush them into fine crumbs with some small chunks remaining. Set aside.
- Make the pudding: In a medium bowl, whisk together the instant chocolate pudding mix and 2 cups cold milk. Whisk for about 2 minutes until the mixture thickens and looks glossy.
- Let the pudding set: Let the pudding sit for 5 minutes at room temperature to continue thickening.
- Fold in the whipped topping: Add 1 cup of thawed whipped topping to the pudding. Use a rubber spatula to gently fold it in until no white streaks remain and the mixture is light and airy.
- Layer the cups: Spoon about 2 tablespoons of the crushed Oreos into the bottom of each cup. Add the pudding mixture, filling each cup about three-quarters full. Smooth the top with the back of a spoon.
- Top with more dirt: Sprinkle another 1-2 tablespoons of crushed Oreos over the pudding, creating a thick enough layer to hide the pudding underneath.
- Add the gummy worms: Gently press 3-4 gummy worms into the top layer of crumbs, positioning some to look like they’re crawling out.
- Chill before serving: Refrigerate for at least 30 minutes before serving. Can be stored in the fridge for up to 2 days.
Notes
Cold milk is essential for the pudding to set properly. Crush Oreos just before using for best texture. Don’t skip the whipped topping—it lightens the texture and helps layers stay distinct. Use clear cups for best visual effect. For gluten-free version, use gluten-free chocolate sandwich cookies. For dairy-free version, use oat milk or full-fat coconut milk and dairy-free whipped topping.
Nutrition
- Serving Size: 1 cup
- Calories: 300
- Sugar: 32.5
- Sodium: 380
- Fat: 13.5
- Saturated Fat: 7
- Carbohydrates: 42.5
- Fiber: 1
- Protein: 5
Keywords: Halloween dirt cups, Oreo dirt cups, gummy worm dessert, quick Halloween dessert, no-bake dessert, chocolate pudding cups, kids Halloween treat


