My niece took one bite, froze mid-chew, and then whispered, “Auntie, you’re a cookie wizard.” That’s the moment I knew these spider web cookies were more than just a Halloween experiment. I’d been chasing the perfect chocolate sugar cookie for years—something with that crisp edge and soft, fudgy center that doesn’t crumble the second you look at it. And honestly? I wasn’t trying to make them spooky at first. The spider web pattern was almost an accident, a last-minute idea born from a tube of store-bought icing I found rolling around in my pantry. Sometimes the best things happen when you stop overthinking and just start piping.
These aren’t your average sugar cookies. They’re deeply chocolatey with that nostalgic butter-sugar snap, but they’re sturdy enough to hold a design without losing their mind. The web pattern sounds fancy, I know, but it’s one of those tricks that looks way harder than it actually is. You just need a steady hand and a little patience—or, let’s be real, a willingness to embrace imperfection. A crooked web just looks more authentic anyway.
Halloween baking can be so hit or miss. You either spend hours on something that looks incredible but tastes like cardboard, or you throw together something tasty that looks like a toddler decorated it. These cookies solve both problems. They taste like the best chocolate cookie you’ve ever had, and they look like you actually tried. The secret is in the chill time and the cocoa powder ratio—too much and they’re dry, too little and they’re bland. I’ve made that mistake more times than I care to admit.
So whether you’re hosting a Halloween party, sending treats to school, or just want something fun to bake on a crisp October afternoon, these spider web cookies deliver. No fondant, no food coloring disasters, no complicated techniques. Just a really good cookie dressed up for the occasion.
Why You’ll Love This Recipe
I’ve tested this recipe six times to get it exactly right. The first batch spread too much in the oven. The second was too cakey. The third had the perfect texture but the web design looked like a toddler’s scribble. By batch four, I had it dialed in, and I’ve been making them the same way ever since. Here’s why these cookies are worth your time:
- Simple Ingredients : You probably already have everything in your kitchen right now. No specialty baking stores, no weird additives. Butter, sugar, eggs, flour, cocoa powder—the classics.
- Beginner-Friendly Design : The spider web pattern looks professional but requires zero artistic skill. If you can draw a circle and a few curved lines, you can make these cookies.
- Perfect Texture : These cookies hold their shape during baking, so your design stays intact. No spreading, no puffing up, no melted edges ruining your hard work.
- Make-Ahead Friendly : The dough keeps in the fridge for up to three days, and the baked cookies freeze beautifully. You can spread the process out over several days if you’re busy.
- Crowd-Pleaser : Kids love the spooky design, adults love the rich chocolate flavor, and everyone loves that they’re not overly sweet. It’s the rare Halloween treat that disappears before the party ends.
- Customizable : You can change the icing color, add sprinkles, or even turn them into different Halloween designs once you master the basic cookie.
What makes these different from every other chocolate cookie recipe out there? It’s the way the edges stay clean and sharp while the centers stay soft. Most cut-out chocolate cookies taste dry or crumbly because cocoa powder absorbs so much moisture. I fixed that by adjusting the butter-to-flour ratio and adding an extra egg yolk. The result is a cookie that holds its shape like a shortbread but eats like a soft-baked sugar cookie. That’s the sweet spot, and it took me way too many batches to find it.
What Ingredients You Will Need
This recipe relies on basic baking staples, but the way they work together makes all the difference. Every ingredient has a job, and skipping or swapping without understanding the consequences can throw off the whole batch. Here’s what you need and why each one matters:
For the Cookie Dough
- Unsalted butter, softened (1 cup / 226g) — I always use unsalted so I can control the salt level. Let it sit out for about an hour until it’s soft enough that your finger leaves an indent without feeling greasy. Kerrygold or Land O’Lakes both work great here.
- Granulated sugar (1 cup / 200g) — Regular white sugar gives these cookies that classic crisp edge. Don’t substitute brown sugar here; it adds too much moisture and the cookies will spread.
- Large egg (1 whole) — Room temperature is key. Cold eggs will seize the butter and give you a lumpy dough. If you forgot to take it out early, place it in a bowl of warm water for 5 minutes.
- Large egg yolk (1 extra) — This is my secret weapon for tenderness. The extra yolk adds richness without adding too much liquid, keeping the cookies soft in the center.
- Vanilla extract (2 teaspoons) — Pure vanilla makes a noticeable difference here. Imitation works in a pinch, but the flavor won’t be as warm and complex.
- All-purpose flour (2 cups / 250g) — Spoon and level your flour. Scooping directly from the bag packs in too much flour and gives you dry, crumbly cookies.
- Unsweetened cocoa powder (½ cup / 50g) — I prefer Dutch-process cocoa for these cookies. It has a smoother, less acidic flavor and gives the cookies that dark, dramatic color that makes the white web pop. Hershey’s Special Dark works beautifully if you can’t find Dutch-process.
- Baking powder (1 teaspoon) — This gives the cookies just enough lift without making them puff up and lose their shape.
- Salt (½ teaspoon) — Don’t skip this. Salt balances the bitterness of the cocoa and makes the chocolate flavor deeper. Fine sea salt dissolves best in dough.
For the Spider Web Design
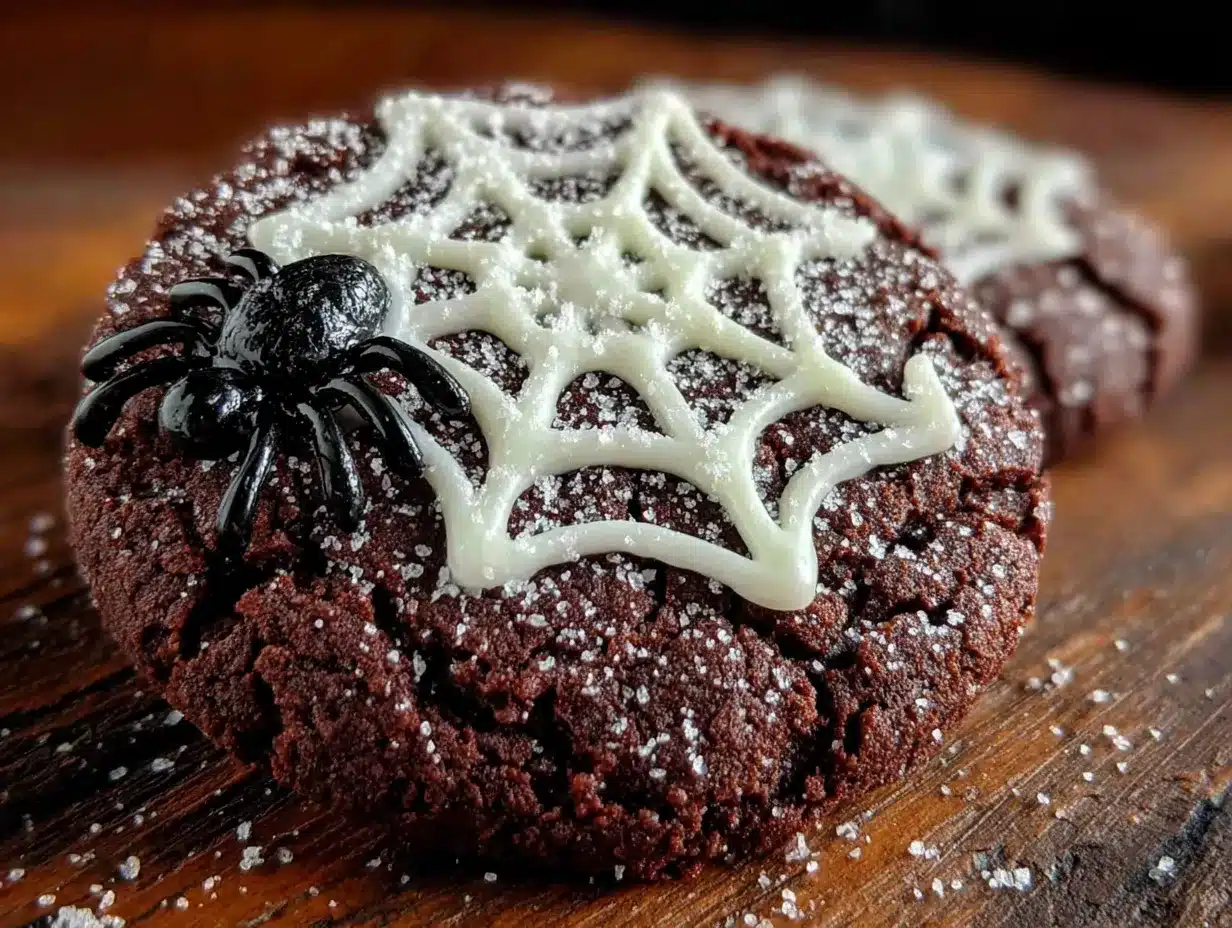
- Royal icing (about 1 cup) — You can use store-bought in a tube for convenience, but homemade royal icing gives you better control over consistency. If using store-bought, microwave it for 5 seconds and stir before piping to loosen it up.
- Powdered sugar (1½ cups / 180g) — If making your own icing, sift this first to avoid lumpy lines.
- Meringue powder (1½ teaspoons) — This stabilizes the icing and helps it dry hard so the cookies can be stacked. You can substitute 1 large egg white if you don’t have meringue powder, but the texture won’t be quite as smooth.
- Water (2-3 tablespoons) — Add slowly. You want the icing thick enough to hold its shape but thin enough to pipe smoothly. Think toothpaste consistency.
- Black gel food coloring (optional, for decorating) — A tiny dot goes a long way. I use Americolor Super Black for the most intense color without altering the icing texture.
Equipment Needed
You don’t need a professional bakery setup to make these cookies look good. Here’s what actually gets used in my kitchen when I make these:
- Stand mixer or hand mixer — A stand mixer makes creaming the butter and sugar effortless, but a hand mixer works just fine. You could even do it by hand with a wooden spoon if you’re up for an arm workout.
- Mixing bowls — At least two: one for dry ingredients and one for wet. Glass or stainless steel both work.
- Rolling pin — I prefer a French-style tapered rolling pin for better control, but any rolling pin will do. If you don’t have one, a wine bottle works in a pinch—just wash it thoroughly first.
- Parchment paper — Non-negotiable. It prevents sticking without adding extra flour to the dough, and it makes cleanup infinitely easier. I buy the pre-cut sheets for convenience.
- Round cookie cutter (2½ to 3 inches) — Any round cutter works. I use a 2.75-inch fluted cutter for a slightly fancier edge, but a plain round one is perfectly fine.
- Baking sheets — Heavy-duty aluminum sheets give the most even baking. Dark nonstick sheets can cause the bottoms to brown too quickly, so keep an eye on them.
- Wire cooling rack — Essential for letting the cookies cool completely before decorating. Hot cookies will melt your icing into a puddle.
- Piping bags or squeeze bottles — Small piping bags with a #2 or #3 round tip give you the most control. If you don’t have piping bags, use a small zip-top bag with the very tip of the corner snipped off.
- Toothpicks — These are the real heroes of the spider web design. You’ll use them to drag the icing into web patterns. Keep a few on hand.
I’ve made these cookies with just a hand mixer, a drinking glass as a cutter, and a sandwich bag for piping. They still turned out great. Don’t let missing equipment stop you from trying.
Preparation Method
Take your time with the dough. Rushing through the chilling step is the number one reason these cookies fail. Trust me, I’ve learned the hard way.
- Cream the butter and sugar (3-4 minutes). In a large mixing bowl, beat the softened butter and granulated sugar together until light and fluffy. You want the mixture to look pale and almost doubled in volume. Scrape down the sides of the bowl halfway through. If you’re using a hand mixer, this takes a little longer—be patient.
- Add the eggs and vanilla (1 minute). Beat in the whole egg, then the extra yolk, then the vanilla extract. Mix until just combined. The mixture might look slightly curdled at this point, especially if your eggs were cold. That’s okay—the flour will bring it back together.
- Combine the dry ingredients. In a separate bowl, whisk together the flour, cocoa powder, baking powder, and salt. Make sure there are no lumps of cocoa. I like to sift the cocoa powder into the bowl because it tends to clump.
- Mix the dough (30 seconds). Gradually add the dry ingredients to the wet mixture, mixing on low speed. Stop as soon as the flour disappears. Overmixing develops gluten and makes the cookies tough. The dough will look soft and slightly sticky—that’s the right texture.
- Chill the dough (at least 2 hours). Divide the dough in half, flatten each half into a disc about 1 inch thick, wrap tightly in plastic wrap, and refrigerate. This is the most important step. Chilled dough holds its shape during baking and prevents the cookies from spreading into blobs. You can chill it overnight if you want to break the process into two days.
- Preheat the oven to 350°F (175°C). Line your baking sheets with parchment paper. Don’t use silicone baking mats for these cookies—they can cause the bottoms to brown too slowly and the edges to spread.
- Roll and cut. Take one disc of dough out of the fridge. Let it sit at room temperature for 5 minutes so it’s rollable but still cold. On a lightly floured surface, roll the dough to ¼-inch thickness. Cut out rounds with your cookie cutter and place them 2 inches apart on the prepared baking sheets. Gather the scraps, gently press them together, re-roll, and cut more cookies. Avoid overworking the scraps or the cookies will be tough.
- Bake (8-10 minutes). Bake one sheet at a time in the center of the oven. The cookies are done when the edges look set and the centers look slightly underdone. They will continue to bake on the hot sheet after you take them out. If you overbake them, they’ll be dry.
- Cool completely (30 minutes). Let the cookies rest on the baking sheet for 5 minutes, then transfer them to a wire cooling rack. Do not decorate until they are completely cool. Warm cookies will turn your icing into a runny mess.
- Make the royal icing. In a small bowl, whisk together the powdered sugar and meringue powder. Add water 1 tablespoon at a time, whisking until smooth. The icing should be thick enough to hold a ribbon on the surface for a few seconds before disappearing. If it’s too thin, add more powdered sugar. If it’s too thick, add a drop more water.
- Pipe the base layer. Transfer the white icing to a piping bag fitted with a #2 round tip. Pipe a spiral on each cookie, starting from the center and working outward. Don’t worry about perfection—you’re going to drag it into a web pattern anyway.
- Create the web pattern. While the icing is still wet, use a toothpick to drag lines from the center outward through the spiral, like drawing spokes on a wheel. Space the lines evenly around the cookie. Then drag the toothpick in a curved motion between each spoke to create the web effect. Wipe the toothpick clean between each drag for sharp lines. Work quickly—royal icing starts to set within a few minutes.
- Let the icing set (1-2 hours). Leave the decorated cookies at room temperature until the icing is completely hard. This usually takes about an hour, but humid days can make it take longer. Don’t stack the cookies until the icing is fully set.
Cooking Tips & Techniques
I’ve made every mistake you can imagine with these cookies. Here’s what I’ve learned so you don’t have to repeat my failures:
Temperature matters more than you think. The first time I made these, I was in a rush and skipped the full chill time. The cookies spread into flat, misshapen blobs that looked nothing like circles. The web design was a lost cause. If your dough feels soft at any point during rolling or cutting, pop it back in the fridge for 15 minutes. Cold dough is obedient dough.
Flour your surface lightly. Too much flour makes the cookies dry and tough. I keep a small bowl of flour nearby and dust my rolling pin and surface with just a sprinkle. If the dough starts sticking, I chill it again rather than adding more flour.
Bake one sheet at a time. I know it’s tempting to cram two sheets in the oven, but the uneven heat will cause some cookies to overbake while others underbake. Your patience will be rewarded with perfectly even cookies.
Watch the clock carefully. These cookies go from perfectly baked to overbaked in about 60 seconds. I set a timer for 8 minutes and check them. If the edges look set but the centers still look soft and slightly puffy, they’re done. The centers will settle as they cool.
Practice the web pattern on parchment first. Before I pipe onto actual cookies, I always do a few practice webs on a piece of parchment paper. It helps me get the rhythm of the toothpick drags without the pressure of ruining a cookie. Plus, you can scrape the practice icing back into the bowl and reuse it.
Keep a damp paper towel nearby. Royal icing dries fast, and a clogged piping tip is frustrating. I cover the tip with a damp paper towel whenever I set the bag down, and I wipe the toothpick clean between each cookie.
Variations & Adaptations
Once you’ve mastered the basic cookie, the possibilities are endless. Here are some variations I’ve tried and loved:
Gluten-Free Version : Substitute the all-purpose flour with a 1:1 gluten-free baking flour that contains xanthan gum. I’ve had the best results with King Arthur Measure for Measure. The dough will be slightly more delicate, so handle it gently and chill it for an extra 30 minutes before rolling.
Vegan Adaptation : Use vegan butter sticks (not the spreadable kind in a tub) and replace the eggs with a flax egg (1 tablespoon ground flaxseed mixed with 3 tablespoons water per egg, let sit for 5 minutes). The texture won’t be quite as tender, but they’re still delicious and hold the web design well.
Different Web Colors : Instead of white icing on dark cookies, try the reverse. Make a batch of vanilla sugar cookies and use black royal icing for the web. Or color your icing orange, green, or purple for a different Halloween vibe. I made a batch with neon green webs last year and they were a hit with the kids.
Spider Addition : After the web icing sets, pipe a small black spider on top of each cookie using black royal icing. Use mini chocolate chips for the eyes. It adds an extra layer of spooky fun and makes the cookies even more impressive.
Spiced Chocolate Version : Add 1 teaspoon of cinnamon and ¼ teaspoon of cayenne pepper to the dry ingredients. The warmth of the spices pairs beautifully with the dark chocolate and gives the cookies a grown-up twist. I made these for a Halloween dinner party and they disappeared faster than the plain ones.
Mini Cookie Version : Use a 1.5-inch round cutter and reduce the baking time to 6-7 minutes. These are perfect for party platters or treat bags. The web design is trickier on small cookies, so I usually just pipe a simple spiral on those.
Serving & Storage Suggestions
These cookies are best at room temperature, so let them sit out for about 10 minutes before serving if you’ve stored them in the fridge. The texture softens slightly and the chocolate flavor becomes more pronounced.
For a Halloween party spread, I arrange these cookies on a dark platter with a few plastic spiders scattered around for effect. They also look stunning on a tiered dessert stand alongside other spooky treats like creamy buffalo chicken dip for a sweet-and-savory contrast. If you’re putting together a full holiday menu, these cookies pair beautifully with a warm mug of hot chocolate or spiced apple cider.
Storage Instructions: Store undecorated cookies in an airtight container at room temperature for up to 1 week. Layer them between sheets of parchment paper to prevent sticking. Decorated cookies with royal icing can be stored the same way—just make sure the icing is completely dry before stacking them.
Freezer Instructions: Freeze undecorated baked cookies in a single layer on a baking sheet, then transfer them to a freezer bag for up to 3 months. Thaw at room temperature before decorating. You can also freeze the unbaked dough discs for up to 3 months—just thaw overnight in the fridge before rolling and cutting.
Flavor Development: These cookies actually taste better the day after baking. The flavors meld together and the texture evens out. If you can resist eating them all on day one, you’ll be rewarded on day two.
Nutritional Information & Benefits
Let’s be honest—these are cookies, not health food. But knowing what’s in them helps you make informed choices, especially if you’re serving them at a party with other options like fresh caprese skewers for balance.
Per cookie (based on 24 cookies using a 2.75-inch cutter):
- Calories: 145
- Total Fat: 7g
- Saturated Fat: 4g
- Carbohydrates: 20g
- Sugar: 11g
- Protein: 2g
- Sodium: 85mg
Health Highlights: Cocoa powder is actually rich in antioxidants called flavonoids, which can help reduce inflammation and support heart health. The butter provides vitamin A, and the eggs add a small amount of protein and B vitamins. Of course, the sugar and butter content means these are a treat, not a daily snack, but I don’t believe in demonizing dessert. A cookie made with real ingredients is always better than something processed from a box.
Dietary Considerations: This recipe contains gluten, dairy, and eggs. For allergen-friendly versions, check the variations section above. These cookies are not suitable for vegan, keto, or low-sugar diets without significant modifications.
Conclusion
These spider web chocolate sugar cookies have become my go-to Halloween treat for a reason. They look like you spent hours on them, they taste like a classic chocolate cookie should, and they bring out the kid in everyone who sees them. The first time I brought them to a family gathering, my sister-in-law asked for the recipe before she even finished her first cookie. That’s the kind of reaction that makes all the chilling and piping worth it.
I love that this recipe leaves room for your personality to shine through. Maybe your webs are perfectly symmetrical, or maybe they’re wild and uneven. Maybe you add spiders, maybe you stick with the classic web. There’s no wrong way to make these cookies, and that’s what makes them so fun. Baking should feel like play, not pressure.
If you make these cookies, I’d love to hear how they turned out. Drop a comment below and tell me about your web designs, your spider additions, or your favorite Halloween baking memories. Share a photo if you’re proud of your work—I always love seeing what other bakers create. And if you’re looking for more holiday inspiration, check out these festive firework rice krispie treats for another fun, decorative dessert idea.
Happy baking, and may your webs be ever spooky!
Frequently Asked Questions
Can I use store-bought cookie dough instead of making it from scratch?
You can, but the results won’t be the same. Most store-bought sugar cookie doughs contain too much sugar and fat, which causes them to spread and lose their shape during baking. The web design needs a sturdy cookie that holds its edges. If you’re in a real pinch, look for a refrigerated sugar cookie dough labeled “cut-out” or “decorating” variety, and chill it for an extra 30 minutes before rolling.
Why did my cookies spread into blobs?
This is almost always a temperature issue. Either the dough wasn’t chilled long enough, the butter was too soft when you started, or your baking sheets were too warm when you placed the cut cookies on them. Next time, chill the dough for at least 2 hours, and let your baking sheets cool completely between batches. If your kitchen is warm, pop the cut cookies in the fridge for 10 minutes before baking.
How do I get clean, sharp lines in my spider web design?
The key is working quickly while the icing is still wet. Pipe your spiral in one smooth motion without stopping, then immediately drag the toothpick through it. Wipe the toothpick clean after each line to prevent dragging excess icing. If the icing starts to set before you finish, you can thin it with a tiny drop of water and stir gently.
Can I freeze these cookies with the icing on them?
I don’t recommend it. Royal icing can become sticky or crack when thawed, and the texture of the cookie underneath can suffer. It’s better to freeze undecorated cookies and add the icing after they’ve thawed. Royal icing dries hard and stays stable at room temperature for over a week, so freezing isn’t usually necessary for decorated cookies anyway.
How far in advance can I make these cookies for a party?
You have several options depending on your schedule. The dough can be made up to 3 days ahead and kept in the fridge. Baked undecorated cookies stay fresh for up to a week in an airtight container. Decorated cookies with fully set royal icing are best within 3-4 days but will keep for up to a week. I usually bake the cookies 2 days before the party and decorate them the day before, so everything is fresh and the icing has plenty of time to set.
Pin This Recipe!

Perfect Spider Web Cookies: Easy Halloween Treat
Deeply chocolatey sugar cookies with a crisp edge and soft, fudgy center, decorated with a stunning spider web pattern. These beginner-friendly Halloween treats taste as amazing as they look.
- Prep Time: 30 minutes
- Cook Time: 10 minutes
- Total Time: 2 hours 40 minutes (includes chilling and cooling)
- Yield: 24 cookies 1x
- Category: Dessert
- Cuisine: American
Ingredients
- 1 cup (226g) unsalted butter, softened
- 1 cup (200g) granulated sugar
- 1 large egg, room temperature
- 1 large egg yolk
- 2 teaspoons vanilla extract
- 2 cups (250g) all-purpose flour, spooned and leveled
- ½ cup (50g) unsweetened cocoa powder (preferably Dutch-process)
- 1 teaspoon baking powder
- ½ teaspoon salt
- 1½ cups (180g) powdered sugar
- 1½ teaspoons meringue powder
- 2–3 tablespoons water
- Black gel food coloring (optional)
Instructions
- Cream the butter and sugar: In a large mixing bowl, beat the softened butter and granulated sugar together until light and fluffy, about 3-4 minutes. Scrape down the sides halfway through.
- Add the eggs and vanilla: Beat in the whole egg, then the extra yolk, then the vanilla extract. Mix until just combined. The mixture may look slightly curdled; that’s okay.
- Combine the dry ingredients: In a separate bowl, whisk together the flour, cocoa powder, baking powder, and salt. Sift the cocoa powder to remove lumps.
- Mix the dough: Gradually add the dry ingredients to the wet mixture, mixing on low speed. Stop as soon as the flour disappears. The dough will be soft and slightly sticky.
- Chill the dough: Divide the dough in half, flatten each half into a 1-inch thick disc, wrap tightly in plastic wrap, and refrigerate for at least 2 hours (or overnight).
- Preheat the oven to 350°F (175°C). Line baking sheets with parchment paper.
- Roll and cut: Take one disc of dough out of the fridge. Let it sit at room temperature for 5 minutes. On a lightly floured surface, roll the dough to ¼-inch thickness. Cut out rounds with a 2.5 to 3-inch round cookie cutter and place them 2 inches apart on the prepared baking sheets. Gather scraps, gently press together, re-roll, and cut more cookies.
- Bake: Bake one sheet at a time in the center of the oven for 8-10 minutes. The cookies are done when the edges look set and the centers look slightly underdone.
- Cool completely: Let the cookies rest on the baking sheet for 5 minutes, then transfer to a wire cooling rack. Cool completely before decorating.
- Make the royal icing: In a small bowl, whisk together the powdered sugar and meringue powder. Add water 1 tablespoon at a time, whisking until smooth. The icing should be thick enough to hold a ribbon on the surface for a few seconds before disappearing.
- Pipe the base layer: Transfer the white icing to a piping bag fitted with a #2 round tip. Pipe a spiral on each cookie, starting from the center and working outward.
- Create the web pattern: While the icing is still wet, use a toothpick to drag lines from the center outward through the spiral, like drawing spokes on a wheel. Then drag the toothpick in a curved motion between each spoke to create the web effect. Wipe the toothpick clean between each drag.
- Let the icing set: Leave the decorated cookies at room temperature until the icing is completely hard, about 1-2 hours. Do not stack until fully set.
Notes
Chill the dough for at least 2 hours to prevent spreading. Use Dutch-process cocoa for a darker color and smoother flavor. Practice the web pattern on parchment first. Keep a damp paper towel over the piping tip to prevent clogging. Cookies taste even better the day after baking.
Nutrition
- Serving Size: 1 cookie
- Calories: 145
- Sugar: 11
- Sodium: 85
- Fat: 7
- Saturated Fat: 4
- Carbohydrates: 20
- Fiber: 1
- Protein: 2
Keywords: spider web cookies, Halloween cookies, chocolate sugar cookies, easy Halloween treat, decorated cookies, royal icing cookies


