It was 11:17 PM on a random Wednesday, and I had a very specific problem. I wanted cheesecake—the creamy, cold, slice-of-heaven kind—but I also wanted to go to bed sometime before midnight. I didn’t have the patience for a traditional baked cheesecake, and honestly, I didn’t have the cream cheese either. What I did have was a half-empty jar of Biscoff spread, some leftover Greek yogurt that was about to expire, and the impulsive thought that maybe, just maybe, I could pull this off without turning on the oven.
I stood there in my pajamas, staring into the fridge like it owed me something. The Biscoff cookies on the counter were practically winking at me. I mean, let’s be real—if you’re going to have a late-night kitchen experiment, you might as well do it with cookie butter. So I grabbed a bowl, crushed some cookies with the bottom of a measuring cup (very professional, I know), and started mixing. The whole thing took maybe fifteen minutes, and when I finally took that first bite the next morning, I actually laughed out loud. It worked. It really, really worked.
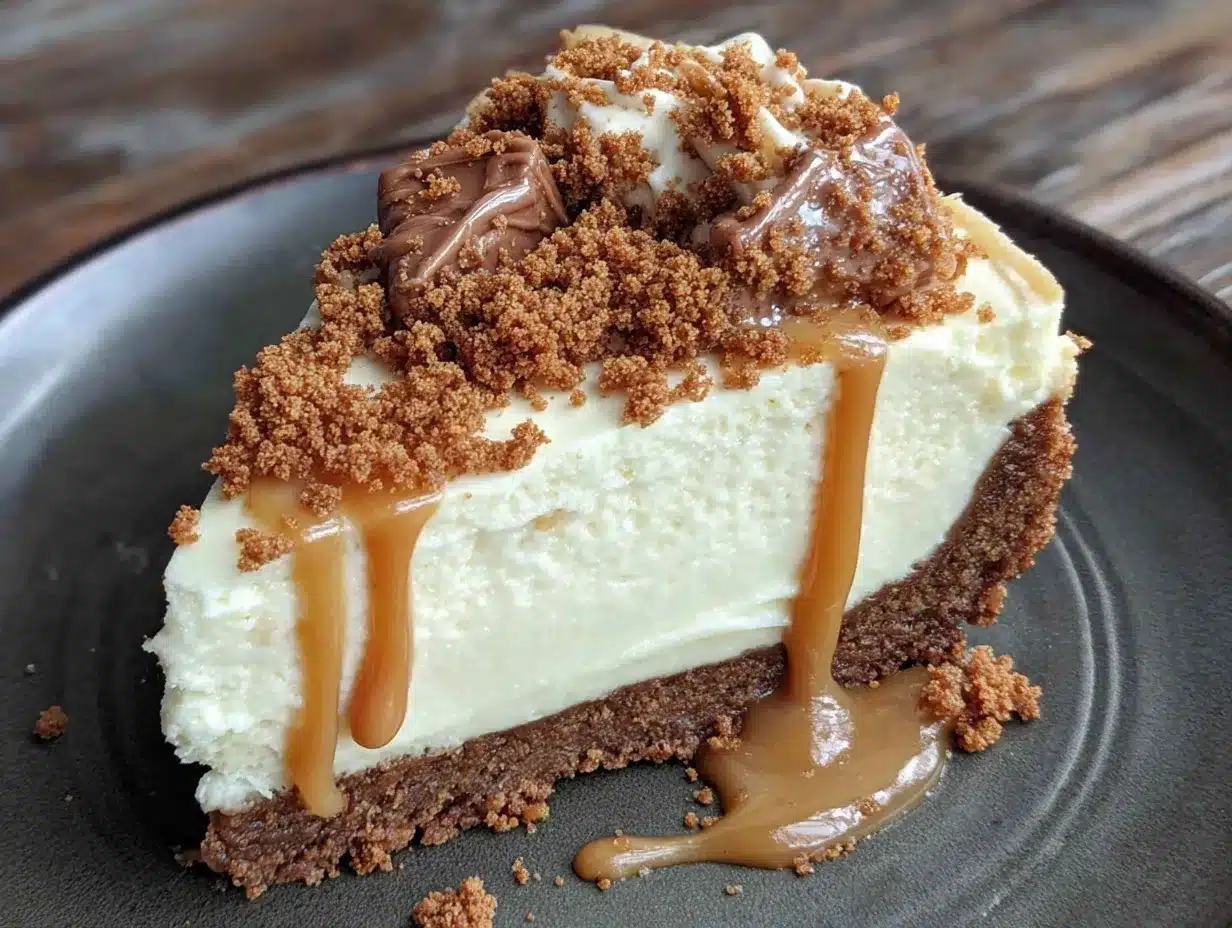
This light no-bake Biscoff cheesecake with cookie crumble is what happens when a craving meets a constraint. It’s creamy without being heavy, sweet without being cloying, and it comes together so fast you’ll wonder why you ever bothered with the oven version. Maybe you’ve been there—standing in your kitchen at an unreasonable hour, wanting something that feels special but doesn’t require a culinary degree. This one’s for you. And for me. And for everyone who believes that dessert should be both delicious and, you know, actually doable on a Tuesday night.
Why You’ll Love This Recipe
Let me tell you why this light no-bake Biscoff cheesecake with cookie crumble has become my go-to dessert for pretty much every occasion. First off, it’s ridiculously easy. We’re talking no oven, no water bath, no fussing over cracks in the surface. You mix, you chill, you eat. That’s it.
- Quick & Easy: Comes together in under 20 minutes of active prep. The fridge does all the hard work for you.
- Simple Ingredients: No fancy grocery trips needed. You likely already have Greek yogurt, vanilla, and butter in your kitchen.
- Perfect for Entertaining: Great for dinner parties, potlucks, or holiday gatherings when you want to impress without stress.
- Crowd-Pleaser: Every single person I’ve served this to has asked for the recipe. Kids and adults alike go crazy for the cookie crumble.
- Unbelievably Delicious: The texture is silky and light, with that signature Biscoff caramelized flavor running through every bite.
What makes this recipe different from the rest? It’s the Greek yogurt. I tested this about six times to get the ratio right—enough yogurt to keep it light and airy, but not so much that it tastes tangy. The result is a cheesecake that feels indulgent but won’t leave you feeling like you need a nap afterward. It’s comfort food reimagined, healthier, faster, but with the same soul-soothing satisfaction. Perfect for those evenings when you want something sweet without the guilt.
What Ingredients You Will Need
This recipe uses simple, wholesome ingredients to deliver bold flavor and satisfying texture without the fuss. Most of these are pantry staples, which is exactly what you want when a craving strikes at 11 PM.
For the Crust
- 200g (about 2 cups) Biscoff cookies, crushed into fine crumbs
- 60g (¼ cup) unsalted butter, melted (adds richness and helps the crust hold together)
- 1 tablespoon granulated sugar (optional, only if you want extra sweetness)
For the Filling
- 450g (16 oz) cream cheese, softened to room temperature (I recommend Philadelphia for the smoothest texture)
- 200g (about 1 cup) Biscoff spread, at room temperature (creamy or crunchy both work)
- 150g (¾ cup) Greek yogurt, plain and full-fat (this is the secret to the light texture)
- 100g (½ cup) powdered sugar, sifted
- 1 teaspoon vanilla extract
- 240ml (1 cup) heavy cream, cold
For the Topping
- 50g (¼ cup) Biscoff spread, melted for drizzling
- 4-5 Biscoff cookies, crushed for the crumble
- Optional: a pinch of flaky sea salt to balance the sweetness
Ingredient selection tip: Look for a Biscoff spread that’s smooth and pourable at room temperature. If yours is too thick, microwave it for 10-15 seconds to loosen it up. For the Greek yogurt, I prefer Fage or Chobani—they’re thick enough to add creaminess without making the filling watery. If you’re dairy-free, you can swap the cream cheese for a vegan alternative and use coconut cream instead of heavy cream, though the texture will be slightly denser.
Equipment Needed
You don’t need a fancy kitchen to pull this off, which is honestly my favorite thing about this recipe. Here’s what you’ll need:
- 9-inch springform pan: This is ideal for easy removal. If you don’t have one, a deep pie dish works too.
- Electric hand mixer or stand mixer: You can whisk by hand, but your arm will thank you for using a mixer.
- Mixing bowls: At least two—one for the crust, one for the filling.
- Food processor or zip-top bag and rolling pin: For crushing the cookies. I’ve used both methods, and honestly, the bag-and-rolling-pin approach is oddly satisfying.
- Spatula: A flexible one for scraping every last bit of filling into the pan.
- Measuring cups and spoons: Precision matters here, especially for the cream.
- Plastic wrap: To cover the cheesecake while it chills.
Budget-friendly tip: If you don’t have a springform pan, line a regular cake pan with parchment paper, leaving overhang on the sides. You can lift the cheesecake out once it’s set. I’ve done this more times than I care to admit, and it works perfectly.
Preparation Method
Alright, let’s get into it. Follow these steps, and you’ll have a dessert that looks like you spent hours on it—even though you didn’t.
- Prepare the crust: In a food processor, pulse the Biscoff cookies until they become fine crumbs. If you’re using the bag method, place the cookies in a zip-top bag and crush them with a rolling pin until you have even crumbs. Transfer to a medium bowl. Pour in the melted butter and mix with a fork until the crumbs are evenly moistened. The mixture should feel like wet sand.
- Press the crust: Transfer the crumb mixture to your springform pan. Press it firmly into an even layer on the bottom. I use the bottom of a flat measuring cup to really pack it down—this prevents the crust from crumbling when you cut the cheesecake later. Place the pan in the refrigerator while you make the filling.
- Whip the cream: In a large bowl, pour the cold heavy cream. Using an electric mixer, beat on medium-high speed until stiff peaks form. This takes about 3-4 minutes. Be careful not to over-whip, or you’ll end up with butter. Set the whipped cream aside in the refrigerator.
- Make the filling base: In another large bowl, beat the softened cream cheese with the electric mixer until smooth and creamy, about 2 minutes. Add the Biscoff spread and beat until fully combined. Scrape down the sides of the bowl with a spatula. Add the Greek yogurt, powdered sugar, and vanilla extract. Beat on medium speed until the mixture is smooth and fluffy, about 2 minutes more. The color should be a uniform pale tan.
- Fold in the whipped cream: Remove the whipped cream from the fridge. Add about one-third of it to the cream cheese mixture and fold gently with a spatula to lighten the batter. Then add the remaining whipped cream and fold until no white streaks remain. Be gentle here—you want to keep the air bubbles intact for that light texture.
- Assemble the cheesecake: Remove the crust from the refrigerator. Pour the filling over the crust and spread it evenly with a spatula. Tap the pan gently on the counter a few times to release any air bubbles.
- Chill: Cover the pan with plastic wrap and refrigerate for at least 6 hours, but overnight is best. The filling needs time to set properly, and patience here pays off big time.
- Add the topping: Once the cheesecake is fully set, melt the remaining Biscoff spread in the microwave for 15-20 seconds. Drizzle it over the top in a decorative pattern. Sprinkle the crushed Biscoff cookies evenly over the top. If you’re using flaky sea salt, add a pinch now.
- Serve: Run a knife under hot water, wipe it dry, then run it around the edge of the pan before releasing the springform. This gives you clean slices. Cut with a sharp knife, wiping the blade between cuts for the prettiest presentation.
Cooking Tips & Techniques
I’ve made this light no-bake Biscoff cheesecake with cookie crumble more times than I can count, and I’ve definitely learned a few things the hard way. Here’s what I wish someone had told me:
The cream cheese must be soft. I cannot stress this enough. If your cream cheese is cold, you’ll end up with lumpy filling. Leave it on the counter for at least an hour before you start. In a pinch, you can microwave it in 10-second bursts, but be careful not to melt it.
Don’t skip the Greek yogurt. I tried this once with sour cream instead, and it was too tangy. The yogurt gives you that lightness without the sharpness. It’s the unsung hero of this recipe.
Chill time is non-negotiable. I once tried to rush the process and served the cheesecake after only 4 hours. It was a sad, soupy mess. Trust me, give it the full overnight chill. Your future self will thank you.
Crush the cookies evenly. Big chunks in the crust can make it crumbly when you cut. Aim for sand-like consistency. If you’re using a bag, really go to town with that rolling pin—it’s a great stress reliever, honestly.
Temperature matters for drizzling. When you melt the Biscoff spread for the topping, let it cool for a minute before drizzling. If it’s too hot, it’ll melt the filling and create a mess. You want it warm and pourable, not hot.
Variations & Adaptations
One of the best things about this recipe is how flexible it is. Here are some twists I’ve tried and loved:
Chocolate Biscoff Cheesecake: Add 2 tablespoons of cocoa powder to the filling mixture before folding in the whipped cream. The chocolate and Biscoff combo is absolutely divine—think speculoos meets brownie batter.
Vegan Version: Use vegan cream cheese (I like Violife), coconut cream instead of heavy cream, and a dairy-free butter alternative. The texture will be slightly firmer, but the flavor is still spot-on. I tested this for a friend’s birthday, and no one noticed the difference.
Mini Cheesecake Cups: Instead of a springform pan, divide the crust and filling among 8-10 small jars or ramekins. These are perfect for parties or portion control. Plus, they look adorable on a dessert table.
Seasonal Berry Swirl: Before chilling, drop spoonfuls of strawberry or raspberry compote onto the filling and swirl with a knife. The tartness of the berries cuts through the sweetness beautifully. I did this with fresh blackberries last summer, and it was a showstopper.
Gluten-Free Option: Use gluten-free Biscoff cookies (they exist!) or substitute with gluten-free graham crackers. The rest of the ingredients are naturally gluten-free, so this is an easy swap.
Serving & Storage Suggestions
This light no-bake Biscoff cheesecake with cookie crumble is best served cold, straight from the fridge. I like to let it sit at room temperature for about 5-10 minutes before slicing—it makes the filling slightly softer and more luscious.
For presentation, I drizzle the melted Biscoff in a zigzag pattern and sprinkle the cookie crumble right before serving. If you’re feeling fancy, add a dollop of whipped cream and a whole Biscoff cookie on top of each slice. It’s a guaranteed crowd-pleaser.
As for drinks, this cheesecake pairs beautifully with a strong cup of coffee, a cold glass of milk, or even a dessert wine like Moscato. I’ve also been known to enjoy it with a chai latte, and let me tell you, that spice combo is something special.
Storage: Cover the cheesecake tightly with plastic wrap or store it in an airtight container in the refrigerator. It will keep for up to 5 days, though the crust may soften slightly after day 3. If that bothers you, just add a fresh sprinkle of crushed cookies before serving.
Freezing: This cheesecake freezes beautifully. Wrap the entire cheesecake (or individual slices) in plastic wrap, then in aluminum foil. Freeze for up to 3 months. To serve, thaw overnight in the refrigerator. The texture remains remarkably creamy—I’ve done this multiple times for last-minute dessert emergencies.
The flavors actually deepen after a day or two in the fridge. Day-old cheesecake is somehow even better, with the Biscoff flavor melding into the filling more thoroughly. So don’t be afraid to make it ahead!
Nutritional Information & Benefits
Here’s the approximate nutritional breakdown per slice (based on 12 servings):
| Nutrient | Amount per Slice |
|---|---|
| Calories | 380 |
| Total Fat | 26g |
| Saturated Fat | 14g |
| Cholesterol | 75mg |
| Sodium | 280mg |
| Total Carbohydrates | 32g |
| Sugars | 22g |
| Protein | 6g |
Now, I’m not going to pretend this is a health food, but there are some redeeming qualities here. The Greek yogurt adds protein and probiotics, which are great for gut health. The Biscoff cookies do contain some fiber and iron, and by using yogurt instead of extra cream cheese, we’ve cut down on saturated fat compared to a traditional cheesecake. It’s a dessert that feels indulgent but won’t send your blood sugar on a roller coaster ride.
If you’re watching your sugar intake, you can reduce the powdered sugar to 75g (about ⅓ cup) without sacrificing too much sweetness—the Biscoff spread is already quite sweet on its own. This recipe is also vegetarian-friendly and can be adapted for gluten-free diets as mentioned above.
Conclusion
This light no-bake Biscoff cheesecake with cookie crumble has become my secret weapon for everything from dinner parties to quiet nights on the couch. It’s the kind of dessert that makes people think you spent hours in the kitchen, when really, you just mixed a few things together and let the fridge do the heavy lifting. I love how versatile it is—you can dress it up for company or keep it simple for yourself.
I hope you give this recipe a try and make it your own. Maybe you’ll add a swirl of caramel, or top it with fresh fruit, or just enjoy it exactly as written. Whatever you do, I’d love to hear about it. Drop a comment below and tell me how it turned out, or share your own twist on this recipe. Honestly, some of the best ideas come from home cooks experimenting in their own kitchens.
Until next time, happy cooking—and don’t be afraid to start at 11 PM on a Wednesday. Some of the best recipes are born from exactly those moments.
Frequently Asked Questions
Can I make this cheesecake without a springform pan?
Absolutely! Use a deep pie dish or a regular cake pan lined with parchment paper. Just make sure the parchment has enough overhang so you can lift the cheesecake out once it’s set. It might not look as perfect, but it’ll taste just as good.
How long does this cheesecake need to set?
At least 6 hours, but overnight is really the sweet spot. The filling needs time to firm up properly, and the flavors meld together beautifully after a full night in the fridge. Trust me on this one—patience pays off.
Can I use low-fat cream cheese or yogurt?
You can, but the texture won’t be as creamy. Low-fat cream cheese has more water content, which can make the filling grainy or watery. If you’re looking to lighten it up, I’d recommend keeping the full-fat cream cheese and using low-fat Greek yogurt instead. That’s the swap I’ve had the most success with.
What if I can’t find Biscoff spread?
You can substitute with any cookie butter, like Speculoos or even peanut butter for a different flavor profile. If you use peanut butter, go with the creamy kind and add an extra tablespoon of powdered sugar to balance the saltiness. It won’t be the same, but it’ll still be delicious.
Can I double this recipe?
Yes! Just use a 10-inch springform pan and increase the chill time to at least 10 hours. You might also need to adjust the crust amount slightly—add about 50g more cookies and 15g more butter to cover the larger surface area. I’ve done this for holiday parties, and it’s always a hit.
PrintLight No-Bake Biscoff Cheesecake with Cookie Crumble
A creamy, no-bake cheesecake made with Biscoff spread and Greek yogurt for a light texture, topped with a cookie crumble and melted Biscoff drizzle. Perfect for a quick and indulgent dessert.
- Prep Time: 20 minutes
- Cook Time: 0 minutes
- Total Time: 6 hours 20 minutes (includes chilling)
- Yield: 12 servings 1x
- Category: Dessert
- Cuisine: American
Ingredients
- 200g (about 2 cups) Biscoff cookies, crushed into fine crumbs
- 60g (¼ cup) unsalted butter, melted
- 1 tablespoon granulated sugar (optional)
- 450g (16 oz) cream cheese, softened to room temperature
- 200g (about 1 cup) Biscoff spread, at room temperature
- 150g (¾ cup) Greek yogurt, plain and full-fat
- 100g (½ cup) powdered sugar, sifted
- 1 teaspoon vanilla extract
- 240ml (1 cup) heavy cream, cold
- 50g (¼ cup) Biscoff spread, melted for drizzling
- 4–5 Biscoff cookies, crushed for the crumble
- Optional: a pinch of flaky sea salt
Instructions
- Prepare the crust: In a food processor, pulse the Biscoff cookies until they become fine crumbs. Transfer to a medium bowl. Pour in the melted butter and mix with a fork until the crumbs are evenly moistened.
- Press the crust: Transfer the crumb mixture to a 9-inch springform pan. Press it firmly into an even layer on the bottom using a flat measuring cup. Place the pan in the refrigerator while you make the filling.
- Whip the cream: In a large bowl, pour the cold heavy cream. Using an electric mixer, beat on medium-high speed until stiff peaks form, about 3-4 minutes. Set aside in the refrigerator.
- Make the filling base: In another large bowl, beat the softened cream cheese until smooth, about 2 minutes. Add the Biscoff spread and beat until fully combined. Add the Greek yogurt, powdered sugar, and vanilla extract. Beat on medium speed until smooth and fluffy, about 2 minutes more.
- Fold in the whipped cream: Remove the whipped cream from the fridge. Add about one-third to the cream cheese mixture and fold gently with a spatula. Add the remaining whipped cream and fold until no white streaks remain.
- Assemble the cheesecake: Remove the crust from the refrigerator. Pour the filling over the crust and spread evenly with a spatula. Tap the pan gently on the counter to release air bubbles.
- Chill: Cover the pan with plastic wrap and refrigerate for at least 6 hours, preferably overnight.
- Add the topping: Once set, melt the remaining Biscoff spread in the microwave for 15-20 seconds. Drizzle over the top. Sprinkle crushed Biscoff cookies evenly. Add a pinch of flaky sea salt if desired.
- Serve: Run a knife under hot water, wipe dry, then run around the edge of the pan before releasing the springform. Cut with a sharp knife, wiping the blade between cuts.
Notes
Cream cheese must be at room temperature to avoid lumps. Chill time is non-negotiable—overnight is best. For a vegan version, use vegan cream cheese, coconut cream, and dairy-free butter. For gluten-free, use gluten-free Biscoff cookies. Store in the refrigerator for up to 5 days or freeze for up to 3 months.
Nutrition
- Serving Size: 1 slice
- Calories: 380
- Sugar: 22
- Sodium: 280
- Fat: 26
- Saturated Fat: 14
- Carbohydrates: 32
- Protein: 6
Keywords: no-bake cheesecake, Biscoff cheesecake, cookie butter cheesecake, easy dessert, no-bake dessert, Greek yogurt cheesecake


