This was supposed to be a batch of classic sugar cookies. You know, the kind you roll out, cut into perfect little shapes, and decorate with royal icing until they look like they belong in a bakery window. I had the butter softening, the flour measured, and my fancy new cookie cutters all laid out. Then my three-year-old decided to “help” by dumping half the almond extract into the bowl instead of the vanilla. I mean, I grabbed the wrong bottle in the chaos and just went with it. The dough was too sticky, the kitchen was a floury mess, and I was already running late for a playdate. Honestly, I almost threw the whole thing in the trash.
But you know that feeling when you’re too tired to start over? That was me. So I just chucked the dough in the fridge to chill, hoping it would firm up enough to salvage. When I came back an hour later, I rolled a piece between my fingers out of pure frustration, and it made this long, skinny shape. A weird, knobby shape. And I thought—well, that looks like a witch finger. Maybe you’ve been there, staring at a kitchen disaster that suddenly looks like a Halloween craft project. So I grabbed a bag of almonds, stuck one on the end, and baked them. What came out was nothing like the plan—and better. They were buttery, slightly spooky, and absolutely delicious. My kid called them “monster cookies,” and honestly, that name stuck for a while.
These Easy Witch Finger Cookies with Almond Nails are now my go-to for Halloween parties, classroom treats, and any time I need a quick, fun recipe that doesn’t require a pastry degree. They’re the happy accident that taught me to stop panicking when things go wrong in the kitchen. Because sometimes the best recipes come from the biggest messes.
Why You’ll Love This Recipe
Let’s be real—Halloween baking can be a huge pain. Between the sticky fondant, the complicated piping bags, and the sugar cookies that spread into blobs, it’s easy to get frustrated. These Easy Witch Finger Cookies with Almond Nails are the antidote to all that. They look impressively creepy but come together with almost no effort. Here’s why they work so well for busy weeknights and last-minute Halloween plans:
- Quick & Easy: From start to finish, you’re looking at about 30 minutes of active time. The dough comes together in one bowl, chills for 20 minutes, and bakes in under 12 minutes. Perfect for when the kids announce they need treats for school tomorrow.
- Simple Ingredients: Butter, sugar, flour, an egg, and some almond extract. That’s it. No weird gelatin sheets or specialty food coloring required. You probably have everything in your pantry right now.
- Perfect for Halloween: These cookies are the star of any spooky spread. They look like actual witch fingers, which is both gross and amazing. Kids absolutely lose their minds over them.
- Crowd-Pleaser: They taste like a slightly almond-y shortbread. Buttery, not too sweet, with that perfect snap when you bite into them. Adults love them just as much as the kids do.
- Unbelievably Delicious: The texture is what gets me every time. They’re crisp on the outside, tender on the inside, and the almond “nail” adds this lovely nutty crunch. It’s next-level comfort food disguised as a Halloween prop.
What makes these different from other witch finger recipes? I’ve tested a dozen versions over the years. Some are too dry, some spread into pancake shapes, and some just taste like sugar. This one uses an extra yolk for richness and a longer chill time to keep the fingers from puffing up. It’s not just another version—it’s the best version. The kind that makes you close your eyes after the first bite, even though you’re eating something that looks like a severed finger.
What Ingredients You Will Need
This recipe uses simple, wholesome ingredients to deliver that perfect shortbread texture without the fuss. Most of these are pantry staples, which makes these cookies perfect for last-minute Halloween baking emergencies. Here’s what you’ll need:
For the Cookie Dough:
- 1 cup (226g) unsalted butter, softened — Make sure it’s at room temperature. Cold butter won’t cream properly, and your cookies will be dense. I like using Land O’Lakes for consistent results.
- 1 cup (200g) granulated sugar — Regular white sugar works best here. Don’t substitute brown sugar—it will make the cookies too soft and they won’t hold their finger shape.
- 1 large egg yolk — Save the white for another recipe (or make a quick omelet). The yolk adds richness and helps the cookies stay tender.
- 1 teaspoon almond extract — This is the secret ingredient that gives the cookies that unmistakable marzipan-like flavor. I recommend Nielsen-Massey for the purest taste, but any brand works. (And yes, this is the extract my toddler dumped in that first batch!)
- 1/2 teaspoon vanilla extract — Balances out the almond flavor so it doesn’t taste like perfume.
- 2 cups (250g) all-purpose flour — Spoon and level your flour. Scooping directly from the bag packs it down and gives you too much, which makes dry cookies.
- 1/2 teaspoon baking powder — Just enough to give them a little lift without making them puff up and lose their finger shape.
- 1/4 teaspoon salt — Balances the sweetness and enhances the buttery flavor. I use fine sea salt.
For the “Nails” and Decoration:
- 1/2 cup (about 60g) whole almonds, blanched or raw — These become the fingernails. Blanched almonds (skins removed) look more like real nails, but raw almonds with the skin on give a more realistic, slightly grungy witch finger look. I prefer the blanched ones for a cleaner appearance.
- Red food coloring (gel or liquid) — For the “blood” at the cuticle area. Gel coloring gives a more vibrant red without thinning the dough.
- 1 tablespoon milk (optional) — For brushing the “knuckles” to help them wrinkle. You can skip this if you’re in a hurry.
Ingredient Selection Tips: Look for almonds that are whole and uniform in size. If they’re too small, they’ll look like baby fingernails—which is honestly even creepier, but not the look I’m going for. For the food coloring, Americolor Super Red is my go-to. A little goes a long way, so start with a toothpick’s worth and add more if needed.
Substitution Guidance: If you’re out of almond extract, you can use 1 teaspoon of vanilla extract instead, but you’ll lose that signature marzipan flavor. For a nut-free version, use a whole cashew or a sliced almond for the nail, and omit the almond extract. The cookies will still taste great—just more like classic shortbread.
Equipment Needed
You don’t need much for this recipe, which is part of the beauty. Here’s what you’ll need:
- Electric mixer (hand or stand) — A hand mixer works perfectly. I’ve made these with a whisk and a strong arm when my mixer died mid-batch, and it’s doable but not fun. The KitchenAid Artisan is my daily driver, but any brand will do.
- Large mixing bowl — Glass or stainless steel works best. Plastic bowls can retain grease and affect the dough.
- Baking sheets — Two standard half-sheet pans. No need to grease them—the butter in the dough will keep them from sticking.
- Parchment paper or silicone baking mats — Parchment paper is cheaper and works great. Silicone mats are a nice splurge and make cleanup even easier.
- Sharp knife or bench scraper — For cutting the dough into finger-sized pieces. A bench scraper is my preferred tool because it doesn’t dull easily.
- Toothpick or skewer — For creating the knuckle lines and cuticle details. A toothpick works best for fine lines.
- Small pastry brush — For applying the milk to create wrinkles. A silicone brush is easier to clean.
Budget-Friendly Options: Don’t have a pastry brush? Use your finger to dab on the milk. Need a quick substitute for a bench scraper? A butter knife works fine. The cookies don’t care about your equipment—they just want to be made.
Preparation Method
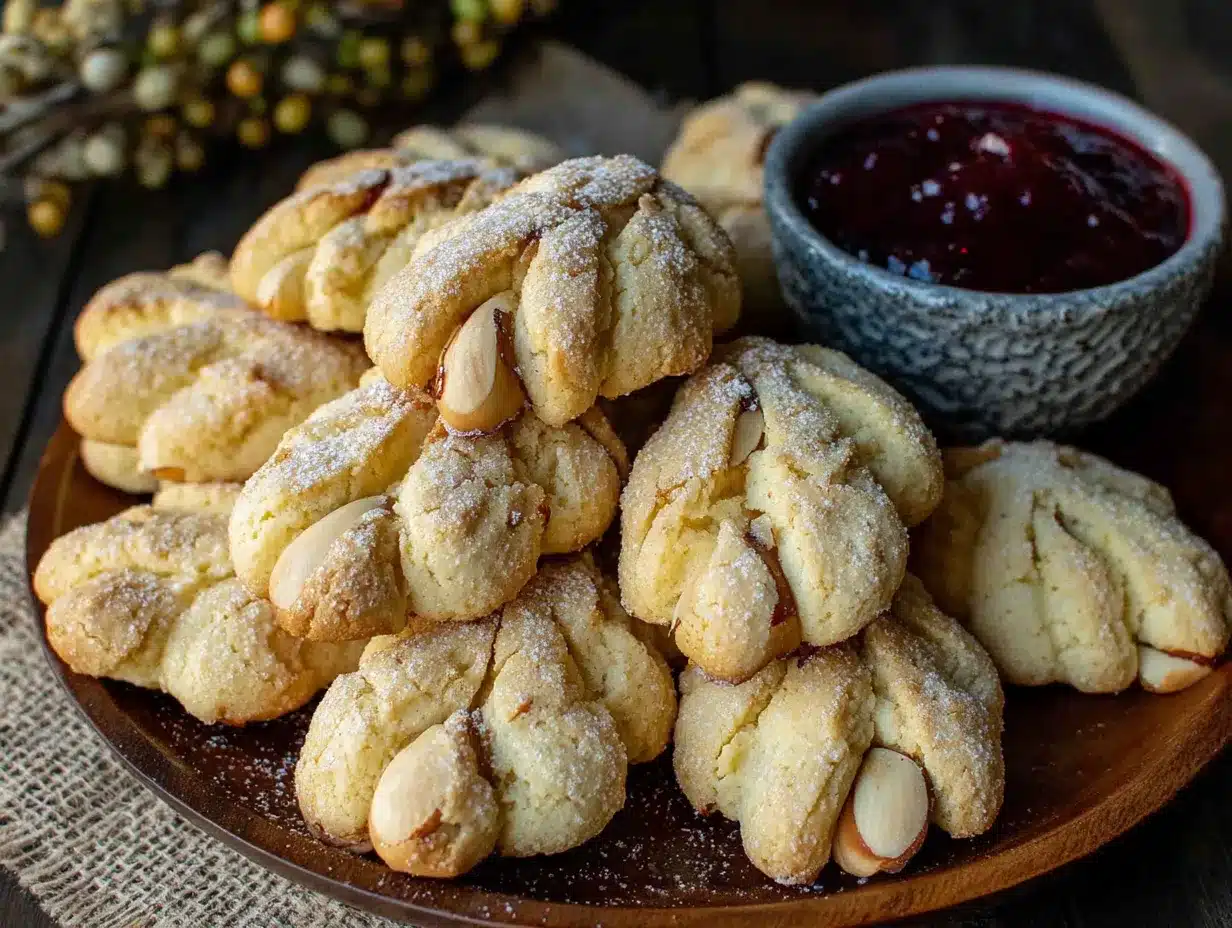
Let’s get to the fun part. Here’s how to make these creepy cookies step by step. I’ve included all the little tricks I’ve learned from making these dozens of times.
- Cream the butter and sugar. In your large mixing bowl, beat the softened butter and granulated sugar together on medium speed until light and fluffy—about 2 to 3 minutes. You’re looking for a pale yellow color and a texture that looks like fluffy sand. Scrape down the sides of the bowl halfway through. Don’t rush this step—proper creaming creates air pockets that give the cookies their tender texture.
- Add the wet ingredients. Beat in the egg yolk, almond extract, and vanilla extract until fully combined. The mixture will look slightly curdled at this point—don’t panic, that’s normal. It will come together once you add the flour.
- Mix the dry ingredients. In a separate small bowl, whisk together the all-purpose flour, baking powder, and salt. This ensures the baking powder is evenly distributed so you don’t get one cookie that puffs up like a balloon while the rest stay flat.
- Combine wet and dry. Gradually add the flour mixture to the butter mixture, mixing on low speed just until the dough comes together. Stop as soon as you no longer see streaks of flour. Overmixing develops gluten, which makes tough cookies. The dough should be soft but not sticky—if it sticks to your fingers, chill it for 10 minutes before shaping.
- Chill the dough. Wrap the dough in plastic wrap and refrigerate for at least 20 minutes. This step is non-negotiable. Chilled dough is much easier to shape into fingers, and it helps the cookies hold their shape while baking. You can chill it for up to 3 days if you want to prep ahead.
- Preheat the oven. While the dough chills, preheat your oven to 325°F (163°C). Line your baking sheets with parchment paper or silicone mats.
- Shape the fingers. Take the chilled dough and pinch off a piece about the size of a walnut (roughly 1 tablespoon). Roll it between your palms into a long, skinny log about 3 to 4 inches long. It should be thicker at the top (where the nail goes) and slightly tapered at the bottom. Don’t make them perfectly smooth—the knobby, irregular shape is what makes them look like real fingers. Place each shaped finger on the prepared baking sheet, leaving about 2 inches between them.
- Add the almond nails. Press one whole almond firmly onto the thicker end of each finger. Press it in about 1/4 inch so it looks like it’s growing out of the dough. This is where the magic happens—the almond becomes the fingernail. Make sure it’s secure; if it’s loose, it might fall off during baking.
- Create the knuckles and details. Use a toothpick or skewer to press gentle lines into the dough where knuckles would be. Make two or three lines per finger, pressing about 1/8 inch deep. Also press a small indent around the base of the almond to create the cuticle area. For extra realism, gently squeeze the dough around the nail to create a slight ridge, like real skin around a fingernail.
- Add wrinkles (optional but worth it). Lightly brush the knuckle areas with a tiny bit of milk. This helps the dough wrinkle as it bakes, giving the fingers that aged, witchy look. Don’t brush the whole cookie—just the joints.
- Bake. Bake for 10 to 12 minutes, or until the cookies are just set and the edges are starting to turn a very light golden brown. The centers should still look slightly pale. They will continue to firm up as they cool on the baking sheet. Don’t overbake—you want them tender, not crunchy all the way through.
- Add the “blood.” As soon as the cookies come out of the oven, use a toothpick to dab a tiny amount of red food coloring at the cuticle area (where the almond meets the dough). The heat from the cookies will help the coloring spread slightly, creating that gory, realistic look. Don’t overdo it—a little goes a long way. You want it to look like a small wound, not a massacre.
- Cool completely. Let the cookies cool on the baking sheet for 5 minutes, then transfer them to a wire rack to cool completely. They will firm up significantly as they cool. Don’t try to move them while they’re still hot—they’re fragile and might break.
Cooking Tips & Techniques
I’ve made these cookies at least twenty times, and I’ve made every mistake in the book. Here are the lessons I learned the hard way so you don’t have to.
Don’t skip the chill time. The first time I made these, I was in a hurry and only chilled the dough for 5 minutes. The cookies spread into flat, puffy blobs that looked nothing like fingers. The chill time solidifies the butter, which prevents spreading. Trust me—20 minutes is worth it.
Watch the bake time closely. These cookies go from perfect to overdone in about 60 seconds. I once got distracted by a phone call and left them in for 14 minutes. They came out hard as rocks and tasted burnt. Set a timer for 10 minutes and check them. If they’re still pale, give them one more minute. They should be just set with no wet spots in the center.
Use your fingers to shape, not a rolling pin. I tried using a rolling pin and a knife to cut out uniform fingers once. It was a disaster—the dough stuck, the shapes were too uniform (which looked fake), and it took twice as long. Hand-rolling each finger gives them that organic, slightly imperfect look that makes them believable.
Make the knuckle lines deep enough. If you press too lightly, the lines will disappear during baking. Press firmly with the toothpick—about 1/8 inch deep. The dough will puff slightly, so those deeper lines will become subtle creases after baking. Perfect.
Multitasking strategy: While the dough chills, line your baking sheets and preheat the oven. While the first batch bakes, shape the second batch. This keeps the process moving and prevents you from standing around waiting.
Variations & Adaptations
These cookies are surprisingly flexible. Here are some ways to change them up depending on your mood, dietary needs, or what you have on hand.
Gluten-Free Version: Substitute the all-purpose flour with a 1:1 gluten-free baking flour blend that contains xanthan gum. I’ve tested this with Bob’s Red Mill 1:1 Baking Flour, and the texture is slightly more crumbly but still delicious. The fingers might be a bit more delicate, so handle them gently.
Vegan Adaptation: Use vegan butter (I like Miyoko’s) and replace the egg yolk with 1 tablespoon of aquafaba (the liquid from a can of chickpeas). The texture won’t be quite as rich, but they’ll still hold their shape and taste great. Use a plant-based milk for the brushing step.
Flavor Variations: Swap the almond extract for peppermint extract for a creepy “minty witch finger” vibe. Or use lemon extract and add a teaspoon of lemon zest for a bright, citrusy version. I once made a batch with orange zest and a pinch of cinnamon—they tasted like a Halloween version of a snickerdoodle. Amazing.
Different “Nails”: If you don’t have whole almonds, use cashews, peanuts, or even a slivered almond for a more delicate nail. For a truly terrifying look, use a whole blanched almond that you’ve painted with red food coloring beforehand. The kids at my daughter’s school still talk about the “bloody nail” cookies I brought last year.
Spooky Add-Ins: Mix in 1/4 cup of mini chocolate chips for a “dirt under the fingernails” effect. Or press a few sesame seeds into the dough for a wart-like texture. The more disgusting they look, the more the kids love them.
Serving & Storage Suggestions
These cookies are best served at room temperature, arranged on a platter in a way that maximizes the creep factor. I like to pile them in a haphazard heap, as if someone just chopped off a bunch of fingers and threw them on a plate. For extra drama, place a small bowl of red jam (like strawberry or raspberry) next to them as “blood” for dipping. The kids go absolutely wild for this.
Complementary Dishes: Serve these alongside a batch of ghost-shaped meringues or spiderweb cupcakes for a full Halloween spread. A glass of cold milk or a warm mug of apple cider pairs perfectly with the buttery, almond flavor.
Storage Instructions: Store the cooled cookies in an airtight container at room temperature for up to 5 days. Layer them between sheets of parchment paper to prevent the almonds from getting knocked off. Do not refrigerate—the cold air will make them stale faster.
Freezer Instructions: These cookies freeze beautifully. Place the baked and cooled cookies in a single layer on a baking sheet and freeze for 1 hour, then transfer to a freezer-safe bag or container. They’ll keep for up to 3 months. Thaw at room temperature for 15 minutes before serving. You can also freeze the unbaked shaped dough—just arrange the shaped fingers on a baking sheet, freeze until solid, then transfer to a bag. Bake directly from frozen, adding 2 to 3 minutes to the bake time.
Flavor Development: These cookies actually taste better the next day. The almond flavor mellows and blends with the butter, creating a more rounded taste. If you can resist eating them all on day one, you’ll be rewarded on day two.
Nutritional Information & Benefits
Let’s be honest—these are cookies, not health food. But they’re made with real ingredients, and there are a few nutritional bright spots worth mentioning.
Estimated Nutritional Values (per cookie, based on 24 cookies):
- Calories: 145
- Total Fat: 8g
- Saturated Fat: 5g
- Cholesterol: 30mg
- Sodium: 55mg
- Total Carbohydrates: 16g
- Sugars: 8g
- Protein: 2g
Health Benefits: Almonds are a great source of vitamin E, healthy monounsaturated fats, and magnesium. So at least the “nails” are good for you! The butter provides vitamin A, and the egg yolk contains choline, which supports brain health. Look, it’s a cookie—but it’s a cookie made with real food, not a chemistry experiment.
Dietary Considerations: This recipe is naturally vegetarian. For a lower-sugar option, reduce the sugar to 3/4 cup—the cookies will be slightly less tender but still tasty. The almond extract makes them naturally gluten-free if you use a certified gluten-free flour blend (just check your extract bottle, as some brands contain gluten).
Allergen Warning: This recipe contains dairy (butter), eggs, tree nuts (almonds), and wheat (flour). For a nut-free version, use a whole cashew or a slice of banana for the nail, and replace the almond extract with vanilla. For a dairy-free version, use vegan butter as mentioned in the variations section.
Conclusion
These Easy Witch Finger Cookies with Almond Nails are proof that the best recipes often come from the biggest kitchen disasters. What started as a sugar cookie fail turned into a Halloween tradition that my family looks forward to every year. They’re fun to make, creepy to look at, and absolutely delicious to eat. Plus, they’re simple enough that even the busiest weeknight baker can pull them off without stress.
I’d love to see how yours turn out! Leave a comment below and tell me about your own kitchen accidents that turned into happy discoveries. Did your kids help shape the fingers? Did you try a different flavor variation? Share your photos and stories—I read every single one, and nothing makes me happier than knowing these cookies are bringing a little spooky joy to your kitchen.
So go ahead, grab that bag of almonds, and make some magic. Or should I say, some mayhem. Happy Halloween, friend!
Frequently Asked Questions
Can I make these cookies ahead of time for a party?
Absolutely. You can make the dough up to 3 days in advance and keep it wrapped in the fridge. You can also bake them up to 5 days ahead and store them in an airtight container. They actually taste better on day two.
Why did my cookies spread and lose their finger shape?
The most common reason is that the dough wasn’t chilled long enough. Make sure you chill it for at least 20 minutes. Also, check that your butter was softened but not melted—if the butter is too soft, the cookies will spread.
Can I use a different nut for the fingernails?
Yes! Cashews, peanuts, and pecans all work well. For a nut-free option, use a slice of banana or a piece of dried apricot. Just keep in mind that the bake time might vary slightly depending on what you use.
How do I get the red coloring to look realistic?
Use a gel food coloring rather than liquid—it’s more concentrated and won’t make the dough soggy. Dab it on with a toothpick while the cookies are still warm from the oven. The heat helps it spread just enough to look like blood pooling at the cuticle.
My cookies came out too hard. What went wrong?
You likely overbaked them. These cookies should be just set when you take them out—they’ll continue to firm up as they cool. If they’re already hard when they come out of the oven, reduce your bake time by 1 to 2 minutes next time. Also, make sure you measured your flour correctly—too much flour makes dry, hard cookies.
Pin This Recipe!
Easy Witch Finger Cookies with Almond Nails

These buttery, almond-flavored shortbread cookies are shaped like creepy witch fingers with almond nails. They’re quick, easy, and perfect for Halloween parties or spooky treats.
- Prep Time: 30 minutes
- Cook Time: 12 minutes
- Total Time: 1 hour 2 minutes
- Yield: 24 cookies 1x
- Category: Dessert
- Cuisine: American
Ingredients
- 1 cup (226g) unsalted butter, softened
- 1 cup (200g) granulated sugar
- 1 large egg yolk
- 1 teaspoon almond extract
- 1/2 teaspoon vanilla extract
- 2 cups (250g) all-purpose flour
- 1/2 teaspoon baking powder
- 1/4 teaspoon salt
- 1/2 cup (about 60g) whole almonds, blanched or raw
- Red food coloring (gel or liquid)
- 1 tablespoon milk (optional)
Instructions
- Cream the butter and sugar: Beat softened butter and granulated sugar together on medium speed until light and fluffy, about 2 to 3 minutes. Scrape down the sides halfway through.
- Add the wet ingredients: Beat in the egg yolk, almond extract, and vanilla extract until fully combined.
- Mix the dry ingredients: In a separate bowl, whisk together flour, baking powder, and salt.
- Combine wet and dry: Gradually add the flour mixture to the butter mixture, mixing on low speed just until the dough comes together. Do not overmix.
- Chill the dough: Wrap the dough in plastic wrap and refrigerate for at least 20 minutes (up to 3 days).
- Preheat the oven to 325°F (163°C). Line baking sheets with parchment paper or silicone mats.
- Shape the fingers: Pinch off walnut-sized pieces (about 1 tablespoon) and roll into 3-4 inch long logs, thicker at one end and tapered at the other. Place on prepared baking sheets, 2 inches apart.
- Add the almond nails: Press one whole almond firmly onto the thicker end of each finger, about 1/4 inch deep.
- Create knuckles and details: Use a toothpick to press 2-3 gentle lines for knuckles and a small indent around the base of the almond for the cuticle.
- Add wrinkles (optional): Lightly brush the knuckle areas with a tiny bit of milk.
- Bake for 10 to 12 minutes, until just set and edges are light golden brown. Centers should still look slightly pale.
- Add the ‘blood’: As soon as the cookies come out of the oven, use a toothpick to dab a tiny amount of red food coloring at the cuticle area.
- Cool completely on the baking sheet for 5 minutes, then transfer to a wire rack to cool completely.
Notes
Chill the dough for at least 20 minutes to prevent spreading. Watch the bake time closely—cookies go from perfect to overdone in about 60 seconds. Hand-roll each finger for an organic, realistic look. These cookies taste even better the next day.
Nutrition
- Serving Size: 1 cookie
- Calories: 145
- Sugar: 8
- Sodium: 55
- Fat: 8
- Saturated Fat: 5
- Carbohydrates: 16
- Protein: 2
Keywords: witch finger cookies, Halloween cookies, almond cookies, shortbread cookies, spooky treats, easy Halloween recipe


