There used to be a tiny bakery on the corner of Maple and 3rd in my old neighborhood that made the most incredible sprinkle cookies. They weren’t fancy—just soft, buttery cookies loaded with rainbow sprinkles that tasted exactly like a birthday party in every single bite. When they closed their doors two years ago (a kombucha shop moved in, if you can believe it), I actually stood outside staring at the new sign feeling genuinely disappointed. I mean, I’d driven twenty minutes out of my way for those cookies on multiple occasions. After about seven attempts—some too cakey, some too flat, one that I accidentally burned because I was on the phone—I finally cracked the code. These birthday cake cookies are it. They’re that same nostalgic, sprinkle-packed cookie that makes you close your eyes and smile.
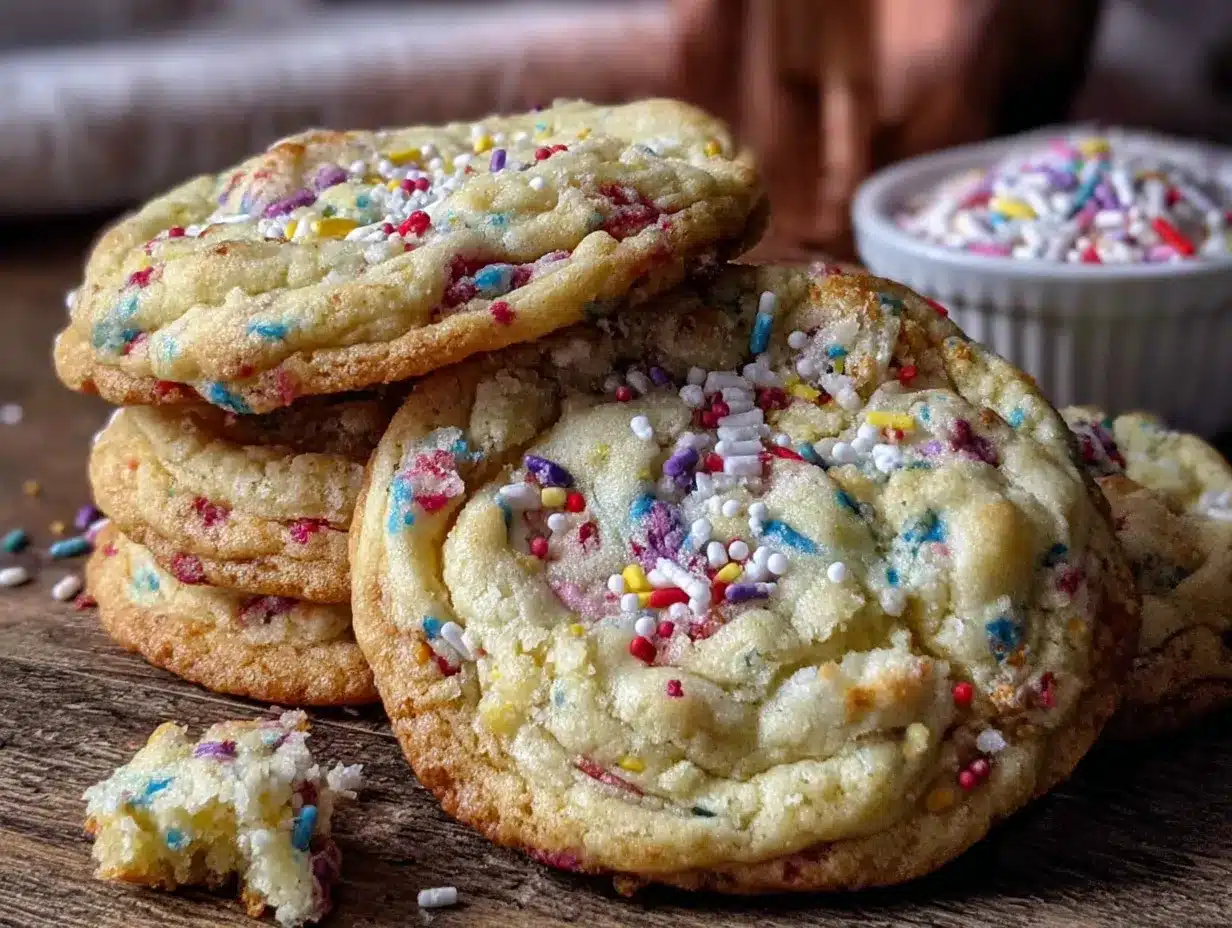
Honestly, I almost gave up after attempt number four. That batch came out looking like sad, flat frisbees with sprinkles that had bled into weird gray streaks. My husband politely said they were “interesting.” You know that feeling when a recipe just won’t cooperate? But I kept tweaking, kept testing, and let me tell you—this version is the one. The texture is soft and chewy, not dry or crumbly, with just enough birthday cake flavor from the extract and those gorgeous rainbow sprinkles studded throughout.
Maybe you’ve had that experience too—chasing a food memory from a place that no longer exists. There’s something special about recreating it in your own kitchen, making it your own, and honestly improving on the original. These cookies stay soft for days, they’re ridiculously easy to throw together on a busy weeknight, and they make the whole house smell like celebration. That’s why I keep making them, and why I think you’ll love them just as much.
Why You’ll Love This Recipe
I tested these birthday cake cookies more times than I’d like to admit, and here’s why they’re worth every single attempt. These aren’t just another sprinkle cookie that turns out dry or bland—they’re soft, buttery, and packed with actual birthday cake flavor.
- Quick & Easy: From start to finish, these cookies take about 25 minutes. No chilling required, no complicated techniques. Perfect for when you need a dessert fast on a Tuesday night.
- Simple Ingredients: You probably already have everything in your pantry. Butter, sugar, flour, eggs—and of course, sprinkles. No fancy baking supplies needed.
- Perfect for Any Occasion: Birthday parties, bake sales, playdates, or just a regular afternoon that needs a little cheer. These cookies make any day feel special.
- Crowd-Pleaser: Kids go absolutely crazy for them, but adults sneak them too. I’ve brought these to three different gatherings and the plate was empty every single time.
- Unbelievably Delicious: The texture is what gets me every time—soft in the middle with slightly crisp edges, and that birthday cake flavor that’s nostalgic without being artificial.
What makes these different from every other sprinkle cookie recipe? It’s the combination of cake flour and a touch of almond extract that gives them that authentic bakery taste. I spent weeks testing ratios, and this balance creates cookies that stay soft for days without getting that weird cakey dryness. Plus, I fold the sprinkles in by hand at the very end so they don’t bleed their color into the dough. Little things like that make a big difference.
This recipe is the kind that makes you feel like you’ve accomplished something wonderful in under half an hour. It’s comfort food with sprinkles on top—literally. Whether you’re making them for a birthday party or just because it’s Wednesday, these cookies deliver that same joy every single time.
What Ingredients You Will Need
This recipe uses simple, pantry-friendly ingredients to create cookies that taste like they came from a bakery. Most of these are probably already in your kitchen, which makes these perfect for last-minute baking cravings.
For the Cookie Dough
- Unsalted butter, softened (1 cup / 2 sticks) — Make sure it’s truly softened to room temperature, not melted. This creates the right texture for creaming with the sugar.
- Granulated sugar (1 cup / 200g) — Regular white sugar works perfectly here. I’ve tried with coconut sugar and it changes the texture too much.
- Large egg (1, room temperature) — Cold eggs can make the dough seize up. Let it sit on the counter for 15 minutes if you forgot to take it out ahead of time.
- Vanilla extract (2 teaspoons) — Use pure vanilla if you have it, but imitation works fine too. This is the backbone of the birthday cake flavor.
- Almond extract (½ teaspoon) — This is the secret ingredient! It gives that classic birthday cake taste that’s hard to pin down otherwise. Don’t skip it.
- All-purpose flour (1¾ cups / 220g) — Spoon and level your flour for the most accurate measurement. Scooping directly can pack in too much flour and make dry cookies.
- Cake flour (¼ cup / 30g) — This is what makes the cookies tender instead of tough. If you don’t have cake flour, you can substitute by removing 2 tablespoons of all-purpose flour and adding 2 tablespoons of cornstarch.
- Baking powder (½ teaspoon) — Helps the cookies puff up slightly. Make sure yours isn’t expired—test it by dropping a pinch in hot water; it should bubble immediately.
- Baking soda (¼ teaspoon) — Works with the baking powder for the perfect texture.
- Salt (½ teaspoon) — Balances the sweetness. I use fine sea salt.
- Rainbow sprinkles (½ cup / 100g) — Use jimmies-style sprinkles, not the little round nonpareils. Jimmies hold their color better and don’t bleed into the dough. I prefer the brand Wilton for the most vibrant colors that don’t fade during baking.
Ingredient Selection Tip: For the best results, use a high-quality butter like Kerrygold or Plugrà. European-style butter has a higher fat content, which means richer flavor and better texture. I’ve tested these with store-brand butter and they still turn out good, but the flavor difference is noticeable.
Substitution Guidance: If you’re out of cake flour, use the cornstarch trick I mentioned above. For a dairy-free version, substitute the butter with a high-quality vegan butter stick (not margarine in a tub—too much water content). I’ve had good results with the brand Miyoko’s. The cookies will spread a tiny bit more, so chill the dough for 15 minutes before baking.
Equipment Needed
You don’t need fancy equipment for these cookies, which is part of why I love this recipe for busy weeknights.
- Electric hand mixer or stand mixer — You can cream the butter and sugar by hand with a wooden spoon, but your arm will get tired. A hand mixer makes this step effortless.
- Large mixing bowl — Any medium-large bowl works. I use a glass Pyrex bowl because I can see when everything is fully incorporated.
- Baking sheets (2) — Light-colored aluminum sheets work best. Dark sheets absorb more heat and can over-brown the bottoms of your cookies.
- Parchment paper or silicone baking mat — Parchment paper is my go-to because it’s disposable and creates perfectly non-stick surfaces. Silicone mats work great too but can make cookies spread slightly more.
- Cookie scoop (1½ tablespoon size) — This is worth the $10 investment. It creates evenly sized cookies that bake uniformly. A spoon works in a pinch but your cookies won’t be as consistent.
- Cooling rack — Wire racks let air circulate so cookies cool evenly without soggy bottoms.
- Measuring cups and spoons — For accuracy, especially with the smaller amounts like almond extract and baking powder.
I’ve made these cookies with just a hand whisk and a bowl when my mixer was broken, and they still turned out delicious. The key is just making sure your butter is properly softened so you can cream it well by hand.
Preparation Method
- Preheat your oven to 350°F (175°C). Line two baking sheets with parchment paper. This is important—don’t skip the parchment or you’ll be scrubbing baked-on sprinkle residue later.
- Cream the butter and sugar together in a large bowl using your hand mixer on medium speed. Beat for 2-3 minutes until the mixture is light and fluffy, scraping down the sides once. It should look pale yellow and feel soft when you touch it. This step creates air pockets that help cookies rise properly.
- Add the egg and extracts — Crack the egg into the butter mixture, add the vanilla and almond extracts, and beat on medium speed until fully combined, about 30 seconds. Scrape the sides and bottom of the bowl to make sure everything is incorporated. The mixture might look slightly curdled at this point—that’s totally normal.
- Whisk the dry ingredients — In a separate medium bowl, whisk together the all-purpose flour, cake flour, baking powder, baking soda, and salt. Whisking aerates the flour and ensures the leavening agents are evenly distributed. I usually whisk for about 15 seconds.
- Combine wet and dry — Add the dry ingredients to the wet ingredients in two additions, mixing on low speed after each until just combined. Don’t overmix here—stop as soon as you don’t see streaks of flour anymore. Overmixing develops gluten and makes cookies tough.
- Fold in the sprinkles — Using a rubber spatula, gently fold the rainbow sprinkles into the dough. Fold only until the sprinkles are evenly distributed, about 5-7 folds. Overmixing at this stage can cause the sprinkles to bleed their color into the dough, creating gray streaks instead of bright pops of color.
- Scoop the dough — Using your cookie scoop, portion out rounded tablespoons of dough (about 1½ tablespoons each) and place them 2 inches apart on the prepared baking sheets. I fit 12 cookies per sheet. Don’t flatten them—they’ll spread on their own.
- Bake — Place one sheet at a time on the middle rack of your preheated oven. Bake for 10-12 minutes, rotating the pan halfway through. The cookies are done when the edges are lightly golden and the centers look slightly underdone and puffy. They’ll continue setting as they cool.
- Cool properly — Let the cookies rest on the baking sheet for 5 minutes. This is crucial—they’re too fragile to move right away. After 5 minutes, transfer them to a wire cooling rack to cool completely. If you try to move them too soon, they’ll fall apart.
- Repeat — Let your baking sheets cool completely before scooping the next batch. Putting dough on a hot sheet will cause the butter to melt too fast and your cookies will spread into thin, greasy puddles.
Sensory Cue: Your kitchen should smell like vanilla and butter by minute 8 of baking. The cookies will look puffy and slightly cracked on top when they’re done. The edges should be just barely golden—if they’re brown all over, you’ve gone too far.
Cooking Tips & Techniques
After burning through seven batches of these cookies, I’ve learned a few things the hard way. Let me save you the trouble.
Don’t overmix the dough. This is the number one mistake I see with cookie recipes. When you overmix after adding the flour, you develop too much gluten, which makes cookies tough and cakey instead of tender and chewy. Mix until you don’t see flour streaks, then stop. I mean it—stop even if it looks a tiny bit shaggy.
Use room temperature ingredients. Cold butter doesn’t cream properly with sugar, and cold egg can seize up your dough. I learned this the hard way when I tried to rush things with cold butter straight from the fridge. The cookies came out dense and flat. Let your butter sit out for at least an hour before starting. If you forgot, cut it into small cubes and microwave in 5-second bursts until it’s soft but not melted.
Chill if necessary. If your kitchen is warm or your dough feels sticky, pop it in the fridge for 15-20 minutes before scooping. This prevents excessive spreading. I live in a hot climate, so during summer months I always chill my dough for 15 minutes. During winter, I skip this step entirely.
Rotate your pans. Every oven has hot spots. Halfway through baking, rotate your sheet 180 degrees and switch racks if you’re baking two sheets at once. This ensures even browning and prevents burned bottoms.
Test bake one cookie first. This sounds extra, but it’s saved me multiple times. Scoop one cookie and bake it for 10 minutes. If it spreads too much, add a tablespoon of flour to the dough. If it’s too puffy, add a tablespoon of softened butter. Adjusting a single cookie is much easier than fixing an entire batch.
Variations & Adaptations
One of the best things about these birthday cake cookies is how easy they are to customize. Here are some variations I’ve tried and loved.
Chocolate Birthday Cake Cookies: Replace ¼ cup of the all-purpose flour with ¼ cup of unsweetened cocoa powder. The chocolate-birthday cake combo is incredible, and the dark specks against the rainbow sprinkles look beautiful. I made these for my nephew’s birthday and they disappeared in ten minutes.
Gluten-Free Version: Substitute the all-purpose and cake flour with 2 cups of a high-quality gluten-free flour blend that contains xanthan gum. I’ve tested this with King Arthur Measure for Measure flour and the texture was surprisingly close to the original. Add an extra tablespoon of butter to compensate for the dryness of gluten-free flour.
Funfetti Frosting Dip: Turn these into sandwich cookies by spreading a thin layer of vanilla buttercream between two cookies. Or serve them with a bowl of cream cheese frosting for dipping—it’s messy but absolutely worth it. I did this for a party and people couldn’t stop talking about it.
Citrus Birthday Cookies: Add 1 tablespoon of lemon or orange zest along with the sugar. The citrus brightens the flavor and cuts through the sweetness beautifully. This is my go-to spring version when I want something that feels fresh and bright.
Holiday Sprinkle Swaps: Use seasonal sprinkles for different occasions—red and green for Christmas, pastels for Easter, orange and black for Halloween. The recipe stays exactly the same, but the cookies look totally different. I keep a stash of different sprinkle colors in my pantry just for this reason.
Serving & Storage Suggestions
These cookies are best served at room temperature, slightly warm if you can manage it. The texture is soft and chewy with just a hint of crispness at the edges—perfect with a cold glass of milk or a hot cup of coffee.
Serving Ideas: Arrange them on a cake stand for a birthday party, stack them in a mason jar for a cute gift, or just pile them on a plate for a Tuesday afternoon treat. They’re also amazing crumbled over vanilla ice cream for a quick ice cream sundae.
Storage: Keep these cookies in an airtight container at room temperature for up to 5 days. Place a slice of bread in the container to keep them extra soft—the cookies will absorb moisture from the bread. Replace the bread slice every other day. I’ve tested this trick extensively and it really works.
Freezer Instructions: These cookies freeze beautifully. You have two options: freeze the baked cookies in a freezer-safe bag for up to 3 months, or freeze the raw dough balls on a baking sheet, then transfer to a freezer bag. For frozen dough, bake directly from frozen, adding 2-3 minutes to the baking time. I always keep a batch of dough balls in my freezer for emergency cookie cravings.
Reheating: Pop a cookie in the microwave for 8-10 seconds to get that just-baked warmth. For a slightly crisper edge, warm them in a 300°F oven for 3-4 minutes. The flavors actually develop more after a day—these cookies taste even better on day two.
Nutritional Information & Benefits
Let’s be honest—these are celebration cookies, not health food. But here’s the breakdown so you know what you’re working with.
Per cookie (based on 24 cookies): Approximately 145 calories, 8g fat, 18g carbohydrates, 2g protein, 10g sugar. These values will vary based on exact ingredients and sprinkle brands used.
Health Highlights: The butter provides vitamin A and healthy fats that help your body absorb nutrients. The egg adds protein and choline, which supports brain health. And honestly? There’s a mental health benefit to eating something that makes you happy. These cookies bring joy, and that counts for something.
Dietary Considerations: This recipe contains gluten, dairy, and eggs. For a dairy-free version, use vegan butter as noted above. For a gluten-free version, use the flour blend I mentioned in the variations section. These cookies are nut-free as written (almond extract is flavoring, not a nut protein), but always check your specific ingredients if allergies are a concern.
I believe in balance—enjoying treats like these alongside nutritious meals is part of a healthy relationship with food. These cookies are for celebrating, not for everyday snacking. But when you do make them, eat them without guilt and enjoy every single bite.
Conclusion
These birthday cake cookies are more than just a recipe—they’re a way to bring a little celebration into your everyday life. After all those failed attempts chasing the memory of that closed bakery, I ended up with something even better: a cookie that’s quick enough for a weeknight, simple enough for beginner bakers, and delicious enough to impress anyone who tries them.
I love that this recipe doesn’t ask for anything fussy. No chilling overnight, no fancy decorating skills, no hard-to-find ingredients. Just butter, sugar, flour, and sprinkles—the stuff of real happiness. The first time I nailed the texture, I actually did a little dance in my kitchen. My dog looked at me like I was crazy, but I didn’t care.
Now I want to hear from you. Have you tried these cookies? Did you add your own twist? Maybe you swapped the sprinkles for chocolate chips or added a pinch of cinnamon? Drop a comment below and tell me how they turned out. And if you loved them as much as I do, share this recipe with someone who needs a little celebration in their life. Happy baking, friend—you’ve got this.
Frequently Asked Questions
Can I use margarine instead of butter?
I don’t recommend it. Margarine has a higher water content than butter, which changes the texture of these cookies significantly. They’ll spread more and end up flat and greasy. Stick with real butter for the best results.
Why did my cookies spread too much?
This usually happens for one of three reasons: your butter was too soft or melted, your dough wasn’t chilled, or your baking sheet was still hot from a previous batch. Make sure your butter is softened but not melted, and let your baking sheets cool completely between batches.
Can I use different types of sprinkles?
Yes, but stick with jimmies-style sprinkles (the long, skinny ones). Round nonpareils tend to bleed their color into the dough and create gray streaks. Sanding sugar sprinkles work great too but don’t show up as much visually. Avoid the gel-based sprinkles—they melt in the oven.
How do I know when the cookies are done baking?
Look for lightly golden edges with centers that still look slightly underdone and puffy. The centers will continue to set as they cool on the baking sheet. If the centers look fully set and firm when you pull them out of the oven, they’ll be overbaked and dry once cooled.
Can I make the dough ahead of time?
Absolutely. You can refrigerate the dough for up to 3 days in an airtight container. Let it sit at room temperature for about 10 minutes before scooping and baking, since cold dough doesn’t spread as much. You can also freeze the dough balls for up to 3 months and bake directly from frozen, adding 2-3 minutes to the baking time.
Pin This Recipe!

Easy Birthday Cake Cookies with Sprinkles
Soft, buttery cookies loaded with rainbow sprinkles that taste exactly like a birthday party in every single bite. Quick and easy to make with simple ingredients, these cookies stay soft for days and are perfect for any occasion.
- Prep Time: 15 minutes
- Cook Time: 10-12 minutes
- Total Time: 25 minutes
- Yield: 24 cookies 1x
- Category: Dessert
- Cuisine: American
Ingredients
- 1 cup (2 sticks) unsalted butter, softened
- 1 cup (200g) granulated sugar
- 1 large egg, room temperature
- 2 teaspoons vanilla extract
- ½ teaspoon almond extract
- 1¾ cups (220g) all-purpose flour
- ¼ cup (30g) cake flour
- ½ teaspoon baking powder
- ¼ teaspoon baking soda
- ½ teaspoon salt
- ½ cup (100g) rainbow sprinkles (jimmies-style)
Instructions
- Preheat your oven to 350°F (175°C). Line two baking sheets with parchment paper.
- Cream the butter and sugar together in a large bowl using a hand mixer on medium speed. Beat for 2-3 minutes until light and fluffy, scraping down the sides once.
- Add the egg, vanilla extract, and almond extract. Beat on medium speed until fully combined, about 30 seconds. Scrape the sides and bottom of the bowl.
- In a separate medium bowl, whisk together the all-purpose flour, cake flour, baking powder, baking soda, and salt for about 15 seconds.
- Add the dry ingredients to the wet ingredients in two additions, mixing on low speed after each until just combined. Do not overmix.
- Using a rubber spatula, gently fold the rainbow sprinkles into the dough until evenly distributed, about 5-7 folds.
- Using a cookie scoop (1½ tablespoon size), portion out rounded tablespoons of dough and place them 2 inches apart on the prepared baking sheets. Do not flatten.
- Place one sheet at a time on the middle rack of the preheated oven. Bake for 10-12 minutes, rotating the pan halfway through. Cookies are done when edges are lightly golden and centers look slightly underdone and puffy.
- Let the cookies rest on the baking sheet for 5 minutes, then transfer to a wire cooling rack to cool completely.
- Let baking sheets cool completely before scooping the next batch.
Notes
Use jimmies-style sprinkles (not nonpareils) to prevent color bleeding. For best results, use room temperature ingredients. If dough is sticky, chill for 15-20 minutes before scooping. Store in an airtight container at room temperature for up to 5 days; place a slice of bread in the container to keep cookies soft. Freeze baked cookies or raw dough balls for up to 3 months.
Nutrition
- Serving Size: 1 cookie
- Calories: 145
- Sugar: 10
- Sodium: 95
- Fat: 8
- Saturated Fat: 5
- Carbohydrates: 18
- Protein: 2
Keywords: birthday cake cookies, sprinkle cookies, easy cookie recipe, soft cookies, funfetti cookies


