This was supposed to be a fancy little appetizer for a Halloween party. I had this whole vision in my head—elegant little crostini with roasted pumpkin and some kind of drizzly balsamic situation. I was feeling ambitious, maybe a little too ambitious. The party was in three hours, I had a toddler wrapped around my leg like a tiny octopus, and I realized halfway through my grocery run that I had grabbed the wrong kind of bread. Not crostini bread. Not even a baguette. I had grabbed a bag of soft, sweet Hawaiian rolls by mistake. And honestly? I almost cried right there in the bread aisle. But I was too tired to go back, and the clock was ticking, so I stood there and just… pivoted. What came out of that moment of panic was nothing like the plan—and somehow, so much better.
Cozy Mummy Meatball Sliders were born out of a kitchen meltdown and a bag of the wrong bread. I got home, threw some frozen meatballs into the slow cooker with marinara, and started thinking about how to turn this disaster into something that still felt Halloween-y. The idea of wrapping the rolls in little “bandages” of pizza dough just hit me. It was silly. It was messy. My kitchen looked like a flour bomb went off. But when I pulled those golden, cheesy, gooey little mummies out of the oven, my kid actually gasped. And that, my friend, is the moment this recipe became a permanent part of our Halloween tradition. Maybe you’ve been there—standing in a grocery aisle, realizing your plan has completely fallen apart. Let me tell you, sometimes the happy accidents are the ones you end up making every single year.
Why You’ll Love This Recipe
These Cozy Mummy Meatball Sliders are the kind of recipe that makes you look like a Halloween hero without actually having to do much work. I’ve tested this one multiple times (and failed a few times too, honestly), so I can tell you with confidence—this version works. Every. Single. Time.
- Quick & Easy: From start to table in about 30 minutes. Perfect for that pre-trick-or-treating chaos or a last-minute party contribution.
- Simple Ingredients: Frozen meatballs, Hawaiian rolls, marinara sauce, mozzarella, and refrigerated pizza dough. No weird specialty items required.
- Perfect for Halloween: They look adorable wrapped up like little mummies, but they’re cozy and comforting—not scary or weird. Kids absolutely love them.
- Crowd-Pleaser: I’ve brought these to three different Halloween gatherings now, and they vanish every single time. Adults and kids alike go back for seconds.
- Unbelievably Delicious: The combination of soft, sweet rolls, savory meatballs, gooey cheese, and that slightly crisp pizza dough “bandage” is next-level comfort food.
What makes this recipe different from all the other Halloween sliders out there? It’s the texture. The pizza dough strips get golden and slightly crispy while the rolls underneath stay soft and buttery. That contrast is everything. Plus, using frozen meatballs means you skip the most tedious part of the process. This isn’t just another Halloween snack—it’s the one that makes you close your eyes after the first bite and forget about the chaos of the evening for a second. It’s comfort food disguised as a craft project, and honestly, that’s the best kind of Halloween treat.
What Ingredients You Will Need
This recipe uses simple, mostly pantry-friendly ingredients to deliver big flavor and that cozy, comforting vibe without any fuss. Most of these are things you probably already have on hand, especially if you keep your freezer and fridge stocked for busy weeks.
- Frozen fully cooked meatballs (24-30 small meatballs): I prefer the homestyle or Italian-style variety for best flavor. Brands like Rosina or Aidells work great. No need to thaw—just toss them in the sauce.
- 1 package (12-count) sweet Hawaiian rolls: These are non-negotiable for the perfect sweet-savory balance. Don’t substitute with regular dinner rolls—the sweetness makes the whole dish.
- 1 cup marinara sauce: Use your favorite jarred brand. I like Rao’s for its rich flavor, but any good-quality marinara works. You can also use homemade if you have it.
- 1 ½ cups shredded mozzarella cheese: Freshly shredded melts better than pre-shredded (which has anti-caking agents). But in a pinch, pre-shredded is fine.
- 1 can (13.8 oz) refrigerated pizza dough: Pillsbury is my go-to. You’ll use this to make the mummy “bandages.” Let it sit at room temperature for 10 minutes—it’s much easier to work with.
- 2 tablespoons unsalted butter, melted: For brushing over the top of the rolls before baking. It gives them that gorgeous golden color and rich flavor.
- ½ teaspoon garlic powder: Mixed into the melted butter for a subtle savory kick.
- ½ teaspoon dried parsley or Italian seasoning: For color and a little herbaceous note on top.
- Candy eyes (optional): Small edible candy eyes to stick on the mummies after baking. Totally optional, but they make the presentation absolutely adorable.
- Salt and black pepper to taste: For seasoning the meatball sauce if needed.
Substitution Notes: If you need a gluten-free option, use gluten-free pizza dough and gluten-free rolls (Udi’s makes a decent one). For a dairy-free version, use dairy-free mozzarella shreds and vegan butter. You can also swap the frozen meatballs for homemade ones if you have time—just make sure they’re fully cooked before assembling.
Equipment Needed
You don’t need any fancy gadgets for this recipe, which is part of why I love it so much. Here’s what you’ll need:
- 9×13-inch baking dish: A standard casserole dish works perfectly. Glass or ceramic is ideal for even baking.
- Small saucepan or microwave-safe bowl: For heating the meatballs and sauce together. You can also do this in a skillet if you prefer.
- Rolling pin: For rolling out the pizza dough thinly. If you don’t have one, a wine bottle works in a pinch—I’ve done it.
- Pizza cutter or sharp knife: For cutting the dough into thin strips. A pizza cutter makes this step much faster and cleaner.
- Pastry brush: For brushing the melted butter over the rolls. A silicone brush is easiest to clean.
- Cutting board: A flat surface for rolling and cutting the dough.
- Measuring cups and spoons: For accurate ingredient portions.
I’ve made these sliders using a cheap baking dish from the grocery store and a butter knife to cut the dough, and they still turned out fantastic. Don’t stress about having the perfect tools—this recipe is forgiving. If you don’t have a pastry brush, just drizzle the melted butter over the rolls with a spoon. It’ll still be delicious.
Preparation Method
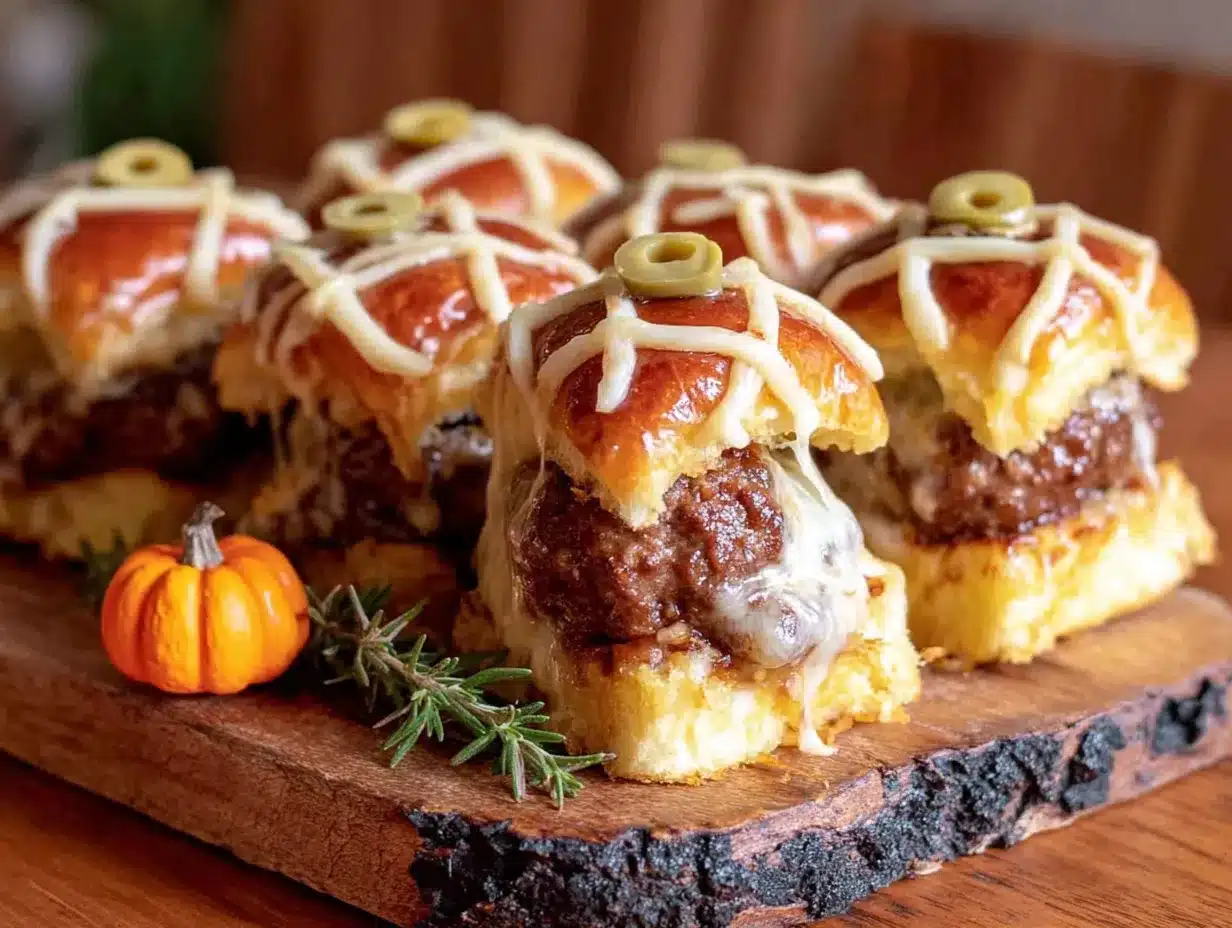
Alright, let’s get into the step-by-step. I’ll walk you through exactly how I make these, including all the little tricks I’ve learned from making them about a dozen times now.
- Preheat your oven to 375°F (190°C). Get this going first so it’s ready when you are. While the oven heats, lightly grease your 9×13-inch baking dish with non-stick spray or a little butter.
- Prepare the meatballs. In a small saucepan over medium heat, combine the frozen meatballs and marinara sauce. Cover and cook for 8-10 minutes, stirring occasionally, until the meatballs are heated through and the sauce is bubbly. If you’re short on time, you can do this in the microwave—just heat in a microwave-safe bowl for 3-4 minutes, stirring halfway through. The meatballs don’t need to be fully cooked through since they’ll finish in the oven, but they should be warm.
- Prepare the rolls. Without separating the individual rolls, carefully slice the entire slab of Hawaiian rolls in half horizontally. You want one big top half and one big bottom half. Place the bottom half in your greased baking dish. It’s okay if they’re a little squished together—they’ll pull apart easily after baking.
- Assemble the base layer. Sprinkle about half of the shredded mozzarella cheese evenly over the bottom half of the rolls. Then, using a slotted spoon, arrange the warm meatballs evenly over the cheese. I usually do about 2 meatballs per slider, so 24 total for a 12-count package. Drizzle a little of the remaining marinara sauce over the meatballs—about 2-3 tablespoons—but don’t drown them. Reserve the rest of the sauce for dipping later.
- Add the top layer of cheese. Sprinkle the remaining mozzarella over the meatballs. This helps glue everything together and makes it extra gooey. Place the top half of the rolls over the cheese layer, pressing down gently.
- Make the mummy bandages. This is the fun part. Unroll the refrigerated pizza dough onto a lightly floured cutting board. Using a rolling pin, roll it out to about a 10×12-inch rectangle—you want it thin enough to cut easily but thick enough to hold its shape. Using a pizza cutter or sharp knife, cut the dough into thin strips, about ½-inch wide and 6-8 inches long. You’ll need about 2-3 strips per slider, so aim for 24-36 strips total.
- Wrap the mummies. Gently lift each strip and wrap it around each individual roll, crisscrossing the strips like you’re wrapping a bandage. Leave a small gap near the top of each roll where the “face” will be—this is where you’ll add the candy eyes later if you’re using them. Don’t wrap too tightly or the dough will tear. Just lay the strips over the rolls in a crisscross pattern. It doesn’t have to be perfect—messy mummies are actually cuter.
- Brush with butter. In a small bowl, mix the melted butter with the garlic powder. Using a pastry brush, gently brush the butter mixture over the pizza dough strips and the exposed parts of the rolls. Sprinkle the dried parsley or Italian seasoning over the top for color.
- Bake. Place the baking dish in the preheated oven and bake for 15-18 minutes, until the pizza dough strips are golden brown and the cheese is melted and bubbly. Keep an eye on it after 12 minutes—ovens vary, and you don’t want the dough to burn. The rolls should be lightly toasted on top.
- Add the eyes (optional). Let the sliders cool in the pan for about 5 minutes. If you’re using candy eyes, press them gently into the exposed top of each slider (the gap you left in the bandages). The residual heat will help them stick. If you don’t have candy eyes, you can use small dots of black olive or just leave them plain—they still look like cute little mummies.
- Serve warm. Use a spatula to lift the sliders out of the dish. Serve with the reserved marinara sauce for dipping. Pull them apart gently—they’re held together by all that glorious cheese.
Pro tip from my own mistakes: The first time I made these, I wrapped the dough strips too tightly and they tore during baking. Give them a little breathing room. Also, don’t skip the butter wash—it’s what gives the mummies that beautiful golden color. Without it, they look pale and sad, like ghosts that forgot to show up.
Cooking Tips & Techniques
I’ve made enough mistakes with these sliders to fill a small cookbook of failures, so let me save you some trouble. Here are the things I wish I’d known from the start.
Don’t overwork the pizza dough. When you’re rolling it out, handle it gently. If you stretch it too aggressively, it will shrink back while baking and pull away from the rolls. Roll it to an even thickness and let it rest for a minute before cutting strips.
Use room temperature dough. Cold pizza dough is stiff and cracks when you try to cut it. Let the can sit on the counter for 10-15 minutes before opening. If you forget (I do this all the time), you can microwave the unopened can for 10 seconds on low power—just don’t overdo it or it’ll start rising.
Keep the meatballs warm while you work. If the meatballs cool down too much, they won’t help melt the cheese in the oven. I keep them in the saucepan on the lowest heat setting while I’m wrapping the mummies. Just stir occasionally so they don’t stick.
Multitask strategically. While the meatballs are heating, you can prep the rolls and cut the dough strips. This saves about 10 minutes total. I’ve learned to do all the prep work before I start assembling—it makes the process so much smoother and less stressful.
Check for doneness early. Every oven runs a little differently. My old apartment oven would burn these at 18 minutes, but my current one needs the full time. Start checking at 12 minutes. The dough should be golden brown and the cheese visibly bubbling around the edges of the rolls.
Let them rest before serving. I know it’s hard to wait, but letting the sliders sit for 5 minutes after baking allows the cheese to set slightly. If you cut into them immediately, everything slides apart and you lose that beautiful mummy shape. Trust me—I learned this the hard way at a party once.
Variations & Adaptations
One of the best things about this recipe is how flexible it is. I’ve tried several variations over the years, and here are my favorites:
Spicy Mummy Sliders: Add ½ teaspoon of red pepper flakes to the marinara sauce while heating the meatballs. You can also use spicy Italian meatballs instead of homestyle. The heat pairs beautifully with the sweet rolls.
Vegetarian Mummy Sliders: Swap the meatballs for plant-based meatballs (like Impossible or Beyond brands) or use large roasted mushroom caps. Portobello mushrooms work great—just sauté them with garlic and herbs before assembling. My vegetarian friend requested these, and honestly, I liked them just as much as the original.
Cheesy Garlic Mummies: Add ¼ cup of grated Parmesan cheese to the melted butter mixture before brushing. It creates a crispy, cheesy crust on the dough strips that’s absolutely addictive. I tried this on a whim one night when I had leftover Parmesan, and it’s now my default version.
Breakfast Mummies: This is a fun twist for a Halloween morning. Replace the meatballs with cooked breakfast sausage links and use a mild cheddar or pepper jack cheese. Serve with maple syrup for dipping instead of marinara. My kids request these every Halloween morning now.
Gluten-Free Version: Use gluten-free pizza dough (many grocery stores carry it in the refrigerated section) and gluten-free Hawaiian rolls. The texture will be slightly different—gluten-free dough is a bit more fragile—but it still works. Just handle the strips gently and don’t over-bake.
Air Fryer Adaptation: If you want to make a smaller batch, these work beautifully in an air fryer. Assemble the sliders in a small air fryer-safe dish or on a piece of parchment paper. Cook at 350°F (175°C) for 8-10 minutes, checking at the 6-minute mark. The dough gets extra crispy this way.
Serving & Storage Suggestions
These sliders are best served warm, right out of the oven, when the cheese is still stretchy and the dough is perfectly crisp. I like to arrange them on a large platter with the reserved marinara sauce in a small bowl in the center for dipping. If you’re serving them at a Halloween party, you can scatter a few candy pumpkins or fake spider webs around the platter for a festive touch—my kids love that.
They pair beautifully with a simple side salad or some roasted vegetables if you want to round out the meal. For drinks, a crisp apple cider (hot or cold) is perfect for fall, or a glass of red wine like a light Zinfandel if it’s an adults-only gathering.
Storage: If you have leftovers (unlikely, but possible), let the sliders cool completely, then store them in an airtight container in the refrigerator for up to 3 days. The pizza dough will soften over time, so they won’t be as crispy, but they’ll still taste great.
Reheating: The best way to reheat these is in the oven or air fryer. Pop them in a 350°F (175°C) oven for 5-7 minutes, or in the air fryer at 325°F (160°C) for 3-4 minutes. The microwave works in a pinch (30-45 seconds), but the dough will be soft rather than crispy. I personally prefer the oven method—it brings back some of that original texture.
Freezing: You can freeze these before or after baking. To freeze unbaked, assemble the sliders completely (including the dough strips and butter wash) but don’t bake. Wrap the dish tightly in plastic wrap and then foil, and freeze for up to 2 months. To bake from frozen, add about 10 minutes to the baking time. To freeze after baking, let them cool completely, wrap individually in plastic wrap, and store in a freezer bag for up to 1 month. Reheat in the oven directly from frozen.
One thing I’ve noticed—these sliders actually get better after they’ve sat for about 10 minutes. The flavors meld together, and the cheese sets just enough to make them easier to handle. So if you’re making them for a party, don’t stress about serving them piping hot. A little rest time does them good.
Nutritional Information & Benefits
While these sliders are definitely a treat, they’re not completely devoid of nutritional value. Here’s a rough estimate per slider (based on using 24 small meatballs and dividing the recipe into 12 servings):
Estimated per slider: Calories: 320 | Fat: 16g | Carbohydrates: 28g | Protein: 18g | Fiber: 2g | Sugar: 8g | Sodium: 680mg
Key Ingredient Benefits:
- Meatballs: Provide a solid source of protein and iron, which helps keep you full and energized. If you use lean beef or turkey meatballs, you’ll reduce the saturated fat content.
- Marinara sauce: Contains lycopene, an antioxidant linked to heart health. Look for a brand with no added sugar for the most benefit.
- Mozzarella cheese: Offers calcium and protein. Using part-skim mozzarella reduces the fat without sacrificing much flavor.
- Garlic: Has anti-inflammatory properties and adds flavor without extra salt.
Dietary Considerations: This recipe is not gluten-free or dairy-free in its standard form, but substitutions are easy to make (see the Variations section). It’s also nut-free and egg-free (the pizza dough and rolls typically don’t contain eggs, but always check labels). For a lower-carb option, you can skip the rolls and serve the meatballs and sauce over zucchini noodles or spaghetti squash—though you’ll lose the mummy effect.
From my own perspective, I don’t make these every week—they’re a special occasion thing. But when I do, I feel good knowing that my kids are getting protein and calcium, even if it’s wrapped in a buttery roll. Balance, right?
Conclusion
These Cozy Mummy Meatball Sliders have become a non-negotiable part of our Halloween tradition, and I honestly can’t imagine the season without them anymore. They started as a mistake in a grocery store aisle, but they’ve turned into something I look forward to making every single year. There’s something about watching those little mummies come out of the oven, all golden and gooey, that just makes me happy. And seeing my kids’ faces light up when they see the candy eyes? That’s the good stuff.
I hope you give these a try, whether you’re hosting a Halloween party, looking for a fun dinner before trick-or-treating, or just want to make a cozy, silly meal on a chilly October evening. Don’t be afraid to make them your own—swap the meatballs, change the cheese, add extra spice. The recipe is just a starting point. The magic is in making it yours.
If you make these, I’d love to hear about it. Drop a comment below and tell me how they turned out, or share your own twist on the recipe. Did your kids help wrap the mummies? Did you add a secret ingredient? I read every comment, and your stories honestly make my day. Happy Halloween, and happy cooking!
Frequently Asked Questions
Can I use homemade meatballs instead of frozen?
Absolutely. If you have time, homemade meatballs add a personal touch. Just make sure they’re fully cooked before assembling the sliders, since the baking time is short. I’ve used both, and honestly, frozen works great for busy nights.
How do I keep the pizza dough from sticking to the rolls?
Make sure your rolls aren’t too wet before adding the dough strips. If you brushed them with butter beforehand, let it soak in for a minute. Also, don’t press the dough strips down too firmly—just lay them gently over the top.
Can I make these ahead of time?
Yes! You can assemble the sliders completely (including the dough strips) up to 24 hours in advance. Cover tightly with plastic wrap and refrigerate. Add about 5 minutes to the baking time if baking from cold. I’ve done this for parties, and it works perfectly.
What if I can’t find candy eyes?
No problem at all. You can use small dots of black olive, capers, or even sesame seeds for “eyes.” Or just leave them plain—the mummies still look adorable without eyes. My kids actually prefer them without because they think the eyes are “creepy.”
How do I prevent the sliders from getting soggy?
The key is not to oversauce the meatballs. Use just enough marinara to coat them, and drain any excess liquid before adding them to the rolls. Also, don’t skip the 5-minute rest after baking—it lets steam escape and keeps the rolls from getting mushy.
PrintCozy Mummy Meatball Sliders: Best Halloween Treat
These adorable mummy meatball sliders are made with sweet Hawaiian rolls, frozen meatballs, marinara, mozzarella, and pizza dough bandages. They’re quick, easy, and perfect for Halloween parties or a fun family dinner.
- Prep Time: 15 minutes
- Cook Time: 18 minutes
- Total Time: 33 minutes
- Yield: 12 servings 1x
- Category: Appetizer
- Cuisine: American
Ingredients
- 24–30 frozen fully cooked meatballs (homestyle or Italian-style)
- 1 package (12-count) sweet Hawaiian rolls
- 1 cup marinara sauce
- 1 ½ cups shredded mozzarella cheese
- 1 can (13.8 oz) refrigerated pizza dough
- 2 tablespoons unsalted butter, melted
- ½ teaspoon garlic powder
- ½ teaspoon dried parsley or Italian seasoning
- Candy eyes (optional)
- Salt and black pepper to taste
Instructions
- Preheat oven to 375°F (190°C). Lightly grease a 9×13-inch baking dish.
- In a small saucepan over medium heat, combine frozen meatballs and marinara sauce. Cover and cook for 8-10 minutes, stirring occasionally, until heated through and bubbly. Alternatively, microwave in a bowl for 3-4 minutes, stirring halfway.
- Without separating the rolls, slice the entire slab of Hawaiian rolls in half horizontally. Place the bottom half in the prepared baking dish.
- Sprinkle half of the shredded mozzarella over the bottom half of the rolls. Using a slotted spoon, arrange the warm meatballs evenly over the cheese (about 2 per slider). Drizzle 2-3 tablespoons of the remaining marinara over the meatballs. Reserve the rest for dipping.
- Sprinkle the remaining mozzarella over the meatballs. Place the top half of the rolls over the cheese, pressing down gently.
- Unroll the pizza dough onto a lightly floured cutting board. Roll out to a 10×12-inch rectangle. Cut into thin strips, about ½-inch wide and 6-8 inches long (24-36 strips total).
- Wrap 2-3 strips around each individual roll in a crisscross pattern, leaving a small gap near the top for the ‘face.’ Do not wrap too tightly.
- In a small bowl, mix melted butter with garlic powder. Brush the butter mixture over the dough strips and exposed rolls. Sprinkle with dried parsley or Italian seasoning.
- Bake for 15-18 minutes, until the dough strips are golden brown and the cheese is melted and bubbly. Check at 12 minutes.
- Let cool in the pan for 5 minutes. If using candy eyes, press them gently into the exposed top of each slider.
- Serve warm with reserved marinara sauce for dipping.
Notes
Don’t overwork the pizza dough; let it rest at room temperature for 10-15 minutes before cutting. Keep meatballs warm while assembling. Let sliders rest 5 minutes after baking to set the cheese. For gluten-free, use gluten-free pizza dough and rolls. For dairy-free, use dairy-free mozzarella and vegan butter.
Nutrition
- Serving Size: 1 slider
- Calories: 320
- Sugar: 8
- Sodium: 680
- Fat: 16
- Saturated Fat: 6
- Carbohydrates: 28
- Fiber: 2
- Protein: 18
Keywords: Halloween, sliders, meatball, mummy, appetizer, party food, kid-friendly, easy


