My niece Lily asked why I couldn’t just use black cocoa powder instead of food coloring for a Halloween cupcake. I started to explain why that wouldn’t work—then stopped. Honestly, I had never tried it. I was about to launch into my usual spiel about how you need gel coloring to get that true black velvet color, but something made me pause. Maybe it was the way she was looking at me, all confident and sure, like she had just cracked some ancient baking code.
So I said, “Alright, let’s try it.” I figured we’d end up with grayish cupcakes that tasted fine but looked sad. I mean, I’ve been baking for years and I know my way around a cocoa powder. But Lily, she’s ten and she watches a lot of baking shows. She was convinced black cocoa was the answer. Tuesday afternoon, we pulled out the mixer and got to work. I let her measure the black cocoa herself, and I might have cringed a little when she dumped it in. The batter looked promising—dark, almost like a storm cloud—but I still had my doubts.
When those cupcakes came out of the oven, I have to admit, I was wrong. They were the deepest, richest black I had ever seen in a homemade cupcake. No artificial coloring, no staining your fingers, just pure, dark chocolate goodness. Lily looked at me with this little smirk, and I just laughed. You know that feeling when someone half your age teaches you something? That was my moment. And honestly, these Black Velvet Halloween Cupcakes with Purple Frosting have become my go-to for every Halloween party since. They are the ones that disappear first, every single time.
Why You’ll Love This Recipe
Let me tell you why these cupcakes are about to become your secret weapon for Halloween hosting. I have tested this recipe at three different parties now, and each time, people ask for the recipe before they even finish the first bite. That is not an exaggeration—it happened at my neighbor’s costume party last weekend.
- No Artificial Dyes: The black color comes from black cocoa powder, not a bottle of food coloring. Your fingers, countertops, and kids will thank you.
- Simple Ingredients: You probably have most of these in your pantry already. No hunting down specialty stores the day before your party.
- Perfect for Halloween Hosting: These cupcakes are designed to impress a crowd. They look dramatic on a dessert table and hold up well if you bake them a day ahead.
- Crowd-Pleaser: Kids love the color, adults love the deep chocolate flavor. I have yet to meet someone who takes one bite and doesn’t grab a second.
- Unbelievably Moist: The buttermilk and oil combo keeps these cupcakes soft for days. No dry, crumbly disasters here.
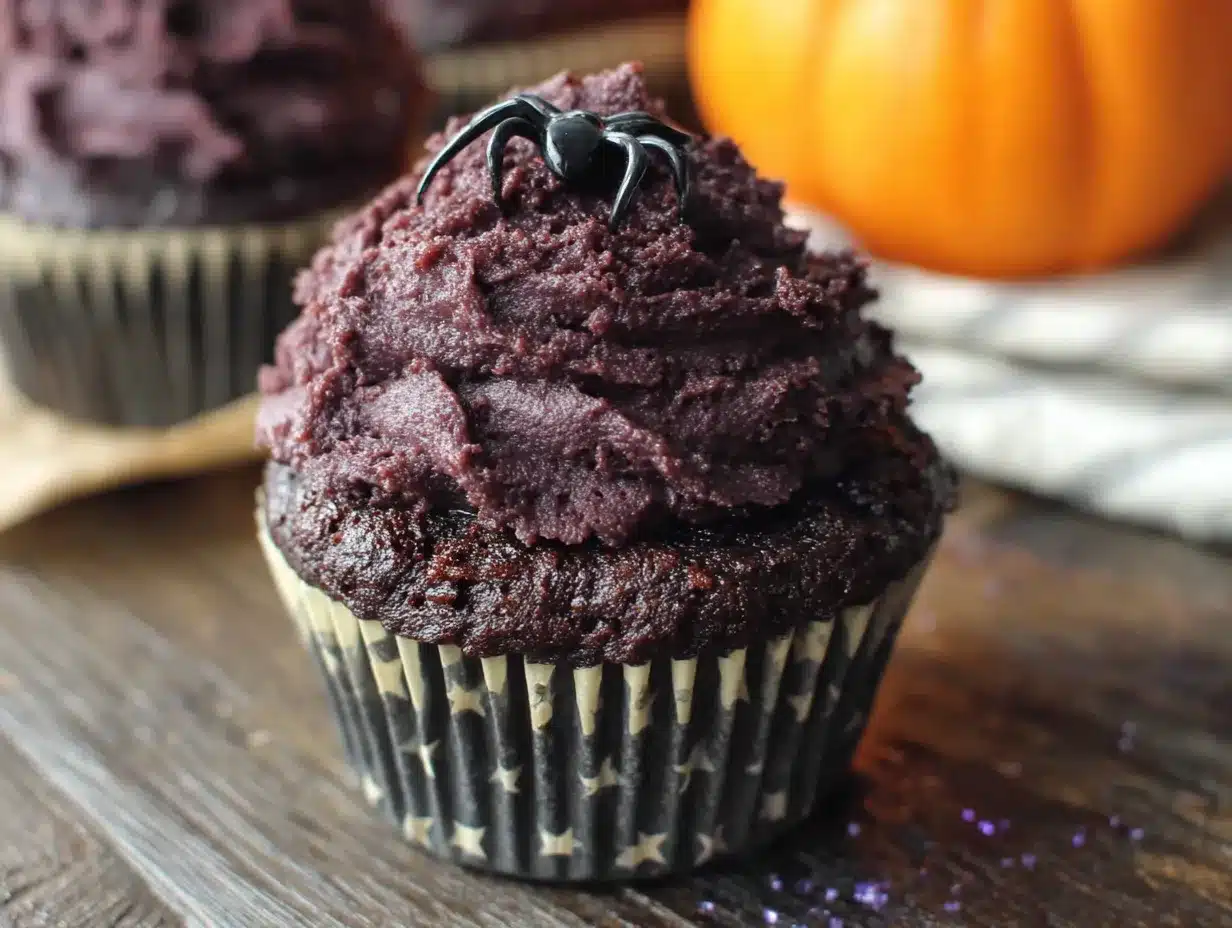
What makes this recipe different from every other black velvet cupcake out there? It is the purple frosting. I know, purple frosting sounds simple, but the trick is using a combination of blackberry extract and a touch of violet gel coloring. It gives you this hauntingly beautiful lavender-purple that looks like it belongs in a witch’s kitchen. Plus, the blackberry flavor pairs perfectly with the dark chocolate. It is not just a pretty face—it tastes incredible.
These are the cupcakes you bring when you want people to think you spent hours in the kitchen, but really, they come together in under an hour. Perfect for that Halloween potluck where everyone is trying to outdo each other. Trust me, these will steal the table.
What Ingredients You Will Need
This recipe uses simple, wholesome ingredients to deliver that dramatic black velvet color and rich flavor without any fuss. Most of these are pantry staples, which makes last-minute Halloween baking totally doable.
For the Cupcakes
- 1 ½ cups all-purpose flour (spooned and leveled—don’t scoop straight from the bag)
- ¾ cup black cocoa powder (I prefer the brand from King Arthur Flour for the deepest color; regular Dutch-process cocoa will work but gives a darker gray instead of true black)
- 1 teaspoon baking soda
- ½ teaspoon salt
- 1 cup granulated sugar
- ½ cup packed light brown sugar (adds moisture and a tiny bit of molasses flavor)
- ½ cup vegetable oil (or any neutral oil like canola or grapeseed)
- 2 large eggs, room temperature
- 1 teaspoon vanilla extract
- 1 cup buttermilk, room temperature (adds tenderness and helps activate the baking soda)
- ½ cup hot coffee (yes, coffee! It deepens the chocolate flavor without making it taste like coffee)
For the Purple Frosting
- 1 cup unsalted butter, softened (I use Kerrygold for the creamy texture)
- 3 ½ cups powdered sugar, sifted
- 2 tablespoons heavy cream (or whole milk if that’s what you have)
- 1 teaspoon blackberry extract (this is the secret! You can find it near the vanilla extract in most grocery stores)
- Violet gel food coloring (a tiny drop goes a long way; start with less than you think you need)
- Pinch of salt
For Decoration (Optional but Fun)
- Purple and black sprinkles
- Edible glitter (the fine kind, not the chunky stuff)
- Small candy eyeballs (for a spooky touch)
If you are dairy-free, you can substitute the buttermilk with 1 cup of almond milk mixed with 1 tablespoon of lemon juice. Let it sit for 5 minutes before using. For the frosting, use vegan butter and coconut cream instead of heavy cream. The texture will be slightly softer, but still delicious.
Equipment Needed
You do not need a fancy bakery setup for these cupcakes. Here is what you will actually use:
- Standard 12-cup muffin tin (I have a non-stick one from Wilton that has never let me down)
- Paper cupcake liners (go for black or purple ones to match the theme; white ones work too but show less contrast)
- Two large mixing bowls (one for dry ingredients, one for wet)
- Whisk (for combining dry ingredients evenly)
- Hand mixer or stand mixer (a hand mixer is totally fine; I used one for years before upgrading)
- Rubber spatula (for scraping the bowl and folding in the coffee)
- Cooling rack (essential for even cooling; a wire rack prevents soggy bottoms)
- Piping bag with a star tip (I use a Wilton 1M tip for that classic swirl; a zip-top bag with the corner snipped off works in a pinch)
If you do not have a piping bag, you can simply spread the frosting with an offset spatula. The cupcakes will still look beautiful, just more rustic. I have done both, and honestly, the piped version gets more “oohs” at parties.
Preparation Method
Preheat your oven to 350°F (175°C). Line your muffin tin with 12 paper liners. This recipe makes exactly 12 generous cupcakes—perfect for a party without leftovers that tempt you all week.
- Mix the dry ingredients: In a large bowl, whisk together the flour, black cocoa powder, baking soda, and salt. Make sure there are no lumps of cocoa. Black cocoa tends to be clumpy, so take an extra 30 seconds to break them up with your whisk.
- Combine the wet ingredients: In a separate bowl, whisk together the granulated sugar, brown sugar, vegetable oil, eggs, vanilla extract, and buttermilk. Whisk until smooth and well combined. The mixture will look thin and almost like a milkshake—that is normal.
- Combine wet and dry: Pour the wet ingredients into the dry ingredients. Stir gently with a rubber spatula or whisk until just combined. Do not overmix! A few small lumps are fine. Overmixing will make the cupcakes tough.
- Add the hot coffee: Slowly pour in the hot coffee while stirring gently. The batter will become very thin—almost like a thin pancake batter. Do not panic. This is exactly what you want. The hot coffee helps bloom the cocoa powder and creates that ultra-moist texture.
- Fill the liners: Divide the batter evenly among the 12 liners. Fill each about ⅔ full. I use a ¼-cup measuring cup for this; it makes it mess-free and ensures even cupcakes.
- Bake: Place the tin in the preheated oven and bake for 18-22 minutes. The cupcakes are done when a toothpick inserted into the center comes out with a few moist crumbs (not wet batter). The tops will look slightly domed and spring back when touched lightly.
- Cool completely: Let the cupcakes cool in the tin for 5 minutes, then transfer them to a wire rack to cool completely. Do not frost them while they are warm, or the frosting will melt into a puddle. Trust me, I learned this the hard way before a party.
- Make the frosting: While the cupcakes cool, beat the softened butter in a large bowl with a hand mixer until creamy and smooth, about 2 minutes. Gradually add the sifted powdered sugar, one cup at a time, beating on low speed. Add the heavy cream, blackberry extract, and pinch of salt. Beat on medium-high for 3-4 minutes until light and fluffy. Add a tiny drop of violet gel coloring and beat until evenly distributed. Add more coloring if needed, but remember—the color deepens as it sits.
- Frost the cupcakes: Once the cupcakes are completely cool, transfer the frosting to a piping bag fitted with a star tip. Pipe a generous swirl onto each cupcake. Start from the outside edge and work your way inward, lifting up at the end for a pointed peak. Add sprinkles or candy eyeballs immediately before the frosting sets.
One thing I always tell people: do not skip the cooling step. I once rushed and frosted slightly warm cupcakes right before a Halloween party. The frosting slid right off and created this sad purple puddle around each cupcake. They still tasted good, but they looked like a disaster. Give them the full hour to cool.
Cooking Tips & Techniques
After making these cupcakes for three different Halloween gatherings, I have picked up a few tricks that make a real difference. Let me share what I have learned the hard way.
Room temperature ingredients matter. I know, everyone says this, but it is especially true here. Cold buttermilk and eggs will make the batter seize up and create dense cupcakes. Set them out on the counter 30 minutes before you start. If you forget (I do all the time), place the eggs in a bowl of warm water for 5 minutes and microwave the buttermilk for 15 seconds.
Do not overmix after adding the coffee. The batter will look thin and you will be tempted to keep stirring to make it “right.” Stop. Stir just until the coffee is incorporated. Overmixing develops gluten, and that means tough cupcakes. You want them tender and soft.
The toothpick test is your friend. Ovens vary wildly. My friend’s oven bakes these in exactly 18 minutes, while mine takes 21. Start checking at 18 minutes. If the toothpick comes out clean, they are done. If it has wet batter, give them 2 more minutes. If it has a few moist crumbs, pull them out immediately—they will continue cooking in the hot pan.
Black cocoa is messy. It is super fine and gets everywhere. I wear an apron and wipe down my counter immediately after measuring. It also stains, so be careful with light-colored towels and clothes. That is why I always use dark liners—they hide any cocoa dust that sneaks onto the sides.
Frosting consistency is key. If your frosting feels too stiff, add another tablespoon of heavy cream. If it is too soft (like if your kitchen is warm), pop the bowl in the fridge for 10 minutes before piping. The frosting should hold its shape when you lift the beaters.
One mistake I made the first time: I used regular cocoa powder instead of black cocoa. The cupcakes came out a dark gray, almost like the color of a rainy sky. They were still delicious, but they did not have that dramatic Halloween look. If you want true black, you need black cocoa powder. It is worth the extra dollar or two.
Variations & Adaptations
These cupcakes are surprisingly flexible. Here are some ways I have adapted them for different occasions and dietary needs.
Gluten-Free Version: Substitute the all-purpose flour with a 1:1 gluten-free baking flour blend (I like Bob’s Red Mill). The texture will be slightly more tender, but they hold together well. Add an extra tablespoon of buttermilk to compensate for the drier gluten-free flour.
Dairy-Free Version: Use almond milk mixed with lemon juice for the buttermilk, and substitute the butter in the frosting with vegan butter. The frosting will be slightly softer, so pipe it right after making it and refrigerate the finished cupcakes. They taste just as good, I promise.
Different Frosting Colors: Instead of purple, try orange frosting for a different Halloween vibe. Use orange gel coloring and a drop of orange extract. Or go for a classic black and white look with vanilla frosting and black sprinkles. I did orange last year and it looked amazing on a dessert table with pumpkins.
Spiderweb Decoration: For a fun twist, pipe the purple frosting in a swirl, then pipe a small circle of black frosting on top. Drag a toothpick from the center outward to create a spiderweb pattern. It takes an extra 30 seconds per cupcake and looks incredibly impressive.
Mini Cupcake Version: Use a mini muffin tin and bake for 10-12 minutes instead of 18-22. This makes about 36 mini cupcakes, perfect for parties where people want to sample multiple desserts. I did this for a potluck and they were gone in 10 minutes.
I have also tried adding a teaspoon of instant espresso powder to the batter for an even deeper chocolate flavor. It works beautifully and does not make the cupcakes taste like coffee. My husband, who hates coffee, could not tell the difference.
Serving & Storage Suggestions
These cupcakes are best served at room temperature. The frosting softens slightly, and the cake becomes incredibly tender. If you have made them ahead, take them out of the fridge about 30 minutes before serving.
For a Halloween party, arrange them on a black cake stand or a wooden board. Add some fake spiderwebs, plastic spiders, or small pumpkins around the base for a spooky display. I put mine on a black platter with orange and purple sprinkles scattered around, and they looked like they belonged in a haunted bakery.
These pair beautifully with a warm apple cider or a pumpkin spice latte. If you are serving adults, a glass of dark red wine or a stout beer complements the chocolate perfectly. For kids, a glass of cold milk is the classic choice.
Storage: Store unfrosted cupcakes in an airtight container at room temperature for up to 3 days. Frosted cupcakes should be stored in the refrigerator in a single layer (do not stack them or the frosting will smudge). They will keep for up to 5 days, but honestly, they never last that long at my house.
Freezing: You can freeze the unfrosted cupcakes for up to 3 months. Wrap each one tightly in plastic wrap, then place them in a freezer bag. Thaw at room temperature for about an hour before frosting. The frosting itself does not freeze well, so always make it fresh.
The flavors actually deepen after a day. The black cocoa mellows out and the buttermilk tang becomes more pronounced. If you can, bake them the day before your party. They will taste even better, and you will have one less thing to do on the day of.
Nutritional Information & Benefits
Here is the approximate nutritional breakdown for one frosted cupcake (based on 12 servings):
| Nutrient | Amount |
|---|---|
| Calories | 385 |
| Total Fat | 18g |
| Saturated Fat | 9g |
| Cholesterol | 55mg |
| Sodium | 220mg |
| Total Carbohydrates | 54g |
| Dietary Fiber | 2g |
| Sugars | 40g |
| Protein | 4g |
Black cocoa powder is actually rich in antioxidants called flavonoids, which are known to support heart health. It also contains less fat than regular cocoa powder, which is a nice bonus. The buttermilk adds calcium and probiotics, though the amount per serving is small. Let us be honest—these are cupcakes, not health food. But knowing there is a little bit of goodness in every bite makes me feel slightly less guilty about having two.
These cupcakes contain gluten, dairy, and eggs. For those with allergies, please see the variations section for suitable substitutions. The black cocoa powder is generally safe for those with nut allergies, but always check the label on your specific brand.
Conclusion
These Black Velvet Halloween Cupcakes with Purple Frosting have become my signature party dessert, and I think they will become yours too. They are dramatic enough to impress your guests, simple enough to make without stress, and delicious enough that people will ask for the recipe before the party is over.
I love that this recipe came from a moment of being wrong. It reminds me that sometimes the best ideas come from unexpected places—like a ten-year-old who watches too many baking shows. Every time I make these cupcakes, I think of Lily standing in my kitchen, so sure of herself, and I smile.
So go ahead, make these for your next Halloween gathering. Play around with the frosting color, add some creepy decorations, and watch them disappear. And if someone asks you how you got that perfect black color without food coloring, just smile and say, “It is a secret family trick.”
I would love to hear how yours turn out! Drop a comment below telling me what decorations you used, or tag me in your photos on social media. Did you try a different frosting flavor? Did your kids help you bake them? Share your stories—I read every single one. Happy Halloween baking, friends!
Frequently Asked Questions
Can I use regular cocoa powder instead of black cocoa?
You can, but your cupcakes will be dark gray instead of black. Regular cocoa powder lacks the deep, almost black color of black cocoa. If you want that dramatic Halloween look, I highly recommend finding black cocoa powder. It is available at most baking supply stores or online.
How far in advance can I make these cupcakes?
You can bake the cupcakes up to 3 days ahead and store them unfrosted in an airtight container at room temperature. Frost them the day you plan to serve them for the best presentation. The frosting is best made fresh, but you can make it a day ahead and keep it refrigerated—just let it come to room temperature and re-whip before piping.
Can I use a different extract for the frosting?
Absolutely! Raspberry extract works beautifully and gives a slightly different purple hue. Vanilla extract will work too, but the frosting will be more of a pastel purple rather than the deep violet. Mint extract is also fun for a Halloween twist, though it pairs less traditionally with chocolate.
Why did my cupcakes turn out dry?
Dry cupcakes usually mean they were overbaked or overmixed. Check your oven temperature with an oven thermometer—many run hot. Also, make sure you are measuring your flour correctly by spooning it into the measuring cup and leveling it off. Scooping directly from the bag can pack in too much flour, leading to dry results.
Can I make these into a cake instead of cupcakes?
Yes! Pour the batter into two greased 8-inch round cake pans and bake at 350°F for 25-30 minutes. The cooking time will vary, so start checking at 25 minutes. You will need to double the frosting recipe to have enough for a layered cake. The presentation is stunning for a Halloween birthday party.
PrintBlack Velvet Halloween Cupcakes: Easy Purple Frosting
These Black Velvet Halloween Cupcakes use black cocoa powder for a deep, natural black color without artificial dyes. Topped with a hauntingly beautiful purple frosting made with blackberry extract, they are moist, rich, and perfect for Halloween parties.
- Prep Time: 15 minutes
- Cook Time: 20 minutes
- Total Time: 35 minutes
- Yield: 12 servings 1x
- Category: Dessert
- Cuisine: American
Ingredients
- 1 ½ cups all-purpose flour (spooned and leveled)
- ¾ cup black cocoa powder
- 1 teaspoon baking soda
- ½ teaspoon salt
- 1 cup granulated sugar
- ½ cup packed light brown sugar
- ½ cup vegetable oil
- 2 large eggs, room temperature
- 1 teaspoon vanilla extract
- 1 cup buttermilk, room temperature
- ½ cup hot coffee
- 1 cup unsalted butter, softened
- 3 ½ cups powdered sugar, sifted
- 2 tablespoons heavy cream
- 1 teaspoon blackberry extract
- Violet gel food coloring
- Pinch of salt
- Purple and black sprinkles (optional)
- Edible glitter (optional)
- Small candy eyeballs (optional)
Instructions
- Preheat oven to 350°F (175°C). Line a 12-cup muffin tin with paper liners.
- In a large bowl, whisk together flour, black cocoa powder, baking soda, and salt until no lumps remain.
- In a separate bowl, whisk together granulated sugar, brown sugar, vegetable oil, eggs, vanilla extract, and buttermilk until smooth.
- Pour wet ingredients into dry ingredients and stir gently until just combined. Do not overmix.
- Slowly pour in hot coffee while stirring gently until incorporated. Batter will be thin.
- Divide batter evenly among the 12 liners, filling each about ⅔ full.
- Bake for 18-22 minutes, until a toothpick inserted in the center comes out with a few moist crumbs.
- Let cupcakes cool in the tin for 5 minutes, then transfer to a wire rack to cool completely.
- For the frosting: Beat softened butter in a large bowl until creamy, about 2 minutes. Gradually add sifted powdered sugar, one cup at a time, beating on low. Add heavy cream, blackberry extract, and salt. Beat on medium-high for 3-4 minutes until light and fluffy. Add a tiny drop of violet gel food coloring and beat until evenly distributed.
- Once cupcakes are completely cool, transfer frosting to a piping bag fitted with a star tip. Pipe a generous swirl onto each cupcake. Add sprinkles or candy eyeballs immediately before frosting sets.
Notes
Do not skip cooling the cupcakes completely before frosting, or the frosting will melt. Room temperature ingredients are important for best texture. Black cocoa powder is essential for true black color; regular cocoa will yield gray cupcakes. The frosting color deepens as it sits, so start with less gel coloring than you think you need.
Nutrition
- Serving Size: 1 frosted cupcake
- Calories: 385
- Sugar: 40
- Sodium: 220
- Fat: 18
- Saturated Fat: 9
- Carbohydrates: 54
- Fiber: 2
- Protein: 4
Keywords: Halloween cupcakes, black velvet cupcakes, purple frosting, black cocoa cupcakes, no food coloring, Halloween dessert, chocolate cupcakes


