There used to be a little bakery tucked between a hardware store and a laundromat in my old neighborhood—the kind of place with a handwritten menu and a bell that jingled when you walked in. They made these blondies every October that were absolutely ridiculous. Not fancy, not complicated, just buttery, chewy, and studded with candy corn in a way that felt like pure childhood magic. When they closed suddenly two autumns ago—”retired,” the sign said, though I suspect the landlord had something to do with it—I genuinely mourned those blondies. I mean, I actually stood outside the dark window one afternoon and felt a little hollow.
After seven attempts—seven, let me tell you, because getting the candy corn to not melt into a sugary puddle was a nightmare—I finally cracked it. The secret, honestly, is treating the candy corn like a mix-in rather than a topping and using a slightly thicker batter to keep those little orange and yellow triangles suspended in all their glory. My first batch turned into a flat, sticky mess that tasted like caramel gone wrong. My second batch was better but the candy corn dissolved into weird white streaks. By batch four, I was texting my friend Maria photos asking, “Does this look right?” She was very patient.
These Easy Candy Corn Blondies are my victory lap. They’ve got that dense, chewy blondie texture with a subtle butterscotch undertone that pairs perfectly with the sugary crunch of candy corn. The edges get this beautiful golden-brown crispness while the center stays soft and almost fudgy. Every bite gives you that nostalgic Halloween candy flavor but in a dessert that feels way more grown-up than just grabbing a handful from the candy bowl. Maybe you’ve had that moment where you want to bring something festive to a party but don’t want to spend hours in the kitchen? That’s exactly why this recipe exists. It’s the dessert equivalent of showing up looking effortlessly put together when really you threw it together in twenty minutes flat.
Why You’ll Love This Recipe
Let me tell you why these blondies have become my go-to for every fall gathering. First off, they’re ridiculously easy. We’re talking one bowl, no mixer, minimal cleanup kind of easy. You don’t need any fancy equipment or techniques—just a whisk, a spatula, and about ten minutes of active prep time. The oven does the rest of the work while you’re figuring out what to wear or finishing up that last-minute appetizer.
- Quick & Easy : From start to finish, you’re looking at about 35 minutes total. That’s less time than it takes to run to the store for a store-bought dessert, and trust me, this tastes a hundred times better.
- Simple Ingredients : Butter, sugar, eggs, flour, vanilla, and candy corn. That’s it. You probably have everything except the candy corn sitting in your pantry right now.
- Perfect for Parties : These blondies are made for sharing. They cut cleanly into neat squares, stack beautifully on a platter, and everyone—kids, adults, picky eaters—goes crazy for them.
- Crowd-Pleaser : I’ve brought these to potlucks, Halloween parties, tailgates, and even a Friendsgiving. They disappear faster than almost anything else on the dessert table. People always ask for the recipe.
- Unbelievably Delicious : The combination of buttery blondie base with those little bursts of candy corn sweetness is honestly addictive. The edges get slightly crispy while the center stays soft and chewy. It’s texture heaven.
What makes these different from every other candy corn dessert out there? It’s the technique. Most recipes have you sprinkle the candy corn on top, which looks pretty but means half of it falls off when you cut the bars. My method folds the candy corn directly into the batter, so every single bite has that festive pop of color and sweetness. Plus, I’ve figured out the exact baking time that keeps the candy corn intact—not melted into oblivion but soft and chewy in the center of each blondie.
Honestly, this is the kind of recipe that makes you look like a baking hero without actually doing anything difficult. It’s comfort food with a Halloween twist, perfect for impressing guests without breaking a sweat. The first time I served these at a party, my friend Dave ate four before anyone else got a chance. He’s not even a sweets person. That’s when I knew I’d nailed it.
What Ingredients You Will Need
This recipe uses simple, pantry-friendly ingredients to create something that tastes far more impressive than its humble components suggest. The magic happens when these everyday staples meet the nostalgic candy corn—it’s a flavor combination that just works.
For the Blondie Base
- 1/2 cup (113g) unsalted butter, melted — I use salted butter in a pinch and just skip the added salt, but unsalted gives you more control. Let it cool slightly before adding to the sugar so you don’t accidentally scramble the eggs.
- 1 cup (200g) packed light brown sugar — This is non-negotiable for that deep, caramel-like sweetness and chewy texture. Dark brown sugar works too but will give a stronger molasses flavor. I’ve tried granulated sugar alone and the blondies come out too cakey.
- 1 large egg, room temperature — Cold eggs will seize up the melted butter. If you forgot to take it out of the fridge, place it in a bowl of warm water for five minutes.
- 1 teaspoon vanilla extract — Pure vanilla makes a difference here, but imitation works fine in a pinch. I’ve used vanilla bean paste before and it was lovely but totally unnecessary.
- 1 cup (125g) all-purpose flour — Spoon and level your flour rather than scooping directly from the bag. Scooping packs the flour down and you’ll end up with dry, crumbly blondies.
- 1/2 teaspoon baking powder — Make sure it’s not expired. Fresh baking powder gives the blondies just enough lift without making them puffy.
- 1/4 teaspoon salt — A little salt balances the sweetness and enhances the butterscotch notes. I prefer fine sea salt for baking.
For the Candy Corn Layer
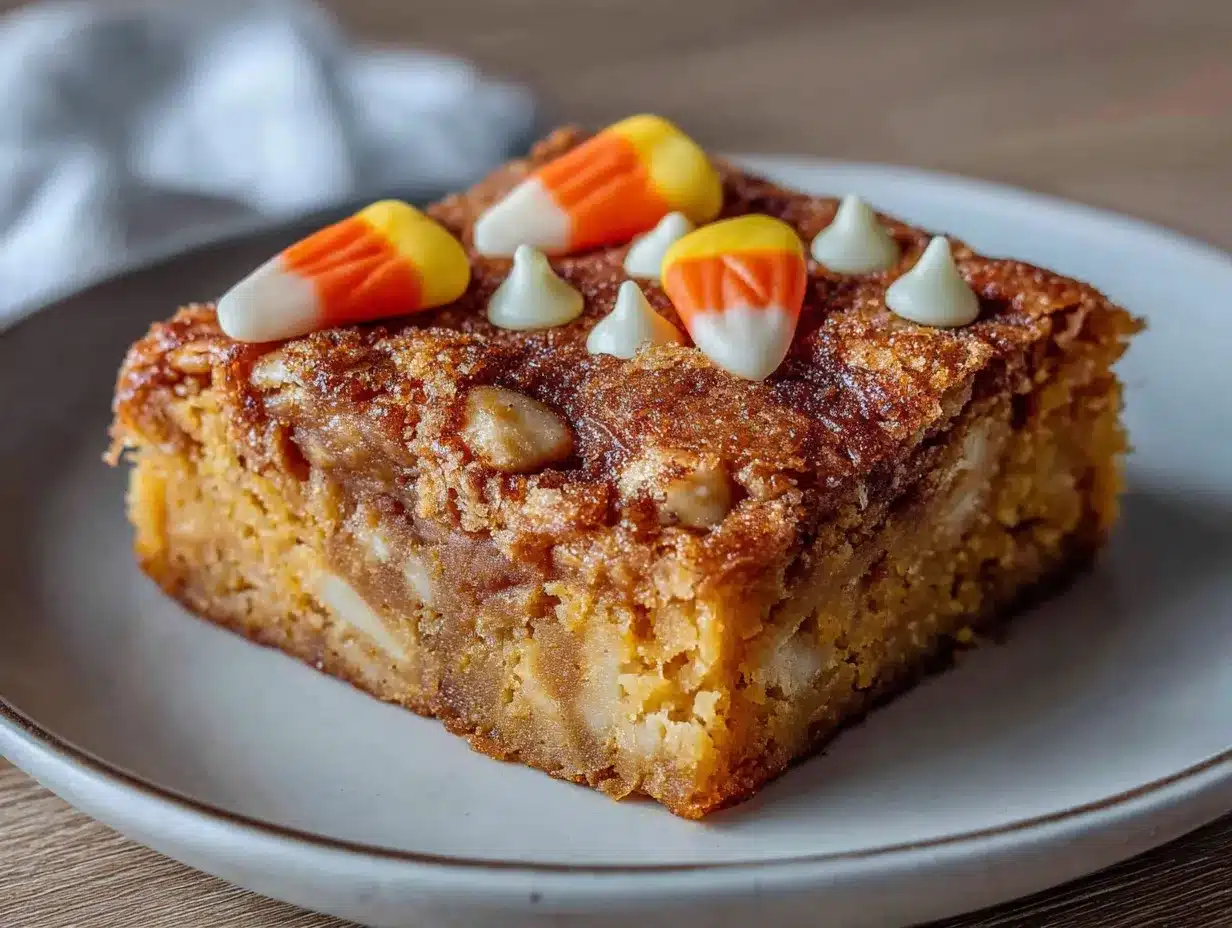
- 1 cup (about 180g) candy corn — The classic Brach’s brand works perfectly, but any candy corn will do. I’ve tried the seasonal autumn mix with the little pumpkins and those work great too—just chop the bigger pieces in half. Avoid the “mellowcreme” style that’s too soft; it melts completely into the batter. Trust me on this one.
One thing I learned the hard way—don’t use the candy corn that’s been sitting in your pantry since last Halloween. Fresh candy corn has a firmer texture that holds up better during baking. If your candy corn feels soft and bendy at room temperature, it’s going to turn into a puddle in the oven. Buy a fresh bag for best results.
For an extra festive touch, you can reserve about 1/4 cup of candy corn to press into the top of the batter before baking. This gives the blondies that classic candy corn look on the surface while still having plenty distributed throughout. I do this when I’m bringing them to a party where presentation matters.
Equipment Needed
You don’t need a fancy kitchen to make these blondies, which is honestly one of my favorite things about this recipe. Here’s what you’ll need:
- 8×8 inch baking pan — A metal pan gives you crisper edges, while glass or ceramic will yield softer, more evenly baked blondies. I prefer metal for that perfect edge-to-center contrast. If you only have a 9×9 pan, the blondies will be thinner and bake faster—check them at 18 minutes.
- Parchment paper — This is your best friend for easy removal. Leave overhang on two opposite sides so you can lift the whole slab out like a handle. If you’re out of parchment, grease the pan thoroughly with butter and dust with flour.
- Large mixing bowl — Any bowl works, but a wide, shallow bowl makes it easier to fold in the candy corn without crushing it.
- Whisk — For combining the wet ingredients smoothly. A fork works in a pinch but you’ll have to work harder to break up the brown sugar lumps.
- Rubber spatula — Essential for folding the candy corn and scraping every last bit of batter into the pan. I’ve used a wooden spoon before and it tends to crush the candy corn.
- Cooling rack — Letting the blondies cool completely in the pan can lead to soggy bottoms. A wire rack allows air to circulate underneath. If you don’t have one, just slide a knife under the parchment to lift the blondies slightly off the pan bottom.
I bought my 8×8 pan at a thrift store for three dollars and it’s been my go-to for years. You really don’t need expensive equipment for good baking results.
Preparation Method
Alright, let’s get to the fun part. Preheat your oven to 350°F (175°C) and line your 8×8 pan with parchment paper, leaving overhang on two sides. This takes two minutes and saves you fifteen minutes of frustrated scraping later. Trust me.
- Melt the butter. Place the 1/2 cup of butter in your mixing bowl and microwave in 30-second bursts until just melted. You can also melt it in a small saucepan over low heat. Let it cool for about two minutes—you want it warm, not hot. If it’s too hot when you add the egg, you’ll end up with scrambled egg bits in your blondies. Been there, not cute.
- Whisk in the brown sugar. Add the 1 cup of packed brown sugar to the melted butter and whisk until smooth. The mixture should look like wet sand and smell amazing. Make sure there are no lumps of sugar hiding at the bottom. This takes about a minute of steady whisking.
- Add the egg and vanilla. Crack the egg into the bowl and add the 1 teaspoon of vanilla. Whisk vigorously until everything is combined and the mixture looks glossy and slightly thickened. This should take about 30 seconds. The batter will be lighter in color now and have a smooth, ribbon-like consistency when you lift the whisk.
- Add the dry ingredients. Sprinkle the 1 cup of flour, 1/2 teaspoon of baking powder, and 1/4 teaspoon of salt over the wet mixture. Use a rubber spatula to fold everything together gently. Stop as soon as you no longer see streaks of flour—overmixing will make your blondies tough and cakey instead of chewy. The batter will be thick and slightly sticky, almost like cookie dough.
- Fold in the candy corn. Add 3/4 cup of the candy corn to the batter (reserve the remaining 1/4 cup for topping). Fold it in gently with your spatula, taking care not to crush the candy corn pieces. You want them to stay intact so they create those little pockets of sweetness throughout the blondies. This is where patience pays off—if you’re too aggressive, the candy corn will break and the colors will bleed into the batter.
- Transfer to the pan. Scrape the batter into your prepared pan and spread it evenly using the spatula. The batter will be thick, so take your time to push it into the corners. Press the reserved 1/4 cup of candy corn into the top of the batter, spacing them evenly. This gives the blondies that beautiful candy corn-studded appearance on top.
- Bake. Place the pan on the middle rack of your preheated oven and bake for 22-25 minutes. The edges should be golden brown and pulling away slightly from the sides of the pan. The center will look slightly underdone and puffy—that’s exactly what you want. Insert a toothpick into the center; it should come out with a few moist crumbs attached, not wet batter. If it comes out clean, you’ve overbaked them.
- Cool completely. This is the hardest part, I know. Let the blondies cool in the pan on a wire rack for at least 30 minutes. Then use the parchment overhang to lift the entire slab out onto the cooling rack. Let them cool completely—about another 30 minutes—before cutting. Cutting them while they’re warm will give you crumbly, messy edges. They’ll still taste amazing, but they won’t look as pretty on your party platter.
- Cut and serve. Use a sharp knife to cut the blondies into 16 squares. Wipe the knife clean between cuts for neat edges. For extra clean cuts, refrigerate the blondies for 15 minutes before slicing. I learned this trick from a bakery owner and it makes a huge difference when you’re serving guests.
Cooking Tips & Techniques
After making these blondies more times than I care to count, I’ve picked up a few tricks that make the process smoother and the results more consistent. Let me share what I’ve learned so you don’t have to make the same mistakes I did.
Don’t overmix the batter. This is the number one mistake people make with blondies. Once you add the flour, mix just until it disappears. Overmixing develops the gluten too much, and you’ll end up with dense, tough blondies instead of tender, chewy ones. I actually set a timer for 30 seconds and stop mixing when it goes off, even if there are a few tiny flour streaks left. Those streaks disappear during baking.
Check your oven temperature. My oven runs hot, so I always use an oven thermometer to make sure it’s actually at 350°F. If your oven runs hot, your candy corn will melt into a sticky mess. If it runs cool, your blondies will be pale and underbaked in the center. An oven thermometer costs about seven dollars and saves you from so many baking disasters.
Let them cool completely. I know it’s torture waiting for these blondies to cool, but it’s absolutely necessary. Warm blondies are fragile and the candy corn is still soft from baking. Cutting them too early results in crumbly edges and candy corn that smears across your knife. I’ve learned to make these the night before a party so they’re perfectly set and ready to go in the morning.
Use room temperature ingredients. This matters more than you might think. A cold egg can cause the melted butter to seize up, creating lumps in your batter. I set my egg out on the counter about 30 minutes before I start baking. If I forget, I place it in a bowl of warm water for five minutes—works like a charm.
Rotate the pan halfway through baking. Most ovens have hot spots, so rotating your pan 180 degrees at the 12-minute mark ensures even browning. I forgot to do this once and ended up with blondies that were dark on one side and pale on the other. They still tasted fine, but they looked uneven on the serving platter.
Variations & Adaptations
One of the best things about this recipe is how easily it adapts to different tastes and dietary needs. Here are some variations I’ve tried and loved.
Chocolate Candy Corn Blondies. Fold in 1/2 cup of semi-sweet chocolate chips along with the candy corn. The chocolate adds a rich counterpoint to the sweetness of the candy corn, and the combination is absolutely irresistible. I made these for a Halloween party and they were gone in twenty minutes. The chocolate also helps mask any slight bitterness from overbaked edges if you accidentally leave them in too long.
White Chocolate Cranberry Version. Swap the candy corn for 1/2 cup dried cranberries and 1/2 cup white chocolate chips. This makes a fantastic fall-themed blondie that works for Thanksgiving or any autumn gathering. The tartness of the cranberries balances the sweetness beautifully. I actually prefer this version for adult parties where candy corn might feel too kiddish.
Gluten-Free Adaptation. Substitute the all-purpose flour with a 1:1 gluten-free baking flour blend. I’ve used Bob’s Red Mill with great results. The texture is slightly more crumbly but still delicious. Add an extra tablespoon of butter to help with moisture retention. Let the blondies cool completely before cutting—gluten-free baked goods are more fragile when warm.
Vegan Option. Replace the butter with melted coconut oil or vegan butter, and use a flax egg (1 tablespoon ground flaxseed mixed with 3 tablespoons water, let sit for 5 minutes). The texture is a bit more cakey than chewy, but the flavor is still fantastic. I’ve made these for a vegan friend’s birthday and she couldn’t believe they were vegan.
Spiced Autumn Blondies. Add 1 teaspoon of pumpkin pie spice or cinnamon to the dry ingredients. This gives the blondies a warm, cozy flavor that pairs beautifully with the candy corn. I love making these for bonfire nights or cozy movie marathons. The cinnamon makes the whole kitchen smell incredible while they’re baking.
Serving & Storage Suggestions
These blondies are incredibly versatile when it comes to serving. They’re perfect at room temperature, slightly warm, or even chilled. For parties, I like to arrange them on a platter in a single layer—stacking them can cause the candy corn to stick together and pull off when guests grab one.
At room temperature, they’re soft and chewy with that perfect edge-to-center contrast. This is how I serve them at potlucks and casual gatherings. They travel well and don’t need any special handling.
Warmed slightly in the microwave for about 10 seconds, the blondies become extra soft and the candy corn gets a little gooey. Serve with a scoop of vanilla ice cream for an absolutely decadent dessert. This is my go-to when I’m serving them at home for a small group.
For a fancy presentation, dust the blondies with a little powdered sugar just before serving. The white powder against the orange and yellow candy corn looks beautiful on a dark plate. I also like to serve them alongside a small bowl of extra candy corn for guests who want a little extra sweetness.
Storage: Store leftover blondies in an airtight container at room temperature for up to 5 days. Place a piece of bread in the container to help maintain moisture—the bread absorbs excess air and keeps the blondies soft. Replace the bread every two days if you’re storing them longer. Do not refrigerate them unless you want dense, dry blondies. The refrigerator draws moisture out of baked goods.
Freezing: These blondies freeze beautifully. Wrap individual squares tightly in plastic wrap, then place them in a freezer-safe bag. They’ll keep for up to 3 months. To thaw, leave them at room temperature for about 30 minutes, or microwave for 15-20 seconds. I always keep a stash in my freezer for unexpected guests or late-night cravings.
Flavor development: Honestly, these blondies taste even better the day after baking. The flavors meld together overnight, and the texture becomes even more chewy and cohesive. If you can resist eating them right away, make them a day ahead for the best results.
Nutritional Information & Benefits
Let’s be real—these are a treat, not a health food. But here’s the estimated nutritional breakdown per blondie (based on 16 servings):
- Calories: Approximately 195
- Total Fat: 8g
- Saturated Fat: 5g
- Carbohydrates: 30g
- Sugar: 22g
- Protein: 2g
- Sodium: 95mg
On the positive side, these blondies do contain some calcium and iron from the flour and butter. The brown sugar provides a small amount of molasses, which contains trace minerals like potassium and magnesium. But honestly, the real benefit here is the joy they bring to a party table.
If you’re looking to make them slightly healthier, you can reduce the sugar to 3/4 cup without significantly affecting the texture. The candy corn provides plenty of sweetness on its own. I’ve also made them with whole wheat pastry flour for a bit more fiber—the flavor is nuttier but still delicious.
For those with dietary concerns, note that these blondies contain gluten, dairy, and eggs. They are not suitable for vegans or those with celiac disease without the substitutions mentioned in the variations section.
Conclusion
These Easy Candy Corn Blondies have become my signature fall dessert, and for good reason. They’re simple enough to throw together on a busy weeknight but impressive enough to bring to any gathering. The combination of buttery blondie base with those little bursts of candy corn sweetness is honestly something special—it’s nostalgic without being childish, festive without being over-the-top.
What I love most about this recipe is how forgiving it is. You don’t need to be an experienced baker to nail these. The ingredients are basic, the technique is straightforward, and the results are consistently delicious. Whether you’re hosting a Halloween party, bringing a dish to a potluck, or just want something sweet to enjoy with your afternoon coffee, these blondies deliver every single time.
I’d love to hear how yours turn out! Leave a comment below and let me know if you tried any of the variations or came up with your own twist. Don’t forget to share this recipe with your friends—trust me, they’ll thank you when they take that first bite. Happy baking!
Frequently Asked Questions
Can I use other types of candy corn for this recipe?
Absolutely! The autumn mix with the little pumpkins works great—just chop the pumpkins in half so they distribute evenly. I’ve also used the chocolate-flavored candy corn for a fun twist. Just avoid the very soft, mellowcreme-style candies that melt completely into the batter.
Why did my candy corn melt into the batter?
This usually happens for two reasons: your oven is too hot, or your candy corn is old and soft. Make sure your oven is actually at 350°F and not running hot. Also, use fresh candy corn from a new bag—stale candy corn has a softer texture that melts more easily during baking.
Can I make these blondies ahead of time?
Yes, and I actually recommend it! These blondies taste even better the next day. Bake them, let them cool completely, and store them in an airtight container at room temperature. They’ll be perfectly set and easy to cut into clean squares. They’re great for up to 5 days.
How do I get clean cuts when slicing the blondies?
Use a sharp knife and wipe it clean between each cut. For the cleanest edges, refrigerate the blondies for 15 minutes before slicing. The cold temperature firms up the candy corn and the blondie base, giving you those perfect, bakery-style squares.
Can I freeze these blondies?
Yes, they freeze beautifully! Wrap individual squares tightly in plastic wrap, then place them in a freezer-safe bag. They’ll keep for up to 3 months. To thaw, leave them at room temperature for about 30 minutes, or microwave for 15-20 seconds for that fresh-baked warmth.
PrintEasy Candy Corn Blondies: Best Party Dessert
These Easy Candy Corn Blondies are a quick, one-bowl dessert with a buttery, chewy texture and festive candy corn throughout. Perfect for Halloween parties, potlucks, or any fall gathering, they come together in about 35 minutes and are always a crowd-pleaser.
- Prep Time: 10 minutes
- Cook Time: 22-25 minutes
- Total Time: 35 minutes
- Yield: 16 servings 1x
- Category: Dessert
- Cuisine: American
Ingredients
- 1/2 cup (113g) unsalted butter, melted
- 1 cup (200g) packed light brown sugar
- 1 large egg, room temperature
- 1 teaspoon vanilla extract
- 1 cup (125g) all-purpose flour
- 1/2 teaspoon baking powder
- 1/4 teaspoon salt
- 1 cup (about 180g) candy corn
Instructions
- Preheat oven to 350°F (175°C). Line an 8×8 inch baking pan with parchment paper, leaving overhang on two sides.
- Melt the butter in a large mixing bowl. Let cool for about 2 minutes.
- Whisk in the brown sugar until smooth and no lumps remain.
- Add the egg and vanilla. Whisk vigorously until glossy and slightly thickened, about 30 seconds.
- Sprinkle flour, baking powder, and salt over the wet mixture. Fold gently with a rubber spatula until just combined—do not overmix.
- Fold in 3/4 cup of the candy corn gently, being careful not to crush them. Reserve the remaining 1/4 cup for topping.
- Scrape batter into the prepared pan and spread evenly. Press the reserved candy corn into the top.
- Bake on the middle rack for 22-25 minutes, until edges are golden and center is slightly underdone. A toothpick inserted should come out with moist crumbs.
- Cool in the pan on a wire rack for 30 minutes, then lift out using parchment and cool completely (about another 30 minutes) before cutting into 16 squares.
Notes
Use fresh candy corn for best results—old or soft candy corn will melt. For clean cuts, refrigerate blondies for 15 minutes before slicing. Blondies taste even better the next day. Store in an airtight container at room temperature for up to 5 days, or freeze for up to 3 months.
Nutrition
- Serving Size: 1 blondie
- Calories: 195
- Sugar: 22
- Sodium: 95
- Fat: 8
- Saturated Fat: 5
- Carbohydrates: 30
- Protein: 2
Keywords: candy corn blondies, Halloween dessert, easy blondies, fall dessert, party dessert, one-bowl blondies


