I figured the most important part of making Pan de Muerto was getting the dough to rise perfectly—light and airy, just like the bakeries in Mexico City. It took about ten minutes of kneading for that assumption to fall apart completely. My first batch came out of the oven looking like dense, oversized dinner rolls with no soul. They tasted fine, sure, but they didn’t have that ethereal, almost cloud-like crumb you get from a proper panadería. I was so focused on the technical side—the yeast, the proofing times, the gluten development—that I forgot the whole point of this bread.
The second time around, I stopped trying to control everything and just let the dough tell me what it needed. And honestly? That made all the difference. This isn’t a bread you rush. It’s a bread you coax into being, with patience and maybe a little bit of faith. The orange blossom water, the warm anise, the butter melting into the flour—it all comes together in a way that smells like memory itself. By the time I pulled that second loaf from the oven, golden and fragrant, I understood. Pan de Muerto isn’t about perfection. It’s about presence. About making something with your hands that honors the people who aren’t here anymore. That first bite, soft and sweet with a hint of citrus, made me tear up a little. Not gonna lie. This recipe became my way of remembering, of celebrating, of keeping the connection alive. And that’s why I keep making it, year after year.
Why You’ll Love This Recipe
This Pan de Muerto recipe is the one I turn to every single Día de los Muertos. I’ve tested it more times than I can count, tweaking the hydration, the proofing times, the amount of orange blossom water until it felt just right. It’s a recipe built on experience, not guesswork.
- Authentic Flavor: Real orange blossom water and a touch of anise give this bread that unmistakable, traditional taste. No shortcuts here.
- Surprisingly Manageable: Yes, it’s a yeast dough. But the process is forgiving. I’ve made it in a rush and it still turned out beautiful.
- Perfect for Ofrendas: This bread is made to be shared with the living and offered to the spirits. It’s the centerpiece of any Day of the Dead celebration.
- Deeply Satisfying to Make: There’s something meditative about shaping the dough into bones and skulls. It connects you to the tradition in a really meaningful way.
- Freezes Like a Dream: Bake it ahead, freeze it, and just warm it up when you’re ready. The flavor actually gets better after a day or two.
What makes this recipe different from the rest? It’s the balance. So many versions are either too dry or too sweet. This one hits that perfect middle ground—tender, slightly sweet, and fragrant with citrus. It’s the kind of bread that makes you close your eyes after the first bite. Not because it’s fancy, but because it tastes like home. Like tradition. Like love baked into every strand of dough.
What Ingredients You Will Need
This recipe uses simple, mostly pantry-friendly ingredients to create something truly special. The magic is in the combination—each element playing its part to build that iconic flavor and texture. Most of these are easy to find, especially around the fall season.
- All-Purpose Flour (4 cups / 500g): The backbone of the dough. I prefer Gold Medal or King Arthur for consistent results. Don’t use bread flour here—it makes the bread too chewy.
- Active Dry Yeast (2 ¼ teaspoons / 7g, or 1 packet): Make sure it’s fresh! Proof it in warm water with a pinch of sugar first to make sure it’s alive and bubbly.
- Warm Milk (½ cup / 120ml), plus more for brushing: Whole milk adds richness, but 2% works fine too. Heat it to about 110°F—warm to the touch but not hot.
- Granulated Sugar (½ cup / 100g): Just enough sweetness. Don’t reduce it—the sugar feeds the yeast and helps with browning.
- Unsalted Butter (½ cup / 113g, or 1 stick), softened: Let it come to room temperature. Cold butter won’t incorporate properly and will leave greasy spots in the dough.
- Large Eggs (3, room temperature): Two go into the dough, one is reserved for the egg wash. Room temperature eggs blend more smoothly into the butter mixture.
- Orange Zest (from 1 large orange): Freshly grated is non-negotiable. The bottled stuff just doesn’t have the same punch. Use a microplane for best results.
- Orange Blossom Water (2 tablespoons): This is the secret ingredient. Find it in Latin grocery stores or online. It adds that floral, aromatic quality that defines Pan de Muerto.
- Anise Seed (1 teaspoon, lightly crushed): A subtle licorice note that’s traditional. Toast them briefly in a dry pan for extra depth, then crush with a mortar and pestle or the bottom of a glass.
- Salt (½ teaspoon): Balances the sweetness and strengthens the gluten structure. I use fine sea salt.
- For the Topping: Melted butter (2 tablespoons) and a mixture of sugar and cinnamon (¼ cup sugar + 1 teaspoon cinnamon) for that final, glorious coating.
Substitution note: If you can’t find orange blossom water, you can use a combination of orange zest and a splash of vanilla extract. It won’t be exactly the same, but it’ll still be delicious. For a dairy-free version, swap the butter with vegan butter and use oat milk.
Equipment Needed
You don’t need a professional bakery setup for this. Just a few basic tools and a little patience.
- Large Mixing Bowl: Glass or stainless steel works best. Plastic can hold onto odors.
- Stand Mixer with Dough Hook (optional but recommended): Kneading by hand is totally doable, but the mixer saves your arms. I’ve done both—the mixer gives a more consistent result with less effort.
- Baking Sheets (2): Lined with parchment paper. No greasing needed.
- Plastic Wrap or a Clean Kitchen Towel: For covering the dough while it rises. A damp towel works great to prevent a skin from forming.
- Sharp Knife or Bench Scraper: For cutting the dough into shapes. A pizza cutter also works.
- Pastry Brush: For the egg wash and the melted butter finish. A silicone one is easy to clean.
- Cooling Rack: Essential for letting the bread cool evenly. No soggy bottoms here.
If you don’t have a stand mixer, just knead by hand on a lightly floured surface for about 10-12 minutes. It’s a great arm workout, I promise. The dough should be smooth and elastic when you’re done.
Preparation Method
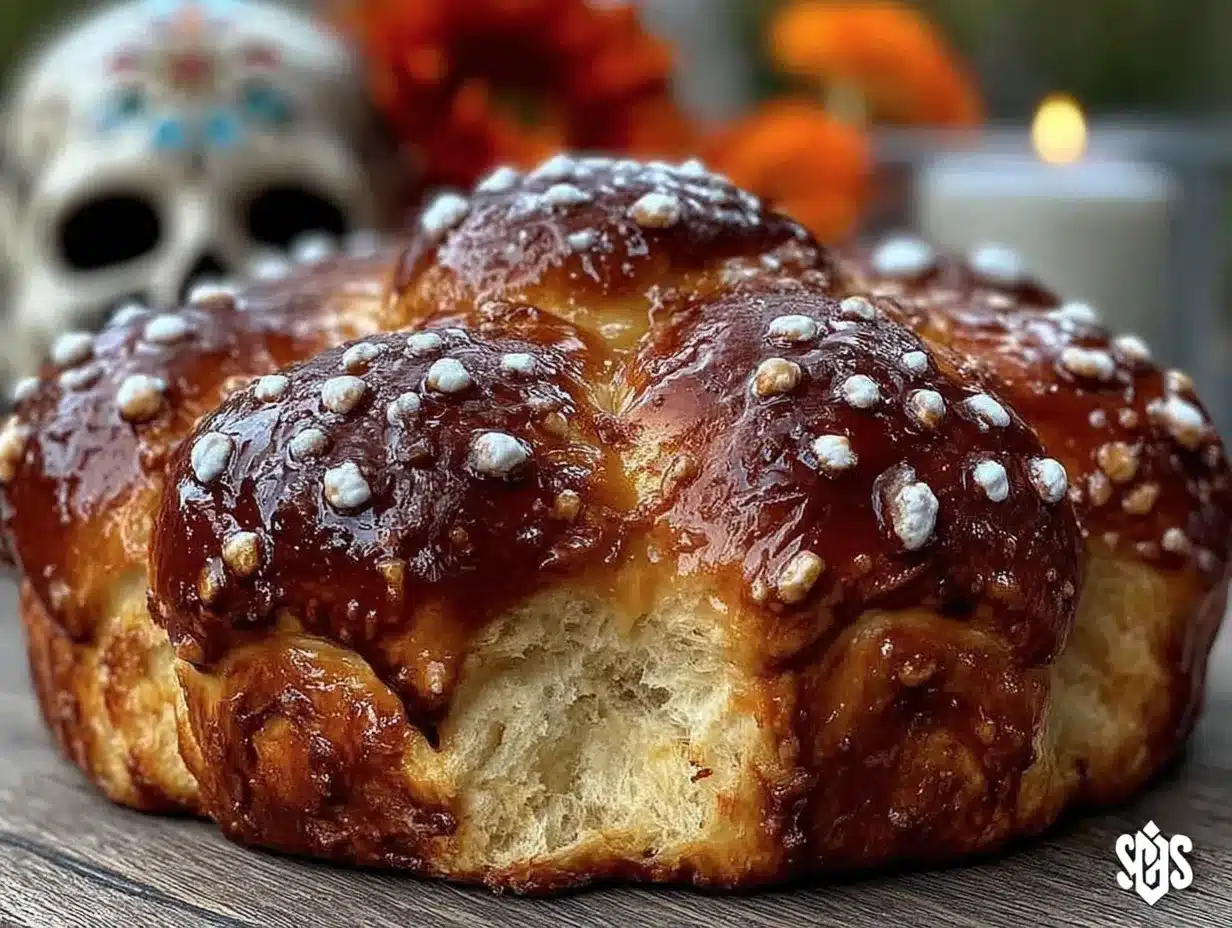
Let’s get to the good stuff. This process takes a few hours, but most of it is hands-off rising time. Put on some music, pour yourself a coffee, and enjoy the rhythm of it.
- Proof the yeast. In a small bowl, combine the warm milk (about 110°F) with 1 tablespoon of the sugar and the active dry yeast. Stir gently and let it sit for 5-10 minutes until it becomes foamy and fragrant. If it doesn’t bubble, your yeast is dead—start over.
- Cream the butter and sugar. In the bowl of your stand mixer (or a large bowl if mixing by hand), beat the softened butter and remaining sugar together until light and fluffy, about 2-3 minutes. It should look pale and creamy.
- Add the wet ingredients. Beat in the eggs one at a time, making sure each is fully incorporated before adding the next. Add the orange zest, orange blossom water, and crushed anise seeds. Mix until combined. The mixture might look a little curdled—that’s totally normal.
- Combine the dry ingredients. In a separate bowl, whisk together the flour and salt. Gradually add this to the wet mixture, alternating with the proofed yeast mixture. Start with the mixer on low speed, then increase to medium as the dough comes together.
- Knead the dough. Once the dough forms a shaggy ball, switch to the dough hook and knead on medium-low speed for about 8-10 minutes. The dough should be smooth, slightly sticky, and pull away from the sides of the bowl. If it’s too sticky, add a tablespoon of flour at a time. If it’s too dry, add a teaspoon of milk.
- First rise. Shape the dough into a smooth ball and place it in a lightly greased bowl, turning to coat. Cover tightly with plastic wrap and let it rise in a warm, draft-free place for about 1.5 to 2 hours, or until doubled in size. A slightly warm oven (turned off) works perfectly.
- Punch down and divide. Gently punch down the dough to release the air. Turn it out onto a lightly floured surface. Divide the dough into two equal pieces for two loaves. Set one piece aside, covered with a towel.
- Shape the base. Take one piece of dough and cut off about ¼ of it. Set that aside. Shape the larger piece into a smooth round ball and place it on your parchment-lined baking sheet. This is the base of your loaf.
- Create the “bones”. Take the reserved ¼ piece and divide it into 4 equal pieces. Roll each piece into a long rope, about 6-7 inches long. These are your “bones.” Place them on top of the round base in a cross pattern—two ropes crossing each other, then the other two crossing the opposite way. Gently press the ends into the dough to secure them.
- Shape the skull. Take a small piece of dough from the remaining mixture (about the size of a walnut) and shape it into a round ball. Place it in the center of the cross, where the ropes meet. This is the “skull.” Use your finger to gently press a small indent in the center.
- Second rise. Cover the shaped loaves loosely with plastic wrap or a clean towel. Let them rise for another 45 minutes to 1 hour, until they look puffy and have increased in size by about half. They should feel light and airy when you gently poke them.
- Preheat and egg wash. About 20 minutes before the second rise is done, preheat your oven to 350°F (175°C). In a small bowl, beat the remaining egg with 1 tablespoon of water. Gently brush this egg wash over the entire surface of each loaf, being careful not to deflate the dough.
- Bake. Bake the loaves for 20-25 minutes, or until they are deeply golden brown and sound hollow when tapped on the bottom. Rotate the pans halfway through for even browning. The smell in your kitchen will be absolutely intoxicating.
- Finish with butter and sugar. As soon as the loaves come out of the oven, brush them generously with melted butter. Then, immediately sprinkle the cinnamon-sugar mixture all over the top and sides. Let them cool on a wire rack for at least 20 minutes before slicing.
Sensory cue: When you tap the bottom of the loaf, it should sound hollow—like a drum. The crust should be a deep, warm gold, and the butter-sugar coating will glisten. The first slice will reveal a soft, tender crumb with tiny air pockets, perfect for soaking up coffee or hot chocolate.
Cooking Tips & Techniques
I’ve made this bread more times than I care to admit, and I’ve learned a few things the hard way. Let me save you from my mistakes.
Don’t rush the rise. I know it’s tempting to speed things up, but a slow, steady rise develops better flavor and texture. If your kitchen is cold, place the dough in your oven with just the oven light on. It creates a perfect little proofing box. One time I tried to speed things up by putting the bowl on a heating pad—ended up with a partially cooked outer layer. Not great.
Handle the dough gently. When shaping the bones and skull, be gentle. You want to preserve all those lovely air bubbles you developed during the rise. Overworking the dough at this stage will give you a dense, tough loaf. I learned this after aggressively rolling the ropes and ending up with what looked like breadsticks on a bun.
Use a thermometer for the milk. Yeast is a living thing. If the milk is too hot (above 120°F), it will kill the yeast. Too cold (below 100°F), and it won’t activate properly. 110°F is the sweet spot. I use an instant-read thermometer every single time now.
Toast the anise seeds. This is a game-changer. Just a minute or two in a dry skillet until they’re fragrant. It deepens the flavor and makes the whole bread taste more complex. Don’t skip this step—it takes 2 minutes and makes a huge difference.
Multitask strategically. While the dough is doing its first rise, clean up your kitchen and set up your baking sheets. During the second rise, make your cinnamon-sugar mixture and melt your butter. This way, when the bread comes out of the oven, you’re ready to finish it immediately.
Variations & Adaptations
One of the best things about this recipe is how adaptable it is. Here are a few ways I’ve played with it over the years.
- Chocolate Pan de Muerto: Add ¼ cup of unsweetened cocoa powder to the flour mixture and increase the sugar by 2 tablespoons. The chocolate pairs beautifully with the orange blossom water. I made this for a friend who isn’t a fan of anise, and she devoured half a loaf in one sitting.
- Vegan Version: Substitute the butter with vegan butter, the eggs with flax eggs (1 tablespoon ground flaxseed + 3 tablespoons water per egg), and use plant-based milk. The texture will be slightly denser but still delicious. I tested this for a friend’s ofrenda and it held up beautifully.
- Gluten-Free Adaptation: Use a good quality 1-to-1 gluten-free flour blend that contains xanthan gum. Add an extra tablespoon of milk to compensate for the drier flour. The dough will be stickier, so wet your hands when shaping. It won’t have the same stretchy texture, but the flavor is all there.
- Filled Version: Before shaping the base, flatten the dough slightly and place a spoonful of your favorite filling in the center—cajeta (goat’s milk caramel), Nutella, or even a cream cheese mixture. Pinch the edges to seal before shaping. I tried this with a pumpkin spice cream cheese filling last year—it was a hit at our gathering.
- Savory Twist: Reduce the sugar to ¼ cup, omit the orange blossom water and anise, and add 1 tablespoon of dried herbs (like rosemary or thyme) and ½ cup of grated cheese (like queso fresco or Parmesan). Shape the same way. It’s unexpected but absolutely wonderful with a bowl of soup.
Serving & Storage Suggestions
Pan de Muerto is best enjoyed slightly warm, when the butter-sugar coating is still a little melty and the crumb is incredibly soft. Serve it alongside a steaming mug of Mexican hot chocolate, café de olla, or a simple cup of black coffee. It’s also wonderful with a glass of cold milk for the kids.
For a traditional presentation, place the loaf on a beautiful plate or a woven basket lined with a colorful cloth. If you’re building an ofrenda, set the bread out as an offering alongside marigolds, photos, and other favorite foods of your loved ones.
Storage: Keep the bread in an airtight container or wrapped tightly in plastic wrap at room temperature for up to 3 days. The flavor actually improves after a day—the orange and anise notes meld together beautifully. Do not refrigerate, as it will dry out the bread.
Freezing: This bread freezes exceptionally well. Wrap the cooled, undecorated loaf tightly in plastic wrap, then in a layer of aluminum foil. Freeze for up to 2 months. When you’re ready to serve, thaw at room temperature, then warm in a 300°F oven for 5-10 minutes. Brush with melted butter and sprinkle with the cinnamon-sugar mixture after reheating.
Reheating: The best way to revive day-old Pan de Muerto is to wrap it in foil and warm it in a 300°F oven for about 10 minutes. The crust will soften slightly, and the interior will become tender again. Avoid the microwave—it makes the bread rubbery.
Nutritional Information & Benefits
Let’s be real—this is a celebration bread, not a health food. But it does have some redeeming qualities. Each serving (about 1/8 of a loaf) contains approximately 280 calories, 10g fat, 42g carbohydrates, 6g protein, and 18g sugar. The orange zest provides a small dose of vitamin C and antioxidants, while the anise seed has been used traditionally to aid digestion.
The eggs and butter add protein and fat, which help keep you full and satisfied. And honestly, there’s a mental health benefit to making this bread. The process of kneading, shaping, and baking is incredibly grounding. It’s a way to connect with tradition, to slow down, and to create something beautiful with your hands.
If you’re watching your sugar intake, you can reduce the topping sugar slightly, but I wouldn’t recommend cutting it from the dough itself—it’s essential for the yeast and the texture. This bread is meant to be a treat, and that’s okay. Some things are worth every single bite.
Conclusion
This Pan de Muerto recipe has become a cornerstone of my Día de los Muertos celebrations. It’s more than just bread—it’s a way to remember, to honor, and to share love with both the living and the departed. The process is meditative, the aroma is heavenly, and the result is a loaf that tastes like tradition itself.
I hope you’ll make this recipe your own. Maybe you’ll stick with the classic version, or maybe you’ll experiment with chocolate or a savory twist. Either way, I’d love to hear about it. Drop a comment below and tell me how your Pan de Muerto turned out, or share a photo of your ofrenda with the bread on it. There’s nothing quite like seeing this tradition come to life in kitchens around the world.
And if you’re looking for more festive recipes to round out your celebration, check out this fresh Caprese skewers recipe for a light appetizer, or these comforting BBQ pulled pork sliders for a hearty main dish. For dessert beyond the bread, this red velvet flag cake is always a showstopper. And if you’re hosting a gathering, this creamy whipped feta dip with hot honey is an absolute must. Happy baking, and may your ofrenda be filled with love, memories, and the sweet scent of Pan de Muerto. ¡Buen provecho!
Frequently Asked Questions
Can I make Pan de Muerto without a stand mixer?
Absolutely! Kneading by hand works perfectly. Just turn the dough out onto a lightly floured surface and knead for about 10-12 minutes until smooth and elastic. It’s a great workout and connects you more to the process.
Why didn’t my dough rise?
Several things could be at play. Your yeast might be expired, your milk could have been too hot (killing the yeast), or your kitchen might be too cold. Always proof your yeast first to make sure it’s active, and find a warm, draft-free spot for the dough to rise.
Can I use all-purpose flour instead of bread flour?
Yes, this recipe uses all-purpose flour specifically. Bread flour would make the bread too chewy and dense. Stick with all-purpose for that soft, tender crumb that Pan de Muerto is known for.
How do I store leftover Pan de Muerto?
Wrap it tightly in plastic wrap or store in an airtight container at room temperature for up to 3 days. For longer storage, freeze the undecorated loaf for up to 2 months. Reheat in a 300°F oven for about 10 minutes before serving.
Can I make this bread ahead of time for Day of the Dead?
Yes! Bake the bread a day or two ahead and store it at room temperature. The flavor actually improves as the orange and anise notes meld. Just brush with butter and add the cinnamon-sugar topping right before serving for the best texture and appearance.
Pin This Recipe!

Perfect Pan de Muerto Bread Recipe for Day of the Dead

This Pan de Muerto recipe is the one I turn to every single Día de los Muertos. It’s a recipe built on experience, not guesswork, with authentic flavor from real orange blossom water and a touch of anise.
- Prep Time: 30 minutes
- Cook Time: 25 minutes
- Total Time: 3 hours 30 minutes
- Yield: 8 servings 1x
- Category: Bread
- Cuisine: Mexican
Ingredients
- 4 cups (500g) all-purpose flour
- 2 ¼ teaspoons (7g) active dry yeast (1 packet)
- ½ cup (120ml) warm milk (about 110°F), plus more for brushing
- ½ cup (100g) granulated sugar
- ½ cup (113g) unsalted butter, softened
- 3 large eggs, room temperature
- Zest from 1 large orange
- 2 tablespoons orange blossom water
- 1 teaspoon anise seed, lightly crushed
- ½ teaspoon fine sea salt
- For the topping: 2 tablespoons melted butter
- For the topping: ¼ cup sugar mixed with 1 teaspoon cinnamon
Instructions
- Proof the yeast: In a small bowl, combine warm milk (about 110°F) with 1 tablespoon of sugar and active dry yeast. Stir gently and let sit for 5-10 minutes until foamy and fragrant.
- Cream the butter and sugar: In the bowl of a stand mixer (or large bowl), beat softened butter and remaining sugar together until light and fluffy, about 2-3 minutes.
- Add wet ingredients: Beat in eggs one at a time, fully incorporating each. Add orange zest, orange blossom water, and crushed anise seeds. Mix until combined (mixture may look curdled).
- Combine dry ingredients: In a separate bowl, whisk together flour and salt. Gradually add to wet mixture, alternating with proofed yeast mixture. Start on low speed, then increase to medium.
- Knead the dough: Switch to dough hook and knead on medium-low speed for 8-10 minutes until smooth, slightly sticky, and pulls away from bowl sides. Add flour or milk as needed.
- First rise: Shape dough into a smooth ball, place in lightly greased bowl, cover with plastic wrap, and let rise in warm place for 1.5-2 hours until doubled in size.
- Punch down and divide: Gently punch down dough. Turn onto floured surface and divide into two equal pieces for two loaves.
- Shape the base: Take one piece, cut off about ¼, and set aside. Shape larger piece into a smooth round ball and place on parchment-lined baking sheet.
- Create the bones: Divide reserved ¼ piece into 4 equal pieces. Roll each into a 6-7 inch rope. Place on top of round base in a cross pattern, pressing ends into dough.
- Shape the skull: Take a walnut-sized piece of dough, shape into a round ball, and place in center of cross. Gently press a small indent in the center.
- Second rise: Cover shaped loaves loosely and let rise for 45 minutes to 1 hour until puffy and increased by about half.
- Preheat and egg wash: Preheat oven to 350°F (175°C). Beat remaining egg with 1 tablespoon water. Gently brush over entire surface of each loaf.
- Bake: Bake for 20-25 minutes until deeply golden brown and hollow when tapped on bottom. Rotate pans halfway through.
- Finish: As soon as loaves come out, brush generously with melted butter. Immediately sprinkle cinnamon-sugar mixture all over. Cool on wire rack for at least 20 minutes before slicing.
Notes
Don’t rush the rise. Handle the dough gently when shaping bones and skull. Use a thermometer for milk (110°F is ideal). Toast anise seeds for deeper flavor. The bread freezes well for up to 2 months. Flavor improves after a day.
Nutrition
- Serving Size: 1/8 of a loaf
- Calories: 280
- Sugar: 18
- Sodium: 180
- Fat: 10
- Saturated Fat: 6
- Carbohydrates: 42
- Fiber: 1
- Protein: 6
Keywords: Pan de Muerto, Day of the Dead bread, Mexican sweet bread, Día de los Muertos, orange blossom bread, anise bread, traditional Mexican bread


