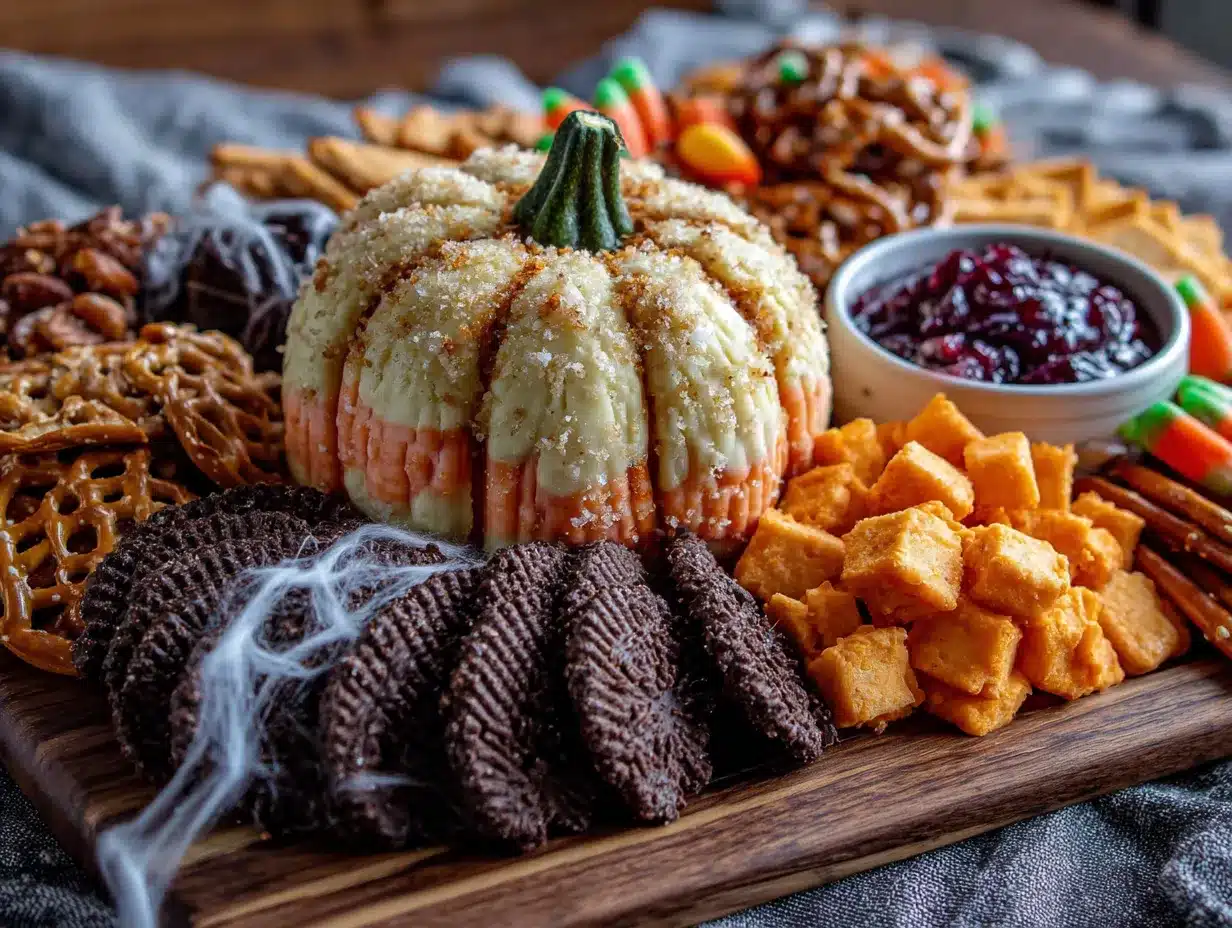
It was the third week of October, and the only thing I wanted was a cheese ball shaped like a triangle of candy corn. Not the candy itself—I mean, I love the stuff, but let’s be honest, it’s more about the nostalgia than the actual waxy sweetness. No, I wanted that iconic shape, but made of cream cheese and cheddar, rolled in something crunchy, sitting pretty on a board surrounded by all the salty, sweet, and spooky snacks a Halloween party could ask for. My kitchen counter was covered in cobwebs (the fake kind, thankfully), and I had just finished carving a lopsided pumpkin that looked more like a sad potato. That’s when it hit me—why not make the centerpiece of the party *edible*? Why not build the whole grazing spread around one hilarious, delicious, and totally Instagram-worthy cheese ball?
I grabbed a block of cream cheese from the fridge, some shredded cheddar, and a bag of tortilla chips. I wasn’t aiming for perfection. I just wanted something that felt fun, festive, and honestly, a little bit ridiculous. And you know what? It worked. That first board disappeared in twenty minutes flat. People weren’t just grabbing a chip and moving on—they were hovering, laughing at the cheese ball, and asking for the recipe. It became the thing everyone talked about, even after the party ended. And that’s the kind of recipe that sticks with you. Not because it’s fancy or complicated, but because it makes people smile. So here we are. Let’s build a board that does the same for your Halloween gathering.
Why You’ll Love This Easy Halloween Charcuterie Board
Let me tell you why this board is about to become your new favorite Halloween tradition. I’ve tested this combination at three different parties now—one with kids running around, one with adults who take their snacks very seriously, and one where I forgot to set out the utensils. It passed every test with flying colors.
- Totally Customizable: You can swap out almost anything on this board based on what you have in your pantry. The cheese ball is the star, but everything else is flexible.
- No Cooking Required: Okay, you might need to toast some nuts or bake some bacon, but the core of this recipe is assembly. No oven timers, no babysitting a hot pan.
- Perfect for Parties: This board serves a crowd and looks impressive without needing plates or forks for every single bite. People can just grab and go.
- Kid-Friendly Fun: The candy corn cheese ball is a conversation starter. Kids love it because it’s silly, and adults love it because it actually tastes amazing.
- Make-Ahead Magic: You can prep the cheese ball two days in advance. Seriously. Just wrap it tight and let it hang out in the fridge until you’re ready to roll it in the coating.
What really sets this recipe apart is the cheese ball itself. Most candy corn cheese balls are just cream cheese and cheddar dyed in layers. I add a little garlic powder, a pinch of cayenne, and some chopped pecans to the mix. It gives it a savory depth that balances out the sweet candy corn you’ll scatter around the board. It’s not just another version—it’s the one that makes you close your eyes after the first bite.
What Ingredients You Will Need
This recipe uses simple, everyday ingredients to build something that looks way more complicated than it actually is. Most of these are pantry staples or easy to find at any grocery store. I’ve broken them down by category so you can see exactly what goes where.
For the Candy Corn Cheese Ball
- Cream cheese, softened – 16 ounces (two 8-ounce blocks). Let it sit out for at least 30 minutes so it mixes smoothly. I prefer Philadelphia brand for consistent texture.
- Sharp cheddar cheese, shredded – 1 cup. Use the block and shred it yourself if you can—pre-shredded cheese has anti-caking agents that can make the texture grainy.
- Garlic powder – 1/2 teaspoon. Adds a subtle savory note that cuts through the richness.
- Onion powder – 1/4 teaspoon. Optional, but I love the depth it adds.
- Cayenne pepper – 1/8 teaspoon. Just a tiny pinch for warmth, not heat. Leave it out if you’re sensitive to spice.
- Salt – 1/4 teaspoon. Helps bring all the flavors together.
- Pecans, finely chopped – 1/2 cup. These go into the cheese mixture for texture. Toast them first for extra flavor.
- For the coating: Another 1/2 cup of finely chopped pecans (or crushed tortilla chips, or both). You’ll roll the finished cheese ball in this.
For the Charcuterie Board (the fun stuff)
- Candy corn – 1 cup. The classic. Use the regular stuff or the autumn mix with the little pumpkins.
- Pretzel sticks or rods – 2 cups. Great for dipping and add that salty crunch.
- Apple slices – 2 apples, sliced thin. Toss them in a little lemon juice to keep them from browning.
- Pear slices – 1 pear, sliced. Same lemon juice trick applies.
- Grapes – 1 cup. Red and green both work. Leave them in small clusters for a nicer look.
- Dried apricots or figs – 1/2 cup. Adds a chewy sweetness that pairs well with the cheese.
- Dark chocolate squares or Halloween-themed chocolates – 1 cup. Because you need something sweet.
- Assorted crackers – About 20-30 crackers. Go with a mix of buttery rounds, whole wheat, and something seedy.
- Salami or prosciutto – 8 ounces, sliced thin. Roll them into little roses or just fold them into loose piles.
- Fresh rosemary or thyme sprigs – For garnish. They make the board look intentional and fancy.
Equipment Needed
You don’t need a lot of fancy tools for this one. Here’s what I use every time I make this board.
- Large wooden cutting board or serving platter – At least 16 inches long. A big surface makes it easier to arrange everything.
- Mixing bowls – One medium bowl for the cheese mixture, one small bowl for the coating.
- Plastic wrap – To shape and chill the cheese ball. It keeps your hands clean and helps form a nice round shape.
- Sharp knife – For slicing apples, pears, and anything else that needs cutting.
- Small spatula or butter knife – For spreading and shaping the cheese.
- Serving spoons and small tongs – So guests can grab things without using their hands (unless you’re at a really casual party).
- Parchment paper – Optional, but helpful if you want to keep the board clean and just lift the cheese ball off for storage.
If you don’t have a large wooden board, a baking sheet lined with parchment paper works perfectly. I’ve done it more times than I can count. It’s not fancy, but it gets the job done.
Preparation Method
Alright, let’s get into the actual making of this thing. I’ll walk you through every step so you feel confident, even if you’ve never made a cheese ball before.
Step 1: Make the Cheese Ball Base
In a medium mixing bowl, combine the softened cream cheese, shredded cheddar, garlic powder, onion powder, cayenne, salt, and 1/2 cup of finely chopped pecans. Use a fork or a spatula to mix everything together until it’s fully combined. You want it smooth with no streaks of cream cheese or cheddar. This takes about 2 minutes of solid mixing. If your cream cheese is still a little cold, pop it in the microwave for 10 seconds to soften it up more.
Step 2: Shape the Cheese Ball
Scoop the mixture onto a large piece of plastic wrap. Use the plastic to help you shape it into a rough triangle—like a wedge of candy corn. Don’t stress about making it perfect. You want it to look like a slightly lumpy triangle. It should be about 6 inches wide at the base and 4 inches tall. Wrap it tightly and refrigerate for at least 2 hours, or up to 48 hours. This chilling step is critical. If you try to roll it in the coating while it’s still soft, it will just fall apart.
Step 3: Prepare the Coating
About 15 minutes before you’re ready to serve, take the remaining 1/2 cup of finely chopped pecans and spread them on a plate. If you want a more colorful coating, you can also crush up some tortilla chips or even use crushed pretzels. I like to do a mix of pecans and crushed tortilla chips for texture and color.
Step 4: Coat the Cheese Ball
Unwrap the chilled cheese triangle and gently press it into the coating mixture. Use your hands to pat the coating onto all sides, including the top and bottom. Don’t forget the edges! You want it fully covered. If the coating isn’t sticking, let the cheese ball sit out for 5 minutes to soften slightly. Place it in the center of your serving board.
Step 5: Arrange the Board
Now comes the fun part. Start by placing the cheese ball in the middle of the board. Then, arrange the crackers, pretzels, and sliced fruits around it in small clusters. I like to put the salami or prosciutto in one corner, the candy corn in another, and the chocolate squares near the fruit. Don’t overthink it. Just scatter things in a way that looks balanced. Use small bowls for anything that might roll away, like candy corn or nuts.
Step 6: Garnish and Serve
Tuck a few sprigs of fresh rosemary or thyme around the cheese ball. It adds a pop of green that makes the whole board look more intentional. Serve immediately, or let it sit at room temperature for up to 30 minutes before guests arrive. The cheese ball is best when it’s slightly softened, so don’t serve it straight from the fridge.
Cooking Tips & Techniques
I’ve made this board enough times to know where things can go wrong. Here are my best tips to save you from the same mistakes I made.
Don’t skip the chilling step. I know it’s tempting to rush, but if you try to coat a warm cheese ball, you’ll end up with a sticky mess that looks more like a science experiment than a party centerpiece. Trust me, I learned this the hard way the first time I made it. The mixture needs that time in the fridge to firm up and hold its shape.
Toast your pecans. Raw pecans are fine, but toasting them for 5 minutes in a dry pan brings out their natural oils and makes them way more flavorful. It takes almost no effort and makes a huge difference in the final taste of the cheese ball.
Use a mix of textures on the board. You want crunchy things (pretzels, crackers), soft things (cheese, fruit), and chewy things (dried apricots, salami). If everything is the same texture, the board feels flat. Mix it up and let people discover different combinations.
Let the cheese ball come to room temperature before serving. About 20 minutes on the counter is perfect. Cold cheese ball is hard and doesn’t spread well. Soft cheese ball is creamy and dreamy. Give it that time to relax.
Prep everything the night before. Slice your fruits, arrange your crackers, and portion out your candy corn. Store everything in separate containers in the fridge. Then, on party day, all you have to do is pull it out and arrange it. It takes the stress out of hosting and lets you actually enjoy the party.
Variations & Adaptations
One of the best things about this board is how easy it is to change things up. Here are a few ways I’ve adapted it over the years.
Spooky Sweet Variation
Swap the savory cheese ball for a sweet version. Use 8 ounces of cream cheese mixed with 1/4 cup of powdered sugar and 1 teaspoon of vanilla extract. Roll it in crushed graham crackers and arrange it with graham crackers, marshmallows, and chocolate squares for a s’mores-inspired board. Add some gummy worms for extra creepiness.
Savory Lover’s Board
If cheese balls aren’t your thing (I know, weird, but okay), you can replace the cheese ball with a big pile of creamy buffalo chicken dip. Serve it warm in a small cast-iron skillet right on the board. It adds a spicy, hearty element that balances out the sweet candy corn and fruit.
Nut-Free Option
Skip the pecans entirely. Use crushed pretzels or crushed tortilla chips for the coating instead. The texture will be a little different, but it still tastes amazing. Just make sure to check all your labels if you’re serving someone with a nut allergy.
Gluten-Free Board
Use gluten-free crackers and pretzels. Most candy corn is naturally gluten-free, but double-check the label. The cheese ball itself is gluten-free as long as you use a gluten-free coating (like crushed tortilla chips or crushed gluten-free pretzels).
Kid-Friendly Mini Boards
If you’re hosting a party with kids, make individual mini boards. Use small plates or even paper plates. Give each kid a mini cheese ball (make them smaller triangles) and let them pick their own toppings. It keeps the mess contained and makes them feel special.
Serving & Storage Suggestions
This board is best served at room temperature, so pull it out of the fridge about 20 minutes before guests arrive. The cheese ball will be soft and spreadable, and the fruit will be crisp and cold. It’s the perfect contrast.
For drinks, I love pairing this board with a crisp apple cider (hot or cold) or a light, fruity white wine like a Riesling or a Sauvignon Blanc. If you’re going for something boozy, a pumpkin beer or a hard cider works beautifully. For the kids (or the designated drivers), sparkling apple cider is always a hit.
If you have leftovers, wrap the cheese ball tightly in plastic wrap and store it in the fridge for up to 5 days. The crackers and pretzels will get soft if you store them with the cheese, so keep them in a separate airtight container at room temperature. The fruit should be eaten within a day or two—it doesn’t hold up well after that.
I’ve also frozen the cheese ball before. Wrap it tightly in plastic wrap, then in foil, and freeze for up to 2 months. Thaw it in the fridge overnight, then let it sit at room temperature for 20 minutes before rolling it in the coating. It works perfectly.
One thing I love about this board is how the flavors develop over time. The cheese ball actually tastes better after a day in the fridge. The garlic and cayenne have time to meld with the cream cheese, and the pecans soften just a little. If you’re making it for a party, I recommend making the cheese ball two days ahead. It’s one less thing to worry about on the day of.
Nutritional Information & Benefits
Let’s be real—this is a treat, not a health food. But it does have some redeeming qualities. The cream cheese and cheddar provide a good amount of protein and calcium. The pecans are packed with healthy fats and vitamin E. And the fruit gives you a little fiber and natural sweetness.
Here’s a rough estimate per serving (based on 12 servings):
- Calories: ~320
- Protein: 10g
- Fat: 22g
- Carbohydrates: 24g
- Fiber: 3g
- Sugar: 14g
This recipe contains dairy, nuts, and gluten (from the crackers). If you’re serving someone with dietary restrictions, the variations section above has plenty of swaps. The candy corn is mostly sugar, so if you’re watching your sugar intake, you can use dark chocolate squares or dried fruit instead.
I personally love that this board feels indulgent without being over-the-top. It’s the kind of thing you can serve at a party and feel good about because people are eating a variety of foods—not just a pile of candy. It’s balanced in its own chaotic, Halloween-y way.
Conclusion
This Easy Halloween Charcuterie Board with Candy Corn Cheese Ball is the kind of recipe that makes you look like a hero without actually doing that much work. It’s fun, it’s festive, and it’s genuinely delicious. The cheese ball is creamy and savory with just a hint of heat, and the board around it gives everyone something to love—sweet, salty, crunchy, and chewy all in one place.
I love this recipe because it brings people together. There’s something about a shared board of snacks that makes a party feel more relaxed and more fun. People gather around it, they talk, they try different combinations, and they laugh at the silly cheese ball in the middle. That’s what Halloween is all about, right? Having a good time with the people you care about.
I’d love to see how your board turns out! Leave a comment below and tell me what you put on yours. Did you add anything weird? Did the kids love the cheese ball? Share your photos and tag me on social media. And if you’re looking for more party-perfect recipes, check out my creamy classic deviled eggs with crispy bacon crumbles or my savory bacon-wrapped smokies with brown sugar glaze. They’re both perfect additions to any Halloween spread.
Now go make that cheese ball. Your party guests will thank you.
Frequently Asked Questions
Can I make the cheese ball vegan?
Yes! Use vegan cream cheese and vegan shredded cheddar. The texture will be slightly different, but it works. Just make sure to chill it well before shaping and coating. I’ve tested it with a few brands, and Kite Hill works best for the cream cheese.
How far in advance can I assemble the whole board?
You can make the cheese ball up to 2 days ahead. For the board itself, I recommend assembling it no more than 2 hours before serving. The crackers will get soft if they sit too long, and the fruit will start to brown. If you want to prep ahead, slice the fruit and store it in lemon water in the fridge. Arrange everything right before guests arrive.
What can I use instead of pecans for the coating?
Crushed pretzels, crushed tortilla chips, crushed graham crackers, or even crushed candy corn work great. If you want a nut-free option, crushed pretzels are my favorite. They add a salty crunch that balances the creamy cheese.
Can I use a different cheese for the ball?
Absolutely. Sharp cheddar is classic, but you can use pepper jack for a spicy kick, gouda for a smoky flavor, or even a mix of cheddar and mozzarella for a milder taste. Just make sure the cheese is finely shredded so it mixes in smoothly.
How do I store leftover candy corn?
Leftover candy corn can be stored in an airtight container at room temperature for months. But honestly, if you have leftover candy corn after Halloween, you’re not trying hard enough. Use it to top cupcakes, mix it into popcorn, or just eat it by the handful while you watch scary movies.
Pin This Recipe!

Easy Halloween Charcuterie Board with Candy Corn Cheese Ball

A fun and festive Halloween charcuterie board featuring a savory candy corn-shaped cheese ball made with cream cheese, cheddar, and pecans, surrounded by sweet, salty, and crunchy snacks. Perfect for parties, this no-cook recipe is customizable, kid-friendly, and sure to be a conversation starter.
- Prep Time: 20 minutes
- Cook Time: 0 minutes
- Total Time: 2 hours 20 minutes (includes chilling time)
- Yield: 12 servings 1x
- Category: Appetizer
- Cuisine: American
Ingredients
- 16 ounces cream cheese, softened (two 8-ounce blocks)
- 1 cup sharp cheddar cheese, shredded
- 1/2 teaspoon garlic powder
- 1/4 teaspoon onion powder
- 1/8 teaspoon cayenne pepper
- 1/4 teaspoon salt
- 1/2 cup pecans, finely chopped (for cheese mixture)
- 1/2 cup pecans, finely chopped (for coating, or use crushed tortilla chips or pretzels)
- 1 cup candy corn
- 2 cups pretzel sticks or rods
- 2 apples, sliced thin (tossed in lemon juice)
- 1 pear, sliced (tossed in lemon juice)
- 1 cup grapes (red or green, in small clusters)
- 1/2 cup dried apricots or figs
- 1 cup dark chocolate squares or Halloween-themed chocolates
- 20–30 assorted crackers (buttery rounds, whole wheat, seedy)
- 8 ounces salami or prosciutto, sliced thin
- Fresh rosemary or thyme sprigs for garnish
Instructions
- In a medium mixing bowl, combine softened cream cheese, shredded cheddar, garlic powder, onion powder, cayenne, salt, and 1/2 cup finely chopped pecans. Mix until fully combined and smooth, about 2 minutes.
- Scoop the mixture onto a large piece of plastic wrap. Use the plastic to shape it into a rough triangle (like a wedge of candy corn), about 6 inches wide at the base and 4 inches tall. Wrap tightly and refrigerate for at least 2 hours, or up to 48 hours.
- About 15 minutes before serving, spread the remaining 1/2 cup finely chopped pecans (or a mix of crushed tortilla chips) on a plate for the coating.
- Unwrap the chilled cheese triangle and gently press it into the coating mixture, covering all sides. Pat with hands to adhere. Place in the center of a serving board.
- Arrange crackers, pretzels, sliced fruits, salami or prosciutto, candy corn, chocolate squares, and dried fruit around the cheese ball in small clusters. Use small bowls for items that may roll.
- Garnish with fresh rosemary or thyme sprigs. Serve immediately, or let sit at room temperature for up to 30 minutes before serving for best texture.
Notes
Don’t skip the chilling step—it helps the cheese ball hold its shape. Toast pecans for extra flavor. Let the cheese ball come to room temperature for 20 minutes before serving for a creamy texture. Prep the cheese ball up to 2 days ahead. For a nut-free option, use crushed pretzels or tortilla chips for the coating. Leftover cheese ball can be wrapped and refrigerated for up to 5 days or frozen for up to 2 months.
Nutrition
- Serving Size: 1 serving (based on
- Calories: 320
- Sugar: 14
- Sodium: 450
- Fat: 22
- Saturated Fat: 10
- Carbohydrates: 24
- Fiber: 3
- Protein: 10
Keywords: Halloween charcuterie board, candy corn cheese ball, Halloween appetizer, easy party snack, no-cook recipe, cheese ball, Halloween grazing board