The October sky had already turned that deep, bruised purple by 5:30 PM, and I was standing in my kitchen staring at a bag of black beans and a pile of bell peppers that were definitely not going to turn into anything scary on their own. My daughter had been asking for a Halloween dinner all week—something spooky but not too spooky, if you know what I mean. She wanted mummies. Edible ones. And honestly, I was fresh out of ideas after the third Pinterest fail of the week.
So I did what any reasonable parent does when faced with a themed dinner request and a pantry full of odds and ends. I started pulling things out. Black beans from the back of the cabinet. Rice that had been sitting there since summer. A block of cheese that was begging to be shredded. And there they were—four orange bell peppers, sitting in the crisper drawer like they were waiting for their moment. I grabbed a knife, sliced off the tops, and suddenly I could see it. Little mummies. Stuffed, wrapped, and ready for a Halloween dinner that didn’t require a trip to the store or a degree in culinary arts.
That first batch came out a little lopsided, if I’m being honest. The cheese strips I used for bandages slid off one pepper entirely, and another one looked more like a sad ghost than a mummy. But the flavor? That was a different story. The smoky cumin, the tender black beans, the way the pepper softened just enough in the oven—it was exactly the kind of easy, satisfying dinner you want on a busy weeknight, even when that weeknight happens to fall on October 31st. These Easy Black Bean Mummy-Stuffed Peppers for Halloween are the kind of recipe that makes you feel like you pulled off something magical, even when you barely tried.
Why You’ll Love This Recipe
I’ve tested this recipe more times than I care to admit, mostly because my daughter kept requesting it for weeks after Halloween. Here’s why it works.
- Quick & Easy : From start to table in about 40 minutes. No complicated techniques, no specialty equipment. Just straightforward cooking that fits into a busy Halloween evening.
- Simple Ingredients : Everything on the ingredient list is something you can find at any grocery store. Black beans, rice, bell peppers, cheese—nothing weird or expensive.
- Perfect for Halloween Dinner : This is the rare recipe that actually looks festive without requiring artistic skills. The cheese bandages do all the work for you.
- Crowd-Pleaser : Kids love the mummy look. Adults love the flavor. Even my picky nephew, who usually pushes vegetables around his plate, ate two of these.
- Unbelievably Delicious : The filling is smoky, cheesy, and satisfying. The pepper gets tender but still holds its shape. Every bite has that perfect balance of textures.
What makes this different from other stuffed pepper recipes is the technique. Instead of boiling the peppers first (which makes them mushy), you roast them with a little water in the pan. This steams them just enough to soften without losing structure. And the cheese bandages? They get crispy on the edges while staying melty in the middle. It’s a small detail, but it’s the kind of thing that makes a recipe feel special.
Honestly, this is the kind of dinner that makes you close your eyes after the first bite. It’s comfort food disguised as Halloween fun—healthy enough to feel good about, festive enough to impress, and simple enough that you’re not stuck in the kitchen while everyone else is having fun.
What Ingredients You Will Need
This recipe uses simple, wholesome ingredients to deliver bold flavor and satisfying texture without the fuss. Most of these are pantry staples, and the ones that aren’t are easy to find.
- Black beans – 1 can (15 oz), drained and rinsed. I prefer Bush’s or Goya for consistent texture. You can use dried beans if you cook them ahead, but canned works perfectly here.
- Cooked rice – 1 cup. Leftover rice works great. White, brown, or even cauliflower rice if you’re cutting carbs. Just make sure it’s fully cooked and cooled slightly.
- Orange bell peppers – 4 large. Look for ones that sit flat on their own. The shape matters for the mummy look—rounder peppers work better than pointy ones.
- Shredded mozzarella cheese – 1 cup, divided. Use low-moisture mozzarella for the best melt and stretch. Fresh mozzarella is too wet and won’t hold its shape for the bandages.
- Shredded cheddar cheese – ½ cup. This adds color and sharpness to the filling. I like sharp cheddar for more flavor.
- Onion – ½ medium, finely diced. Yellow or white works best. Red onion is fine but changes the color slightly.
- Garlic – 3 cloves, minced. Fresh is best, but jarred minced garlic works in a pinch (use 1 teaspoon).
- Ground cumin – 1 teaspoon. This is the backbone of the flavor. Don’t skip it.
- Smoked paprika – ½ teaspoon. Adds that subtle smoky depth. Regular paprika works too, but smoked is better.
- Chili powder – ½ teaspoon. Use mild or medium depending on your heat preference. Ancho chili powder adds a nice earthy sweetness.
- Salt – ½ teaspoon, or to taste.
- Black pepper – ¼ teaspoon, freshly ground.
- Tomato sauce – ½ cup. Plain tomato sauce, not marinara. You want it smooth and simple.
- Olive oil – 1 tablespoon, for sautéing.
- Water – ¼ cup, added to the baking dish to help steam the peppers.
- Candy eyes – 8 small (optional but highly recommended). These are the ones you find at baking supply stores. They make the mummies come alive. Literally.
For the cheese bandages, you’ll want to use mozzarella strips. I recommend Sargento or Kraft block mozzarella that you shred yourself—the pre-shredded bags have anti-caking agents that prevent proper melting. If you’re dairy-free, Violife mozzarella shreds work surprisingly well for the bandages, though they won’t get quite as crispy.
Equipment Needed
You don’t need much for this recipe, which is part of the appeal. Here’s what you’ll need:
- Baking dish – An 8×8 or 9×9 square dish works perfectly. A round pie plate works too if that’s what you have.
- Sharp knife – For cutting the tops off the peppers. A serrated knife actually works better than a straight edge for this.
- Cutting board – Standard size is fine.
- Large skillet – For sautéing the onion and garlic, and mixing the filling. A non-stick skillet makes cleanup easier.
- Mixing bowl – Medium size, for combining the filling ingredients.
- Small spoon – For stuffing the peppers. A teaspoon works great.
- Measuring cups and spoons – Standard set.
- Foil – For covering the dish during the first part of baking.
I’ve made this recipe using a cast iron skillet for the whole thing—sauté, stuff, and bake—and it works beautifully. If you have a 10-inch cast iron, you can skip the baking dish entirely. Just be careful when handling the hot skillet. Budget-wise, you probably already own everything on this list. No need to buy anything special.
Preparation Method
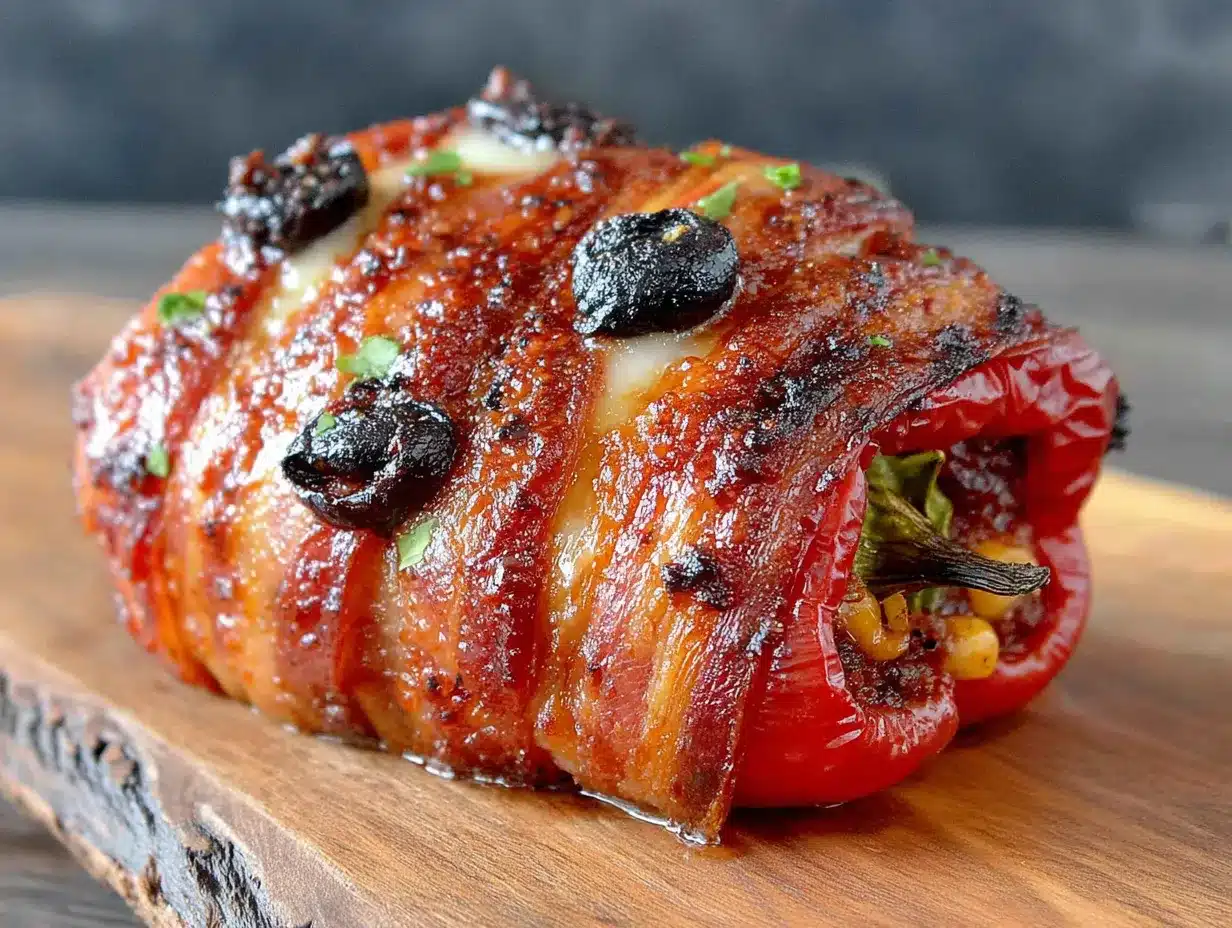
Let’s get these mummies ready. The whole process takes about 40 minutes, and most of that is hands-off baking time.
- Preheat your oven to 375°F (190°C). This gives it time to come to temperature while you prep everything. Position the rack in the middle of the oven.
- Prepare the peppers. Wash and dry your bell peppers. Using a sharp knife, slice the tops off about ½ inch from the stem. Set the tops aside (you can chop them up and add them to the filling if you want, or just compost them). Use a small spoon to scoop out the seeds and white membranes from inside each pepper. Be gentle—you want the pepper to stay intact. If a pepper won’t stand up straight, slice a tiny bit off the bottom to create a flat surface. Just don’t cut through the bottom.
- Start the filling. Heat 1 tablespoon of olive oil in a large skillet over medium heat. Add the diced onion and cook for 3-4 minutes, stirring occasionally, until it turns translucent and starts to soften. You want it fragrant but not browned. Add the minced garlic and cook for another 30 seconds, just until you can smell it. Don’t let the garlic burn—it turns bitter fast.
- Build the flavor. Add the ground cumin, smoked paprika, and chili powder to the skillet. Stir constantly for about 30 seconds. This toasts the spices and wakes up their flavors. You’ll smell it immediately. Add the tomato sauce and stir to combine, scraping up any browned bits from the bottom of the pan.
- Combine the filling. Add the drained black beans, cooked rice, ½ cup of the shredded mozzarella, and all of the shredded cheddar to the skillet. Stir everything together until the cheese melts and the filling is evenly mixed. Season with salt and pepper. Taste it. Adjust the salt if needed. The filling should be slightly moist but not wet. If it looks dry, add a tablespoon of water or extra tomato sauce.
- Stuff the peppers. Place the hollowed-out peppers in your baking dish, standing upright. Using a small spoon, divide the filling evenly among the four peppers. Pack it in gently but firmly—you want the filling to be compact so it stays together when you bite into it. Don’t overstuff; leave about ¼ inch of space at the top for the cheese bandages. If you have leftover filling, just spoon it into the dish around the peppers.
- Add the water. Pour ¼ cup of water into the bottom of the baking dish, being careful not to pour it directly into the peppers. This water creates steam in the oven, which helps the peppers soften without boiling them first. Cover the dish tightly with foil.
- Bake covered. Place the dish in the preheated oven and bake for 20 minutes. The steam will soften the peppers while the filling heats through. Set a timer—it’s easy to forget.
- Create the mummy bandages. While the peppers bake, prepare your cheese bandages. Take the remaining ½ cup of mozzarella and pull it into thin strips. They don’t have to be perfect—mummies are supposed to look a little messy. Think of it as character.
- Uncover and decorate. After 20 minutes, carefully remove the foil. The peppers should be tender but still holding their shape. Lay the mozzarella strips across each pepper in a crisscross pattern, leaving a small gap near the top for the eyes. Don’t cover the entire pepper—you want some orange showing through. This is where the mummy look comes together.
- Bake uncovered. Return the dish to the oven, uncovered, and bake for another 8-10 minutes. Keep an eye on it. You want the cheese to melt and start browning in spots, but not burn. The edges of the bandages should get crispy and golden.
- Add the eyes. Remove the dish from the oven. While the cheese is still hot and melty, press two candy eyes into the gap you left at the top of each pepper. Press gently so they stick. If you don’t have candy eyes, you can use small dots of black olive or even black sesame seeds. Let the peppers rest for 5 minutes before serving. This helps them set and makes them easier to handle.
Cooking Tips & Techniques
I’ve made these mummy peppers about a dozen times now, and I’ve learned a few things the hard way. Here’s what I wish someone had told me.
Don’t overbake the peppers. The first time I made these, I left them in the oven too long because I was distracted by trick-or-treaters. The peppers collapsed and looked more like zombie mummies than cute ones. Check them at the 18-minute mark during the covered bake. They should be fork-tender but still firm enough to hold their shape. You want them to have a little resistance when you poke them.
Shred your own cheese. I know it’s tempting to buy the pre-shredded bags. I’ve done it. But the anti-caking powder they coat the shreds with prevents proper melting. Your bandages won’t stretch or get crispy the same way. Take the extra two minutes to shred a block of mozzarella. Your mummies will thank you.
Toast your spices. This is a small step that makes a huge difference. When you add the cumin and paprika to the hot oil, let them sizzle for just 30 seconds before adding the tomato sauce. It releases their essential oils and makes the filling taste deeper and more complex. You’ll smell the difference immediately.
Multitask wisely. While the peppers are baking covered, use that time to clean up your workspace and prep the cheese bandages. You’ll thank yourself later when dinner is ready and you don’t have a mountain of dishes waiting. I usually wipe down the cutting board and put away the spices during those 20 minutes.
Keep the candy eyes handy. I once spent five minutes digging through the pantry looking for the candy eyes while the cheese was cooling and hardening. Press them in while the cheese is still hot and sticky. Have them ready on the counter before you pull the dish out of the oven.
Variations & Adaptations
One of the best things about this recipe is how flexible it is. Here are some variations I’ve tried and loved.
Make it vegan. Swap the cheese for a dairy-free mozzarella alternative. Violife and Miyoko’s both melt well. Use a vegan cheddar-style shred in the filling. The texture will be slightly different, but the flavor is still fantastic. I’ve made this version for a friend with dairy allergies, and she asked for the recipe.
Spice it up. If you like heat, add a diced jalapeño to the onion mixture, or stir in ½ teaspoon of cayenne pepper with the other spices. You can also use pepper jack cheese instead of cheddar for the filling. The smoky cumin balances the heat beautifully.
Swap the protein. Black beans are great, but you can use any cooked bean you have on hand. Pinto beans, kidney beans, or even lentils work well. For a meat version, substitute cooked ground beef or turkey for the beans. Just brown the meat with the onion and drain the fat before adding the spices.
Change up the grain. Quinoa, farro, or even cooked bulgur wheat work in place of rice. Quinoa adds a nice nutty flavor and extra protein. Cauliflower rice keeps it low-carb and light. Just make sure whatever grain you use is fully cooked and not too wet.
Seasonal twist. In summer, I sometimes add fresh corn kernels to the filling. In fall, a little diced butternut squash roasted and mixed in adds sweetness. The basic recipe is a template—feel free to play with it.
Serving & Storage Suggestions
These mummy peppers are best served warm, right out of the oven. The cheese should still be stretchy, and the peppers should be tender but not mushy. I like to serve them on a dark plate or black platter to make the orange peppers pop. A simple side salad with a lime vinaigrette balances the richness of the filling.
For a full Halloween dinner spread, pair these with a creamy buffalo chicken dip as a starter and some savory bacon-wrapped smokies on the side. The combination of flavors is perfect for a festive meal. You could also serve them alongside a fresh caprese skewers for a lighter option.
Storage: Leftover stuffed peppers keep well in the refrigerator for up to 3 days. Store them in an airtight container. The peppers will soften more over time, but the flavor actually gets better as the spices meld together.
Reheating: The best way to reheat is in the oven at 350°F for about 10 minutes. This helps the peppers firm up again. The microwave works in a pinch, but the peppers will be softer. If you’re reheating from frozen, thaw in the refrigerator overnight first, then reheat in the oven.
Freezing: You can freeze the stuffed peppers before baking. Assemble them completely, but don’t add the cheese bandages or candy eyes. Wrap each pepper individually in plastic wrap, then place in a freezer bag. They’ll keep for up to 2 months. When you’re ready to bake, thaw in the refrigerator, add the cheese bandages, and bake as directed. Add the candy eyes after baking.
Nutritional Information & Benefits
Here’s an estimated nutritional breakdown per serving (one stuffed pepper):
- Calories: 320
- Protein: 16g
- Carbohydrates: 38g
- Fiber: 10g
- Fat: 12g
- Saturated Fat: 6g
- Sodium: 580mg
These peppers are packed with fiber from the black beans and bell peppers, which helps with digestion and keeps you full. Bell peppers are an excellent source of vitamin C—one pepper provides more than 100% of your daily needs. Black beans are rich in plant-based protein and iron, making this a satisfying vegetarian meal. The rice provides complex carbohydrates for steady energy.
If you’re watching your sodium, use low-sodium black beans and reduce the added salt. You can also skip the cheese for a lower-fat version, though you’ll lose the mummy effect. This recipe is naturally gluten-free and can easily be made dairy-free with the substitutions mentioned earlier.
For a lighter meal, serve alongside a fresh watermelon cucumber gazpacho for a refreshing contrast to the warm, savory peppers.
Conclusion
These Easy Black Bean Mummy-Stuffed Peppers for Halloween are proof that festive food doesn’t have to be complicated. They’re fun enough for a Halloween party, but satisfying enough for a regular weeknight dinner. The combination of smoky black beans, tender peppers, and melty cheese is comfort food at its finest—with a side of silly, which is honestly the best side dish of all.
I love this recipe because it makes me feel like I’m giving my family something special, even when I’m short on time and energy. The mummy faces make everyone smile, and the flavor makes everyone go back for seconds. It’s the kind of dinner that creates memories without creating stress.
Try this recipe and make it your own. Swap in your favorite beans, add extra spice, or change up the cheese. The basic formula is forgiving and flexible. And when you make it, I’d love to hear how it turned out. Leave a comment below with your variations, or tag me in your photos. Happy Halloween, and happy eating!
Frequently Asked Questions
Can I make these ahead of time?
Yes! You can assemble the stuffed peppers (without the cheese bandages and candy eyes) up to 24 hours in advance. Cover and refrigerate. When you’re ready to bake, add the cheese bandages and bake as directed, adding about 5 extra minutes to the covered baking time since the peppers will be cold.
Can I use different colored peppers?
Absolutely. Red, yellow, or green bell peppers all work. Orange peppers look the most Halloween-appropriate, but red peppers are sweeter and green peppers have a more savory flavor. Mix and match for a colorful plate.
My cheese bandages keep sliding off. What am I doing wrong?
This happens when the cheese strips are too thick or the peppers are too wet. Make sure you’re using thin strips of mozzarella. Also, pat the peppers dry with a paper towel before adding the bandages. The cheese needs to stick to a relatively dry surface.
Can I make this in an air fryer?
You can, but the results are slightly different. Air fry at 350°F for 12-15 minutes covered with foil, then remove the foil and add the cheese bandages for another 3-4 minutes. The peppers won’t be as tender as oven-baked ones, but they’ll still be good.
What can I use instead of candy eyes?
Black olives cut into small rounds work great. You can also use black sesame seeds, small pieces of black bean, or even dots of black food coloring on a toothpick. The eyes are optional, but they really sell the mummy look.
Pin This Recipe!
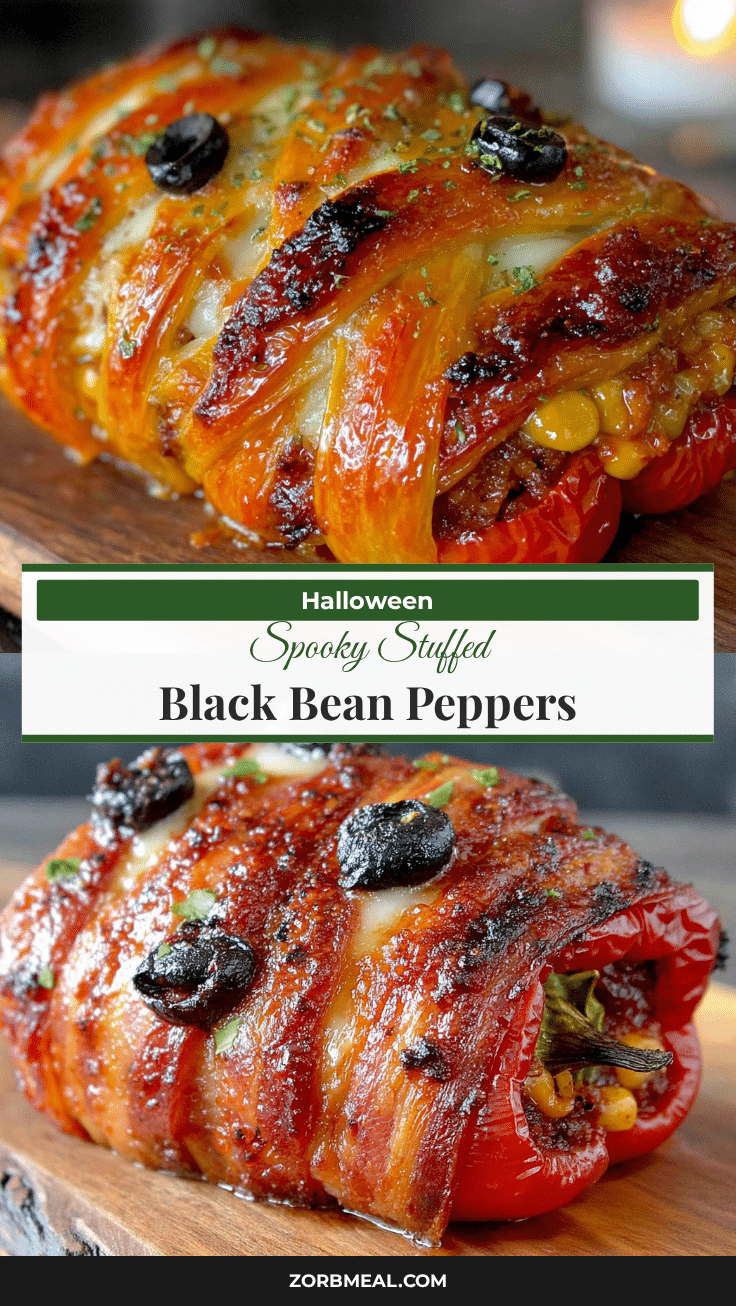
Easy Black Bean Mummy-Stuffed Peppers for Halloween
These fun and festive mummy-stuffed peppers are filled with smoky black beans, rice, and cheese, then topped with melty mozzarella bandages and candy eyes. Perfect for a Halloween dinner that’s both delicious and easy to make.
- Prep Time: 15 minutes
- Cook Time: 30 minutes
- Total Time: 45 minutes
- Yield: 4 servings 1x
- Category: Main Course
- Cuisine: American
Ingredients
- 1 can (15 oz) black beans, drained and rinsed
- 1 cup cooked rice (white, brown, or cauliflower rice)
- 4 large orange bell peppers
- 1 cup shredded low-moisture mozzarella cheese, divided
- ½ cup shredded sharp cheddar cheese
- ½ medium onion, finely diced
- 3 cloves garlic, minced
- 1 teaspoon ground cumin
- ½ teaspoon smoked paprika
- ½ teaspoon chili powder
- ½ teaspoon salt
- ¼ teaspoon black pepper, freshly ground
- ½ cup tomato sauce
- 1 tablespoon olive oil
- ¼ cup water
- 8 small candy eyes (optional)
Instructions
- Preheat your oven to 375°F (190°C). Position the rack in the middle of the oven.
- Wash and dry the bell peppers. Slice the tops off about ½ inch from the stem. Scoop out the seeds and white membranes. If a pepper won’t stand up straight, slice a tiny bit off the bottom to create a flat surface.
- Heat 1 tablespoon of olive oil in a large skillet over medium heat. Add the diced onion and cook for 3-4 minutes until translucent. Add the minced garlic and cook for 30 seconds.
- Add the ground cumin, smoked paprika, and chili powder to the skillet. Stir constantly for about 30 seconds to toast the spices. Add the tomato sauce and stir to combine, scraping up any browned bits.
- Add the drained black beans, cooked rice, ½ cup of the shredded mozzarella, and all of the shredded cheddar to the skillet. Stir until the cheese melts and the filling is evenly mixed. Season with salt and pepper. Taste and adjust salt if needed.
- Place the hollowed-out peppers in a baking dish, standing upright. Divide the filling evenly among the four peppers, packing it gently but firmly. Leave about ¼ inch of space at the top for the cheese bandages.
- Pour ¼ cup of water into the bottom of the baking dish, being careful not to pour it directly into the peppers. Cover the dish tightly with foil.
- Bake covered for 20 minutes.
- While the peppers bake, prepare the cheese bandages by pulling the remaining ½ cup of mozzarella into thin strips.
- After 20 minutes, carefully remove the foil. Lay the mozzarella strips across each pepper in a crisscross pattern, leaving a small gap near the top for the eyes.
- Return the dish to the oven, uncovered, and bake for another 8-10 minutes until the cheese is melted and starting to brown in spots.
- Remove the dish from the oven. While the cheese is still hot and melty, press two candy eyes into the gap at the top of each pepper. Let the peppers rest for 5 minutes before serving.
Notes
Don’t overbake the peppers; check at 18 minutes during covered bake. Shred your own cheese for best melting. Toast spices in hot oil for deeper flavor. Keep candy eyes handy to press in while cheese is hot. For vegan option, use dairy-free mozzarella and cheddar alternatives.
Nutrition
- Serving Size: 1 stuffed pepper
- Calories: 320
- Sugar: 6
- Sodium: 580
- Fat: 12
- Saturated Fat: 6
- Carbohydrates: 38
- Fiber: 10
- Protein: 16
Keywords: Halloween, stuffed peppers, black beans, mummy, vegetarian, easy dinner, festive