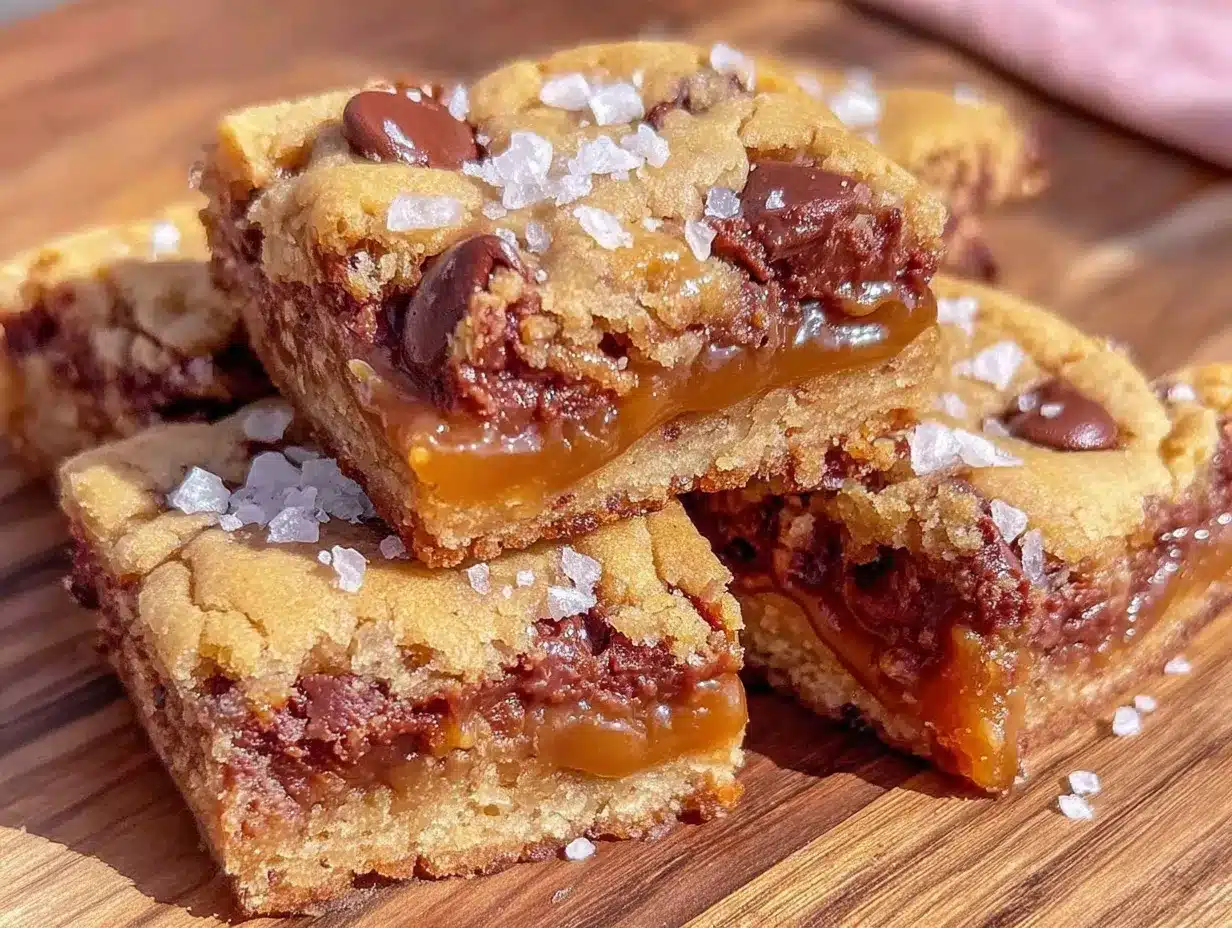
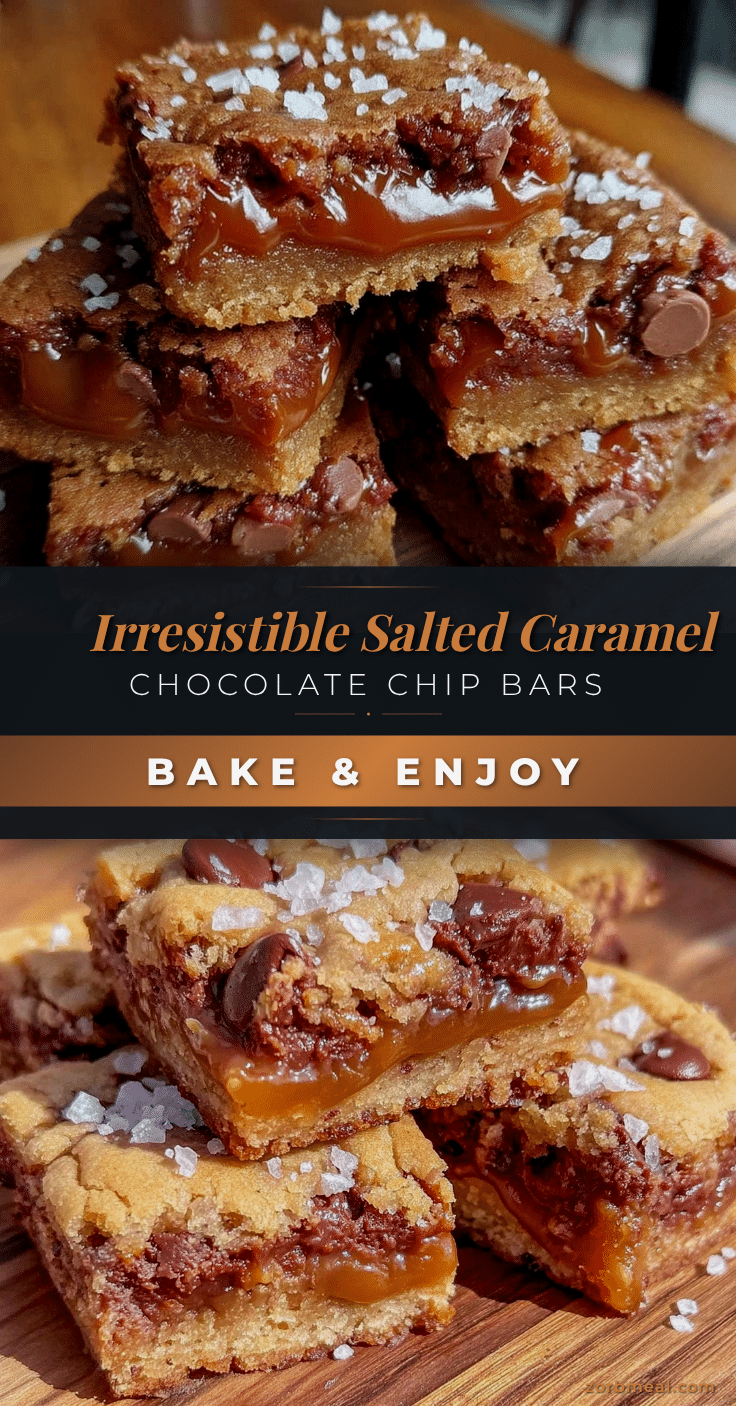
“You really have to try these bars,” my coworker whispered conspiratorially as she slid a plate across the breakroom table. I eyed the slightly sticky, golden-brown squares studded with chocolate chips and a teasing drizzle of caramel, skeptical but curious. Honestly, I wasn’t expecting much—just another cookie bar among many. But that first bite? It was like a sweet surprise party in my mouth. The way the salted caramel melted into the warm, chewy chocolate chip cookie base was something I hadn’t quite experienced before. It hit me then—this wasn’t your typical cookie bar. It was the kind of treat that stops you mid-conversation and demands your full attention.
Since that day, I couldn’t stop making these salted caramel chocolate chip cookie bars. They’ve turned into my go-to when I need a quick homemade fix that feels fancy without the fuss. Late-night cravings, unexpected guests, or just a quiet moment with a cup of coffee—these bars fit perfectly. And what’s best? They come together with easy pantry ingredients that don’t require a special trip to the store. No stress, just pure deliciousness. It’s funny how a simple plate of bars in an office breakroom became my secret weapon for easy homemade treats that everyone asks for again and again.
There’s something about that balance—the chewy chocolate chip cookie base, that luscious salted caramel, and just the right sprinkle of sea salt—that makes this recipe impossible to resist. You know, it’s one of those recipes you keep close because it works every single time. And honestly, once you try it, you’ll understand why it stuck with me.
Why You’ll Love This Recipe
From personal kitchen experiments and many happy taste testers, these salted caramel chocolate chip cookie bars have proven themselves as a standout recipe. Here’s what makes them a must-try:
- Quick & Easy: Ready in under 40 minutes, perfect for those hectic evenings or when you need a sweet pick-me-up fast.
- Simple Ingredients: No fancy or hard-to-find items—just staples you likely have on hand like brown sugar, butter, and chocolate chips.
- Perfect for Any Occasion: Whether it’s a casual family dessert, a potluck contribution, or part of a cozy brunch spread, these bars fit right in.
- Crowd-Pleaser: Kids love them, adults rave about them, and I’ve yet to meet someone who doesn’t ask for seconds.
- Unbelievably Delicious: The chewy texture and the sweet-salty combo bring comfort food vibes that hit the spot every time.
What sets this recipe apart is how the salted caramel is woven right into the cookie bars, not just drizzled on top. It gives a perfect balance—melty pockets of caramel that don’t overpower but invite you to savor each bite. Plus, I’ve found that using a mix of semi-sweet and dark chocolate chips adds a depth that’s just heavenly. For a bit of fun, I sometimes swap in a touch of espresso powder to boost the chocolate flavor—trust me, it’s a game-changer!
This isn’t just your average cookie bar—it’s a recipe that feels special but comes together with ease. It’s that little homemade indulgence that makes any day feel a bit brighter.
What Ingredients You Will Need
This recipe uses simple, wholesome ingredients to deliver bold flavor and satisfying texture without the fuss. Most are pantry staples, making it easy to whip up anytime.
- Unsalted butter, melted (adds richness and helps create that chewy texture)
- Brown sugar, packed (for deep caramel notes and moisture)
- Granulated sugar (balances sweetness and crunch)
- Large eggs, room temperature (for structure and binding)
- Pure vanilla extract (authentic flavor boost)
- All-purpose flour (the sturdy base; use a trusted brand like King Arthur for consistent results)
- Baking soda (helps the bars rise just enough)
- Salt (a must to balance sweetness and highlight the caramel)
- Semi-sweet chocolate chips (classic choice; I like Ghirardelli for quality and melt)
- Soft caramel candies, chopped or caramel sauce (for that irresistible gooey caramel pockets; if you prefer, use store-bought caramel sauce or make your own)
- Coarse sea salt flakes (sprinkled on top for that perfect salty crunch)
Optional:
- Espresso powder (about 1/2 teaspoon to enhance chocolate flavor)
- Walnuts or pecans, chopped (for a nutty twist)
If you need a gluten-free option, swapping all-purpose flour with almond flour works well but expect a slightly different texture. For dairy-free, substitute butter with coconut oil and use dairy-free chocolate chips—both work surprisingly well.
Equipment Needed
Pulling together these cookie bars requires basic kitchen equipment you likely already own:
- 9×13-inch baking pan: This size works perfectly for nice thick bars. I’ve tried glass and metal pans—both give great results, but metal tends to brown edges faster.
- Mixing bowls: A large one for wet ingredients and a smaller one for dry.
- Hand mixer or stand mixer: Helpful for creaming sugars and butter, but a sturdy whisk and elbow grease work just fine too.
- Spatula: For folding ingredients and spreading batter evenly.
- Measuring cups and spoons: Precision counts here for balanced flavor and texture.
- Cooling rack: To let the bars cool evenly and avoid sogginess.
For budget-friendly baking, disposable aluminum pans can be used in a pinch, though I prefer reusable ones for even heat distribution. If you bake often, investing in a quality silicone spatula and reliable mixer makes a world of difference.
Preparation Method
- Preheat your oven to 350°F (175°C). Lightly grease your 9×13-inch pan or line it with parchment paper, leaving an overhang for easy bar removal.
- Mix the melted butter, brown sugar, and granulated sugar in a large bowl until smooth and shiny, about 2 minutes. This step is key to that chewy texture, so don’t rush it.
- Add eggs and vanilla extract to the sugar-butter mixture. Beat well until combined and slightly fluffy, about 1 minute. The batter should feel creamy, not curdled.
- In a separate bowl, whisk together flour, baking soda, and salt. Gradually add the dry ingredients to the wet, folding gently with a spatula. Stop mixing as soon as the flour disappears to avoid tough bars.
- Fold in semi-sweet chocolate chips (and nuts if using), distributing evenly throughout the dough.
- Pour half the batter into the prepared pan, spreading evenly. Scatter chopped caramel candies or drizzle caramel sauce over the layer, then cover with the remaining batter. Lightly spread to seal the caramel in.
- Bake for 28-32 minutes. The edges should be golden brown, and the center set but still slightly soft (it will firm up as it cools). Avoid overbaking or the caramel may dry out.
- Remove from oven and immediately sprinkle coarse sea salt flakes over the top. Let the bars cool completely in the pan on a wire rack—about 1 hour—to ensure clean slicing.
- Use the parchment overhang to lift bars from the pan. Slice into 12 or 16 squares, depending on your preferred size.
Pro tip: If caramel candies are too hard to chop, warm them slightly in the microwave for 10 seconds to soften. Also, keeping the batter slightly thick helps trap the caramel pockets without them sinking to the bottom.
Cooking Tips & Techniques
These bars have a few tricks that make all the difference:
- Melted butter vs. softened butter: Using melted butter gives the bars a denser, chewier texture compared to creamed softened butter. It’s a subtle but game-changing detail.
- Don’t overmix flour: Mixing just until combined keeps the bars tender and avoids developing gluten, which would make them tough.
- Salt placement: Adding coarse sea salt right after baking preserves the crunch and enhances the caramel’s flavor. Adding salt to the dough itself also balances sweetness.
- Caramel distribution: Layering caramel in the middle traps those gooey pockets. If you mix caramel directly into the batter, it tends to melt and spread too thin.
- Cooling time: Patience here is key. Cutting bars too soon leads to melty messes, so let them cool fully for clean edges.
I once tried mixing caramel bits straight into the dough, and while tasty, it lacked those luscious pockets that make this recipe special. Learning from that mistake made me appreciate the layering method even more. Also, multitasking by prepping the caramel while the oven heats saves precious minutes.
Variations & Adaptations
Want to switch things up? Here are a few ideas to customize these bars:
- Nut-Free Version: Simply omit nuts and use allergy-friendly chocolate chips. The bars still shine with caramel and chocolate.
- Peanut Butter Swirl: Swirl in dollops of peanut butter before baking for a nutty twist that pairs perfectly with caramel.
- Seasonal Twist: Add a teaspoon of pumpkin pie spice or cinnamon for cozy fall vibes. You could also swap chocolate chips for white chocolate and sprinkle toasted coconut on top.
- Gluten-Free: Use almond or oat flour instead of all-purpose. The texture will be slightly different but just as delicious.
- Healthier Swap: Replace half the butter with unsweetened applesauce to cut fat, though this will make the bars softer and less chewy.
Personally, I’ve tried adding a handful of chopped dried cherries for a sweet-tart contrast that’s surprisingly addictive. You might also enjoy pairing these bars with the chewy tahini chocolate chip cookies for a cookie platter that dazzles every time.
Serving & Storage Suggestions
These bars are best served at room temperature, letting the salted caramel pockets shine with their gooey charm. For a special touch, warm individual bars briefly in the microwave (10-15 seconds) before serving—just enough to get that melty caramel but not so much that the bars lose structure.
They pair wonderfully with a cold glass of milk, rich coffee, or even a scoop of vanilla ice cream for dessert. For entertaining, they hold their own alongside savory snacks like the flavorful layered taco dip or the creamy buffalo chicken dip, balancing sweet and savory flavors beautifully.
Store cooled bars in an airtight container at room temperature for up to 3 days. For longer storage, refrigerate for up to a week or freeze for up to 3 months. When freezing, wrap individual bars tightly in plastic wrap and place in a freezer-safe bag to prevent freezer burn.
Note: The caramel flavor deepens as the bars rest, so if you make them ahead, the taste improves over time. Just be sure to reheat gently to revive that gooey texture.
Nutritional Information & Benefits
Each bar (assuming 12 servings) contains approximately:
| Calories | 280 |
|---|---|
| Fat | 14g |
| Saturated Fat | 8g |
| Carbohydrates | 34g |
| Fiber | 1g |
| Sugar | 22g |
| Protein | 3g |
While indulgent, these bars include some redeeming qualities. The dark chocolate chips offer antioxidants, and the sea salt adds a trace mineral boost that balances sweetness. Using real butter provides fat-soluble vitamins, and the brown sugar contributes molasses minerals.
For those mindful of allergens, this recipe contains gluten, dairy, and eggs, but can be adapted for gluten-free or dairy-free diets as noted. These bars are definitely a treat rather than a health food, but they bring joy and comfort in every bite, which is important too!
Conclusion
These salted caramel chocolate chip cookie bars have become a kitchen staple for me, offering the perfect blend of chewy, sweet, and salty that makes you pause and savor. They’re simple enough to throw together on a whim but special enough to wow friends and family without fuss.
Feel free to tweak the recipe based on your tastes—add nuts, spice it up, or keep it classic. The best part is how forgiving and versatile it is, welcoming all sorts of personal touches.
Honestly, these bars hold a special place in my recipe box because they remind me that homemade treats don’t have to be complicated to be memorable. So go ahead, bake a batch, and enjoy that moment when the salted caramel meets warm chocolate in a way that just feels right.
If you try this recipe, I’d love to hear how you make it your own—drop a comment or share your variations!
FAQs
Can I use store-bought caramel sauce instead of chopped caramel candies?
Yes! Drizzle about 1/2 cup of caramel sauce between the layers just like the chopped candies. The bars will be gooey and delicious.
How do I prevent the caramel from sinking to the bottom?
Layer your batter: spread half the dough, add caramel, then cover with remaining dough. This traps caramel pockets instead of letting them sink.
Can I make these bars vegan?
With some swaps—use dairy-free butter or coconut oil, flax eggs instead of regular eggs, and vegan chocolate chips—you can make a vegan-friendly version.
What’s the best way to cut the bars without them falling apart?
Cool completely before slicing, ideally using the parchment paper overhang to lift them out. Use a sharp knife and wipe it clean between cuts.
How long do these cookie bars stay fresh?
They keep well at room temperature for 3 days, refrigerated for up to a week, and freeze beautifully for 3 months when wrapped tightly.
Pin This Recipe!
Salted Caramel Chocolate Chip Cookie Bars
Chewy chocolate chip cookie bars with luscious salted caramel pockets and a sprinkle of sea salt, perfect for a quick homemade treat that feels fancy without the fuss.
- Prep Time: 10 minutes
- Cook Time: 30 minutes
- Total Time: 40 minutes
- Yield: 12 servings 1x
- Category: Dessert
- Cuisine: American
Ingredients
- 1 cup unsalted butter, melted
- 1 cup packed brown sugar
- 1/2 cup granulated sugar
- 2 large eggs, room temperature
- 2 teaspoons pure vanilla extract
- 2 1/4 cups all-purpose flour
- 1 teaspoon baking soda
- 1/2 teaspoon salt
- 1 1/2 cups semi-sweet chocolate chips
- 1 cup chopped soft caramel candies or 1/2 cup caramel sauce
- Coarse sea salt flakes, for sprinkling
- Optional: 1/2 teaspoon espresso powder
- Optional: 1/2 cup chopped walnuts or pecans
Instructions
- Preheat your oven to 350°F (175°C). Lightly grease a 9×13-inch pan or line it with parchment paper, leaving an overhang for easy bar removal.
- In a large bowl, mix the melted butter, brown sugar, and granulated sugar until smooth and shiny, about 2 minutes.
- Add eggs and vanilla extract to the sugar-butter mixture. Beat well until combined and slightly fluffy, about 1 minute.
- In a separate bowl, whisk together flour, baking soda, and salt.
- Gradually add the dry ingredients to the wet, folding gently with a spatula. Stop mixing as soon as the flour disappears.
- Fold in semi-sweet chocolate chips and nuts if using, distributing evenly throughout the dough.
- Pour half the batter into the prepared pan, spreading evenly. Scatter chopped caramel candies or drizzle caramel sauce over the layer, then cover with the remaining batter. Lightly spread to seal the caramel in.
- Bake for 28-32 minutes until edges are golden brown and center is set but still slightly soft.
- Remove from oven and immediately sprinkle coarse sea salt flakes over the top.
- Let the bars cool completely in the pan on a wire rack, about 1 hour, to ensure clean slicing.
- Use the parchment overhang to lift bars from the pan and slice into 12 or 16 squares.
Notes
If caramel candies are too hard to chop, warm them slightly in the microwave for 10 seconds to soften. Use parchment paper overhang for easy removal and clean slicing. Avoid overmixing flour to keep bars tender. Let bars cool completely before slicing to prevent melty messes. For gluten-free, substitute almond flour; for dairy-free, use coconut oil and dairy-free chocolate chips.
Nutrition
- Serving Size: 1 bar (if cut into 1
- Calories: 280
- Sugar: 22
- Fat: 14
- Saturated Fat: 8
- Carbohydrates: 34
- Fiber: 1
- Protein: 3
Keywords: salted caramel, chocolate chip, cookie bars, easy dessert, homemade treats, caramel pockets, chewy cookie bars