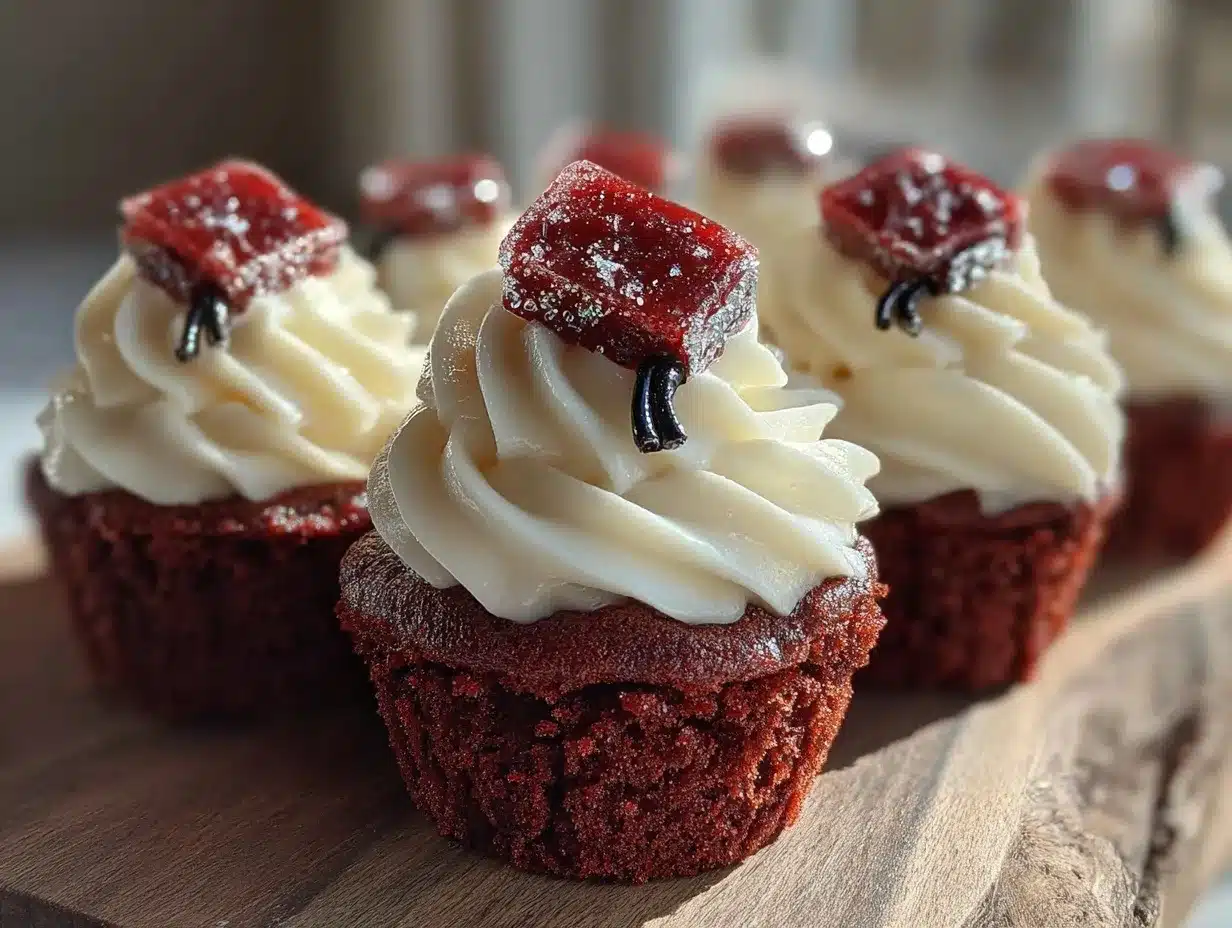
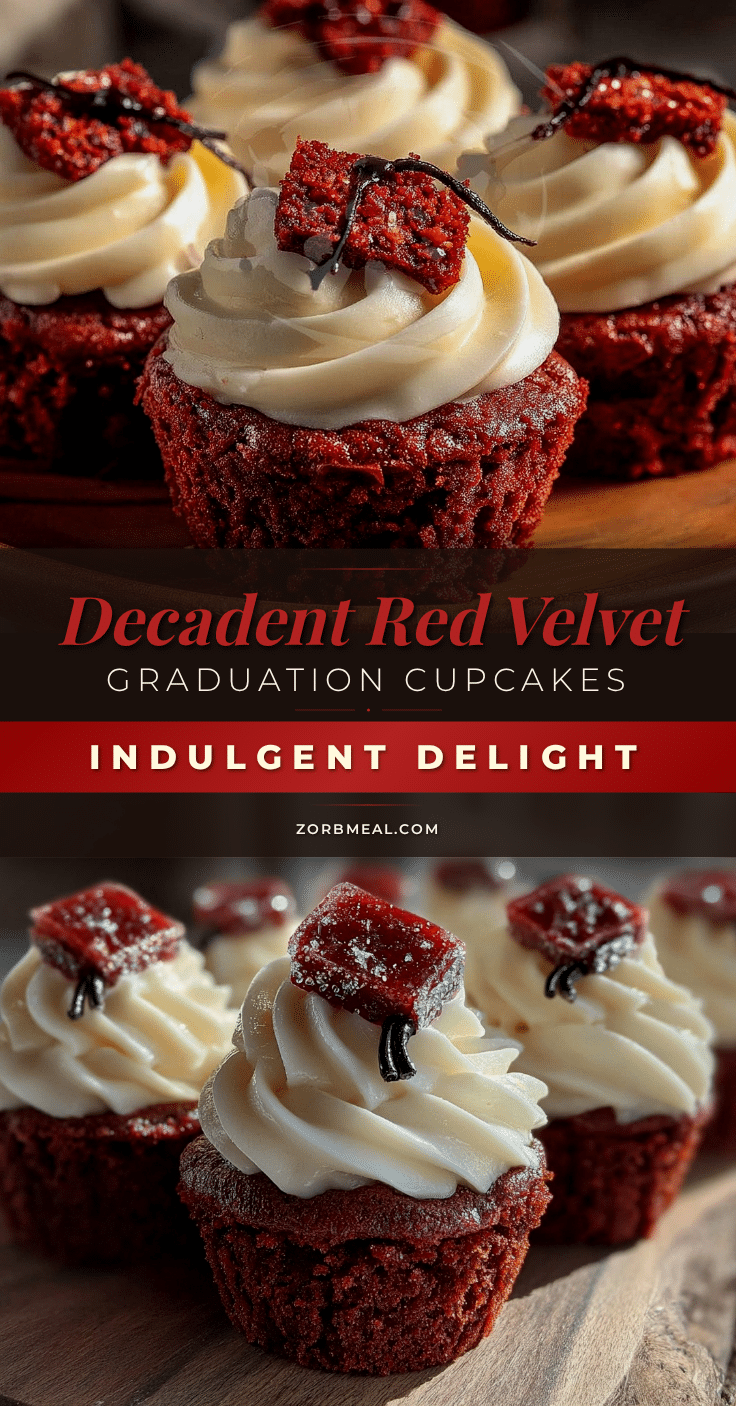
“You seriously made those yourself?” my cousin asked, eyes wide as she picked up one of the red velvet graduation cap cupcakes. That moment, surrounded by a swirl of laughter and the scent of cocoa and cream cheese, made me realize how these cupcakes had quietly taken over our entire party. Honestly, I wasn’t sure if I could pull off something that looked so sharp and festive, especially with the little mortarboard hats perched on top. But after a few trial runs, tweaking the cream cheese frosting and getting the right crumb texture, this recipe became my go-to for celebrations.
Graduations are a whirlwind of excitement and a bit of chaos, you know? The last thing I wanted was a complicated dessert that added stress. So, these cupcakes came about in a sort of “make-it-work” moment, turning a simple red velvet batter into something that felt special without needing fancy decorations or professional skills. The cream cheese frosting? That’s the magic touch — tangy, smooth, and just sweet enough to balance the rich cake.
What I love most is how these cupcakes bring together the nostalgic flavor of red velvet with a playful nod to the occasion. Each cap is like a mini celebration, a reminder of effort and achievement wrapped in softness and sweetness. They stuck with me because they’re not just a dessert; they’re a little tradition in the making, perfect for marking milestones with a bit of homemade charm.
Why You’ll Love This Recipe
Having baked these red velvet graduation cap cupcakes multiple times for family and friends, I can honestly say this recipe hits the sweet spot between ease and wow-factor. Here’s why it shines:
- Quick & Easy: These cupcakes come together in about 35 minutes, making them perfect for last-minute celebrations or busy days when you want something impressive without the fuss.
- Simple Ingredients: You probably have everything on hand already — basic pantry staples and fresh dairy — no special trips needed.
- Perfect for Graduations & Parties: The playful mortarboard design makes them ideal for graduation ceremonies, but they’re just as charming for any celebratory gathering.
- Crowd-Pleaser: Kids and adults alike can’t stop reaching for these cupcakes — the cream cheese frosting’s tang complements the cake’s subtle cocoa flavor perfectly.
- Unbelievably Delicious: The texture is moist and tender, with that classic red velvet tang, paired with smooth, creamy frosting that’s not overly sweet.
This isn’t just any red velvet cupcake recipe. The little graduation caps add a creative twist that’s surprisingly simple to nail without fancy tools or complicated steps. Plus, I’ve found that using buttermilk and a touch of vinegar really lifts the cake’s flavor and texture to a home-run level. Honestly, this recipe has become my favorite way to celebrate achievements because it combines fun, flavor, and a personal touch all at once.
What Ingredients You Will Need
This recipe uses simple, wholesome ingredients to deliver bold flavor and that iconic red velvet look, with a creamy cream cheese frosting that’s just right.
- For the Cupcakes:
- All-purpose flour – 1 1/4 cups (150g), sifted
- Cocoa powder – 1 tablespoon (unsweetened, for that subtle chocolate flavor)
- Baking soda – 1/2 teaspoon (helps the cupcakes rise beautifully)
- Salt – 1/4 teaspoon
- Unsalted butter – 1/2 cup (113g), softened (I prefer Land O’Lakes for great texture)
- Granulated sugar – 3/4 cup (150g)
- Large egg – 1, room temperature
- Buttermilk – 1/2 cup (120ml), room temperature (adds moisture and tang)
- Red food coloring – 2 tablespoons (liquid or gel, depending on your preference)
- Vanilla extract – 1 teaspoon
- White vinegar – 1 teaspoon (reacts with baking soda for that tender crumb)
- For the Cream Cheese Frosting:
- Cream cheese – 8 oz (225g), softened (I recommend Philadelphia for smoothness)
- Unsalted butter – 1/4 cup (57g), softened
- Powdered sugar – 2 cups (240g), sifted for smooth frosting
- Vanilla extract – 1 teaspoon
- Pinch of salt (balances the sweetness)
- For the Graduation Caps:
- Black fondant or black candy melts – about 1/2 cup (for making the mortarboard tops)
- Black licorice strings or thin black licorice candy – for the tassels
If you want a dairy-free version, swap the buttermilk for almond milk mixed with a teaspoon of lemon juice, and use dairy-free cream cheese and butter alternatives. For a gluten-free option, almond or oat flour works well, though the texture will be a bit different but still delicious.
Equipment Needed
- Standard 12-cup muffin tin – for the cupcakes
- Paper cupcake liners – prevents sticking and makes serving easier
- Electric mixer – either a stand or hand mixer to get that smooth batter and frosting
- Mixing bowls – at least two, one for dry ingredients and one for wet
- Measuring cups and spoons – precise measurements make a difference here
- Offset spatula or butter knife – great for spreading frosting evenly
- Rolling pin (optional) – if you’re shaping fondant caps by hand
- Small sharp knife or pizza cutter – for cutting fondant squares
If you don’t have fondant, black candy melts are a fantastic alternative and easier to handle for beginners. Personally, I like using a simple silicone spatula for folding ingredients gently and a piping bag with a flat tip for frosting — but a zip-top bag with a corner cut works just fine.
Preparation Method
- Preheat your oven to 350°F (175°C). Line your muffin tin with cupcake liners (about 12).
- Mix dry ingredients: In a bowl, sift together the flour, cocoa powder, baking soda, and salt. Set aside.
- Cream butter and sugar: Using your mixer, beat the softened butter and granulated sugar on medium speed until light and fluffy, about 3-4 minutes. This step is key for a tender crumb.
- Add egg and vanilla: Beat in the egg and vanilla extract until combined.
- Combine wet and dry: Alternately add the dry ingredients and buttermilk to the butter mixture, starting and ending with the dry ingredients. Mix until just combined — don’t overmix or the cupcakes might turn dense.
- Add color and vinegar: Stir in the red food coloring until the batter is evenly colored. Then add the vinegar and give a gentle final mix. You’ll notice the batter lighten slightly — that’s perfect.
- Fill cupcake liners: Divide batter evenly among liners, filling about 2/3 full. This prevents spilling over and creates a nice dome.
- Bake: Bake for 18-22 minutes, or until a toothpick inserted in the center comes out clean. Your kitchen will start smelling like a cozy bakery!
- Cool: Let cupcakes cool in the tin for 5 minutes, then transfer to a wire rack to cool completely before frosting.
- Prepare frosting: Beat the cream cheese and butter together until smooth. Gradually add powdered sugar, vanilla, and salt, mixing until creamy and spreadable.
- Frost cupcakes: Use an offset spatula or piping bag to frost the cooled cupcakes generously.
- Make graduation caps: Roll out black fondant and cut into small squares (about 1 1/2 inch/4 cm). Place on top of each frosted cupcake. Use licorice strings to create tassels, attaching them gently to the squares.
Tips: If fondant feels sticky, dust your surface with a bit of powdered sugar. Don’t frost warm cupcakes — the frosting will melt and slide off. If you’re short on time, you can shape caps ahead of time and store them in an airtight container.
Cooking Tips & Techniques
One of the trickiest parts is getting that velvet texture without overmixing — mix just until ingredients come together. Overbeating flour can make cupcakes tough, and no one wants that on graduation day!
When creaming butter and sugar, patience pays off. Whipping until the mixture is pale and fluffy traps air, which helps your cupcakes rise nicely. Also, using room temperature eggs prevents the batter from curdling.
For the frosting, don’t rush the creaming of cream cheese and butter. If either is too cold, you’ll get lumps. If it’s too soft, you might end up with a runny mess. I learned that the hard way — once I ended up with frosting puddling off the cupcakes.
As for the caps, if you don’t have fondant experience, black candy melts are a forgiving alternative. Just melt, pour into square molds or shape with a spoon on parchment paper, and let set. Tassels made from licorice strings add a fun touch and are easy to handle.
Timing-wise, bake cupcakes first, while they cool, prepare frosting and caps. This workflow saves time and keeps everything fresh. And remember — a quick chill of the frosting helps it set just right for crisp edges.
Variations & Adaptations
If you want to switch it up, here are some ideas:
- Flavor Twist: Add a teaspoon of espresso powder to the batter for a mocha red velvet that’s unexpectedly rich.
- Frosting Swap: Replace cream cheese frosting with whipped vanilla buttercream if you prefer a sweeter, lighter topping.
- Dietary Options: Use gluten-free flour blends and dairy-free cream cheese to accommodate allergies without losing the classic flavor.
- Color Play: Swap red food coloring for purple or blue to match different school colors or party themes.
- Mini Cupcakes: Bake bite-sized versions in mini muffin pans — great for party platters or buffets.
Personally, I once made these with a touch of orange zest in the frosting for a subtle brightness that surprised everyone — that little twist added a whole new layer of fun. Also, pairing these cupcakes alongside a savory snack like flavorful layered taco dip made for a well-rounded celebration spread.
Serving & Storage Suggestions
Serve your red velvet graduation cap cupcakes at room temperature for the best flavor and texture. The cream cheese frosting tastes richest when it’s not too cold.
Presentation-wise, arrange cupcakes on a tiered stand or decorative plate to make the caps stand out. They pair beautifully with fresh berries or a light sparkling punch.
Store leftover cupcakes in an airtight container in the refrigerator for up to 3 days. Bring them back to room temperature before serving so the frosting softens nicely. For longer storage, freeze unfrosted cupcakes wrapped tightly for up to 2 months; thaw completely before frosting.
Flavors often deepen after a day as the frosting and cake meld together — honestly, sometimes the next-day cupcakes taste even better!
Nutritional Information & Benefits
Each cupcake provides about 280 calories, with 12 grams of fat and 35 grams of carbs. The cream cheese adds a dose of calcium and protein, while the buttermilk contributes beneficial probiotics.
This recipe is naturally free from nuts and can be adapted to gluten-free or dairy-free diets, making it accessible for many guests. Red velvet’s cocoa powder offers antioxidants, and the moderate sugar level keeps it balanced for an occasional treat.
For those watching calories, you can reduce frosting sugar slightly or swap butter for a lighter alternative, though I’d warn the texture might shift a bit. Still, these cupcakes feel indulgent but not overwhelming — a nice fit for celebrations where you want flavor without guilt.
Conclusion
These Perfect Red Velvet Graduation Cap Cupcakes with Cream Cheese Frosting have become my favorite way to mark big moments. They’re approachable, playful, and taste just as special as they look. Whether you’re baking for a big crowd or a small family celebration, these cupcakes bring a little extra joy to the table.
Feel free to make them your own — swap colors, try different frostings, or pair with simple snacks like creamy BLT dip for a complete party spread. I love how these cupcakes turn any graduation into a sweet memory, and I hope they do the same for you.
Give them a try, and don’t hesitate to share your twists or questions — I’m always excited to hear how you celebrate with these treats!
Frequently Asked Questions
Can I make these cupcakes ahead of time?
Absolutely! You can bake and frost them a day ahead. Store in an airtight container in the fridge and bring to room temperature before serving.
What can I use if I don’t have buttermilk?
Mix 1/2 cup milk with 1 teaspoon lemon juice or white vinegar, let it sit for 5 minutes. This homemade buttermilk substitute works great.
How do I store leftover cupcakes?
Keep them in an airtight container in the refrigerator for up to 3 days. For longer storage, freeze unfrosted cupcakes wrapped tightly for up to 2 months.
Can I make the graduation caps without fondant?
Yes! Black candy melts are an easy alternative. Melt, shape into squares, and let set. Licorice strings make perfect tassels.
Is it okay to use gel food coloring instead of liquid?
Definitely. Gel food coloring is more concentrated, so use about half the amount and adjust color as needed for that vibrant red.
Pin This Recipe!
Perfect Red Velvet Graduation Cap Cupcakes with Cream Cheese Frosting
These red velvet graduation cap cupcakes feature a moist, tender crumb and tangy cream cheese frosting, topped with playful mortarboard hats, perfect for celebrations.
- Prep Time: 15 minutes
- Cook Time: 20 minutes
- Total Time: 35 minutes
- Yield: 12 servings 1x
- Category: Dessert
- Cuisine: American
Ingredients
- 1 1/4 cups all-purpose flour (150g), sifted
- 1 tablespoon unsweetened cocoa powder
- 1/2 teaspoon baking soda
- 1/4 teaspoon salt
- 1/2 cup unsalted butter (113g), softened
- 3/4 cup granulated sugar (150g)
- 1 large egg, room temperature
- 1/2 cup buttermilk (120ml), room temperature
- 2 tablespoons red food coloring (liquid or gel)
- 1 teaspoon vanilla extract
- 1 teaspoon white vinegar
- 8 oz cream cheese (225g), softened
- 1/4 cup unsalted butter (57g), softened
- 2 cups powdered sugar (240g), sifted
- 1 teaspoon vanilla extract
- Pinch of salt
- About 1/2 cup black fondant or black candy melts
- Black licorice strings or thin black licorice candy for tassels
Instructions
- Preheat oven to 350°F (175°C). Line a 12-cup muffin tin with cupcake liners.
- In a bowl, sift together flour, cocoa powder, baking soda, and salt. Set aside.
- Using a mixer, beat softened butter and granulated sugar on medium speed until light and fluffy, about 3-4 minutes.
- Beat in the egg and vanilla extract until combined.
- Alternately add dry ingredients and buttermilk to the butter mixture, starting and ending with dry ingredients. Mix until just combined; do not overmix.
- Stir in red food coloring until batter is evenly colored, then add vinegar and mix gently.
- Divide batter evenly among liners, filling about 2/3 full.
- Bake for 18-22 minutes or until a toothpick inserted in the center comes out clean.
- Let cupcakes cool in the tin for 5 minutes, then transfer to a wire rack to cool completely.
- Beat cream cheese and butter together until smooth. Gradually add powdered sugar, vanilla, and salt, mixing until creamy and spreadable.
- Frost cooled cupcakes generously using an offset spatula or piping bag.
- Roll out black fondant and cut into small squares about 1 1/2 inch (4 cm). Place on top of each frosted cupcake.
- Attach licorice strings to fondant squares to create tassels.
Notes
Do not overmix batter to maintain tender crumb. Use room temperature ingredients for best results. If fondant is sticky, dust surface with powdered sugar. Frost cupcakes only when fully cooled to prevent melting. Black candy melts can be used as an easier alternative to fondant for graduation caps.
Nutrition
- Serving Size: 1 cupcake
- Calories: 280
- Sugar: 25
- Sodium: 180
- Fat: 12
- Saturated Fat: 7
- Carbohydrates: 35
- Fiber: 1
- Protein: 4
Keywords: red velvet cupcakes, graduation cupcakes, cream cheese frosting, celebration treats, homemade cupcakes, mortarboard cupcakes