There’s just something magical about the first whiff of rich cocoa and tangy buttermilk mingling with a swirl of sweet vanilla as these Green Velvet Cupcake Sandwiches bake up in the oven. The kitchen fills with that deep, comforting aroma—warm, almost toasty, but with a playful twist thanks to the vibrant emerald color. You know, the kind of scent that has everyone wandering in asking, “What’s in the oven?” (and secretly hoping you’ll share a taste before they’re even cool enough to frost). The first time I made these cupcake sandwiches, it was a rainy March afternoon and I was craving something festive for St. Patrick’s Day—something that would spark a little joy and a lot of smiles.
I’ll never forget that first bite: the fluffy cake, the silky buttercream, and that pop of green that’s just pure fun. It was the kind of moment where you pause, take a deep breath, and just grin because you know you’ve stumbled onto something special. These cupcake sandwiches are packed with nostalgia, reminding me of those bake sales from when I was knee-high to a grasshopper, when anything colorful felt like a celebration. Honestly, I wish I’d thought of making them sandwich-style years ago—it’s two cupcakes and frosting in every bite, and who can argue with that?
My kids can’t stop sneaking them off the cooling rack, and I’ve watched my husband “taste test” more than his fair share (in the name of quality control, of course). Friends start texting every March, asking if I’ll bring these to the St. Paddy’s party or the school bake sale. They’re perfect for potlucks, a sweet treat for your kids, or to brighten up your Pinterest cookie board with a big splash of green. Honestly, these Green Velvet Cupcake Sandwiches have become a staple in our house—for gifting, sharing, and, yes, devouring straight from the fridge late at night. If you’re looking for a recipe that feels like a warm, festive hug, you’re going to want to bookmark this one!
Why You’ll Love This Green Velvet Cupcake Sandwiches Recipe
After years of recipe testing (and a few epic kitchen flops), I can say with confidence: these Green Velvet Cupcake Sandwiches are a crowd-pleaser you’ll want to make again and again. Here’s why they win hearts in my house and beyond:
- Quick & Easy: These come together in about 45 minutes, so you can whip them up for last-minute parties or when that sweet tooth strikes.
- Simple Ingredients: All pantry staples—no hunting for fancy extracts or specialty flours. You probably have everything on hand!
- Perfect for St. Patrick’s Day: The cheerful green color makes these a standout on any holiday table, classroom party, or family get-together.
- Crowd-Pleaser: I’ve never seen a batch last more than a day—kids, teens, and adults all go back for seconds (and sometimes thirds!).
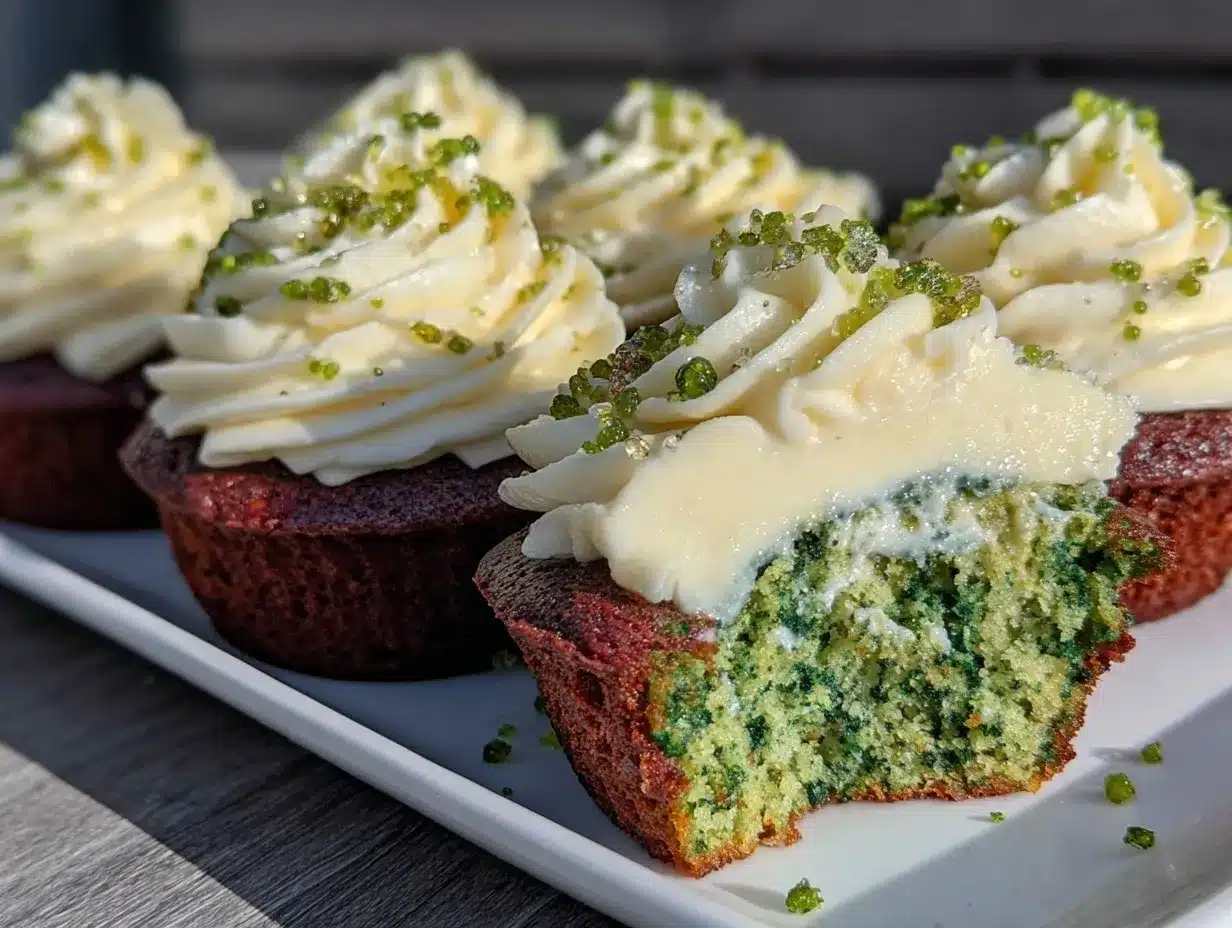
- Unbelievably Delicious: The combo of moist green velvet cake and creamy buttercream is pure comfort—soft, rich, and just sweet enough. Every bite makes you want to do a little happy dance.
What makes this recipe stand out? For starters, I use a touch of white vinegar for classic velvet cake tang and a generous swirl of real vanilla in the frosting. The green color is bold but natural-looking, and the texture is fluffy without being dry (I’m picky about that!). Plus, sandwiching the cupcakes means you get frosting in every single bite, not just on top. That’s a win, right?
This isn’t just another green cupcake recipe—it’s my best version, honed over years of baking and taste-testing. It’s festive enough for parties but easy enough for a rainy afternoon baking session with your kids. Best of all, you don’t need a piping bag or special skills to pull these off—just a spoon and a little enthusiasm. If you want to impress your friends without breaking a sweat, or if you’re just craving a little nostalgic comfort with a dash of luck, these Green Velvet Cupcake Sandwiches are calling your name. Close your eyes, take a bite, and let the celebration begin!
What Ingredients You Will Need
This Green Velvet Cupcake Sandwiches recipe uses simple, reliable ingredients for bold color, moist texture, and crowd-pleasing flavor. It’s all about making magic with what you’ve already got in your kitchen—no wild goose chases, just real, good food. Here’s what you’ll need:
For the Green Velvet Cupcakes
- 1 1/4 cups (150g) all-purpose flour (King Arthur or Gold Medal work well)
- 1 cup (200g) granulated sugar
- 2 tablespoons (12g) unsweetened cocoa powder (Dutch-process or natural, but Dutch gives a deeper color)
- 1/2 teaspoon baking soda
- 1/4 teaspoon salt
- 1/2 cup (120ml) buttermilk, room temperature (for tang and moisture; sub 1/2 cup milk + 1/2 tsp vinegar if needed)
- 1/2 cup (120ml) vegetable oil (canola or sunflower work too)
- 1 large egg, room temperature
- 1 teaspoon vanilla extract (I love Nielsen-Massey for flavor)
- 1/2 teaspoon white vinegar (for classic velvet cake texture)
- 1 tablespoon green gel food coloring (I use AmeriColor or Wilton for vibrant color—liquid works, but gel is best for intensity)
For the Buttercream Filling
- 1/2 cup (113g) unsalted butter, softened
- 1 1/2 cups (180g) powdered sugar, sifted
- 1 tablespoon whole milk or heavy cream (for smoothness; dairy-free works in a pinch)
- 1 teaspoon vanilla extract
- Pinch of salt (just enough to balance the sweetness)
Optional Garnishes
- Green or gold sprinkles (for that extra festive touch)
- Mini shamrock candies or edible glitter
Ingredient Tips: For the most vibrant green, start with a small amount of gel food coloring and add more as needed—some brands are more potent than others! If you need a dairy-free version, swap the buttermilk for unsweetened almond milk mixed with a splash of lemon juice and use vegan butter for the frosting.
Honestly, it’s the balance of cocoa, tang from the buttermilk, and the creamy sweetness of the buttercream that makes these so addictive. If you want to go gluten-free, Bob’s Red Mill 1:1 flour works well (I’ve tested it!). And if you have little helpers, let them sprinkle on the decorations—there’s no wrong way to make these fun!
Equipment Needed
You don’t need a fancy bakery setup to pull off these Green Velvet Cupcake Sandwiches. Here’s what you’ll need (and some tips for making do with what you’ve got):
- 12-cup muffin tin: Standard size. If you only have a 6-cup tin, bake in batches.
- Paper cupcake liners: They make cleanup a breeze and keep the cakes from sticking. Parchment squares work in a pinch.
- Mixing bowls: One large for the dry, one medium for the wet.
- Whisk and spatula: For mixing. A wooden spoon works if that’s what you have.
- Measuring cups and spoons: Precision helps here—especially for baking.
- Hand mixer or stand mixer: For the buttercream. A sturdy whisk and arm power will do, but it takes a little more muscle (and patience!).
- Wire cooling rack: To cool cupcakes evenly. Flip them onto a clean towel if you don’t have one.
- Serrated knife: For splitting cupcakes neatly.
- Small offset spatula or butter knife: For spreading the buttercream. Even a regular spoon gets the job done.
Cleanup is easy since you’re not dealing with sticky dough or a piping bag. If you bake often, investing in a sturdy muffin tin (like USA Pan) is worth it—it lasts for years, as I learned after my old tin got rusty! And if you’re on a budget, dollar store mixing bowls and a basic hand mixer will work just fine. Just remember to dry everything well before storing—especially metal tools.
Preparation Method
-
Preheat and Prep:
Preheat your oven to 350°F (175°C). Line your muffin tin with paper liners. This keeps the cupcakes from sticking and makes cleanup a snap. -
Mix Dry Ingredients:
In a large mixing bowl, whisk together 1 1/4 cups (150g) all-purpose flour, 1 cup (200g) sugar, 2 tbsp (12g) cocoa powder, 1/2 tsp baking soda, and 1/4 tsp salt. Make sure there are no flour clumps—sifting helps, but a good whisking works too. -
Combine Wet Ingredients:
In a separate medium bowl, whisk together 1/2 cup (120ml) buttermilk, 1/2 cup (120ml) oil, 1 large egg, 1 tsp vanilla, 1/2 tsp vinegar, and 1 tbsp green gel food coloring. (Tip: Start with 2 tsp green, add more for your ideal shade.) The batter should look bright and evenly colored. -
Mix Batter:
Pour wet ingredients into the dry ingredients. Mix gently with a spatula or whisk until just combined—overmixing can make the cupcakes tough. The batter will be thick and vividly green. -
Fill Muffin Tin:
Spoon the batter evenly into your cupcake liners, filling each about 2/3 full. (I use a cookie scoop for less mess.) Tap the tin gently on the counter to release any air bubbles. -
Bake:
Bake in the preheated oven for 16–18 minutes. Check at the 15-minute mark—a toothpick inserted in the center should come out clean or with a few moist crumbs, not wet batter. If you see darkening edges, they’re nearly done. -
Cool Completely:
Remove cupcakes from the tin and set on a wire rack. Cool fully—about 30 minutes—before assembling. Warm cupcakes will melt the buttercream! -
Make the Buttercream:
In a mixing bowl, beat 1/2 cup (113g) softened butter until creamy (about 2 minutes). Gradually add 1 1/2 cups (180g) powdered sugar, mixing on low, then increase speed once the sugar is mostly incorporated. Add 1 tbsp milk, 1 tsp vanilla, and a pinch of salt. Beat until fluffy and smooth (2–3 minutes). If too thick, add a splash more milk; if too soft, add a bit more sugar. -
Slice and Fill:
Once cupcakes are cool, use a serrated knife to carefully slice each cupcake horizontally in half. Gently spread or pipe a generous layer of buttercream on the bottom half, then sandwich with the top half. Press lightly—don’t squish all the frosting out! -
Decorate:
Add green or gold sprinkles, a dusting of edible glitter, or even a mini shamrock candy on top for extra St. Paddy’s Day flair.
Notes: If your cupcakes dome too much, slice a little off the tops for a flat sandwich. If the buttercream gets too soft, chill for 5 minutes to firm it up. And if crumbs sneak into your frosting, just call it “rustic charm”—nobody minds when it tastes this good!
Cooking Tips & Techniques
I’ve baked my fair share of green velvet cakes, and here’s what I’ve learned along the way (sometimes the hard way):
- Don’t Overmix: Once you add wet to dry, stir just until no flour streaks remain. Too much mixing = tough cupcakes.
- Check Your Oven: Ovens can run hot or cool. Start checking cupcakes at 15 minutes with a toothpick—every oven’s a little quirky. My old oven made me set a timer for 13 minutes just to be safe!
- Color Control: Gel food coloring is your friend. Start with less and add more as you mix—sometimes the batter looks lighter but bakes up bright, so don’t panic if it’s not neon green right away.
- Fluffy Buttercream: Use room-temperature butter and sifted powdered sugar for the smoothest frosting. If your butter’s too cold, the frosting will be lumpy. Too warm? Pop it in the fridge for 10 minutes.
- Efficiency Tip: While cupcakes bake, make the buttercream and tidy up—less chaos later! If you’re baking with kids, let them unwrap liners and prep sprinkles during downtime.
- Sandwich Assembly: Slice with a gentle sawing motion to avoid squishing the cupcakes. If they’re crumbly, chill for 10 minutes before slicing.
- Storage Wisdom: If you’re not serving right away, keep the cupcake sandwiches in the fridge but let them come to room temp for 15 minutes before eating for the best texture.
And if something goes wrong? Remember, frosting covers a world of sins—nobody ever complains about extra buttercream! I’ve had batches come out a little lopsided, but once sandwiched and sprinkled, they always disappear fast.
Variations & Adaptations
One of the best things about these Green Velvet Cupcake Sandwiches is how easy they are to tweak for any taste, season, or need:
- Gluten-Free: Swap the all-purpose flour for a 1:1 gluten-free blend (like Bob’s Red Mill). I’ve done this for a friend with celiac, and they couldn’t tell the difference.
- Dairy-Free: Use unsweetened almond milk with lemon for buttermilk and a good vegan butter (like Earth Balance) for both cake and frosting. The texture stays moist and fluffy!
- Flavor Twists: Add 1/2 teaspoon peppermint extract to the batter or frosting for a minty kick—so fun for St. Paddy’s! Or swirl in a spoonful of mini chocolate chips for extra richness.
- Different Holidays: Swap the green for red (Valentine’s), orange (Halloween), or pastel colors (Easter) and decorate to match the season.
- Mini Sandwiches: Use a mini muffin tin and make bite-sized versions—adorable for parties or lunchboxes.
Personally, I love adding a hint of orange zest to the buttercream for a subtle citrus pop—especially in early spring. You can also make these as classic cupcakes with the frosting on top if you’re pressed for time. And if nuts aren’t an issue, try a sprinkle of chopped pistachios between the layers for crunch. The possibilities are endless—so don’t be afraid to make them your own!
Serving & Storage Suggestions
These Green Velvet Cupcake Sandwiches are best served slightly cool or at room temperature, when the buttercream is creamy but not too soft. Stack them on a festive platter, sprinkle with a little extra green, and watch them disappear at your St. Patrick’s Day gathering—or honestly, any time you need a little luck!
Pair these with a cup of hot cocoa or Irish coffee for a cozy treat. They’re also fantastic alongside fresh fruit or a simple scoop of vanilla ice cream if you want to get fancy for dessert. For parties, I like to wrap each sandwich in parchment and tie with green ribbon for grab-and-go treats—kids love them in lunchboxes, too.
To store, place cupcake sandwiches in an airtight container and refrigerate for up to 4 days. They taste best if you let them sit at room temperature for 10–15 minutes before eating (the cake softens, and the frosting gets just right). For longer storage, freeze sandwiches individually wrapped in plastic, then pop into a zip-top bag—just thaw in the fridge overnight before serving. The flavor and color stay bright for days, and the buttercream never gets grainy.
Nutritional Information & Benefits
Each Green Velvet Cupcake Sandwich (based on 12 servings) contains approximately 320 calories, 16g fat, 41g carbohydrates, and 3g protein. These values will shift a bit if you make mini versions or swap in dairy-free or gluten-free ingredients.
While these are definitely a treat, they do offer some small perks: cocoa powder brings antioxidants, and using a quality oil gives a dose of heart-healthy fats. If you use almond milk or gluten-free flour, they can be made suitable for those with allergies. Just a heads-up: these contain wheat, dairy, and eggs, so be sure to check with guests about dietary needs.
From a wellness perspective, I’m all about balance—these cupcake sandwiches are meant to be shared and savored, not stressed over. They’re a bright spot for any celebration, and honestly, a little green food is good for the soul this time of year!
Conclusion
Green Velvet Cupcake Sandwiches are the kind of recipe you’ll find yourself making every March—and probably a few months in between. The color is fun, the texture is soft and moist, and the creamy buttercream filling is downright irresistible. Whether you’re baking for a St. Patrick’s Day bash, a kid’s party, or just to put a smile on your family’s face, this recipe delivers joy in every bite.
Don’t be afraid to put your own spin on these—swap flavors, adjust the frosting, or toss in a handful of sprinkles. That’s the beauty of a recipe that’s as forgiving as it is festive. I love these cupcakes because they bring people together, and honestly, they taste like a celebration. If you try them, I’d love to hear how yours turned out—drop a comment, share your photos, or let me know your favorite twist!
So, preheat that oven, grab your green food coloring, and get baking—you’re about to make a new St. Patrick’s Day tradition that everyone will ask for year after year. May your kitchen be filled with laughter, and may your cupcakes always be this delicious (and bright green)!
Frequently Asked Questions
Can I make the cupcake sandwiches ahead of time?
Absolutely! You can bake the cupcakes a day in advance and store them (unfilled) in an airtight container. Fill with buttercream the day you plan to serve for the freshest flavor.
What’s the best way to get a bright green color?
Gel food coloring works best for a vivid green. Start with less and add more as needed—you want the batter to look bold, since it lightens as it bakes.
Can I freeze these cupcake sandwiches?
Yes! Freeze assembled sandwiches wrapped in plastic and stored in a freezer bag for up to one month. Thaw overnight in the fridge and enjoy at room temperature.
What if I don’t have buttermilk?
No worries—just mix 1/2 cup regular milk with 1/2 teaspoon white vinegar or lemon juice. Let it sit for 5 minutes, and you’re good to go!
How do I make this recipe gluten-free?
Use a 1:1 gluten-free flour blend in place of all-purpose flour. I’ve tested this swap, and the texture stays soft and delicious.
Pin This Recipe!
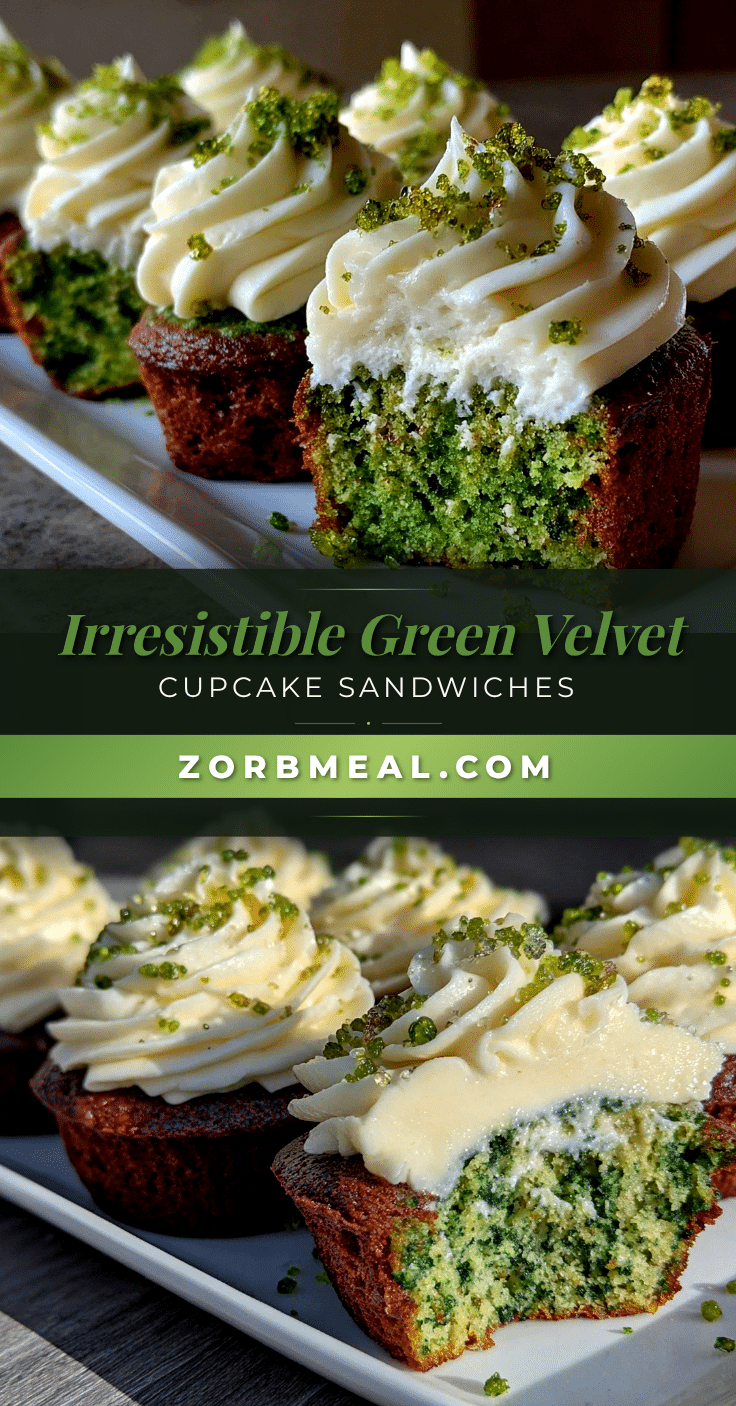
Green Velvet Cupcake Sandwiches
These Green Velvet Cupcake Sandwiches are a festive, fun, and easy treat perfect for St. Patrick’s Day or any celebration. Fluffy green velvet cupcakes are sandwiched with creamy vanilla buttercream for a nostalgic, crowd-pleasing dessert.
- Prep Time: 20 minutes
- Cook Time: 18 minutes
- Total Time: 45 minutes
- Yield: 12 cupcake sandwiches 1x
- Category: Dessert
- Cuisine: American
Ingredients
- 1 1/4 cups all-purpose flour
- 1 cup granulated sugar
- 2 tablespoons unsweetened cocoa powder
- 1/2 teaspoon baking soda
- 1/4 teaspoon salt
- 1/2 cup buttermilk, room temperature (or 1/2 cup milk + 1/2 tsp vinegar)
- 1/2 cup vegetable oil
- 1 large egg, room temperature
- 1 teaspoon vanilla extract
- 1/2 teaspoon white vinegar
- 1 tablespoon green gel food coloring
- 1/2 cup unsalted butter, softened
- 1 1/2 cups powdered sugar, sifted
- 1 tablespoon whole milk or heavy cream
- 1 teaspoon vanilla extract
- Pinch of salt
- Green or gold sprinkles (optional)
- Mini shamrock candies or edible glitter (optional)
Instructions
- Preheat your oven to 350°F (175°C). Line a 12-cup muffin tin with paper liners.
- In a large mixing bowl, whisk together flour, sugar, cocoa powder, baking soda, and salt until well combined.
- In a separate medium bowl, whisk together buttermilk, oil, egg, vanilla extract, white vinegar, and green gel food coloring until smooth and evenly colored.
- Pour the wet ingredients into the dry ingredients and mix gently with a spatula or whisk until just combined. Do not overmix.
- Spoon the batter evenly into cupcake liners, filling each about 2/3 full. Tap the tin gently to release air bubbles.
- Bake for 16–18 minutes, checking at 15 minutes. Cupcakes are done when a toothpick inserted in the center comes out clean or with a few moist crumbs.
- Remove cupcakes from the tin and cool completely on a wire rack (about 30 minutes).
- For the buttercream, beat softened butter until creamy (about 2 minutes). Gradually add powdered sugar, mixing on low, then increase speed. Add milk, vanilla, and a pinch of salt. Beat until fluffy and smooth (2–3 minutes). Adjust consistency with more milk or sugar as needed.
- Once cupcakes are cool, use a serrated knife to slice each cupcake horizontally in half. Spread or pipe a generous layer of buttercream on the bottom half, then sandwich with the top half.
- Decorate with green or gold sprinkles, edible glitter, or mini shamrock candies as desired.
Notes
For the most vibrant green, use gel food coloring and add gradually. If making gluten-free, use a 1:1 gluten-free flour blend. For dairy-free, substitute almond milk with lemon juice for buttermilk and vegan butter for frosting. If cupcakes dome too much, slice off the tops for flat sandwiches. Store assembled sandwiches in the fridge and let come to room temperature before serving.
Nutrition
- Serving Size: 1 cupcake sandwich
- Calories: 320
- Sugar: 28
- Sodium: 170
- Fat: 16
- Saturated Fat: 6
- Carbohydrates: 41
- Fiber: 1
- Protein: 3
Keywords: green velvet, cupcake sandwiches, St. Patrick’s Day, easy dessert, buttercream, festive treats, kid-friendly, party food