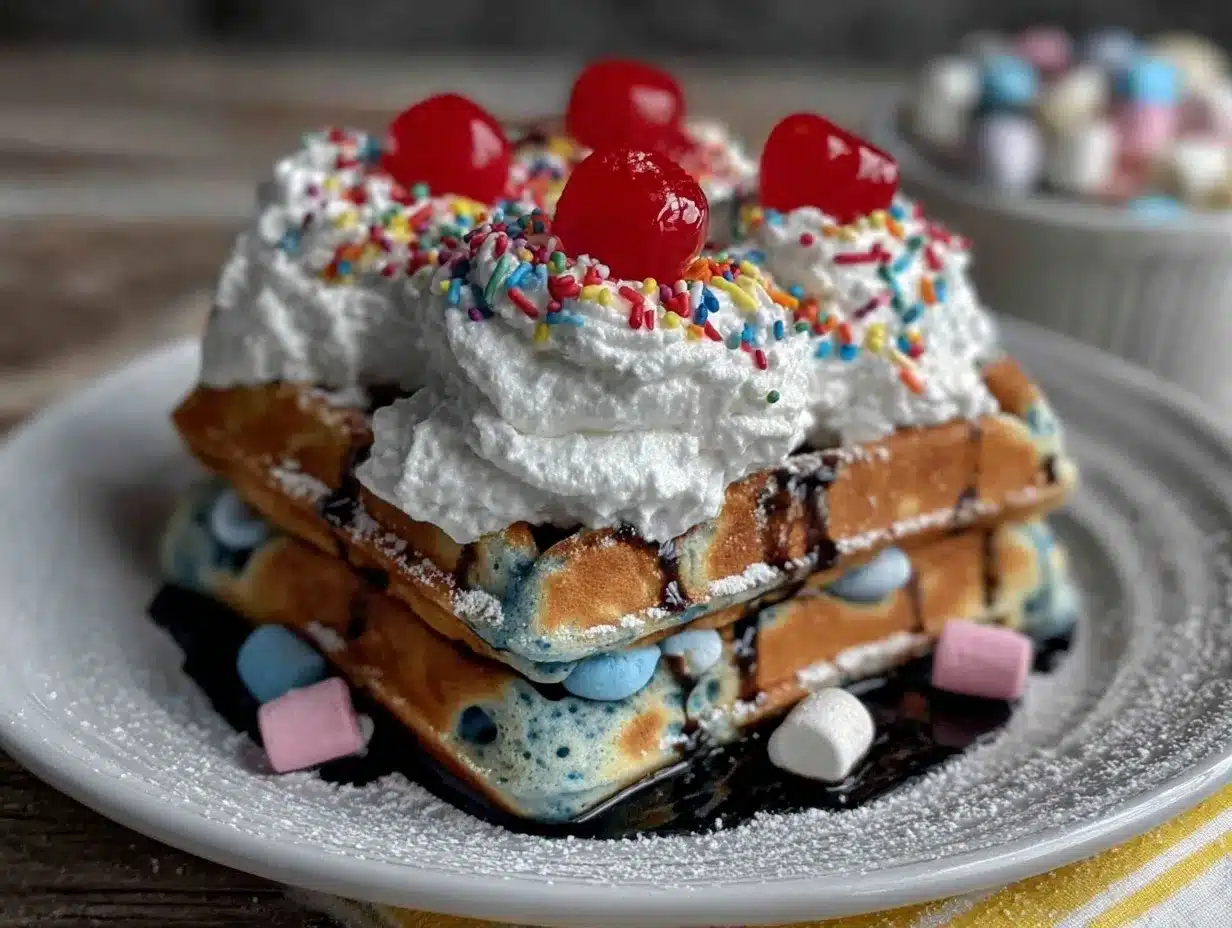
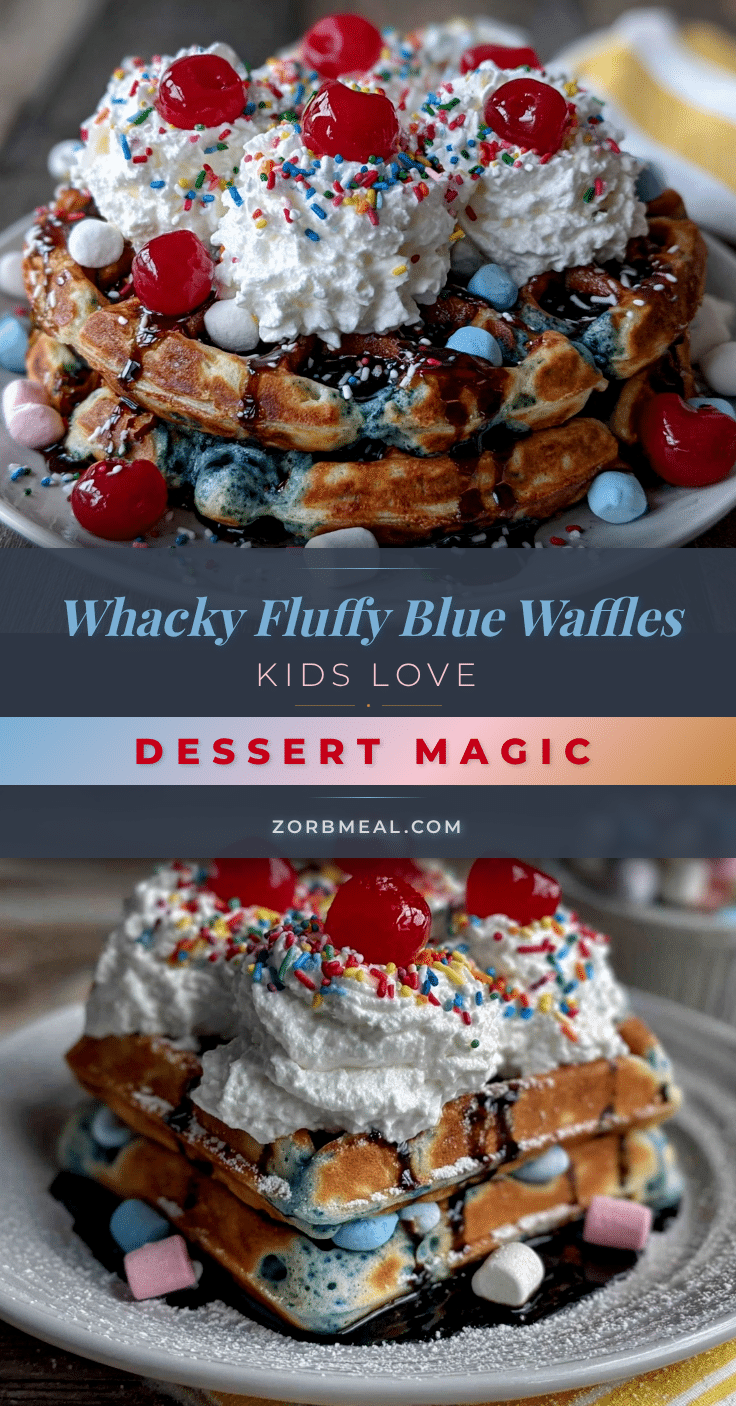
Let me set the scene for you: the kitchen smells like vanilla and warm sugar, and the sizzle of batter on a hot waffle iron fills the air. There’s something almost magical about watching brilliant blue batter puff up into impossibly fluffy waffles—it’s like a scene straight out of a Dr. Seuss book, with colors popping and giggles echoing down the hall. The first time I whipped up these Dr. Seuss blue waffles, my daughter’s eyes went as wide as saucers. She gasped, “They’re really BLUE!” and that was the kind of moment where you pause, take a deep breath, and just smile because you know you’re onto something truly special.
Honestly, these blue waffles are pure, nostalgic comfort—like Saturday cartoons in edible form. They remind me of when I was knee-high to a grasshopper, swirling food coloring into pancakes with my grandma just for fun. The idea for Dr. Seuss blue waffles actually hit me on a rainy weekend when the kids were bouncing off the walls and we all needed a bright, silly distraction. I wish I’d stumbled upon this trick years ago! Not only did my family devour them (my husband snuck two before they even hit the table), but these waffles quickly became a staple for birthday breakfasts, Dr. Seuss Day celebrations, and any morning that needs a dash of whimsy.
Let’s face it—kids adore anything colorful and fun, and these blue waffles always bring out the smiles. They’re perfect for playful brunches, sleepover mornings, or just brightening up your Pinterest breakfast board. I’ve tested this recipe more times than I’d like to admit (in the name of research, of course), and every single batch comes out light, airy, and packed with that classic, comforting waffle flavor. If you want a breakfast that feels like a warm hug and looks like it leapt off the page of a storybook, you’re going to want to bookmark this one.
Why You’ll Love This Dr. Seuss Blue Waffles Recipe
After years of experimenting with homemade waffles, I can honestly say this Dr. Seuss blue waffles recipe stands out from the crowd. Here’s why it’s become a family favorite and a top request at every kids’ sleepover:
- Quick & Easy: These waffles whip up in under 25 minutes—so you can turn any ordinary morning into a special Seussical breakfast, even on busy weekdays.
- Simple Ingredients: There’s nothing fancy here. You probably have everything you need right in your pantry and fridge, including the blue food coloring (if not, it’s easy to find at any supermarket).
- Perfect for Celebrations: These are a showstopper for Dr. Seuss Day, birthday breakfasts, or any time you want to wow the kids (and the grown-ups who never stopped loving silly things).
- Crowd-Pleaser: I’ve yet to meet a child (or adult) who can resist a stack of fluffy blue waffles. They vanish from the table faster than you can say “Sam-I-Am.”
- Unbelievably Delicious: The secret is in the balance—just enough vanilla, a hint of sweetness, and that classic, pillowy texture you want in a waffle. The color may be whacky, but the flavor is all comfort.
What really sets this recipe apart is the technique: gently folding beaten egg whites into the batter gives these waffles a lift you can see and taste. It’s a little trick I picked up from my years working in a bakery, and it makes all the difference for that cloud-like bite. You don’t just get a blue waffle—you get the fluffiest, most tender blue waffle ever.
This isn’t just another novelty breakfast. It’s the kind of recipe that makes kids squeal, grown-ups smile, and everyone ask for seconds. Whether you want to impress guests, create a new family tradition, or just add some fun to your morning routine, these blue waffles deliver. They’re playful, comforting, and guaranteed to make breakfast memorable.
What Ingredients You Will Need
This Dr. Seuss blue waffles recipe keeps things simple but big on flavor. Most of these are everyday staples, with just a couple of fun twists to create that signature blue hue and fluffy texture. Here’s what you’ll need:
- For the Waffle Batter:
- 2 cups (250g) all-purpose flour – sifted for extra fluffiness
- 2 tablespoons granulated sugar – adds just the right touch of sweetness
- 1 tablespoon baking powder – gives the waffles their lift
- 1/2 teaspoon salt – balances the flavor
- 2 large eggs, separated – yolks for richness, whites for extra airy waffles
- 1 3/4 cups (420ml) milk – whole milk gives the best texture, but 2% works fine
- 1/3 cup (80ml) vegetable oil – or melted butter for a richer flavor
- 1 1/2 teaspoons pure vanilla extract – brings warmth and depth
- Blue food coloring – gel or liquid, as much as needed for your perfect Seuss blue (I usually use 6-8 drops of gel)
- For Whipped Egg Whites:
- 2 egg whites (from above) – whipped until stiff peaks form
- Pinch of cream of tartar – optional, but helps stabilize the beaten whites
- For Topping (Optional but Highly Recommended):
- Maple syrup or honey – for classic sweetness
- Whipped cream – makes it extra fun for kids
- Fresh berries – strawberries, bananas, or blueberries add a pop of flavor and color
- Sprinkles or candy eyes – for an even wackier Seussical presentation
You can swap all-purpose flour for a gluten-free blend if needed. Plant-based milk and vegan butter work well, too, for dairy-free families. I like to use Americolor gel food coloring for the most vibrant blue, but Wilton or McCormick work great. If you want a natural blue, try a touch of butterfly pea powder (though the color won’t be as intense). If you’re out of baking powder, mix 2 teaspoons cream of tartar with 1 teaspoon baking soda. Don’t stress if you’re missing a topping—these waffles are fantastic all on their own.
Equipment Needed
- Waffle Iron: Any standard or Belgian-style waffle maker will work. I use a classic Cuisinart, but even a mini Dash makes adorable kid-sized waffles. If you don’t have a waffle iron, you can pour the batter into a griddle for thick, fluffy pancakes.
- Mixing Bowls: Two medium bowls—one for dry and one for wet ingredients. If you have a glass bowl, it’s easier to see if the food coloring is evenly mixed.
- Hand Mixer or Stand Mixer: For whipping the egg whites. You can do it by hand with a whisk (and a little elbow grease), but an electric mixer saves time and gives fluffier results.
- Measuring Cups and Spoons: For accuracy and consistency. I love my stainless steel set because they’re sturdy and easy to clean.
- Silicone Spatula: For gently folding the whipped egg whites into the batter without deflating them. A wooden spoon works in a pinch.
- Ladle or Measuring Cup: For pouring the batter into the waffle iron—makes things less messy.
- Wire Rack: If you want to keep waffles crisp while you make the rest, a cooling rack helps. Otherwise, a baking sheet works too.
If you’re on a budget, most kitchen stores carry basic nonstick waffle irons for under $20. Just wipe the plates with a damp cloth after each use to keep them in good shape—learned that the hard way with my first waffle iron! If you’re using an older waffle maker, a quick spritz of cooking spray will help prevent sticking.
How to Make Fluffy Dr. Seuss Whacky Blue Waffles Kids Adore
-
Preheat and Prepare:
- Plug in your waffle iron and set it to your preferred doneness level (I like medium-high for a crisp outside and soft inside).
- If your waffle maker isn’t nonstick, lightly grease with oil or spray.
-
Mix Dry Ingredients:
- In a medium bowl, whisk together 2 cups (250g) all-purpose flour, 2 tablespoons sugar, 1 tablespoon baking powder, and 1/2 teaspoon salt.
- Set aside. Make sure the dry ingredients are evenly combined for a consistent batter.
-
Combine Wet Ingredients:
- In a separate bowl, whisk together 2 egg yolks, 1 3/4 cups (420ml) milk, 1/3 cup (80ml) vegetable oil, and 1 1/2 teaspoons vanilla extract.
- Add blue food coloring, starting with 6 drops and whisking until you reach your desired shade. The batter should be a bright, Dr. Seuss blue!
-
Beat Egg Whites:
- In a clean bowl, beat the 2 egg whites (with a pinch of cream of tartar, if using) until stiff peaks form. This usually takes 2-3 minutes with a hand mixer.
- The egg whites should hold their shape and look glossy.
-
Combine Wet and Dry:
- Pour the wet ingredients into the dry ingredients. Stir gently with a spatula until just combined—don’t overmix! Some lumps are okay.
- The batter should be thick and evenly blue. If it looks streaky, fold a few more times.
-
Fold in Egg Whites:
- Using a spatula, gently fold the whipped egg whites into the batter in three batches. Lift and fold, rather than stirring, to keep the mixture light and airy.
- Stop as soon as no big white streaks remain. The batter will be fluffy and slightly bubbly.
-
Cook the Waffles:
- Ladle about 1/2 cup (120ml) of batter onto the center of the preheated waffle iron (adjust as needed for your model).
- Close lid and cook for 3-5 minutes, or until the waffle is puffed, golden at the edges, and lightly crisp. Steam escaping means they’re nearly done.
- If your first waffle sticks, add a bit more oil to the iron next time.
-
Serve Hot:
- Transfer waffles to a wire rack as you cook the rest. Don’t stack them or they’ll lose their crispness.
- Serve immediately with your favorite toppings—whipped cream, syrup, sprinkles, or sliced fruit.
Notes: If the waffles come out pale, leave them in for an extra minute. Batter should be thick but pourable—add a splash more milk if it seems stiff. For best results, don’t skip folding in the whipped egg whites; that’s what makes these waffles so pillowy and light.
Cooking Tips & Techniques
Here’s what I’ve learned over countless batches of Dr. Seuss blue waffles (including a few blue disasters):
- Don’t Overmix: Gentle mixing keeps waffles tender. Overworking the batter will make them dense. Lumpy batter is okay—smooth isn’t your goal here!
- Separate and Whip the Egg Whites: Folding in fluffy egg whites is the magic trick for sky-high, cloud-soft waffles. Don’t skip this step, even if you’re in a hurry. If you underbeat the whites, waffles won’t rise as much.
- Use Gel Food Coloring: Gel gives you bold color without thinning the batter. If you’re using liquid, add slowly so you don’t make things too runny.
- Let the Batter Rest: Letting the batter sit for 5 minutes before cooking helps the baking powder activate and creates a slightly thicker, fluffier waffle.
- Preheat the Waffle Iron Thoroughly: A hot iron ensures crisp outsides and prevents sticking. If your first waffle is pale or soggy, let the iron heat longer.
- Oil Between Batches: Give a quick oil or spray between waffles if your iron isn’t nonstick. I learned this after the third blue waffle stuck like glue—lesson learned!
- Test Cook Time: Every waffle iron is a bit different. I usually check after 3 minutes, but some take up to 5. Trust your nose—when you smell toasty edges, they’re close to done.
If you want to keep waffles warm for a crowd, pop cooked waffles on a baking sheet in a 200°F (95°C) oven until ready to serve. For extra crispiness, leave them uncovered, not stacked. And if you’re making these with kids, let them swirl in the blue color—just be ready for blue fingers (and maybe a blue kitchen towel or two).
Variations & Adaptations
- Gluten-Free Blue Waffles: Swap the all-purpose flour for a 1:1 gluten-free baking blend. I’ve used Bob’s Red Mill with great results—no one could tell the difference.
- Dairy-Free/Vegan Version: Use plant-based milk (like almond or oat), melted coconut oil instead of butter, and your favorite egg replacer (such as flax eggs or a commercial blend). The texture stays surprisingly fluffy!
- Natural Blue Coloring: Butterfly pea flower powder or spirulina can give a blue tint without artificial dye. The color is more subtle, but it’s a fun science experiment for kids.
- Flavor Twists: Add a teaspoon of lemon zest for a bright, citrusy note, or a handful of mini chocolate chips for an extra treat. For a “Green Eggs and Ham” breakfast, add a side of scrambled eggs and crispy bacon.
- Waffle Shapes: Make mini waffles, heart shapes, or use cookie cutters for fun edges—anything to add to the whimsy. My son loves star-shaped blue waffles for his birthday breakfast.
- Allergy Adaptations: Sub sunflower seed butter for dairy if you’re nut-free, and check all food coloring for allergen warnings.
My personal favorite twist is swirling a little purple food coloring in at the last minute for “crazy cat” stripes—my kids call them Cat-in-the-Hat waffles!
Serving & Storage Suggestions
These Dr. Seuss blue waffles are best served fresh and hot, straight from the waffle iron. The color is most vibrant right away, and the texture is perfectly crisp on the outside, pillowy inside. Top with whipped cream, sliced strawberries, or a drizzle of maple syrup for a breakfast that looks as good as it tastes. For birthday mornings, a few rainbow sprinkles or candy eyes make these even more Seussical.
Pair with scrambled eggs, crispy bacon, or a fruit salad for a complete meal. They’re also fantastic alongside a tall glass of cold milk or a fruity smoothie (blueberry, of course!).
To store, let leftover waffles cool completely, then stack between sheets of parchment paper and wrap in foil. They’ll keep in the fridge for up to 3 days, or in the freezer for 2 months. Reheat in a toaster or 350°F (175°C) oven until crisp and warm—microwaving works in a pinch but makes them softer. You’ll notice the color stays bright, even after freezing, which is always a treat for kids when waffles make a surprise comeback on a school morning.
Nutritional Information & Benefits
Each Dr. Seuss blue waffle (without toppings) contains approximately 220 calories, 8g fat, 30g carbs, and 6g protein. Using whole milk adds calcium, while eggs provide a good dose of protein and B vitamins. Swap to plant-based milk and vegan butter for dairy-free diets.
While these are a fun treat, you can easily adjust the sugar or oil for a lighter option—or add chia seeds or ground flax for a fiber boost. Always check your food coloring choice if you have sensitivities; some kids do best with natural color alternatives.
Honestly, I love knowing exactly what’s in my kids’ breakfast, and this recipe lets you keep things real, colorful, and tasty.
Conclusion
If you’re searching for a breakfast that’s as joyful and memorable as a storybook adventure, these Dr. Seuss whacky blue waffles are just the ticket. They combine playful color, irresistible fluffiness, and classic waffle comfort into one dish that kids (and grown-ups) beg for over and over. Every batch feels like a celebration—no special occasion required.
Don’t be afraid to tweak the recipe for your crew—try new toppings, shapes, or dietary swaps. That’s half the fun! Personally, I love making these on rainy Saturdays, when a pop of blue can turn the whole day around. If you try this recipe, I’d love to hear how it turned out—leave a comment, share your best blue waffle photos, or let me know what wild variations your family came up with. Here’s to breakfast that makes everyone smile—Seuss-style!
Frequently Asked Questions
Can I make Dr. Seuss blue waffles without food coloring?
Absolutely! Try using butterfly pea flower powder or a bit of spirulina for a natural blue tint. The color will be subtler, but still fun for kids.
Can I prepare the batter ahead of time?
It’s best to cook the waffles right after mixing for maximum fluffiness. If you want to prep ahead, mix the dry and wet ingredients separately and combine just before cooking.
What if I don’t have a waffle iron?
No problem! You can make thick, fluffy pancakes on a griddle using the same batter. They’ll taste just as good (and still be blue!).
How do I freeze and reheat blue waffles?
Cool completely, stack between parchment, and freeze in a zip-top bag. Reheat in a toaster or oven at 350°F (175°C) until crisp and warmed through.
Can I double the recipe for a crowd?
Yes! Simply double all ingredients—just be sure to fold in the whipped egg whites gently, and cook waffles in batches. Keep them warm in a low oven until serving.
Pin This Recipe!
Dr. Seuss Blue Waffles Recipe Kids Love – Easy Fluffy Breakfast
These Dr. Seuss blue waffles are a whimsical, fluffy breakfast treat that kids adore. With a vibrant blue hue and classic waffle flavor, they’re perfect for playful mornings, celebrations, or any day that needs a dash of fun.
- Prep Time: 10 minutes
- Cook Time: 12-15 minutes
- Total Time: 22-25 minutes
- Yield: 4 servings 1x
- Category: Breakfast
- Cuisine: American
Ingredients
- 2 cups (250g) all-purpose flour, sifted
- 2 tablespoons granulated sugar
- 1 tablespoon baking powder
- 1/2 teaspoon salt
- 2 large eggs, separated
- 1 3/4 cups (420ml) milk (whole or 2%)
- 1/3 cup (80ml) vegetable oil or melted butter
- 1 1/2 teaspoons pure vanilla extract
- Blue food coloring (gel or liquid, 6-8 drops or as needed)
- Pinch of cream of tartar (optional, for egg whites)
- Maple syrup or honey (optional, for topping)
- Whipped cream (optional, for topping)
- Fresh berries (optional, for topping)
- Sprinkles or candy eyes (optional, for topping)
Instructions
- Preheat your waffle iron to your preferred doneness level. Lightly grease with oil or spray if not nonstick.
- In a medium bowl, whisk together flour, sugar, baking powder, and salt. Set aside.
- In a separate bowl, whisk together egg yolks, milk, oil or melted butter, and vanilla extract. Add blue food coloring, starting with 6 drops and whisking until you reach your desired shade.
- In a clean bowl, beat the 2 egg whites (with a pinch of cream of tartar, if using) until stiff peaks form.
- Pour the wet ingredients into the dry ingredients. Stir gently with a spatula until just combined; some lumps are okay.
- Gently fold the whipped egg whites into the batter in three batches, lifting and folding to keep the mixture light and airy. Stop as soon as no big white streaks remain.
- Ladle about 1/2 cup of batter onto the center of the preheated waffle iron (adjust as needed for your model). Close lid and cook for 3-5 minutes, or until the waffle is puffed, golden at the edges, and lightly crisp.
- Transfer cooked waffles to a wire rack as you make the rest. Serve immediately with your favorite toppings such as whipped cream, syrup, sprinkles, or sliced fruit.
Notes
For best results, gently fold in whipped egg whites for extra fluffiness. Let the batter rest for 5 minutes before cooking. Use gel food coloring for the most vibrant blue. Waffles are best served fresh but can be frozen and reheated in a toaster or oven. For gluten-free or dairy-free versions, substitute with appropriate flour and milk alternatives.
Nutrition
- Serving Size: 1 waffle (about 1/4
- Calories: 220
- Sugar: 5
- Sodium: 320
- Fat: 8
- Saturated Fat: 2
- Carbohydrates: 30
- Fiber: 1
- Protein: 6
Keywords: blue waffles, Dr. Seuss breakfast, kids waffles, colorful waffles, fluffy waffles, fun breakfast, birthday breakfast, Seussical food