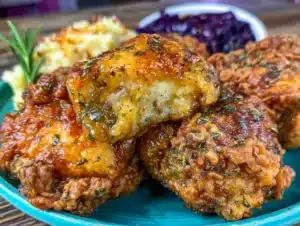
“Are you sure you want to deep fry that much chicken?” my partner asked skeptically as I pulled out three pounds of chicken and a giant bowl of buttermilk. Honestly, I wasn’t sure myself at the start of this crispy buttermilk fried chicken adventure. I’d always admired those golden, crunchy crusts at diners but figured homemade versions would be a huge mess or end up dry inside.
One rainy Saturday afternoon, craving something comforting but quick, I decided to toss the chicken pieces in a buttermilk bath to tenderize overnight. The next day, armed with a trusty cast-iron skillet and a simple flour-spice mix, I set about frying. The kitchen quickly filled with that nostalgic sizzle and aroma—the kind that makes you pause and lean in.
When I finally bit into the crisp, crackling crust, followed by juicy, tender meat, it hit me: this wasn’t just fried chicken; it was a revelation. The buttermilk marinade worked its magic, breaking down the meat fibers for a moist bite, while the seasoned coating offered the perfect crunch. Since then, I’ve made this recipe more times than I can count—sometimes for family dinners, other times just to treat myself after a long day.
Truth is, this crispy buttermilk fried chicken stuck with me because it turned a simple meal into a little celebration of textures and flavors. No fuss, no complicated steps—just honest, delicious fried chicken that feels like a warm hug on a plate.
Why You’ll Love This Recipe
I’ve tested this crispy buttermilk fried chicken recipe over and over, tweaking the seasoning and frying technique until it hit the sweet spot. Here’s why you’ll want to keep it in your regular rotation:
- Quick & Easy: The marinade tenderizes while you sleep or work, and the frying goes fast—ready in about 45 minutes from start to finish.
- Simple Ingredients: No specialty spices or fancy oils needed. Most of these are pantry staples you probably have right now.
- Perfect for Any Occasion: Whether it’s a casual weeknight feast, a backyard picnic, or a game day snack, this chicken fits right in.
- Crowd-Pleaser: Kids, adults, picky eaters—everyone loves that crispy crust and juicy inside combo.
- Unbelievably Delicious: The buttermilk tenderizes the chicken for a juicy bite, while the flour coating crisps up golden and crunchy without being greasy.
This recipe isn’t just another fried chicken. I blend the seasoning right into the flour for a perfect balance of savory, peppery notes that sneak in with every crunch. Plus, the buttermilk marinade isn’t just for tenderness—it adds a subtle tang that makes the chicken taste homemade in the best way possible.
Honestly, it’s comfort food but not in a heavy, greasy way. It feels like you’re treating yourself without the guilt, which is exactly why this recipe has stayed on my favorites list. If you want to try a reliable fried chicken that’s just as good as your favorite diner (or better), this is it.
What Ingredients You Will Need
This recipe uses simple, wholesome ingredients to deliver bold flavor and satisfying texture without the fuss. Most of these are easy to find and often already in your kitchen.
- Chicken pieces: About 3 pounds (1.4 kg) of bone-in, skin-on thighs, drumsticks, or breasts (thighs are my personal favorite for juiciness)
- Buttermilk: 2 cups (480 ml) – the star tenderizer (if you don’t have buttermilk, mix 2 cups milk with 2 tbsp lemon juice or vinegar and let sit 5 minutes)
- All-purpose flour: 2 cups (250 g) – I recommend King Arthur for consistent texture
- Seasoning blend for dredge:
- 1 tbsp paprika (adds smoky color and subtle sweetness)
- 1 tsp garlic powder
- 1 tsp onion powder
- 1 tsp salt (adjust to taste)
- 1/2 tsp black pepper (freshly ground if possible)
- 1/2 tsp cayenne pepper (optional for a kick)
- Vegetable oil or peanut oil: For frying – enough to fill your skillet about 1.5 inches deep (around 4 cups/960 ml)
- Optional: Hot sauce (a few dashes in the buttermilk marinade for extra zing)
If you want a gluten-free option, swap the all-purpose flour with a gluten-free blend or almond flour, though the texture will vary slightly. For dairy-free, use coconut yogurt thinned with water instead of buttermilk.
Equipment Needed
- Large mixing bowl: For marinating the chicken pieces thoroughly in buttermilk.
- Cast-iron skillet or heavy-bottomed frying pan: Essential for even heat retention and a perfect golden crust.
- Tongs: To safely flip and remove chicken pieces without breaking the crust.
- Wire rack: For draining cooked chicken to keep it crispy (a cooling rack over a baking sheet works well).
- Thermometer: A deep-fry or instant-read thermometer helps monitor oil temperature, ensuring the chicken cooks evenly without burning.
- Paper towels: To blot excess moisture before dredging and for resting cooked chicken.
If you don’t have a cast-iron skillet, a heavy stainless steel pan works too—just watch the heat carefully. I’ve tried this with a deep fryer, but the skillet gives better control over cooking and crust formation. Keeping your oil temperature steady is key, so a thermometer is a worthwhile investment if you don’t have one already.
Preparation Method
- Marinate the chicken: Pat the chicken pieces dry with paper towels, then place them in a large bowl. Pour 2 cups (480 ml) of buttermilk over the chicken, making sure each piece is well coated. Add 2-3 dashes of hot sauce if you like a little heat. Cover and refrigerate for at least 4 hours, ideally overnight. This step is crucial—trust me, it makes the meat tender and juicy.
- Prepare the seasoned flour: In a shallow dish, combine 2 cups (250 g) all-purpose flour, 1 tbsp paprika, 1 tsp garlic powder, 1 tsp onion powder, 1 tsp salt, 1/2 tsp black pepper, and 1/2 tsp cayenne pepper. Mix well to distribute the spices evenly.
- Heat the oil: Pour about 4 cups (960 ml) of vegetable or peanut oil into your cast-iron skillet, filling it about 1.5 inches deep. Heat the oil over medium heat to 350°F (175°C). Use a thermometer to keep a steady temperature—too hot will burn the coating; too cool will make it greasy.
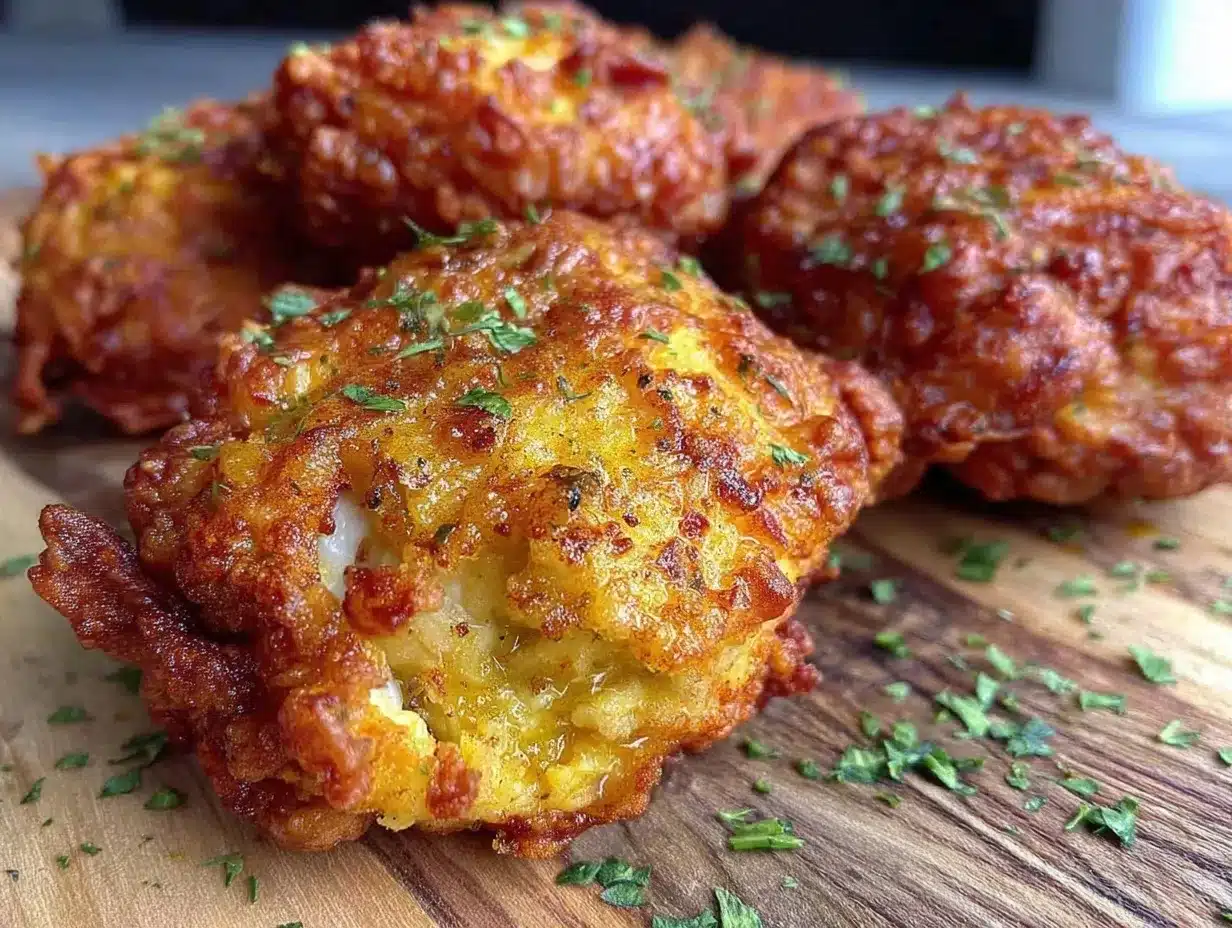
- Dredge the chicken: Remove a piece of chicken from the buttermilk, letting excess drip off (but don’t shake it dry). Dredge it thoroughly in the seasoned flour, pressing gently to build up a good coating. Place each coated piece on a wire rack and let rest 10 minutes; this helps the crust set and stick better.
- Fry in batches: Carefully place a few pieces of chicken into the hot oil, making sure not to overcrowd the pan. Fry for 12-15 minutes total, turning occasionally with tongs, until the crust is deep golden brown and an internal thermometer reads 165°F (75°C). Adjust heat as needed to maintain temperature.
- Drain and rest: Remove the chicken and place on a wire rack over a baking sheet to drain excess oil. Let it rest 5 minutes before serving—this locks in juices and keeps the crust crisp.
- Repeat: Continue frying remaining batches, letting the oil reheat to 350°F (175°C) between batches for best results.
Quick tip: If your coating starts falling off during frying, you might be shaking the excess buttermilk off too aggressively or not letting the flour rest before frying. Patience here pays off!
Cooking Tips & Techniques
Getting that perfect crispy crust with juicy meat isn’t always straightforward—here’s what I’ve learned over many fried chicken sessions:
- Buttermilk is your best friend: It tenderizes the chicken by breaking down proteins, making every bite juicy instead of dry. Skipping this step changes the whole texture.
- Don’t rush the oil temperature: Use a thermometer to keep it steady at 350°F (175°C). Too hot burns the coating, too cool makes it soggy.
- Double dredge for extra crunch: For a thicker crust, dip the buttermilk-soaked chicken back into the flour mixture a second time before frying.
- Use skin-on pieces: The skin adds flavor and helps keep the meat moist during frying.
- Let coated chicken rest before frying: Sitting on the rack for 10 minutes lets the flour hydrate slightly, which helps the crust stick and crisp better.
- Don’t overcrowd the pan: Fry in batches to keep the oil temperature consistent and avoid steaming.
- Drain on a wire rack, not paper towels: Paper towels trap steam and make the crust soggy. The rack lets air circulate for crispiness.
I remember one time I skipped resting the coated chicken, and the crust basically fell apart in the oil. Lesson learned the hard way! Also, if you’re after an even crispier crust, try mixing a few tablespoons of cornstarch into the flour—it’s a game changer.
Variations & Adaptations
This recipe is a great base, but I love switching things up depending on mood or dietary needs:
- Spicy Kick: Add 1 tsp smoked paprika and 1 tsp chili powder to the flour mix. Toss a few dashes of hot sauce in the buttermilk for extra heat.
- Gluten-Free: Use a gluten-free flour blend instead of all-purpose flour. Almond flour works but expect a slightly different texture and color.
- Oven-Fried Version: After dredging, place chicken pieces on a wire rack over a baking sheet and bake at 425°F (220°C) for 40-45 minutes, flipping halfway. Spray with oil to crisp up the crust.
- Herb-Infused: Mix dried thyme, oregano, and rosemary into the flour for a fragrant twist.
- Dairy-Free: Swap buttermilk for coconut yogurt thinned with water or a mixture of almond milk and vinegar.
One personal favorite is pairing this chicken with my flaky buttermilk biscuits—the combo is unbeatable for weekend brunches. Also, if you’re into dips, a side of creamy buttermilk ranch dressing is a natural fit.
Serving & Storage Suggestions
This crispy buttermilk fried chicken shines best fresh and hot, straight from the pan. Serve it on a platter with some pickles or coleslaw for a classic Southern vibe. It pairs beautifully with mashed potatoes, cornbread, or even a fresh green salad.
If you have leftovers (lucky you!), store them in an airtight container in the refrigerator for up to 3 days. To reheat without losing crunch, pop the pieces in a 375°F (190°C) oven on a wire rack for about 10-15 minutes until warmed through and crisp again.
Freezing is possible too—wrap each piece tightly in foil or plastic wrap, then place in a freezer bag. Thaw overnight in the fridge and reheat in the oven as above. The flavors actually deepen a bit after resting, so sometimes the next-day chicken tastes even better.
Nutritional Information & Benefits
Per serving (approximate, based on 1 piece of fried chicken):
| Calories | 350-400 kcal |
|---|---|
| Protein | 28 g |
| Fat | 22 g |
| Carbohydrates | 10-15 g |
The buttermilk not only tenderizes but adds calcium and probiotics, which support digestion. Using skin-on chicken helps retain moisture and flavor, though it also adds fat, so balance with fresh veggies or salads.
For those watching carbs, this recipe can be adapted with almond or coconut flour alternatives. Just remember, fried chicken is a comfort food—best enjoyed as part of a balanced diet.
Conclusion
This crispy buttermilk fried chicken recipe has become a go-to for me when I want a meal that feels like a treat but doesn’t require hours in the kitchen. It’s a dependable mix of crunchy crust and juicy meat that fills the house with mouthwatering smells and feeds the soul.
Make it your own by adjusting spices, trying different cuts, or pairing with some sides you love—whether crispy fries, a fresh salad, or those buttery biscuits I mentioned. I hope you find the same satisfaction from this recipe that keeps me coming back.
And if you do try it, I’d love to hear how it turns out or what twists you added. Sharing food stories and tweaks is part of what makes cooking fun, right?
FAQs
Can I use boneless chicken for this recipe?
Yes! Boneless, skinless chicken breasts or thighs work fine but reduce frying time to avoid overcooking and drying out. Bone-in pieces hold moisture better, though.
How long should I marinate the chicken in buttermilk?
At least 4 hours is good, but overnight marinating (8-12 hours) is best for tender, juicy results.
What oil is best for frying chicken?
Peanut oil, vegetable oil, or canola oil are great choices due to their high smoke points and neutral flavor.
Can I bake this chicken instead of frying?
Absolutely! Bake at 425°F (220°C) on a wire rack for 40-45 minutes, flipping halfway. Spray lightly with oil to encourage crispiness.
How do I keep the fried chicken crispy after cooking?
Drain on a wire rack instead of paper towels and avoid stacking pieces. If reheating, use the oven instead of microwave to keep the crust crunchy.
Pin This Recipe!
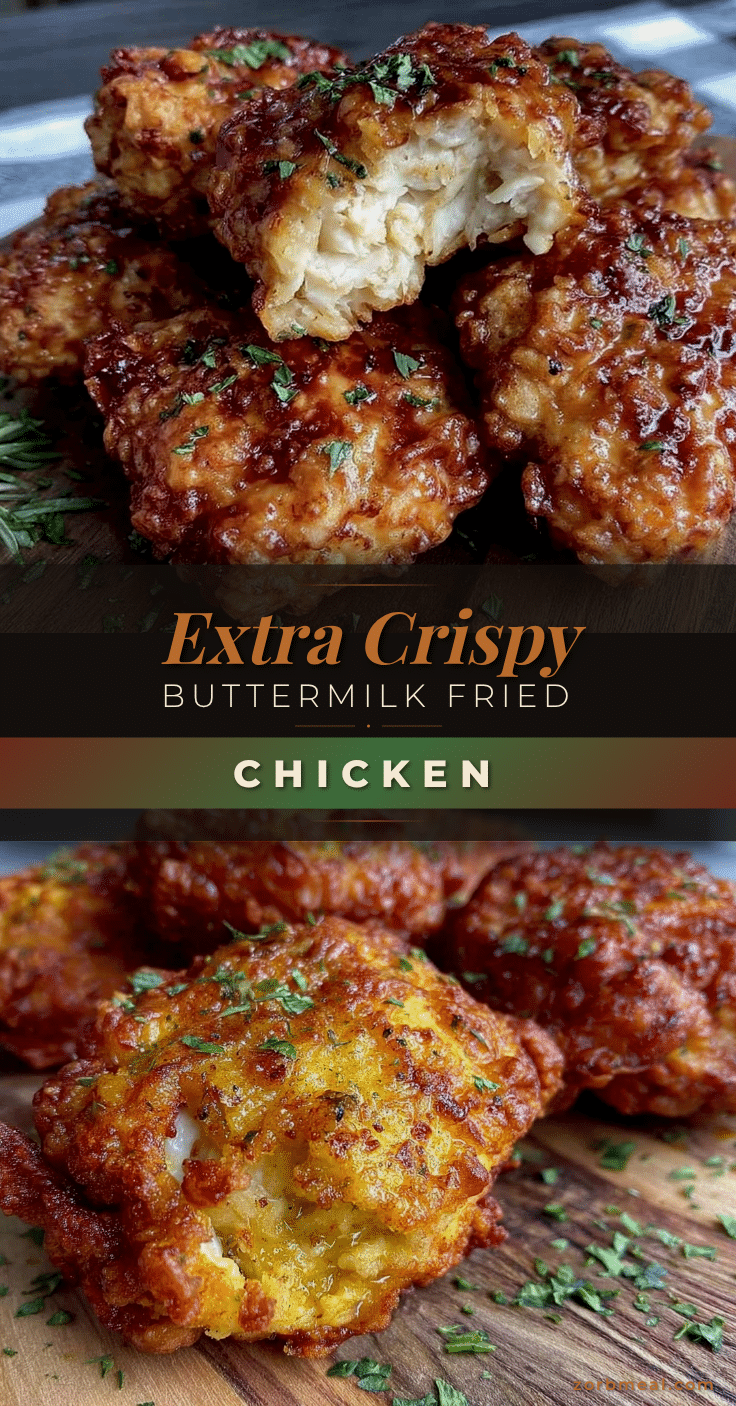
Crispy Buttermilk Fried Chicken

A quick and easy recipe for tender, juicy fried chicken with a crispy, golden crust, marinated in buttermilk for extra flavor and moisture.
- Prep Time: 10 minutes (plus 4-12 hours marinating)
- Cook Time: 15 minutes per batch
- Total Time: 45 minutes (excluding marinating time)
- Yield: 6 servings 1x
- Category: Main Course
- Cuisine: Southern American
Ingredients
- 3 pounds bone-in, skin-on chicken pieces (thighs, drumsticks, or breasts)
- 2 cups buttermilk (or 2 cups milk + 2 tbsp lemon juice or vinegar, let sit 5 minutes)
- 2 cups all-purpose flour
- 1 tbsp paprika
- 1 tsp garlic powder
- 1 tsp onion powder
- 1 tsp salt (adjust to taste)
- 1/2 tsp black pepper
- 1/2 tsp cayenne pepper (optional)
- Vegetable oil or peanut oil (about 4 cups for frying)
- Optional: hot sauce (a few dashes for marinade)
Instructions
- Pat chicken pieces dry with paper towels and place in a large bowl.
- Pour buttermilk over chicken, add hot sauce if using, cover and refrigerate for at least 4 hours or overnight.
- In a shallow dish, combine flour, paprika, garlic powder, onion powder, salt, black pepper, and cayenne pepper; mix well.
- Heat oil in a cast-iron skillet to 350°F (175°C), filling about 1.5 inches deep.
- Remove chicken from buttermilk, letting excess drip off without shaking dry.
- Dredge chicken thoroughly in seasoned flour, pressing gently to coat well.
- Place coated chicken on a wire rack and let rest for 10 minutes to set the crust.
- Fry chicken in batches, avoiding overcrowding, for 12-15 minutes, turning occasionally until golden brown and internal temperature reaches 165°F (75°C).
- Remove chicken and drain on a wire rack over a baking sheet; let rest 5 minutes before serving.
- Repeat frying remaining batches, reheating oil to 350°F (175°C) between batches.
Notes
Use a thermometer to maintain oil temperature at 350°F for best results. Let coated chicken rest before frying to help crust stick. Fry in batches to avoid overcrowding. For extra crunch, double dredge or add cornstarch to flour. Use skin-on pieces for juiciness. Drain on wire rack, not paper towels, to keep crust crispy.
Nutrition
- Serving Size: 1 piece of fried chi
- Calories: 350400
- Fat: 22
- Carbohydrates: 1015
- Protein: 28
Keywords: fried chicken, buttermilk fried chicken, crispy chicken, comfort food, easy fried chicken, southern fried chicken