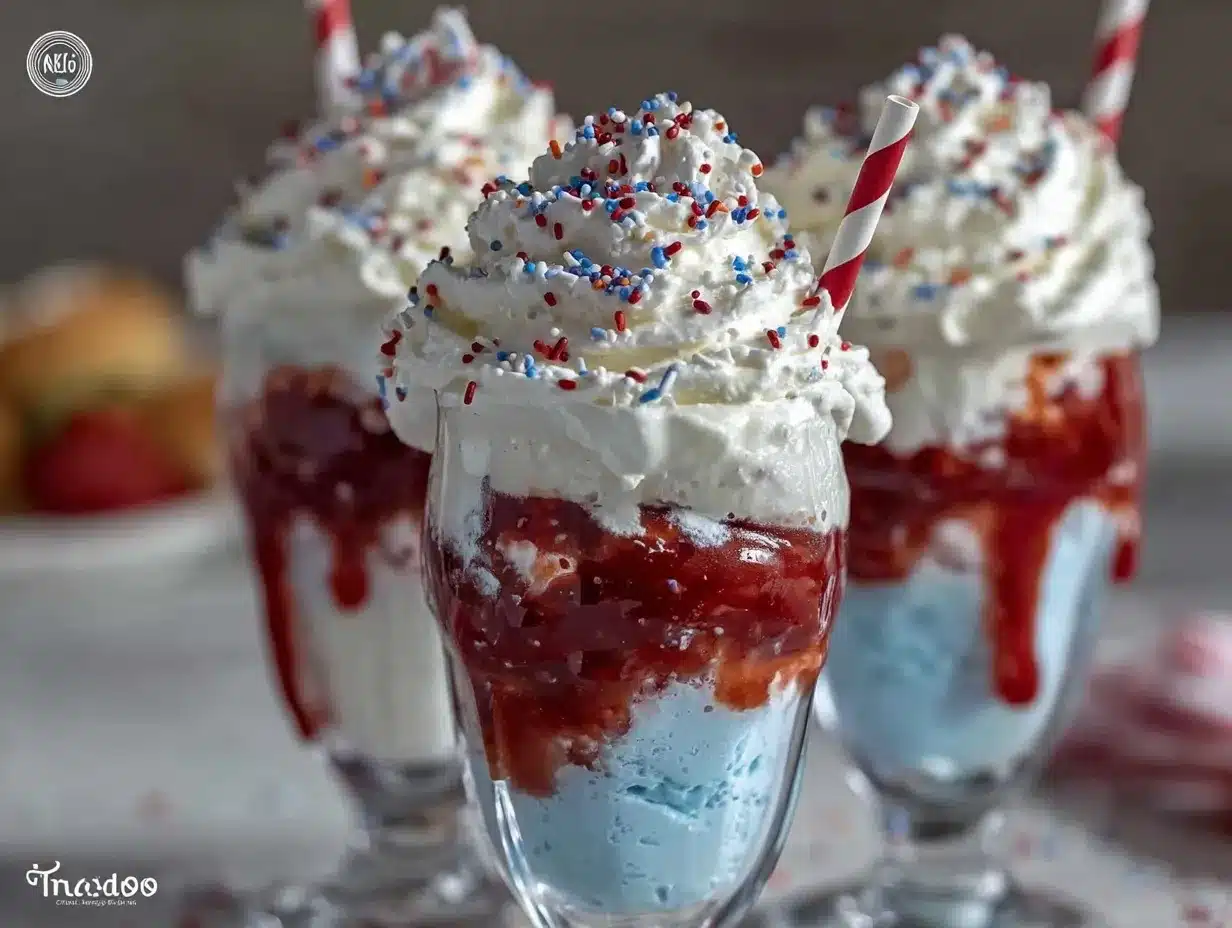
Imagine the moment you lift a spoonful of fluffy, swirled pudding—the kind that’s so vibrant and playful, it feels like you’ve just stepped into a Dr. Seuss book. The first time I layered these creamy Dr. Seuss red & blue pudding parfaits, the kitchen was filled with laughter and a certain sweet anticipation. There’s something magical about watching those bold red and blue layers settle in a glass, topped with fluffy clouds of whipped cream and a sprinkle of whimsical candy.
The scent of vanilla pudding mingling with fruity berry flavors is enough to make anyone—big or small—hover around the fridge, waiting for dessert. I still remember my nephew’s face the first time he saw these parfaits; wide-eyed, grinning ear to ear, and asking if he could have seconds before he’d even finished the first. It’s the kind of moment where you pause, take a deep breath, and just smile because you know you’re onto something truly special (and honestly, a little mischievous). These parfaits are pure, nostalgic comfort—just a little more fun than your average pudding cup.
Back when I was knee-high to a grasshopper, my grandma used to make layered desserts for every holiday. I’ve taken her old-school techniques and spun them with a whimsical twist, inspired by the bold colors and joyful chaos of Dr. Seuss. I wish I’d thought to brighten up birthday parties and rainy afternoons with these much sooner! They’re dangerously easy to whip up, perfect for potlucks, birthday bashes, and especially for brightening your Pinterest dessert board.
My family can’t stop sneaking these off the tray before dinner. You know what? I can’t blame them. Every batch gets taste-tested (in the name of research, of course), and these parfaits have become a staple for family gatherings, gifting, and those moments when you just need a dessert that feels like a warm hug. If you love easy, crowd-pleasing treats, you’re going to want to bookmark this one!
Why You’ll Love This Creamy Dr. Seuss Pudding Parfaits Recipe
After making these pudding parfaits more times than I can count (and let’s be honest, cleaning up a few kitchen messes along the way), I can promise you—they’re a must-try. Here’s why these whimsical desserts have become my not-so-secret weapon for celebrations and everyday fun:
- Quick & Easy: Each parfait comes together in less than 30 minutes, making this a lifesaver for last-minute parties or when you need a sweet treat in a snap.
- Simple Ingredients: No wild goose chase at the grocery store—most of what you need is probably already hanging out in your pantry.
- Perfect for Parties: These are a hit at birthday parties, school events, Dr. Seuss Day (hello, March 2nd!), or just a rainy-day kitchen adventure with the kids.
- Crowd-Pleaser: Kids love the colors, adults love the nostalgia, and everyone fights over the extra whipped cream.
- Unbelievably Delicious: The combo of creamy vanilla and tangy berry flavors, layered with pillowy whipped cream, is the kind of comfort food you remember from childhood—only brighter and bolder.
Honestly, what makes my creamy Dr. Seuss pudding parfaits stand out is the way each bite balances silky, cool pudding with a playful pop of berry and a cloud-like topping. I use a little extra vanilla and a blend of real fruit puree for the red layer, which makes every spoonful taste homemade (even if you’re using boxed pudding—no shame in shortcuts!). Sometimes I swap in Greek yogurt for extra tang or use a dash of almond extract for a grown-up twist. It’s not just another layered dessert—it’s a joyful, show-stopping treat that’s as fun to make as it is to eat.
There’s something almost magical about these parfaits. They make you slow down and enjoy the moment, whether you’re sharing them with friends or sneaking one for yourself after everyone’s gone to bed. They’re just as perfect for impressing guests as they are for making an ordinary Tuesday feel special. So go ahead—make a batch, and watch the smiles appear (even on the faces of folks who claim they don’t have a sweet tooth)!
What Ingredients You Will Need
This recipe keeps things playful and simple, using classic ingredients with a few fun twists. You won’t need anything fancy—just a mix of pantry staples and a couple of special touches to bring that whimsical Dr. Seuss vibe to life. Here’s what you’ll need:
- For the Red Layer:
- Strawberry or raspberry flavored gelatin mix (1 box, 3 oz / 85g) – for that bright, bold color
- Boiling water (1 cup / 240ml) – for dissolving the gelatin
- Cold water (1 cup / 240ml)
- Fresh or frozen strawberries or raspberries (optional, 1/2 cup / 75g) – chopped, for extra berry goodness
- For the Blue Layer:
- Blueberry flavored gelatin mix or blue raspberry (1 box, 3 oz / 85g) – for that Seussian blue
- Boiling water (1 cup / 240ml)
- Cold water (1 cup / 240ml)
- Fresh or frozen blueberries (optional, 1/2 cup / 75g) – adds a juicy, fruity layer
- For the Creamy Pudding Layer:
- Instant vanilla pudding mix (1 box, 3.4 oz / 96g)
- Cold milk (2 cups / 475ml) – whole or 2% works best for that creamy texture
- Whipped topping (1 cup / 240ml), thawed – for folding into the pudding, making it extra airy
- Optional: 1/2 tsp pure vanilla extract (for a deeper vanilla flavor)
- For Assembly & Topping:
- Whipped cream or whipped topping (as much as you like)
- Festive sprinkles (red & blue, or rainbow for extra whimsy)
- Mini marshmallows or candy pearls (optional, for Seuss-inspired fun)
- Clear glasses, mason jars, or small dessert cups
Ingredient Tips: I find that Jell-O brand gelatin and pudding mix sets up reliably every time (no weird textures). For a gluten-free option, check the labels—most instant pudding and gelatin mixes are, but it’s worth a peek. Want to cut down on sugar? Use sugar-free mixes and swap in light whipped topping. If you’re dairy-free, try coconut milk and a non-dairy whipped topping—they work just as well and keep things creamy.
In the summer, I love folding in fresh berries for that pop of tartness. In winter, frozen fruit works in a pinch. The best part? You can swap flavors—think cherry for the red layer or lemon for a yellow twist. This recipe is forgiving and fun, so don’t be afraid to mix it up!
Equipment Needed for Dr. Seuss Pudding Parfaits
You won’t need any fancy gadgets to whip up these parfaits—just some basics, plus a few tools that make layering a breeze:
- Mixing bowls (at least 2, preferably glass for easy monitoring)
- Whisk or electric hand mixer (for smooth pudding and whipped topping)
- Measuring cups and spoons (for accuracy—especially with gelatin and pudding)
- Clear dessert glasses, mason jars, or small plastic cups (the see-through sides are half the fun!)
- Rubber spatula or large spoon (helps with even layering)
- Small ladle or ice cream scoop (for neat layers—optional but handy)
- Refrigerator space (enough for chilling your assembled parfaits)
If you don’t have parfait glasses, don’t sweat it—use juice glasses, wine glasses, or even sturdy plastic cups for kid-friendly events. I’ve even used old jam jars in a pinch (they look adorable!). For easy cleanup, disposable piping bags can help layer the pudding and gelatin without smudging the sides, but a spoon works just fine if you’re more of a “less dishes, more fun” type.
Quick tip: If you’re making a big batch, line up the glasses on a sheet tray. It makes moving them in and out of the fridge a whole lot easier—and trust me, I’ve learned that the hard way after a few wobbly spills!
How to Make Creamy Dr. Seuss Red & Blue Pudding Parfaits
- Make the Red Gelatin Layer:
- Pour 1 box (3 oz / 85g) red gelatin mix into a medium bowl.
- Add 1 cup (240ml) boiling water and whisk until fully dissolved (about 2 minutes).
- Stir in 1 cup (240ml) cold water. Let cool for 10-15 minutes at room temperature—don’t rush, or you’ll melt the next layer!
- If using, fold in 1/2 cup (75g) chopped strawberries or raspberries.
- Spoon a layer (about 2-3 tablespoons) into the bottom of each glass.
- Place glasses in the fridge and chill for at least 30 minutes, until set but not too firm.
- Make the Blue Gelatin Layer:
- Repeat the process: combine 1 box (3 oz / 85g) blue gelatin mix with 1 cup (240ml) boiling water. Whisk until dissolved.
- Add 1 cup (240ml) cold water, stir, and let cool to room temp.
- Fold in 1/2 cup (75g) blueberries if you like.
- Spoon a layer of blue gelatin (2-3 tablespoons) on top of the red layer once it’s set.
- Chill again for 30 minutes, until both layers are set.
- Prepare the Creamy Pudding:
- In a clean bowl, whisk together 1 box (3.4 oz / 96g) instant vanilla pudding mix and 2 cups (475ml) cold milk for 2-3 minutes, until thickened.
- Fold in 1 cup (240ml) whipped topping and 1/2 tsp vanilla extract (if using). The mixture should be smooth and fluffy.
- Let set for 5 minutes. If pudding seems too thick, add a splash more milk.
- Assemble the Parfaits:
- Once gelatin layers are set, spoon or pipe a generous layer of creamy pudding over the blue gelatin. Try not to smudge the sides for a clean, striped look.
- Top with another thin layer of red gelatin (if you have extra) or go straight to the whipped topping for a three-layer effect.
- Chill parfaits for at least 1 hour before serving. This helps the layers settle and flavors mingle.
- Add Whimsical Toppings:
- Just before serving, dollop or pipe whipped cream on top of each parfait.
- Decorate with red & blue sprinkles, mini marshmallows, or candy pearls for that Seussical flair.
- Serve chilled with a long spoon—and maybe a Dr. Seuss rhyme or two!
Troubleshooting: If your gelatin isn’t setting, double-check your water temps—hot must be boiling, and cold must be cold. If layers bleed together, let each set fully before adding the next. If you’re in a rush, pop them in the freezer for 10 minutes between layers (just don’t forget them in there, or you’ll have a parfait popsicle!).
Personal tip: If you want perfectly straight layers, use a small measuring cup to pour each layer down the center—less dribble, more wow factor. And don’t worry if it’s a little messy—just call it “Seussical style!”
Cooking Tips & Techniques for Whimsical Parfaits
Years of parfait-making (and a few flops along the way) have taught me some tricks that will make your creamy Dr. Seuss pudding parfaits pop—both in looks and taste:
- Cool Each Layer Fully: Patience is key. If you rush the gelatin, the layers will swirl together. I usually chill each for 30 minutes, or until it doesn’t jiggle when you nudge the glass.
- Use Piping Bags for Neat Layers: If you want picture-perfect stripes, fill a piping bag (or zip-top bag with the corner snipped off) with pudding or gelatin. Squeeze gently for clean lines.
- Don’t Overmix Whipped Topping: Fold it in gently to keep the pudding airy. Overmixing can make it runny and heavy.
- Keep Glasses Dry: If condensation forms inside the glasses as you chill layers, wipe with a paper towel before adding the next. It keeps your stripes crisp and clear.
- Layer Order Matters: For the brightest colors, sandwich the white pudding between red and blue. It looks especially striking in clear glasses.
- Flavor Boosts: Add a dash of lemon zest to the pudding for a hint of zing, or swap in almond extract for a bakery-style twist.
- Batch Assembly: Line up your glasses assembly-line style and work in batches. It’s faster and keeps everything even.
- Chill Before Serving: This sets the layers and helps the flavors meld—plus, cold parfaits are just so refreshing.
Common mistakes? Oh, I’ve made them. Once I poured hot gelatin over cold pudding—result: a melty mess. I’ve also tried to rush the process and ended up with muddy stripes. If that happens, just swirl with a spoon and call it “abstract art.” Honest kitchen moments, right?
For consistent results, stick to the same glass size, keep ingredients chilled, and don’t be afraid to improvise. These parfaits are meant to be playful—just like a Seuss story!
Variations & Adaptations
The beauty of these Dr. Seuss parfaits is how easily you can tweak them to suit any occasion, dietary need, or flavor craving. Here are a few of my favorite spins:
- Dairy-Free Version: Use almond or coconut milk for the pudding and swap in a non-dairy whipped topping. Most gelatin mixes are dairy-free, but always double-check the label.
- Low-Sugar or Keto-Friendly: Choose sugar-free pudding and gelatin mixes, and use a light whipped topping. Layer with fresh berries instead of candy to keep it lighter but still fun.
- Seasonal Flavors: For winter, try cherry and blueberry gelatin. In summer, use lemon gelatin with fresh strawberries and blueberries for a patriotic twist—perfect for July 4th!
- Chocolate Lovers: Swap the vanilla pudding for chocolate, and use cherry and blueberry layers for a Black Forest vibe. Add mini chocolate chips between layers for a little crunch.
- Adult Version: Stir a splash of berry liqueur into the red or blue layer (just a tablespoon or two). Not for the kids, but a hit at grown-up gatherings!
For kids with allergies, use certified gluten-free and nut-free ingredients. I once made these with lemon and lime gelatin for a “Grinch” Christmas version, and they were a total hit. Don’t be afraid to let your creativity loose—after all, Dr. Seuss would approve of a little kitchen chaos!
Serving & Storage Suggestions
These parfaits are best served chilled, straight from the fridge. The colors are brightest and the layers hold up perfectly when cold. For parties, I like to prep them in small mason jars with lids—just pop them open when it’s dessert time.
Presentation is half the fun! Top each parfait with a swirl of whipped cream, a sprinkle of red and blue candy, and maybe a striped paper straw for that Seussical look. Pair with frosted sugar cookies or serve alongside a berry fruit platter for a truly festive table.
To store, cover parfaits with plastic wrap (or snap on the jar lids) and refrigerate for up to 3 days. The gelatin and pudding will stay firm, and the flavors meld nicely. For longer storage, you can make the gelatin and pudding layers ahead and assemble up to 24 hours before serving. I wouldn’t recommend freezing—gelatin doesn’t thaw well and can turn watery.
Reheating? Not needed—just eat them cold! If the whipped cream droops a bit, add a fresh swirl before serving. Honestly, I think the flavors are even better on day two when everything’s had time to get cozy.
Nutritional Information & Benefits
Each creamy Dr. Seuss pudding parfait (prepared as shown) contains approximately:
- Calories: 210
- Fat: 5g
- Carbohydrates: 38g
- Protein: 3g
- Sugar: 26g
These parfaits are a sweet treat, but they’re lighter than cake or brownies—especially if you use sugar-free mixes or swap in Greek yogurt for part of the whipped topping. The berries add a dose of antioxidants and vitamin C, and you can boost fiber by folding in more fresh fruit.
Dietary notes: Naturally gluten-free if you check the mix labels, and easy to adapt for dairy-free diets. Allergens to consider: contains milk (in pudding and whipped topping) and may contain artificial colors (in gelatin). As always, check labels if cooking for someone with allergies.
From a wellness angle, these parfaits are about balance—treats that bring joy without overindulgence. They’re great for portion control (thanks to those handy individual cups!), and honestly, every now and then, a little whimsy is good for the soul.
Conclusion
If you’re looking for a dessert that’s as joyful to make as it is to eat, these creamy Dr. Seuss pudding parfaits are the answer. They’re colorful, customizable, and guaranteed to make any gathering more memorable—whether you’re serving kids, grown-ups, or anyone in between.
Try swapping flavors, tossing in new toppings, or playing with the layers to make them truly your own. That’s half the fun! I keep coming back to this recipe because it’s a sure-fire way to bring smiles (and a few giggles) to the dessert table.
So, what are you waiting for? Whip up a batch, share with friends, and don’t forget to leave a comment below with your favorite twist or family reaction. I’d love to see your creations and hear your stories. Go ahead—add a little whimsy to your next dessert and make your own sweet Seussical memory!
Frequently Asked Questions
Can I make Dr. Seuss pudding parfaits ahead of time?
Absolutely! You can assemble the parfaits up to 24 hours in advance. Just keep them covered in the fridge until you’re ready to serve, and add whipped cream and toppings right before eating.
What if I can’t find blue gelatin mix?
No worries—use blue raspberry, blueberry, or even a combo of lemon and a few drops of blue food coloring. The goal is that fun, bold blue stripe!
Are these parfaits gluten-free?
Most instant pudding and gelatin mixes are gluten-free, but always check the packaging to be sure. Use gluten-free whipped topping and you’re all set.
Can I use homemade pudding instead of instant?
Definitely! Homemade pudding works beautifully and gives an extra-rich texture. Just let it cool fully before layering to keep the stripes neat.
What’s the best way to transport these for a party?
Pop the parfaits into mason jars with lids or cover each cup tightly with plastic wrap. Bring the toppings separately and add them just before serving for maximum wow factor.
Pin This Recipe!
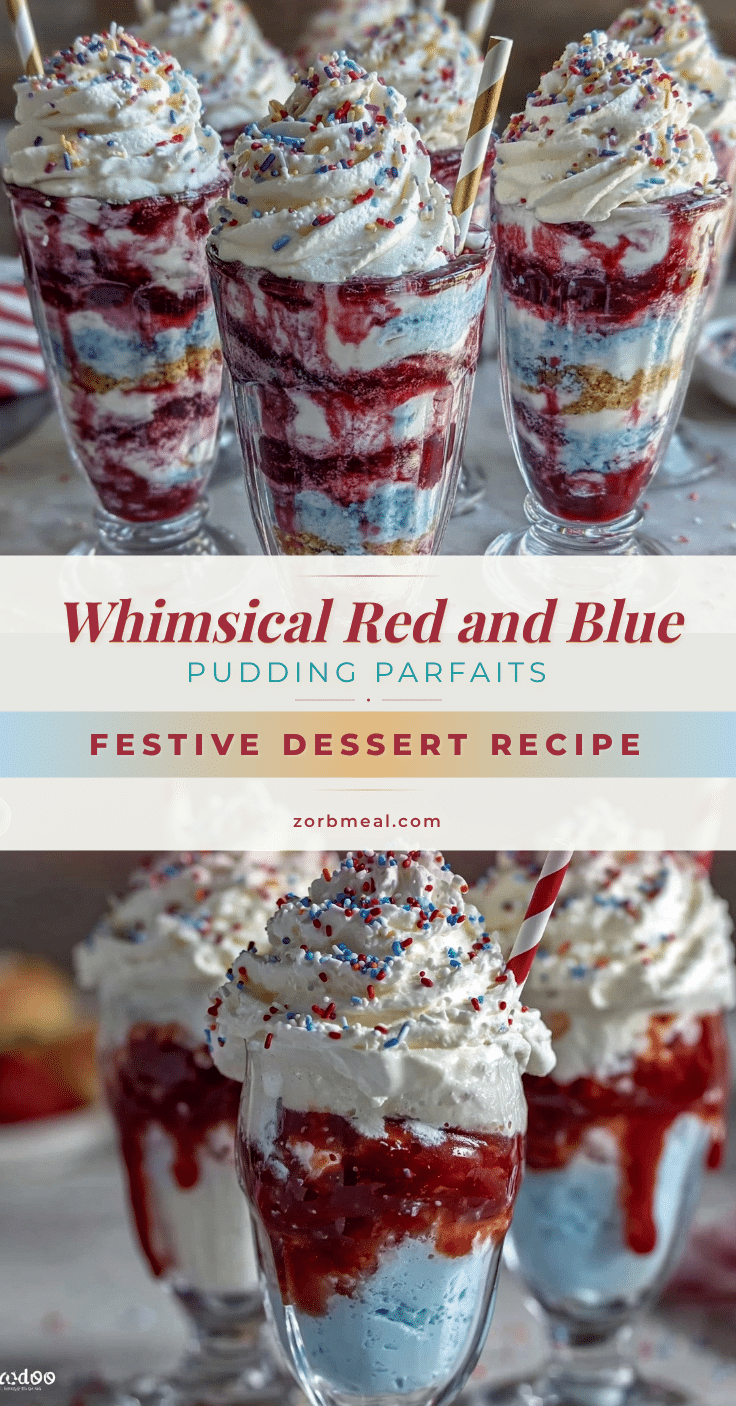
Creamy Dr. Seuss Pudding Parfaits

These whimsical red and blue pudding parfaits are a playful, crowd-pleasing dessert inspired by Dr. Seuss. With layers of fruity gelatin, creamy vanilla pudding, and fluffy whipped cream, they’re perfect for parties, birthdays, or any occasion that needs a pop of color and fun.
- Prep Time: 20 minutes
- Cook Time: 0 minutes
- Total Time: 2 hours
- Yield: 6 parfaits 1x
- Category: Dessert
- Cuisine: American
Ingredients
- 1 box (3 oz) strawberry or raspberry flavored gelatin mix
- 1 cup boiling water
- 1 cup cold water
- 1/2 cup fresh or frozen strawberries or raspberries, chopped (optional)
- 1 box (3 oz) blueberry or blue raspberry flavored gelatin mix
- 1 cup boiling water
- 1 cup cold water
- 1/2 cup fresh or frozen blueberries (optional)
- 1 box (3.4 oz) instant vanilla pudding mix
- 2 cups cold milk (whole or 2%)
- 1 cup whipped topping, thawed (plus more for topping)
- 1/2 teaspoon pure vanilla extract (optional)
- Festive sprinkles (red & blue, or rainbow)
- Mini marshmallows or candy pearls (optional)
- Clear glasses, mason jars, or small dessert cups
Instructions
- Make the Red Gelatin Layer: Pour red gelatin mix into a medium bowl. Add 1 cup boiling water and whisk until dissolved (about 2 minutes). Stir in 1 cup cold water. Let cool for 10-15 minutes at room temperature. Fold in strawberries or raspberries if using. Spoon 2-3 tablespoons into each glass. Chill for at least 30 minutes until set.
- Make the Blue Gelatin Layer: Repeat with blue gelatin mix, using 1 cup boiling water and 1 cup cold water. Let cool to room temperature. Fold in blueberries if using. Spoon 2-3 tablespoons on top of the red layer. Chill for 30 minutes until set.
- Prepare the Creamy Pudding: In a clean bowl, whisk together instant vanilla pudding mix and 2 cups cold milk for 2-3 minutes until thickened. Fold in 1 cup whipped topping and vanilla extract if using. Let set for 5 minutes.
- Assemble the Parfaits: Once gelatin layers are set, spoon or pipe a generous layer of creamy pudding over the blue gelatin. Top with another thin layer of red gelatin if desired, or go straight to the whipped topping.
- Chill parfaits for at least 1 hour before serving.
- Add Whimsical Toppings: Just before serving, top with whipped cream, sprinkles, mini marshmallows, or candy pearls. Serve chilled.
Notes
For best results, chill each layer fully before adding the next to keep stripes clean. Use piping bags for neat layers. For gluten-free or dairy-free adaptations, check ingredient labels and substitute as needed. Parfaits can be made up to 24 hours ahead; add toppings just before serving.
Nutrition
- Serving Size: 1 parfait (about 1 c
- Calories: 210
- Sugar: 26
- Sodium: 210
- Fat: 5
- Saturated Fat: 3
- Carbohydrates: 38
- Fiber: 1
- Protein: 3
Keywords: Dr. Seuss dessert, pudding parfaits, red and blue parfaits, kids party dessert, whimsical dessert, layered pudding, easy parfait recipe, gelatin parfait, birthday dessert