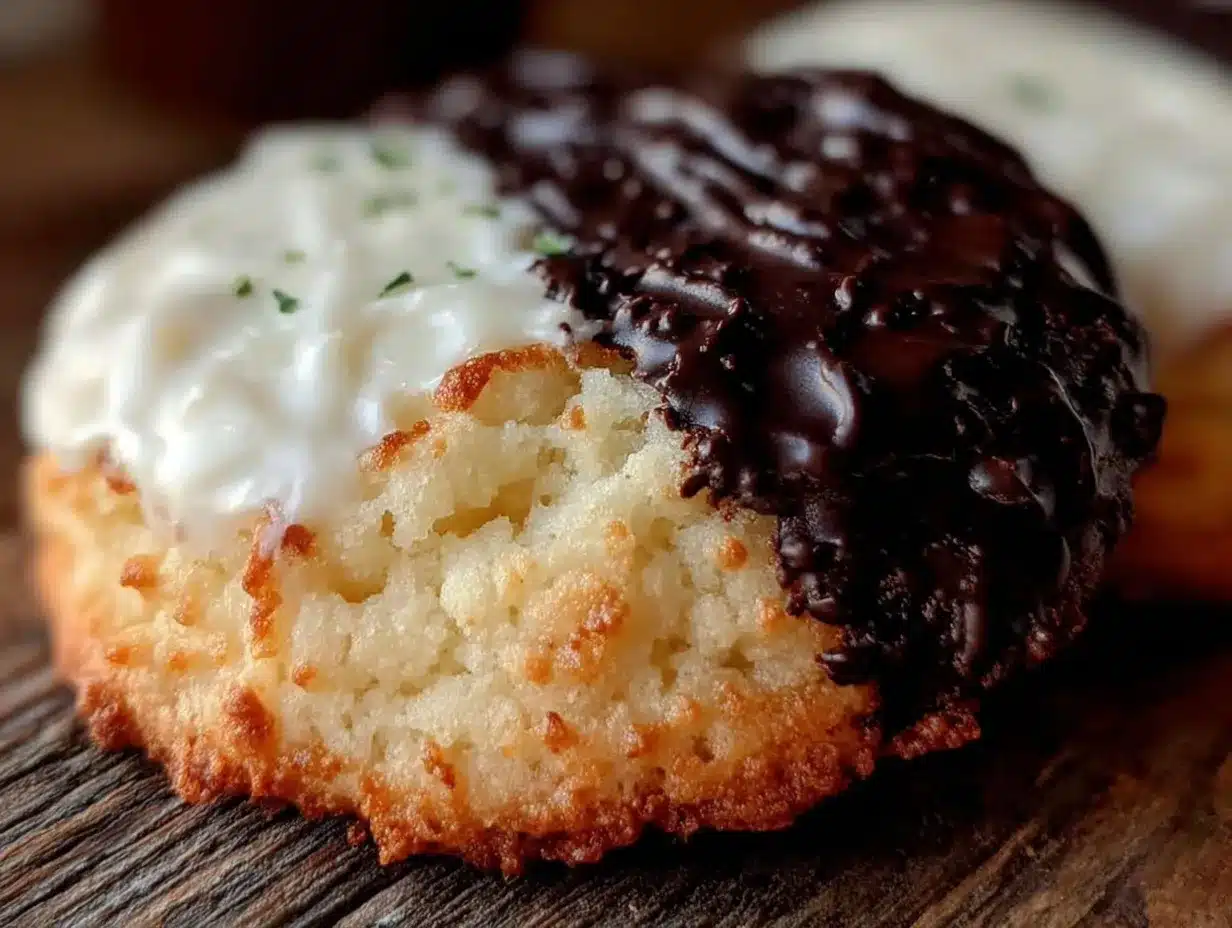
Let me tell you, the moment you slice into a freshly baked New York black and white cookie, the smell alone is enough to make anyone’s mouth water. The soft, cakey texture paired with that distinctive half-vanilla, half-chocolate icing is pure, nostalgic comfort. The first time I baked these cookies, I was instantly hooked—the kind of moment where you pause, take a deep breath, and just smile because you know you’re onto something truly special. It reminded me of lazy afternoons spent wandering the streets of Manhattan with a cookie in hand, feeling the city buzz around me.
Years ago, when I was knee-high to a grasshopper, my grandma used to bring home treats from the local bakery, but none captured that cozy, sweet balance quite like a black and white cookie. I stumbled upon this recipe on a rainy weekend, trying to recreate that classic New York bakery vibe right in my own kitchen. Honestly, I wish I’d discovered this recipe years ago—it’s dangerously easy and perfect for brightening up any Pinterest cookie board or sweet treat for your kids.
My family couldn’t stop sneaking them off the cooling rack (and I can’t really blame them). It’s become a staple for family gatherings, gifting, or just a little midweek pick-me-up. If you’re looking for a cookie that feels like a warm hug wrapped in frosting, you’re going to want to bookmark this one.
Why You’ll Love This Recipe
After testing this black and white cookie recipe multiple times (in the name of research, of course), I can say with confidence it’s one of the best homemade treats you’ll ever bake. Here’s why it stands out:
- Quick & Easy: Comes together in under 45 minutes, perfect for busy weeknights or last-minute cravings.
- Simple Ingredients: No fancy grocery trips needed; you likely already have everything in your kitchen pantry.
- Perfect for Any Occasion: Great for brunches, potlucks, or cozy afternoons with friends and family.
- Crowd-Pleaser: Always gets rave reviews from kids and adults alike—trust me, no leftovers here!
- Unbelievably Delicious: The unique combo of soft cake-like cookie and smooth, split icing is next-level comfort food.
This recipe isn’t just another cookie; it’s the best version of a classic, with a perfectly balanced sweetness and texture. The trick is in the simple batter and the signature half-and-half glaze, which gives that iconic look and flavor. You know what? This cookie makes you close your eyes after the first bite—pure comfort food with a touch of nostalgia. Whether you’re impressing guests without stress or just craving a sweet moment, this recipe hits the spot every time.
What Ingredients You Will Need
This classic cozy New York black and white cookie recipe uses simple, wholesome ingredients to deliver bold flavor and that satisfying soft texture without any fuss. Most of these are pantry staples, so you won’t have to hunt around for anything exotic.
- For the Cookie Batter:
- All-purpose flour (2 ½ cups / 312 grams) – I prefer Gold Medal for consistent texture
- Baking powder (2 teaspoons) – gives that perfect rise
- Salt (½ teaspoon) – balances the sweetness
- Unsalted butter (½ cup / 113 grams), softened – adds richness
- Granulated sugar (1 cup / 200 grams) – for sweetness
- Large eggs (2), room temperature – helps with structure
- Vanilla extract (2 teaspoons) – pure Madagascar vanilla is my go-to
- Whole milk (½ cup / 120 ml) – feel free to use dairy-free milk if needed
- Lemon juice (1 teaspoon) – a little acidity brightens the flavor
- For the Icing:
- Powdered sugar (2 cups / 240 grams) – sifted for smoothness
- Light corn syrup (2 tablespoons) – helps with that glossy finish
- Vanilla extract (1 teaspoon)
- Milk (3-4 tablespoons / 45-60 ml) – adjust for consistency
- Cocoa powder (3 tablespoons) – for the chocolate half of the icing
If you want to switch things up, almond flour can work if you need a gluten-free option, but it’ll change the texture a bit. Also, if you prefer a dairy-free version, swap butter and milk with coconut oil and almond milk. For best results, use fresh ingredients and measure carefully – it really makes a difference.
Equipment Needed
- Mixing bowls – medium and large sizes work best
- Electric mixer or stand mixer – makes creaming butter and sugar a breeze
- Measuring cups and spoons – accuracy is key
- Rubber spatula – perfect for folding ingredients gently
- Baking sheets – lined with parchment paper or silicone mats to prevent sticking
- Wire cooling rack – lets cookies cool evenly
- Small bowls for icing preparation
- Offset spatula or butter knife – for spreading the icing smoothly
If you don’t have a stand mixer, no worries! A hand mixer or even a sturdy whisk and some elbow grease will do the job. Parchment paper or silicone mats are lifesavers for cleanup and keeping cookies intact. I’ve tried various brands, and Silpat mats last forever and are worth the investment.
Preparation Method
- Preheat your oven to 350°F (175°C). Line two baking sheets with parchment paper or silicone mats to prevent sticking.
- Mix dry ingredients: In a medium bowl, whisk together 2 ½ cups (312 g) all-purpose flour, 2 teaspoons baking powder, and ½ teaspoon salt. Set aside.
- Cream butter and sugar: In a large bowl, beat ½ cup (113 g) softened unsalted butter with 1 cup (200 g) granulated sugar using an electric mixer on medium speed until light and fluffy (about 3-4 minutes). This step is essential for a soft, tender cookie.
- Add eggs and vanilla: Beat in 2 large eggs one at a time, then stir in 2 teaspoons vanilla extract. The batter will look smooth and creamy.
- Combine milk and lemon juice: In a small bowl, mix ½ cup (120 ml) whole milk with 1 teaspoon lemon juice. Let it sit for 5 minutes to create a buttermilk substitute.
- Alternate adding dry ingredients and milk mixture: Gradually add the flour mixture and milk mixture to the butter mixture, beginning and ending with the flour. Mix just until combined—overmixing can make the cookies tough.
- Scoop batter: Using a large spoon or ice cream scoop, drop rounded mounds (about 3 tablespoons / 45 ml) of batter onto prepared baking sheets, spacing them about 3 inches apart because these cookies spread a bit.
- Bake: Bake for 15-18 minutes, or until the edges are lightly golden and the centers spring back when touched. Let them cool on the baking sheets for 5 minutes, then transfer to wire racks to cool completely (this is key for a clean icing application).
- Prepare icing: In two small bowls, combine 1 cup (120 g) powdered sugar, 1 tablespoon light corn syrup, ½ teaspoon vanilla, and 1-2 tablespoons milk to make the vanilla glaze. Adjust milk to get a spreadable but not runny consistency. For the chocolate glaze, mix 1 cup (120 g) powdered sugar, 1 tablespoon corn syrup, ½ teaspoon vanilla, 3 tablespoons unsweetened cocoa powder, and 1-2 tablespoons milk.
- Apply icing: Using an offset spatula or butter knife, spread vanilla glaze on half of each cookie, then chocolate glaze on the other half. Let the icing set at room temperature for about 30 minutes before serving.
Pro tip: If your icing gets too thick, add a tiny bit more milk; if too thin, add more powdered sugar. Also, don’t rush the cooling step—warm cookies will cause the icing to melt and swirl together.
Cooking Tips & Techniques
One trick I learned early on is to cream the butter and sugar really well—don’t rush this step! It traps air, giving the cookies that soft, cakey texture you expect. Also, measuring flour correctly can be a game changer. I recommend spooning the flour into your measuring cup and leveling it off rather than scooping directly from the bag, which can pack the flour and lead to dense cookies.
Be cautious not to overmix once you add the dry ingredients. Mixing just until combined keeps the texture light. When spreading the icing, work quickly but gently; if the icing sits too long, it thickens and becomes harder to spread evenly.
Another tip: If you want perfectly shaped cookies, chill the dough for 15 minutes before scooping. It helps reduce spreading, but honestly, I like them a bit rustic—it adds to the homemade charm.
Timing is everything here. Baking the cookies just until edges turn light golden but centers are still soft ensures they stay tender after cooling. Multitasking while the cookies bake—like preparing the icing—is a good way to save time.
Variations & Adaptations
This classic cozy New York black and white cookie recipe is versatile and lends itself well to a few fun tweaks.
- Gluten-Free Option: Swap all-purpose flour for a 1:1 gluten-free baking blend. The texture will be slightly different but still delicious.
- Vegan Variation: Use plant-based butter, substitute eggs with flax eggs (1 tablespoon ground flaxseed + 3 tablespoons water per egg), and replace milk with almond or oat milk. Use dairy-free powdered sugar if needed.
- Flavor Twist: Add a teaspoon of orange zest to the batter for a citrusy hint that pairs beautifully with the icing.
- Baking Method Change: Try making mini black and white cookies by using a teaspoon to scoop smaller dough balls for bite-sized treats perfect for parties.
- Personal Favorite: I once tried a coffee-infused chocolate glaze by stirring in a teaspoon of espresso powder—adds a subtle mocha flavor that’s dangerously good.
Serving & Storage Suggestions
These black and white cookies are best served at room temperature, allowing the icing to be soft and the cookie tender. They pair wonderfully with a cup of coffee or a cold glass of milk—classic combo, you know?
For presentation, serve them on a simple white plate or a rustic wooden board to highlight their iconic half-and-half icing. They make a perfect sweet finish for brunch or a nostalgic treat at afternoon tea.
Store cookies in an airtight container at room temperature for up to 3 days. If you want to keep them longer, pop them in the refrigerator for up to a week, but bring them back to room temp before serving to soften the icing. These cookies freeze well too: wrap individually in plastic wrap then place in a freezer-safe bag for up to 2 months. Thaw overnight and refresh icing if needed.
Fun fact: the flavors mellow and blend beautifully if you let the cookies rest overnight—sometimes, the wait is worth it!
Nutritional Information & Benefits
Each classic cozy New York black and white cookie contains roughly 220-250 calories, with about 8 grams of fat and 30 grams of carbohydrates. While they’re definitely a treat, the recipe uses real butter and whole milk for a richer flavor and texture compared to processed versions.
The eggs provide protein and essential nutrients, and the lemon juice adds a bright note with a hint of vitamin C. If you swap to gluten-free flour or dairy-free milk, be mindful of ingredient nutritional profiles.
These cookies are not suitable for those with egg or dairy allergies unless adapted. For a balanced approach, enjoy one cookie alongside a fruit or a handful of nuts—because, honestly, life’s about balance, right?
Conclusion
This classic cozy New York black and white cookie recipe is a must-try for anyone who loves comforting, nostalgic sweets. It’s straightforward, approachable, and delivers that iconic bakery taste right at home. You can easily customize it to your taste and dietary needs, making it a favorite for any occasion.
I love this recipe because it brings a little slice of New York magic to my kitchen, and every bite feels like a warm hug from the city itself. Give it a go, share your versions, and don’t be shy about tweaking it to make it your own.
Let me know how your black and white cookies turn out in the comments below, and feel free to share this recipe with friends who need a cozy treat in their lives. Happy baking!
FAQs About Classic Cozy New York Black and White Cookies
Q1: Can I make these cookies ahead of time?
Absolutely! You can bake them a day ahead and store in an airtight container at room temperature. Just let them come to room temp before serving for the best texture.
Q2: What’s the best way to get smooth icing?
Sift your powdered sugar before mixing and add milk gradually. Using light corn syrup helps keep the icing glossy and smooth.
Q3: Can I freeze these cookies?
Yes! Wrap each cookie tightly and freeze for up to 2 months. Thaw overnight at room temperature before enjoying.
Q4: How do I prevent the cookies from spreading too much?
Chilling the dough for 15-20 minutes before baking helps maintain shape, but a bit of spread is part of their charm.
Q5: Can I use butter flavoring instead of real butter?
I recommend real unsalted butter for the best texture and flavor, but if you must, use butter flavoring sparingly—it won’t give the same richness.
Pin This Recipe!
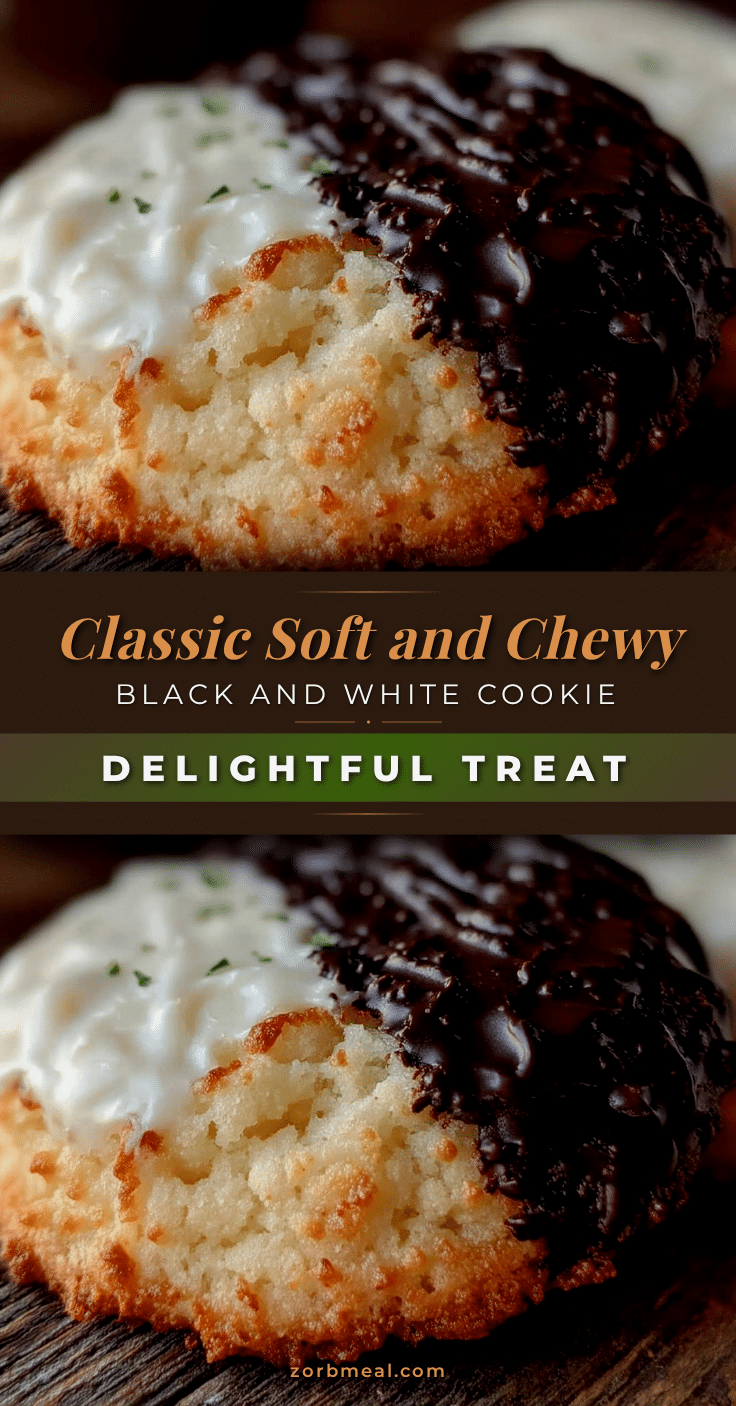
Classic Cozy New York Black and White Cookie Recipe Easy Homemade Treat
A nostalgic and comforting recipe for soft, cakey New York black and white cookies with distinctive half-vanilla, half-chocolate icing. Perfect for any occasion and easy to make at home.
- Prep Time: 15 minutes
- Cook Time: 18 minutes
- Total Time: 43 minutes
- Yield: 12 servings 1x
- Category: Dessert
- Cuisine: American
Ingredients
- 2 ½ cups (312 grams) all-purpose flour
- 2 teaspoons baking powder
- ½ teaspoon salt
- ½ cup (113 grams) unsalted butter, softened
- 1 cup (200 grams) granulated sugar
- 2 large eggs, room temperature
- 2 teaspoons vanilla extract
- ½ cup (120 ml) whole milk
- 1 teaspoon lemon juice
- 2 cups (240 grams) powdered sugar, sifted
- 2 tablespoons light corn syrup
- 1 teaspoon vanilla extract (for icing)
- 3–4 tablespoons (45–60 ml) milk (for icing)
- 3 tablespoons cocoa powder
Instructions
- Preheat your oven to 350°F (175°C). Line two baking sheets with parchment paper or silicone mats.
- In a medium bowl, whisk together the flour, baking powder, and salt. Set aside.
- In a large bowl, beat the softened butter and granulated sugar with an electric mixer on medium speed until light and fluffy, about 3-4 minutes.
- Beat in the eggs one at a time, then stir in the vanilla extract until smooth and creamy.
- In a small bowl, mix the milk and lemon juice and let sit for 5 minutes to create a buttermilk substitute.
- Gradually add the flour mixture and milk mixture to the butter mixture, beginning and ending with the flour. Mix just until combined.
- Drop rounded mounds (about 3 tablespoons) of batter onto the prepared baking sheets, spacing about 3 inches apart.
- Bake for 15-18 minutes until edges are lightly golden and centers spring back when touched. Cool on baking sheets for 5 minutes, then transfer to wire racks to cool completely.
- Prepare the vanilla icing by mixing 1 cup powdered sugar, 1 tablespoon light corn syrup, ½ teaspoon vanilla, and 1-2 tablespoons milk until spreadable.
- Prepare the chocolate icing by mixing 1 cup powdered sugar, 1 tablespoon light corn syrup, ½ teaspoon vanilla, 3 tablespoons cocoa powder, and 1-2 tablespoons milk until spreadable.
- Spread vanilla icing on half of each cookie and chocolate icing on the other half using an offset spatula or butter knife.
- Let the icing set at room temperature for about 30 minutes before serving.
Notes
For best results, cream butter and sugar well to trap air for a soft texture. Measure flour by spooning and leveling to avoid dense cookies. Chill dough for 15 minutes to reduce spreading if desired. Adjust milk in icing for spreadability. Let cookies cool completely before icing to prevent melting.
Nutrition
- Serving Size: 1 cookie
- Calories: 235
- Sugar: 18
- Sodium: 120
- Fat: 8
- Saturated Fat: 5
- Carbohydrates: 30
- Fiber: 1
- Protein: 3
Keywords: black and white cookie, New York cookie, homemade cookies, easy cookie recipe, vanilla chocolate icing, soft cookies, nostalgic dessert