That exact question came from my cousin last Fourth of July, right as I was handing out these little red, white, and blue cheesecake cups at the picnic table. Honestly, I hadn’t planned on the recipe becoming a star, but those little desserts, all colorful and creamy, caught everyone’s eye (and taste buds) faster than I expected. It was a blazing hot day, and the idea of firing up the oven was about as appealing as jumping into the lake fully clothed. So, I whipped together this easy no-bake patriotic mini cheesecake cups recipe to keep things cool and festive.
The vibrant layers of blueberry, strawberry, and whipped cream sitting atop a crunchy graham cracker crust were just the perfect little bites to balance out the smoky barbecue smells and the laughter filling the air. I remember how the kids’ faces lit up when they got their hands sticky with berry juices, and my aunt asked for the recipe on the spot (which, by the way, I’m sharing here). It’s funny how a simple dessert can turn a casual summer party into a memory, isn’t it?
What stuck with me most was how these mini cheesecakes didn’t just taste good—they felt like a small celebration in every spoonful. Light, cool, and just sweet enough, they became my go-to for every summer gathering since. So if you’re looking for a dessert that’s fuss-free, crowd-pleasing, and perfect for that red, white, and blue vibe, this recipe might just become your secret weapon.
Why You’ll Love This Recipe
Honestly, making these easy no-bake patriotic mini cheesecake cups feels like cheating in the best way possible. After testing this recipe several times (because hey, someone’s gotta make sure it’s foolproof!), here’s why it’s a winner:
- Quick & Easy: You can assemble these in about 20 minutes, and then just let them chill. Perfect for busy summer days when you want to enjoy the party, not slave over the stove.
- Simple Ingredients: Everything you need is probably already in your pantry or fridge—cream cheese, graham crackers, berries, and a few staples. No last-minute grocery runs required!
- Perfect for Fourth of July Parties: These mini cheesecakes fit the patriotic theme flawlessly with their red, white, and blue layers. They’re bite-sized, making them great for mingling and sharing.
- Crowd-Pleaser: Whether it’s kids, adults, or that one picky eater at the party, these little cups always get rave reviews.
- Unbelievably Delicious: The combo of smooth cream cheese filling, crunchy crust, and fresh berries is a total home run for comfort food lovers.
What sets this recipe apart? It’s the way the cream cheese mixture is whipped to a light, fluffy texture and folded with just the right amount of whipped cream—giving you that melt-in-your-mouth feel without being too heavy. Plus, layering the berries on top adds a fresh, tangy pop that feels seasonal and festive.
I’ve tried a bunch of no-bake cheesecake recipes before, but this one’s special because it doesn’t rely on gelatin or complicated steps—just pure, simple goodness. It’s like comfort food reimagined for the summer heat, and honestly, it’s the kind of treat that makes you pause and smile after the first bite. If you love easy, festive desserts that taste like a celebration, you’re in the right spot.
What Ingredients You Will Need
This recipe uses simple, wholesome ingredients to deliver bold flavor and satisfying texture without the fuss. Most of these are pantry staples, with fresh berries adding that perfect pop of color and flavor for the patriotic theme.
- For the Crust:
- 1 ½ cups graham cracker crumbs (about 10 full sheets, crushed finely)
- 5 tablespoons unsalted butter, melted (I prefer Kerrygold for its rich taste)
- 2 tablespoons granulated sugar (balances the buttery crust)
- For the Cream Cheese Filling:
- 8 ounces (225 g) cream cheese, softened (room temperature is key for smooth mixing)
- ½ cup (120 ml) heavy whipping cream, cold (for that fluffy texture)
- ½ cup (60 g) powdered sugar (adds just the right sweetness)
- 1 teaspoon pure vanilla extract (trust me, it makes a difference)
- For the Topping:
- ½ cup fresh strawberries, hulled and sliced (or frozen, thawed, and drained)
- ½ cup fresh blueberries
- Optional: a few fresh raspberries for extra color and tang
Ingredient tips: If you want a gluten-free option, swap graham cracker crumbs for gluten-free graham-style crumbs or crushed gluten-free cookies. For a dairy-free version, you can try vegan cream cheese and coconut cream, but the texture will vary slightly. When picking berries, I like to buy local fresh ones if available, but frozen berries work just fine if you drain them well.
Equipment Needed
Making these easy no-bake patriotic mini cheesecake cups doesn’t require anything fancy, but here are the basics:
- Mixing bowls (medium and large)
- Electric hand mixer or stand mixer (helps whip that cream cheese filling super smooth—though whisking by hand can work if you have the patience!)
- Measuring cups and spoons (accuracy matters, especially with sugar and vanilla)
- Spatula (for folding the whipped cream into the cream cheese)
- Mini clear plastic or glass cups (about 4-ounce size)—perfect for layering and serving
- Food processor or rolling pin (to crush graham crackers finely)
If you don’t have a food processor, just put the graham crackers in a ziplock bag and crush them with a rolling pin or even a heavy pan. I’ve done it this way more times than I can count—it works just fine! Also, if you don’t have mini cups, small mason jars or even a muffin tin lined with cupcake liners will do.
Preparation Method
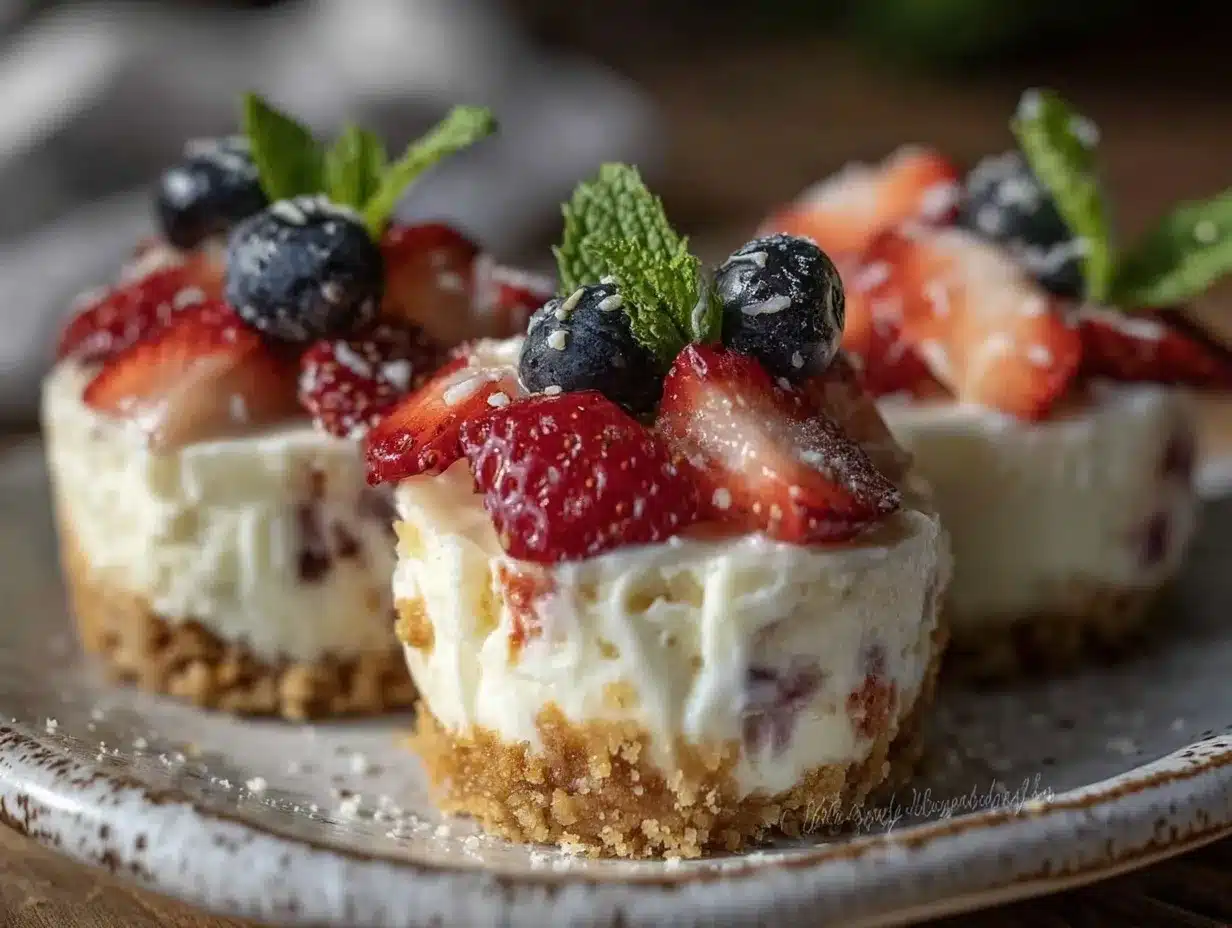
- Prepare the Crust: Combine 1 ½ cups graham cracker crumbs, 5 tablespoons melted butter, and 2 tablespoons sugar in a bowl. Mix until the crumbs look evenly coated and feel sandy but sticky when pressed. This step usually takes about 5 minutes.
Tip: If the crumbs aren’t sticking together when pressed, add a tiny splash more melted butter, but don’t overdo it. - Assemble the Crust Layer: Spoon about 2 tablespoons of the crumb mixture into each mini cup. Press down firmly with the back of a spoon or your fingers to create a compact base. This helps avoid crumbly bites later. Chill the cups in the fridge while you make the filling (about 10 minutes).
- Make the Cream Cheese Filling: In a medium bowl, beat the softened cream cheese with an electric mixer until smooth and creamy (about 2-3 minutes). Gradually add powdered sugar and vanilla extract, mixing well after each addition.
Pro tip: Scrape the bowl sides often for even mixing. - Whip the Heavy Cream: In a separate chilled bowl, whip the cold heavy cream until stiff peaks form (about 3-4 minutes). You want it fluffy but not dry.
Look for: When you lift the whisk, the cream should hold a peak without collapsing. - Fold Whipped Cream into Cream Cheese: Gently fold the whipped cream into the cream cheese mixture using a spatula. Use soft, sweeping motions to keep the air in the mix, creating a light, airy filling.
Warning: Don’t overmix or it will deflate and become dense. - Fill the Cups: Spoon or pipe the cream cheese filling over the chilled crust in each cup, filling them almost to the top. Smooth the surface lightly.
Time saver: Using a piping bag or a ziplock with the corner snipped makes this step faster and neater. - Add the Berry Toppings: Arrange sliced strawberries and blueberries on top in festive patterns—think stripes or little clusters. For a fun twist, add raspberries or even a few mini star-shaped fruit cutouts.
Look for: Bright, fresh berries without mushy spots. - Chill and Serve: Refrigerate the cups for at least 2 hours to let the filling set nicely. You can make these up to 24 hours ahead (just cover tightly with plastic wrap).
Tip: Let them sit at room temperature for 10 minutes before serving if they’re too chilled.
Cooking Tips & Techniques
Making no-bake cheesecakes might seem easy, but I’ve learned a few things the hard way (hello, grainy filling!). Here are tips to get it right every time:
- Softened Cream Cheese is a Game-Changer: Don’t rush this. If your cream cheese is cold, it will clump and make the filling lumpy. Leave it out for about 30 minutes or zap it in 10-second bursts in the microwave.
- Whip the Cream Properly: Underwhipped cream won’t add the fluffy texture you want, but overwhipped cream turns into butter (yes, it happens!). Stop whipping as soon as stiff peaks form.
- Folding Not Stirring: Folding the whipped cream into the cream cheese keeps the texture light. Stirring vigorously will deflate the air and make the filling dense.
- Press Crust Firmly: A loosely packed crust leads to crumbly messes. Press firmly and evenly into the cups for a sturdy base.
- Keep Everything Cold: Chill the bowls for whipping cream and the assembled cups as you go. It prevents melting and keeps the texture just right.
- Multitasking: While the crust chills, whip the filling and prepare the berries. This way, you’re using your time efficiently, and everything comes together smoothly.
- Common Mistake: Adding too much sugar can overpower the fresh berry flavors. Stick to the recipe for best balance.
Variations & Adaptations
You know how it goes—sometimes you want to switch things up or tailor recipes to fit your crowd. Here are some fun ways to customize these mini cheesecake cups:
- Flavor Swaps: Mix in lemon zest or a splash of fresh lemon juice to the filling for a zesty twist. You can also swirl in a bit of homemade raspberry or blueberry jam before chilling.
- Diet-Friendly: Use a dairy-free cream cheese and coconut cream to make a vegan version. For gluten-free crusts, swap graham crackers with almond flour-based crumbs or crushed gluten-free cookies.
- Seasonal Fruits: In summer, fresh berries are perfect, but in fall or winter, try pomegranate seeds, chopped kiwi, or mandarins for a colorful pop. I once made a batch with peach slices that disappeared in minutes.
- Presentation: Instead of mini cups, assemble this in a trifle dish layered with crust, filling, and fruit for a party centerpiece (kind of like the star-spangled strawberry shortcake trifle cups I love making).
Serving & Storage Suggestions
These mini cheesecakes are best served chilled but not ice-cold. I usually take them out of the fridge about 10 minutes before serving. This little rest lets the flavors shine and the texture soften just right.
They pair wonderfully with a fresh summer drink—think iced tea with lemon or a sparkling berry cocktail. For a savory counterpoint, try serving alongside easy appetizers like fresh caprese skewers or the creamy buffalo chicken dip with crispy tortilla scoops.
To store, cover the cups tightly with plastic wrap or a lid and keep refrigerated. They stay fresh for up to 3 days, but honestly, they rarely last that long at my parties. If you want to freeze them, do so without the fruit topping and thaw overnight in the fridge before adding fresh berries.
Over time, the crust might soften slightly, but the flavors often deepen, making leftovers a treat in their own right.
Nutritional Information & Benefits
Each mini cheesecake cup contains approximately 200 calories, with 12 grams of fat, 18 grams of carbohydrates, and 4 grams of protein. The fresh berries add antioxidants, vitamin C, and fiber, making this dessert a lighter, more wholesome option compared to heavier cakes.
The cream cheese provides calcium and protein, and using natural ingredients keeps it free from artificial additives. For those watching carbs, you can reduce sugar or swap crust crumbs for nut-based alternatives to lower the glycemic load.
Overall, this dessert balances indulgence with freshness—a little treat that feels good enough to enjoy without guilt during summer celebrations.
Conclusion
So there you have it—easy no-bake patriotic mini cheesecake cups that bring together simplicity, flavor, and festive fun. I love this recipe because it’s just so reliable: no oven stress, no complicated steps, just good, honest ingredients coming together in a way that makes everyone smile. Plus, it’s a perfect little canvas for your own creative twists.
Whether you’re planning a laid-back Fourth of July picnic or a last-minute summer party, these mini cheesecakes are a sweet way to celebrate. I’d love to hear how you make them your own or what berries you choose. Don’t be shy to share your stories or photos in the comments—there’s nothing better than swapping homemade recipe experiences with friends around the table.
Here’s to many more delicious moments (and yes, lots of easy desserts) ahead!
FAQs About Easy No-Bake Patriotic Mini Cheesecake Cups
Can I make these mini cheesecakes ahead of time?
Absolutely! They taste great when made up to 24 hours in advance. Just cover and refrigerate until ready to serve.
What can I use instead of graham cracker crumbs for the crust?
You can use crushed digestive biscuits, gluten-free cookies, or even finely chopped nuts mixed with a bit of butter for a low-carb option.
How do I prevent the cream cheese filling from becoming grainy?
Make sure your cream cheese is fully softened before mixing and beat it thoroughly until smooth before adding other ingredients.
Can I use frozen berries for the topping?
Yes! Just thaw and drain them well to avoid soggy cheesecake cups.
Is there a way to make this recipe vegan?
Yes, swap cream cheese and heavy cream for vegan alternatives like cashew cream cheese and coconut cream, but expect a slightly different texture.
Pin This Recipe!

Easy No-Bake Patriotic Mini Cheesecake Cups Recipe for Fourth of July Party
These easy no-bake mini cheesecake cups feature a crunchy graham cracker crust, light and fluffy cream cheese filling, and fresh red, white, and blue berry toppings. Perfect for summer parties and patriotic celebrations.
- Prep Time: 20 minutes
- Cook Time: 0 minutes
- Total Time: 2 hours 20 minutes
- Yield: 12 mini cheesecake cups 1x
- Category: Dessert
- Cuisine: American
Ingredients
- 1 ½ cups graham cracker crumbs (about 10 full sheets, crushed finely)
- 5 tablespoons unsalted butter, melted
- 2 tablespoons granulated sugar
- 8 ounces cream cheese, softened
- ½ cup heavy whipping cream, cold
- ½ cup powdered sugar
- 1 teaspoon pure vanilla extract
- ½ cup fresh strawberries, hulled and sliced
- ½ cup fresh blueberries
- Optional: a few fresh raspberries for extra color and tang
Instructions
- Combine graham cracker crumbs, melted butter, and sugar in a bowl. Mix until crumbs are evenly coated and feel sandy but sticky when pressed.
- Spoon about 2 tablespoons of the crumb mixture into each mini cup. Press down firmly to create a compact base. Chill in the fridge for about 10 minutes.
- Beat softened cream cheese with an electric mixer until smooth and creamy (2-3 minutes). Gradually add powdered sugar and vanilla extract, mixing well after each addition.
- In a separate chilled bowl, whip cold heavy cream until stiff peaks form (3-4 minutes).
- Gently fold whipped cream into the cream cheese mixture using a spatula, keeping the mixture light and airy.
- Spoon or pipe the cream cheese filling over the chilled crust in each cup, filling almost to the top. Smooth the surface lightly.
- Arrange sliced strawberries and blueberries on top in festive patterns. Optionally add raspberries or mini star-shaped fruit cutouts.
- Refrigerate the cups for at least 2 hours to let the filling set. Let sit at room temperature for 10 minutes before serving if too chilled.
Notes
Use softened cream cheese for smooth filling. Whip cream to stiff peaks but avoid overwhipping. Press crust firmly to avoid crumbly bites. Chill bowls and cups to keep texture perfect. Can be made up to 24 hours ahead. For gluten-free, use gluten-free crumbs; for dairy-free, use vegan cream cheese and coconut cream.
Nutrition
- Serving Size: 1 mini cheesecake cu
- Calories: 200
- Fat: 12
- Carbohydrates: 18
- Protein: 4
Keywords: no-bake cheesecake, mini cheesecake cups, Fourth of July dessert, patriotic dessert, easy summer dessert, berry cheesecake, no oven dessert


