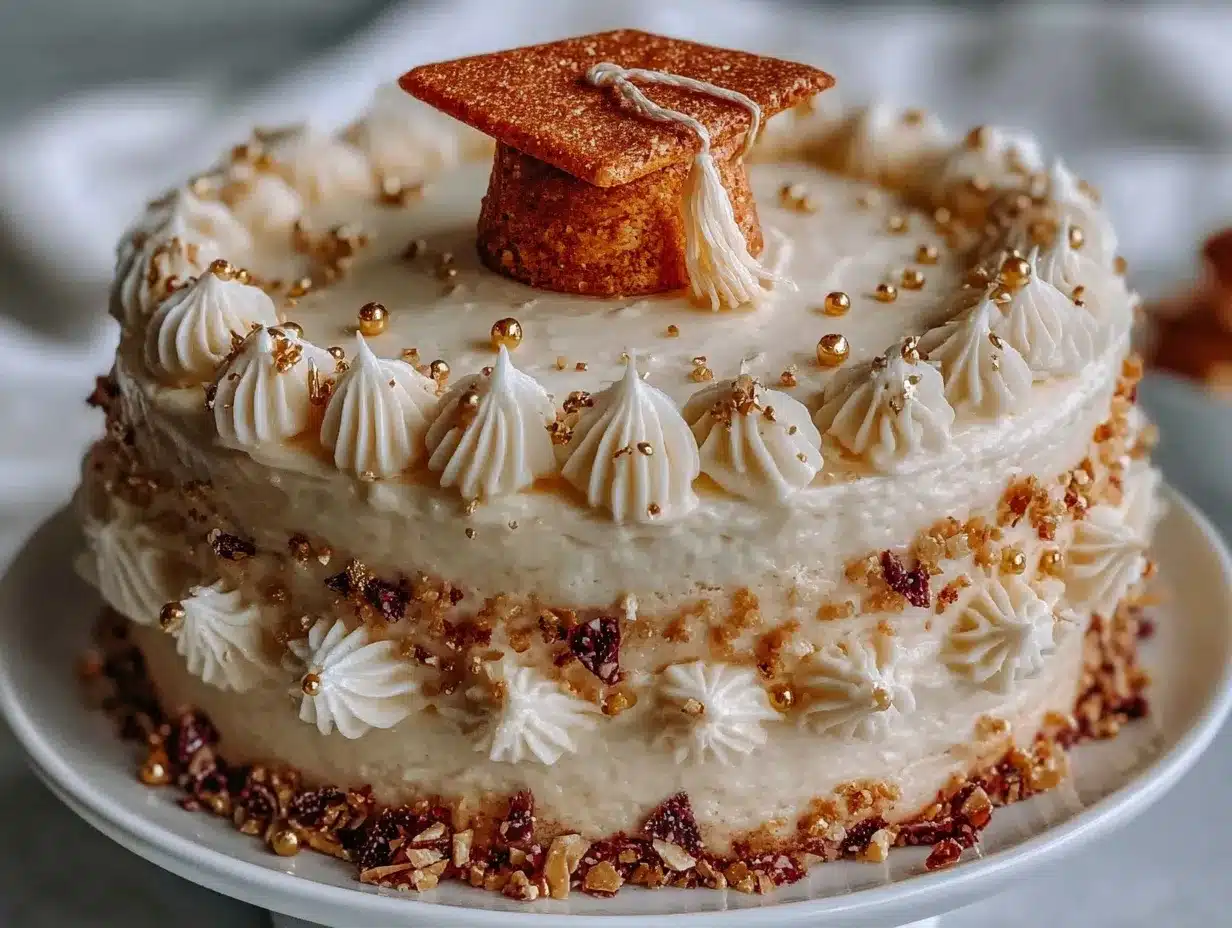
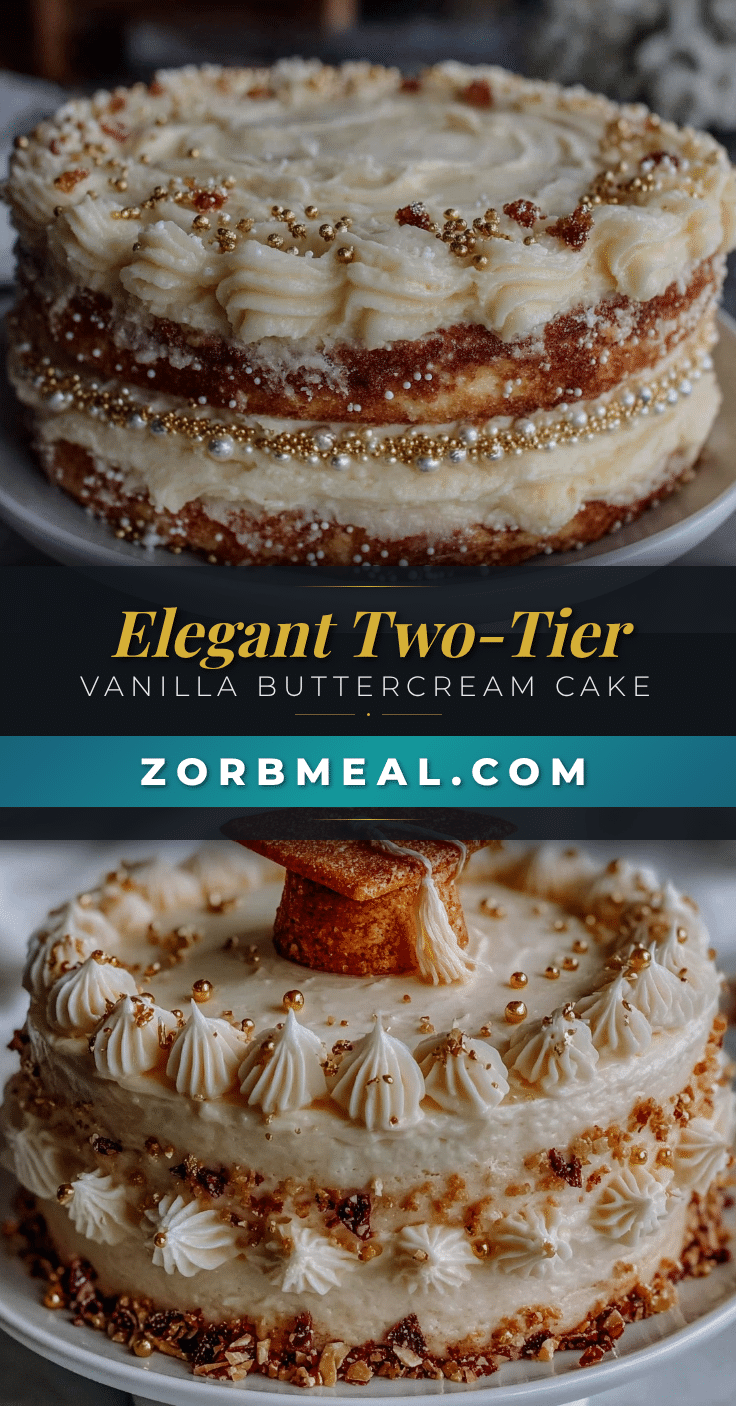
“I didn’t think a cake could make a day feel this special,” I remember texting my cousin right after the graduation party. The cake wasn’t just a dessert; it was the star, quietly stealing the show with its smooth vanilla buttercream and those subtle gold accents that caught the light just right. Honestly, it was a last-minute idea that almost didn’t happen—I had meant to order something fancy, but life threw a curveball, and I ended up baking this two-tier vanilla buttercream graduation cake myself, with barely any prep time.
At first, I doubted whether it would come out anything close to the picture-perfect cakes you see on Pinterest. But as the layers stacked up and that buttercream got whipped into silky perfection, something clicked. This cake wasn’t just easy—it felt like the kind of treat that says “you did it” without needing a ton of fuss.
What stuck with me was the quiet pride in making something homemade feel so polished. The gold accents? A little splurge but not over the top, just enough to make it feel celebratory without shouting for attention. It wasn’t just a cake; it was a simple, heartfelt nod to a milestone, and that’s why this recipe has been on repeat for every graduation and special occasion since.
Why You’ll Love This Recipe
After testing this perfect two-tier vanilla buttercream graduation cake recipe several times, I can say it’s one of those dependable winners that bring joy every time. It balances simplicity with a touch of elegance, so you get a cake that’s easy to make but looks like you spent hours on it.
- Quick & Easy: Comes together in under 3 hours, including baking and decorating—great for busy hosts or last-minute celebrations.
- Simple Ingredients: No need for specialty stores; pantry staples like vanilla extract, butter, and sugar create the magic.
- Perfect for Graduations: The two-tier design with gold accents screams celebration, ideal for marking big achievements.
- Crowd-Pleaser: Universally loved flavor and texture that kids and adults alike rave about.
- Unbelievably Delicious: The buttercream is silky smooth, and the vanilla cake layers are moist and tender, a combo that melts in your mouth.
What sets this recipe apart is the little twists I’ve added over time—like folding in just the right amount of sour cream to keep the cake moist and using a blend of real vanilla bean paste and extract for a richer flavor. Plus, the gold accents aren’t just for looks; they’re made with edible gold leaf that adds a classy touch without overpowering the cake’s delicate taste.
This cake is not just dessert; it’s that quiet kind of celebration that makes everyone pause a moment and smile. And if you’re wondering about frosting techniques, I’ve found this recipe easier and more forgiving than most, which means even if you’re not a seasoned baker, you can get professional-looking results.
What Ingredients You Will Need
This recipe uses simple, wholesome ingredients to deliver bold flavor and satisfying texture without the fuss. Most are pantry staples, and the few specialty ones like edible gold leaf are easy to find online or at party supply stores.
- For the Vanilla Cake Layers:
- All-purpose flour, 3 cups (360 g) – sifted for a light crumb
- Baking powder, 1 tablespoon – for that perfect rise
- Baking soda, ½ teaspoon – balances acidity
- Salt, ½ teaspoon – enhances flavor
- Unsalted butter, 1 cup (227 g), softened – I recommend Kerrygold for rich taste
- Granulated sugar, 2 cups (400 g) – use pure cane sugar for best results
- Large eggs, 4, room temperature – helps with structure and moisture
- Vanilla bean paste, 2 teaspoons – adds deep vanilla flavor beyond extract
- Pure vanilla extract, 1 teaspoon – complements the bean paste
- Buttermilk, 1 cup (240 ml), room temperature – keeps the cake tender and moist
- Sour cream, ½ cup (120 ml), room temperature – my secret for extra moistness
- For the Vanilla Buttercream Frosting:
- Unsalted butter, 2 cups (454 g), softened – quality butter makes all the difference
- Powdered sugar, 6 cups (720 g), sifted – for smooth texture
- Pure vanilla extract, 2 teaspoons
- Heavy cream or whole milk, 4-6 tablespoons (60-90 ml) – adjust for desired consistency
- Salt, a pinch – balances the sweetness
- For the Gold Accents:
- Edible gold leaf sheets, about 3-4 sheets – handle carefully with tweezers
- Optional: gold dust or luster powder for subtle shimmer (food-grade)
If you want a gluten-free version, almond flour is a decent substitute for part of the flour, but expect a denser texture. For dairy-free options, swap butter for vegan margarine and use coconut cream instead of heavy cream. I’ve also tried adding a splash of rose water in the buttercream for a floral note that’s surprisingly pleasant.
Equipment Needed
- Two 8-inch round cake pans (preferably non-stick or lined with parchment paper) – I love using Wilton pans for even baking
- Electric mixer (stand or hand) – makes whipping the buttercream a breeze and ensures smooth texture
- Mixing bowls – medium and large sizes for batter and frosting
- Rubber spatula – for folding ingredients gently
- Cooling racks – crucial for cakes to cool evenly and avoid sogginess
- Offset spatula and bench scraper – for smooth frosting application and clean edges
- Turntable (optional but helpful) – makes decorating easier and faster
- Pastry brush or tweezers – for applying edible gold leaf delicately
- Measuring cups and spoons – accuracy is key for baking success
No fancy airbrush equipment needed here. I once tried using a paintbrush for the gold leaf and ended up with a mess, so I highly recommend tweezers for precision. If you don’t have a turntable, don’t sweat it—just rotate the cake by hand carefully. For budget-friendly options, silicone spatulas and basic glass bowls work just fine.
Preparation Method
- Preheat and Prepare Pans (10 minutes): Preheat your oven to 350°F (175°C). Grease two 8-inch pans with butter or non-stick spray, then line the bottoms with parchment paper circles to prevent sticking. Dust lightly with flour and tap out excess.
- Mix Dry Ingredients (5 minutes): In a large bowl, whisk together 3 cups (360 g) all-purpose flour, 1 tablespoon baking powder, ½ teaspoon baking soda, and ½ teaspoon salt. Set aside. This ensures even distribution of leavening agents.
- Cream Butter and Sugar (7 minutes): Using an electric mixer, beat 1 cup (227 g) softened unsalted butter with 2 cups (400 g) granulated sugar on medium-high speed until light and fluffy—about 3-4 minutes. The mixture should look pale and have a slightly grainy texture, which helps trap air for lightness.
- Add Eggs and Vanilla (5 minutes): Add 4 large eggs one at a time, mixing well after each addition. Scrape down the sides to keep everything uniform. Then mix in 2 teaspoons vanilla bean paste and 1 teaspoon pure vanilla extract. The batter should smell rich and inviting.
- Alternate Adding Dry Ingredients and Buttermilk (8 minutes): Reduce mixer speed to low. Add the dry ingredients in three parts, alternating with 1 cup (240 ml) buttermilk and ½ cup (120 ml) sour cream, beginning and ending with dry ingredients. Mix just until combined—overmixing can make the cake tough.
- Divide and Bake (30-35 minutes): Pour batter evenly into prepared pans (about 3 cups/720 ml batter per pan). Smooth the tops with a spatula. Bake in the center rack for 30-35 minutes, or until a toothpick inserted in the center comes out clean. Rotate pans halfway through baking for even color.
- Cool Completely (1 hour): Remove cakes from oven. Let cool in pans for 15 minutes, then turn out onto wire racks to cool completely before frosting. Patience here prevents melting buttercream.
- Make Buttercream Frosting (15 minutes): Beat 2 cups (454 g) softened unsalted butter on medium speed until creamy. Gradually add 6 cups (720 g) sifted powdered sugar, 1 cup at a time, mixing well between additions. Add 2 teaspoons vanilla extract, a pinch of salt, and 4-6 tablespoons (60-90 ml) heavy cream or milk. Beat on high for 3-5 minutes until fluffy and spreadable. Adjust thickness with more cream or sugar as needed.
- Assemble the Cake (20 minutes): Level cakes if needed with a serrated knife. Place one layer on your cake board or serving plate. Spread a thick, even layer of buttercream (about ½ inch / 1.3 cm). Top with the second layer and crumb coat the entire cake with a thin buttercream layer. Chill for 20 minutes to set.
- Final Frosting and Gold Accents (20 minutes): Apply a smooth, final coat of buttercream using an offset spatula and bench scraper. Chill briefly if needed to firm up. Carefully apply edible gold leaf sheets using tweezers, pressing gently onto the buttercream in random patches or neat stripes depending on your style. A light dusting of gold luster powder adds a subtle shimmer.
Tip: If your buttercream feels too soft while frosting, pop it in the fridge for 15 minutes to firm up, then continue. And if you want to see a great example of layering and smooth frosting techniques, the layered taco dip recipe taught me a lot about even layering under pressure!
Cooking Tips & Techniques
One of the trickiest parts is getting that buttercream smooth without overworking it. I learned the hard way that overmixing can introduce air bubbles, causing tiny holes on the cake’s surface. Keep your mixer speed moderate when finishing the frosting, and use a bench scraper to smooth the sides with gentle, steady pressure.
Don’t rush the crumb coat step; it locks in crumbs and makes the final frosting layer cleaner. Also, chilling between coats helps the buttercream firm up and prevents smudging. I once skipped this and ended up with crumbs everywhere—lesson learned!
Applying edible gold leaf is a delicate dance. Use tweezers and avoid touching it with your fingers—it’s thin and tears easily. If you want a subtle shimmer instead, brushing on gold dust with a dry brush works wonders and is less fiddly for beginners.
Multitasking tip: while the cakes bake, whip up the buttercream and prep your decorating tools. This saves time and keeps everything fresh. If you’re interested in mastering smooth frostings, the techniques I picked up from making the creamy buttermilk ranch dressing really helped me understand balancing texture and consistency.
Variations & Adaptations
Here are some ways to make this vanilla buttercream graduation cake uniquely yours:
- Flavor Variations: Swap vanilla bean paste for almond or lemon extract to give your frosting a fresh twist. You can also add a layer of raspberry jam or fresh berries between cake layers for a fruity surprise.
- Dietary Adjustments: Use gluten-free flour blends to make the cake gluten-free. For a dairy-free option, try coconut oil in place of butter and coconut cream instead of heavy cream in the frosting.
- Decoration Alternatives: Instead of gold leaf, try silver edible glitter or colorful sprinkles for a more playful vibe. For a rustic look, pipe rosettes with the buttercream and add fresh flowers (make sure they’re edible or pesticide-free).
- Different Cake Sizes: If you want a smaller or larger cake, adjust the pan sizes to 6-inch or 10-inch rounds; just remember to keep the baking time in check and test for doneness.
- Personal Favorite: I once made this cake with a thin layer of homemade salted caramel sauce between the tiers, which was a showstopper at my nephew’s birthday. The sweet-salty combo worked beautifully with the vanilla buttercream.
Serving & Storage Suggestions
This cake shines best served at room temperature, about 20-30 minutes after taking it out of the fridge. That way, the buttercream softens slightly, making each bite melt-in-your-mouth good. Slice with a sharp serrated knife, wiping it clean between cuts for neat slices.
Pair this celebration cake with a light, refreshing beverage like sparkling water with lemon or a mild chamomile tea to balance the sweetness. If you’re planning a full party spread, the creamy cheesesteak dip recipe I recently tried is a great savory contrast to sweet treats.
To store, keep the cake covered in the refrigerator for up to 4 days. If you want to freeze it, wrap tightly in plastic wrap and then foil, and freeze for up to 2 months. Thaw overnight in the fridge before serving. The flavors actually deepen after a day or two, so leftovers can be even better!
Nutritional Information & Benefits
This vanilla buttercream graduation cake is a treat rather than an everyday snack. Each serving (about 1/12th of the cake) contains approximately 450 calories, with 25 grams of fat, 55 grams of carbs, and 4 grams of protein. The butter and eggs provide some vitamin A and essential fatty acids.
Using real vanilla bean paste and pure extracts means no artificial flavors, and the cake’s moistness comes from buttermilk and sour cream rather than heavy oils. Gluten-free and dairy-free adaptations make it accessible for many diets. Just a note: the edible gold leaf is purely decorative and safe to eat but adds no nutritional value.
I believe a celebration cake should bring joy, not guilt, so I always balance it with wholesome meals the rest of the day. After all, indulging in milestones is part of life’s sweetness.
Conclusion
This perfect two-tier vanilla buttercream graduation cake with gold accents is more than just a dessert; it’s a celebration made tangible. Whether you’re marking a graduation, an anniversary, or any special moment, it holds space for pride and joy without demanding hours of work or fancy ingredients.
Feel free to tweak the flavors or decoration to match your style—baking is as much about personal touches as it is about recipes. I’ve made this cake multiple times, and each time it’s brought smiles and a little sparkle to the party, just like that first unexpected success that got me hooked.
Don’t hesitate to share your own twists or questions after trying it out—I’d love to hear how your cake turns out and what memories it creates!
FAQs
- Can I make this cake ahead of time? Yes, you can bake the layers and make the buttercream a day ahead. Assemble and decorate the cake on the day of the event for best freshness.
- What’s the best way to store leftover cake? Keep it covered in the refrigerator for up to 4 days. For longer storage, freeze tightly wrapped for up to 2 months.
- How do I prevent the buttercream from melting? Keep the cake refrigerated until 20-30 minutes before serving and avoid frosting in a warm kitchen.
- Can I color the buttercream? Absolutely! Use gel food coloring for vibrant colors without thinning the frosting.
- Is the edible gold leaf safe to eat? Yes, edible gold leaf is food-grade and safe, but it’s purely decorative and has no flavor.
Pin This Recipe!
Perfect Two-Tier Vanilla Buttercream Graduation Cake Easy Gold Accent Recipe
A simple yet elegant two-tier vanilla buttercream cake with subtle edible gold accents, perfect for graduations and special occasions. Moist vanilla layers with silky smooth buttercream frosting create a crowd-pleasing celebration cake.
- Prep Time: 45 minutes
- Cook Time: 35 minutes
- Total Time: 3 hours
- Yield: 12 servings 1x
- Category: Dessert
- Cuisine: American
Ingredients
- 3 cups (360 g) all-purpose flour, sifted
- 1 tablespoon baking powder
- ½ teaspoon baking soda
- ½ teaspoon salt
- 1 cup (227 g) unsalted butter, softened
- 2 cups (400 g) granulated sugar
- 4 large eggs, room temperature
- 2 teaspoons vanilla bean paste
- 1 teaspoon pure vanilla extract
- 1 cup (240 ml) buttermilk, room temperature
- ½ cup (120 ml) sour cream, room temperature
- 2 cups (454 g) unsalted butter, softened (for frosting)
- 6 cups (720 g) powdered sugar, sifted
- 2 teaspoons pure vanilla extract (for frosting)
- 4–6 tablespoons (60–90 ml) heavy cream or whole milk
- Pinch of salt (for frosting)
- 3–4 sheets edible gold leaf
- Optional: gold dust or luster powder (food-grade)
Instructions
- Preheat oven to 350°F (175°C). Grease two 8-inch round cake pans and line bottoms with parchment paper. Dust lightly with flour and tap out excess.
- In a large bowl, whisk together flour, baking powder, baking soda, and salt.
- Using an electric mixer, beat 1 cup softened butter with granulated sugar on medium-high speed until light and fluffy, about 3-4 minutes.
- Add eggs one at a time, mixing well after each addition. Mix in vanilla bean paste and vanilla extract.
- Reduce mixer speed to low. Add dry ingredients in three parts, alternating with buttermilk and sour cream, beginning and ending with dry ingredients. Mix just until combined.
- Divide batter evenly between prepared pans. Smooth tops and bake for 30-35 minutes or until a toothpick inserted in the center comes out clean. Rotate pans halfway through baking.
- Cool cakes in pans for 15 minutes, then turn out onto wire racks to cool completely.
- For the buttercream, beat 2 cups softened butter until creamy. Gradually add powdered sugar, 1 cup at a time, mixing well between additions.
- Add vanilla extract, salt, and heavy cream or milk. Beat on high for 3-5 minutes until fluffy and spreadable. Adjust consistency as needed.
- Level cakes if needed. Place one layer on serving plate, spread about ½ inch of buttercream. Top with second layer and crumb coat entire cake. Chill for 20 minutes.
- Apply final smooth coat of buttercream using offset spatula and bench scraper. Chill briefly if needed.
- Carefully apply edible gold leaf sheets using tweezers in desired pattern. Optionally dust with gold luster powder for shimmer.
Notes
If buttercream is too soft while frosting, chill in fridge for 15 minutes to firm up. Use tweezers to apply edible gold leaf carefully to avoid tearing. Chill between crumb coat and final frosting to prevent smudging. For gluten-free, substitute part of flour with almond flour (denser texture). For dairy-free, use vegan margarine and coconut cream. Can add rose water to buttercream for floral note.
Nutrition
- Serving Size: 1 slice (1/12th of c
- Calories: 450
- Fat: 25
- Carbohydrates: 55
- Protein: 4
Keywords: vanilla cake, buttercream frosting, two-tier cake, graduation cake, edible gold leaf, celebration cake, easy cake recipe