Let me paint a picture for you: the scent of sizzling beef mingling with the sharp bite of onions and the unmistakable, melty magic of nacho cheese bubbling away—there’s honestly nothing quite like it. The first time I whipped up these Nacho Cheese Burger Sliders for my Super Bowl crowd, I had no idea what kind of game day legend I was about to create. I remember standing in my kitchen, the air thick with anticipation (and a little bit of cheddar steam), as I layered those pillowy slider buns with juicy beef, creamy cheese sauce, and a smattering of jalapeños. The whole thing was a touchdown before the game had even started. It was one of those moments where you stop, breathe in all that savory goodness, and realize you’ve stumbled onto something truly special.
These nacho cheese burger sliders hold a special place in my heart and, let’s face it, in my family’s bellies. My dad, who’s usually a “plain burger” kind of guy, practically hovered over the tray, sneaking bites before halftime. My kids? They loved getting a little messy—cheese on their faces, laughter echoing through the living room. And my friends still ask, “Are you making those nacho sliders again this year?” all while pretending it’s not a big deal (it is, trust me). I can’t help but smile whenever I think about how these sliders turned our living room into the best spot in town for the Super Bowl.
Honestly, if I’d known years ago how easy and crowd-pleasing these would be, I would’ve been making them for every potluck, movie night, and late-night snack attack. They’re dangerously easy, packed with pure, nostalgic comfort, and perfect for feeding a hungry crowd. Whether it’s the big game, a birthday bash, or just a regular Friday night, these sliders are the answer. I’ve tested this recipe a dozen times (in the name of research, of course), and every single batch gets rave reviews. So go ahead—bookmark this one. You’re going to want to make these Savory Super Bowl Nacho Cheese Burger Sliders again and again.
Why You’ll Love These Savory Super Bowl Nacho Cheese Burger Sliders
I’ve made my fair share of sliders over the years, but these nacho cheese burger sliders are in a league of their own. After lots of kitchen experiments (and a few late-night snack disasters), I can say with confidence—these sliders are foolproof and downright delicious. Here’s why they’ll become your new game day staple:
- Quick & Easy: You can have a huge batch ready in under 40 minutes. Perfect for last-minute party prep or when your crew shows up hungry and unannounced.
- Simple Ingredients: No need for fancy grocery runs. Just grab ground beef, slider buns, cheese, and a handful of pantry staples—you probably have most of these on hand already.
- Perfect for Parties: Seriously, these sliders were born for Super Bowl gatherings, birthday bashes, or any event where you need to feed a crowd without stress.
- Crowd-Pleaser: Kids, teens, picky eaters, football fans—everyone loves these. The first time I made them, my tray was empty before halftime.
- Unbelievably Delicious: The combo of juicy beef, gooey nacho cheese, and soft slider buns just hits all the right notes. Plus, every bite is packed with flavor and a little bit of spice.
What makes this recipe stand out? I use a simple trick—layering the cheese sauce and adding sliced jalapeños right in the middle—so you get nacho flavor in every bite. No dry sliders here! I also brown the beef with taco seasoning for that classic nacho punch, but keep the process simple (no complicated steps or specialty tools needed).
This isn’t just about feeding people—it’s about creating that “wow, you made these?!” moment. The sliders are comforting, a little nostalgic, and a total upgrade from regular burgers or nachos alone. They’re fun to customize, easy to hold, and even easier to devour. If you want something that’s going to make your party guests smile—and ask for seconds—these savory Super Bowl nacho cheese burger sliders are your MVP.
What Ingredients You Will Need
This recipe uses no-nonsense ingredients to deliver big flavor and that classic nacho burger feel. Most of these are pantry staples, and you can swap things out to suit your taste or dietary needs. Here’s what you’ll need:
- For the Sliders:
- 2 pounds (900g) ground beef (80/20 blend for juiciness)
- 1 small yellow onion, finely diced
- 2 cloves garlic, minced
- 1 packet (1 oz/28g) taco seasoning (or homemade blend—see tips below)
- Salt and black pepper, to taste
- 12 slider buns or small dinner rolls (soft and fluffy are best—King’s Hawaiian is my go-to)
- For the Nacho Cheese Sauce:
- 2 tablespoons (30g) unsalted butter
- 2 tablespoons (16g) all-purpose flour
- 1 cup (240ml) whole milk (or half-and-half for extra richness)
- 2 cups (200g) shredded sharp cheddar cheese (I like Tillamook for meltiness)
- 1/2 cup (60g) shredded pepper jack cheese (optional, but adds a nice kick)
- 1/4 teaspoon smoked paprika
- 1/4 teaspoon onion powder
- Pinch of cayenne pepper (leave it out if you don’t want heat)
- Salt, to taste
- For Assembling:
- Pickled jalapeño slices (about 1/2 cup/60g, more or less to taste)
- Chopped fresh cilantro (for garnish, optional)
- Chopped tomatoes or pico de gallo (optional, for a fresh, bright topping)
- Ingredient Notes & Tips:
- For a gluten-free version, use gluten-free slider buns and swap flour for a gluten-free blend in the cheese sauce.
- You can use ground turkey or plant-based “beef” if you like. The flavor holds up either way.
- Freshly grated cheese melts better—bagged shreds sometimes get grainy.
- If you love extra heat, add a dash of hot sauce to the cheese or top with sliced fresh jalapeños.
- For a lighter version, swap in reduced-fat cheese and lean ground beef.
Honestly, you really can’t go wrong—this recipe is super forgiving and easy to customize for whatever you have in your fridge.
Equipment Needed
- Large Skillet or Sauté Pan: This is for browning the beef. If you don’t have a big skillet, use two smaller ones (just split the meat evenly).
- Medium Saucepan: Essential for making that creamy nacho cheese sauce. A nonstick one helps prevent any sticking or scorching.
- Baking Sheet or 9×13-inch (23x33cm) Baking Dish: You’ll need this for assembling and baking the sliders. If you don’t have a baking dish, a sturdy sheet pan with a rim works just fine.
- Sharp Knife and Cutting Board: For dicing onions, slicing buns, and prepping any toppings.
- Silicone Spatula or Wooden Spoon: For stirring beef and cheese sauce. A silicone spatula helps you really scrape up all that flavor from the pan.
- Aluminum Foil: To cover the sliders for part of the baking (keeps everything steamy and melty without drying out the buns).
- Oven Mitts: For safety—these trays get hot, and I’ve burned myself more than once forgetting this step!
If you’re on a budget, don’t worry—basic kitchen gear works great. I’ve used thrift store pans and hand-me-down spatulas, and the sliders always come out fantastic. Just make sure your baking dish is big enough to hold all the sliders in a single layer so they bake evenly.
How to Make Savory Super Bowl Nacho Cheese Burger Sliders
-
Prep Your Ingredients (10 minutes):
Gather your slider buns, dice the onion, and mince the garlic. If you’re grating cheese by hand (which I recommend), do that now. Preheat your oven to 350°F (175°C). -
Brown the Beef (8-10 minutes):
Heat your large skillet over medium-high. Add ground beef and diced onion. Cook, breaking up the meat with your spatula, until beef is browned and onion is soft. Drain off any excess fat (too much grease will make the sliders soggy). -
Season the Meat (2 minutes):
Stir in minced garlic, taco seasoning, and a pinch of salt and pepper. Cook for another minute until fragrant. Taste and adjust seasoning as needed. -
Make the Nacho Cheese Sauce (6-8 minutes):
In a medium saucepan over medium heat, melt the butter. Whisk in flour and cook for 1 minute until bubbly (but not browned). Slowly whisk in milk, stirring constantly until smooth and thickened (about 2-3 minutes). Lower heat and add cheddar and pepper jack cheeses, stirring until completely melted and velvety. Stir in smoked paprika, onion powder, cayenne, and a little salt. If the sauce seems too thick, add a splash more milk. If it’s too thin, let it simmer a minute longer. -
Assemble the Sliders (5 minutes):
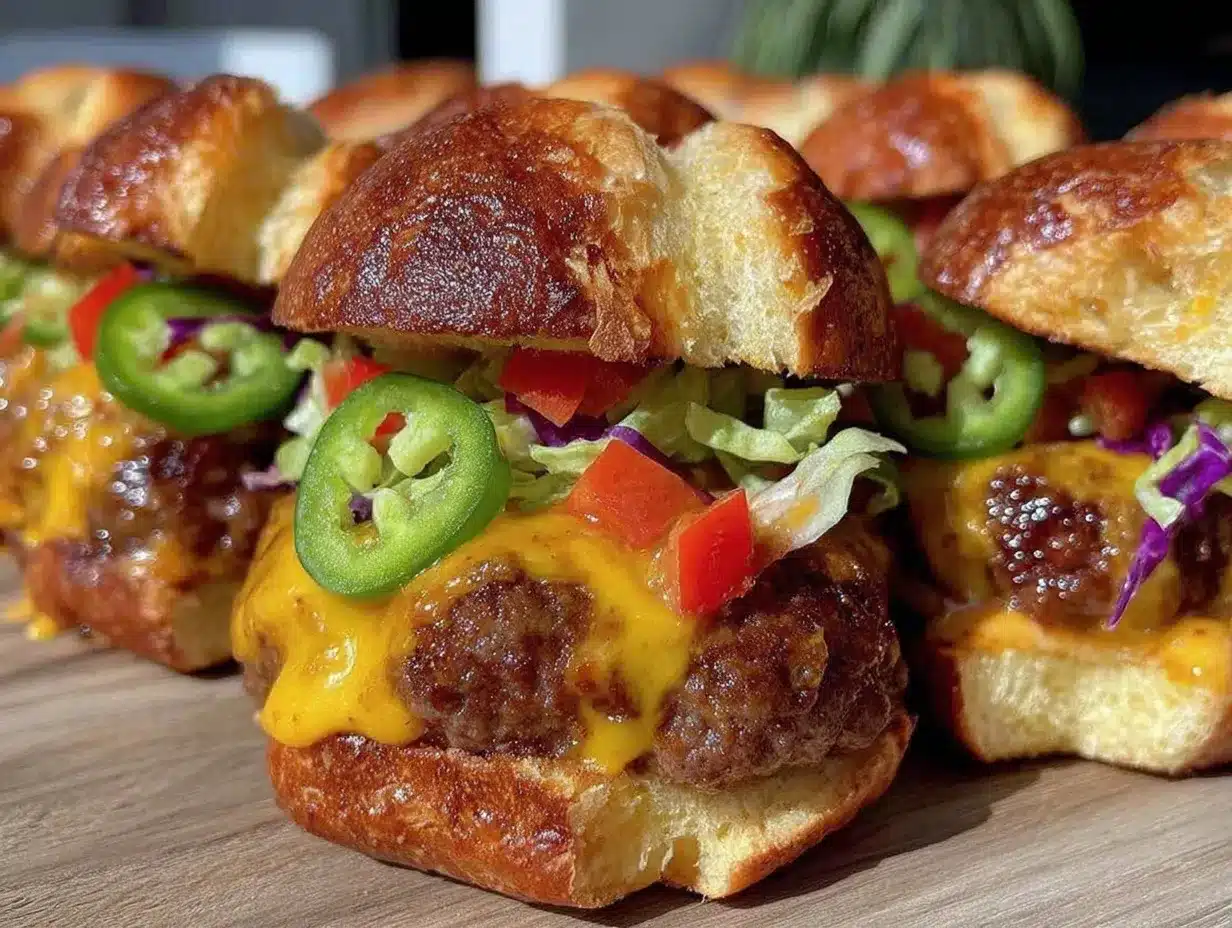
Lightly spray your baking dish or sheet pan with nonstick spray. Slice slider buns in half horizontally (keep the tops and bottoms connected if you can—it’s easier to assemble that way). Arrange the bottom halves in the dish. Evenly spread the beef mixture over the buns, pressing gently. -
Add the Cheese and Toppings (3 minutes):
Pour nacho cheese sauce over the beef. Top with pickled jalapeño slices (as much or as little as you like). Scatter a little chopped cilantro or pico de gallo if using. -
Top and Bake (10-12 minutes):
Place the tops of the buns over the sliders. Cover loosely with aluminum foil. Bake in the preheated oven for 10 minutes, then uncover and bake 2-3 more minutes until the buns are golden and the cheese is bubbly. -
Serve Hot:
Let sliders cool for 2 minutes. Use a sharp knife to cut between each slider, then serve straight from the tray—warm, cheesy, and perfect.
Preparation Tips: If the cheese sauce thickens too much while you assemble, just whisk in a splash of milk. For crispier buns, brush the tops lightly with melted butter before baking. And if you’re making these ahead, you can cook the beef and cheese sauce up to a day in advance—just assemble and bake when ready.
Cooking Tips & Techniques
I’ve had a few slider fails in my day, so here are the best tricks I’ve picked up (learned the hard way, so you don’t have to):
- Don’t Overcrowd the Pan: Browning the beef in batches keeps it juicy and flavorful. If you dump it all in at once, it’ll steam instead of sear—trust me, I’ve made that mistake under pressure.
- Freshly Grated Cheese Is Key: Bagged shredded cheese just doesn’t melt as smoothly for the sauce. A little extra effort goes a long way here.
- Watch the Cheese Sauce: Keep the heat medium-low, and stir constantly. Cheese sauces can split if you rush them or get distracted (I’ve had to toss a batch after answering a text—lesson learned!).
- Assemble Quickly: Have your cheese, jalapeños, and buns ready so you can layer everything while it’s warm. This keeps the sliders gooey and delicious.
- Cover to Steam, Uncover to Crisp: Covering the sliders for the first part of baking keeps everything melty. Uncover toward the end for that golden top.
- Custom Seasoning: Taste as you go. If you want a stronger nacho punch, add extra paprika or a dash of hot sauce to the cheese sauce.
- Make Ahead: The beef and cheese sauce can be made the night before. Refrigerate, then reheat gently before assembling.
Honestly, don’t sweat the small stuff—sliders are super forgiving. If your cheese sauce is a little thick, it’ll still taste great. And if your jalapeños are extra spicy, just warn your guests (or keep a few plain sliders for the spice-shy crowd). The main thing is to have fun and enjoy the game day spirit!
Variations & Adaptations
One of the best things about these savory Super Bowl nacho cheese burger sliders is how easy they are to customize. Here are some favorite twists (and a few I’ve tried myself):
- Low-Carb/Keto Option: Swap slider buns for mini lettuce cups or use low-carb rolls. The nacho cheese sauce and beef are naturally low in carbs—just keep an eye on the toppings.
- Vegetarian Version: Substitute the ground beef with a plant-based crumble (like Beyond or Impossible) or even sautéed mushrooms and black beans. The cheese sauce and seasonings give you all that nacho flavor without the meat.
- Spicy Buffalo Twist: Add a drizzle of buffalo sauce to the beef mixture and top the sliders with blue cheese crumbles before baking. This is a winner for heat lovers!
- Breakfast Sliders: Swap beef for scrambled eggs and crumbled cooked sausage. Top with cheese sauce and bake as usual. My kids love these for brunch after a sleepover.
- Gluten-Free Option: Use gluten-free buns and swap the flour in the cheese sauce for a gluten-free blend or cornstarch slurry.
- Allergen Substitutes: For dairy-free sliders, use plant-based cheese and unsweetened almond milk in the sauce. I’ve made a batch this way for a friend with dairy allergies, and they were still a hit.
My personal favorite? The spicy version, with extra jalapeños and a dash of chipotle powder in the cheese sauce. Feel free to get creative—these sliders are a blank canvas for all your nacho cravings.
Serving & Storage Suggestions
These nacho cheese burger sliders are best served hot and fresh, straight from the oven. Arrange them on a big platter, scatter with fresh cilantro and a little pico de gallo for color, and you’re game day ready. I like to let everyone pull their own slider—it’s more fun that way, and the cheese pull is unreal.
Pair with crunchy tortilla chips, a big bowl of guacamole, and cold drinks (beer or fizzy sodas work great). For a full-on party spread, add a fresh salad or some spicy buffalo wings on the side. These sliders steal the show, but they play well with other snacks!
Leftovers? Pop them in an airtight container and refrigerate for up to 3 days. To reheat, wrap sliders loosely in foil and warm in a 350°F (175°C) oven for 10 minutes, or microwave individual sliders for 30-40 seconds. The flavors actually deepen overnight (kind of like chili), so don’t be afraid to enjoy them the next day.
Freeze for later by wrapping baked sliders (minus toppings) in plastic wrap and foil. Thaw overnight in the fridge, then reheat as above. They’re almost as good as fresh—perfect for a midnight snack or next week’s lunchbox.
Nutritional Information & Benefits
Each slider (as prepared) has approximately 260 calories, 16g fat, 16g protein, and 15g carbohydrates. If you go bunless or use low-carb rolls, you can shave off a few carbs. The ground beef provides protein and iron, while the cheese adds calcium and a little extra protein boost.
Want to lighten things up? Use lean beef or turkey, reduced-fat cheese, and whole grain buns. For gluten-free needs, swap in gluten-free buns and flour. The sliders contain dairy and gluten as written, so check labels if you’re serving folks with allergies.
Honestly, these aren’t “health food,” but they’re hearty, satisfying, and way better for you than takeout nachos or drive-thru burgers. I like to balance them out with a big salad (and maybe a few extra jalapeños for metabolism!).
Conclusion
If you’re looking for something that’s easy, fun, and guaranteed to score with a crowd, these savory Super Bowl nacho cheese burger sliders are it. They’re loaded with flavor, customizable for any diet, and so simple you’ll wonder why you ever bought frozen appetizers. Every bite is cheesy, beefy, and a little bit spicy—the kind of thing you’ll crave long after the game is over.
Don’t be afraid to put your own spin on these sliders. Try different cheeses, add bacon, or go vegetarian—the sky’s the limit. This recipe is a family favorite at my house, and I hope it becomes a staple in yours, too.
If you try these nacho cheese burger sliders, let me know in the comments! Share your own twists or party stories—I love hearing how folks make these their own. And if you’re hosting a Super Bowl party, pin this recipe for later and get ready to wow your guests. Game on, friends!
Frequently Asked Questions
How many people does this slider recipe serve?
This recipe makes 12 sliders, perfect for feeding 6-8 people if served with other snacks. For bigger crowds, double the recipe and use two baking dishes.
Can I make the sliders ahead of time?
Yes! You can cook the beef and prep the cheese sauce a day ahead. Store separately in the fridge, then assemble and bake the sliders just before serving.
What’s the best way to keep sliders warm for a party?
Keep sliders covered with foil in a 200°F (93°C) oven until ready to serve. This keeps them melty without drying out the buns.
Can I freeze leftover sliders?
Absolutely! Wrap tightly in plastic and foil, then freeze for up to 2 months. Thaw overnight in the fridge and reheat in the oven until warmed through.
What toppings go well with nacho cheese burger sliders?
Try pickled jalapeños, chopped tomatoes, shredded lettuce, or a dollop of sour cream. Sliced avocado or salsa is great for extra flavor, too.
Pin This Recipe!
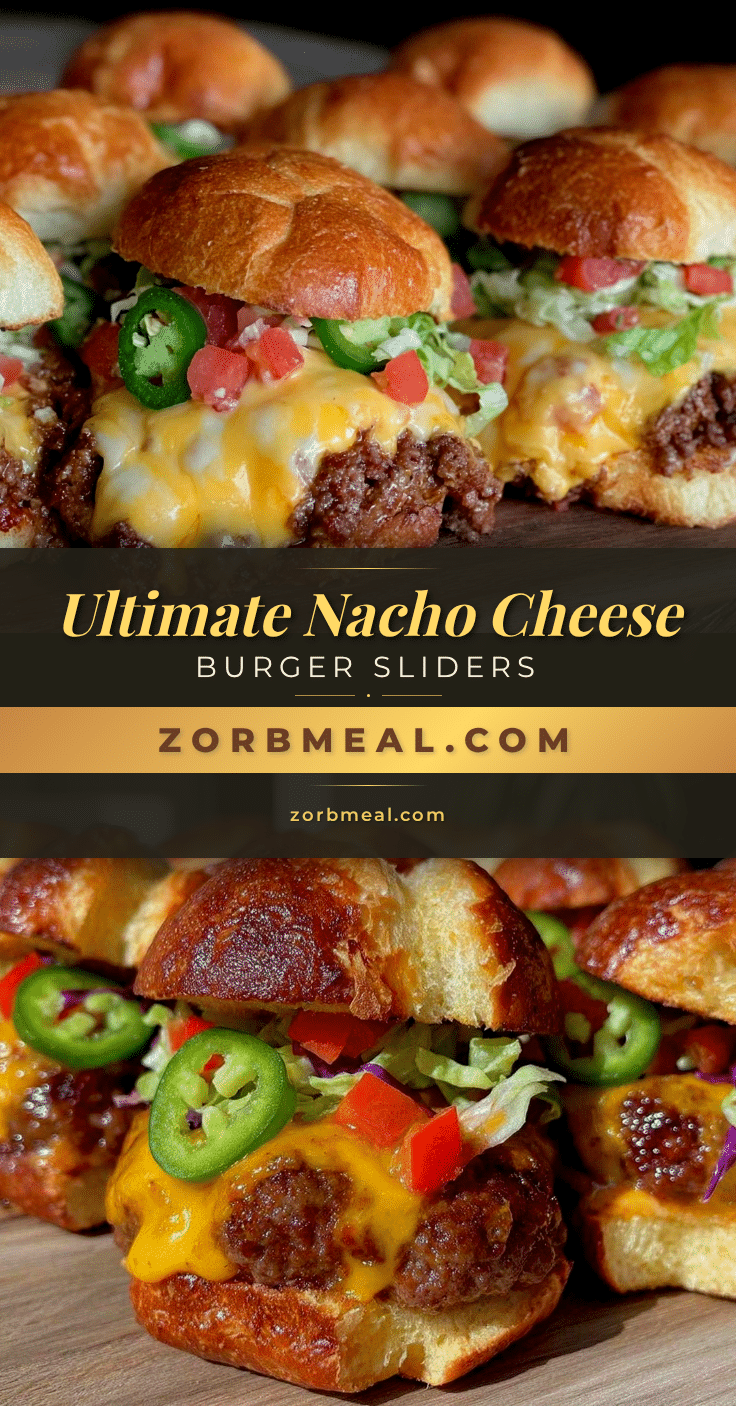
Savory Super Bowl Nacho Cheese Burger Sliders

These nacho cheese burger sliders are the ultimate game day crowd-pleaser, featuring juicy seasoned beef, creamy homemade nacho cheese sauce, and a kick of jalapeños, all layered on soft slider buns. Quick to make and easy to customize, they’re perfect for parties, potlucks, or any time you need to feed a hungry crowd.
- Prep Time: 15 minutes
- Cook Time: 20 minutes
- Total Time: 35 minutes
- Yield: 12 sliders (serves 6-8) 1x
- Category: Main Course
- Cuisine: American
Ingredients
- 2 pounds ground beef (80/20 blend)
- 1 small yellow onion, finely diced
- 2 cloves garlic, minced
- 1 packet (1 oz) taco seasoning
- Salt and black pepper, to taste
- 12 slider buns or small dinner rolls
- 2 tablespoons unsalted butter
- 2 tablespoons all-purpose flour
- 1 cup whole milk
- 2 cups shredded sharp cheddar cheese
- 1/2 cup shredded pepper jack cheese (optional)
- 1/4 teaspoon smoked paprika
- 1/4 teaspoon onion powder
- Pinch of cayenne pepper (optional)
- Salt, to taste
- 1/2 cup pickled jalapeño slices
- Chopped fresh cilantro (optional, for garnish)
- Chopped tomatoes or pico de gallo (optional, for topping)
Instructions
- Prep your ingredients: Dice the onion, mince the garlic, and grate the cheese if needed. Preheat oven to 350°F (175°C).
- Brown the beef: In a large skillet over medium-high heat, cook ground beef and diced onion, breaking up the meat, until beef is browned and onion is soft (8-10 minutes). Drain excess fat.
- Season the meat: Stir in minced garlic, taco seasoning, salt, and pepper. Cook for 1 more minute until fragrant. Taste and adjust seasoning.
- Make the nacho cheese sauce: In a medium saucepan over medium heat, melt butter. Whisk in flour and cook for 1 minute. Slowly whisk in milk, stirring until smooth and thickened (2-3 minutes). Lower heat and add cheddar and pepper jack cheeses, stirring until melted. Stir in smoked paprika, onion powder, cayenne, and salt. Adjust consistency with a splash of milk if needed.
- Assemble the sliders: Lightly spray a baking dish or sheet pan with nonstick spray. Slice slider buns in half horizontally (keeping tops and bottoms connected if possible). Arrange bottom halves in the dish. Evenly spread beef mixture over buns.
- Add cheese and toppings: Pour nacho cheese sauce over beef. Top with pickled jalapeño slices and optional cilantro or pico de gallo.
- Top and bake: Place tops of buns over sliders. Cover loosely with aluminum foil. Bake for 10 minutes, then uncover and bake 2-3 more minutes until buns are golden and cheese is bubbly.
- Serve hot: Let sliders cool for 2 minutes. Cut between each slider and serve warm.
Notes
For gluten-free sliders, use gluten-free buns and swap flour for a gluten-free blend in the cheese sauce. For dairy-free, use plant-based cheese and milk. The beef and cheese sauce can be made ahead and refrigerated. For extra flavor, add hot sauce or chipotle powder to the cheese sauce. Leftovers keep well in the fridge for up to 3 days or can be frozen for up to 2 months.
Nutrition
- Serving Size: 1 slider
- Calories: 260
- Sugar: 3
- Sodium: 540
- Fat: 16
- Saturated Fat: 8
- Carbohydrates: 15
- Fiber: 1
- Protein: 16
Keywords: nacho cheese burger sliders, Super Bowl sliders, party food, game day recipes, beef sliders, nacho sliders, easy sliders, crowd-pleaser, cheesy sliders, appetizer