The PTA Halloween party was in four hours and I’d completely forgotten. My son had reminded me three times that week, and somehow, between work deadlines and carpool chaos, it had slipped my mind entirely. I was standing in my kitchen at 2 PM, staring into the fridge like it might magically produce something impressive. Everyone else would be bringing elaborate themed treats—I’d seen the sign-up sheet. There were going to be professionally decorated cookies, a haunted gingerbread house situation, and probably something involving dry ice knowing Karen from the fundraising committee.
I had half a package of Oreos, some vanilla pudding mix that was probably expired, and a bag of gummy worms my husband had bought for a road trip we never took. Honestly, I almost just grabbed a store-bought platter and called it a day. But then I remembered the cottage cheese sitting in the back of my fridge. I’d been experimenting with it for healthier dips, and a little voice in my head said, “What if?”
So I threw together these Lighter Halloween Oreo Dirt Cups with Gummy Worms in a total panic. I mean, I was literally scraping the cream out of Oreos while my son was asking where his soccer cleats were. It was not a glamorous cooking moment. But here’s the thing—when I walked into that school gym with my little plastic cups, I felt a bit sheepish. Everyone else’s treats looked so polished. But by the end of the night, my cups were the first ones gone. A dad came up to me and asked for the recipe. The teacher asked if I could bring them to the next class party. And my son looked at me with this grin and said, “Mom, you’re the best.”
Maybe you’ve been there—scrambling at the last minute, feeling like you’re falling short. Let me tell you, these cups saved me that day. They’re creamy, they’re fun, they’ve got that classic dirt cup vibe we all know and love. But they’re lighter, so you don’t feel like you need a nap after eating one. And honestly? I think they taste even better than the full-sugar version. That’s why I keep making them, even when there’s no party to rush to.
Why You’ll Love This Recipe
Let’s be real for a second. Halloween treats are usually a sugar bomb that leaves you crashing before the kids even finish trick-or-treating. These Lighter Halloween Oreo Dirt Cups with Gummy Worms are different. They give you all the nostalgic fun without that heavy, overly sweet feeling. I’ve tested this recipe at three different parties now, and it’s held up every single time.
- Quick & Easy: You can throw these together in under 20 minutes. No baking, no complicated steps. Just mix, layer, and chill. Perfect for when you realize the party is tomorrow and you’ve got nothing.
- Simple Ingredients: You probably have most of this stuff in your kitchen already. No trips to a specialty store for obscure ingredients. I’m all about that.
- Perfect for Halloween Parties: These are a hit at classroom celebrations, office potlucks, or family gatherings. Kids love the gummy worms peeking out, and adults love that they’re not loaded with refined sugar.
- Crowd-Pleaser: I’ve served these to picky kids and health-conscious adults. Everyone goes back for seconds. I mean, it’s still dessert—it just happens to be a smarter version.
- Unbelievably Delicious: The texture is what gets me. It’s creamy and light, not heavy like traditional pudding cups. The cottage cheese trick makes it silky smooth, and you honestly can’t taste it. I promise.
What makes this recipe different from the hundreds of dirt cup recipes out there? It’s the secret ingredient. Blending cottage cheese into the pudding base gives you that rich, velvety texture with way less sugar and more protein. It’s not just another version—it’s the best version I’ve found after a lot of trial and error. I’ve had friends who swore they hated cottage cheese go back for thirds. That’s the kind of magic we’re talking about here.
This recipe is comfort food reimagined. It’s healthier, faster, and has the same soul-soothing satisfaction as the original. Perfect for impressing guests without stress, or turning a simple weeknight into something a little more fun. And honestly? It just makes you feel good about what you’re eating.
What Ingredients You Will Need
This recipe uses simple, wholesome ingredients to deliver that classic dirt cup flavor without the fuss. Most of these are pantry staples, and the swaps are easy if you need them.
For the Creamy Pudding Base
- 1 cup cottage cheese (full-fat or low-fat both work; I prefer Good Culture or Daisy brand for the creamiest texture)
- 1 package (3.4 oz) sugar-free vanilla instant pudding mix (Jell-O brand works great, but store brands are fine too)
- 1 ½ cups cold milk (any kind works—dairy, almond, oat, or coconut milk all do the job)
- ½ cup plain Greek yogurt (adds protein and tanginess; use full-fat for extra creaminess or non-fat if you’re watching calories)
- 1 teaspoon vanilla extract (pure extract tastes better, but imitation works in a pinch)
For the Dirt Layer
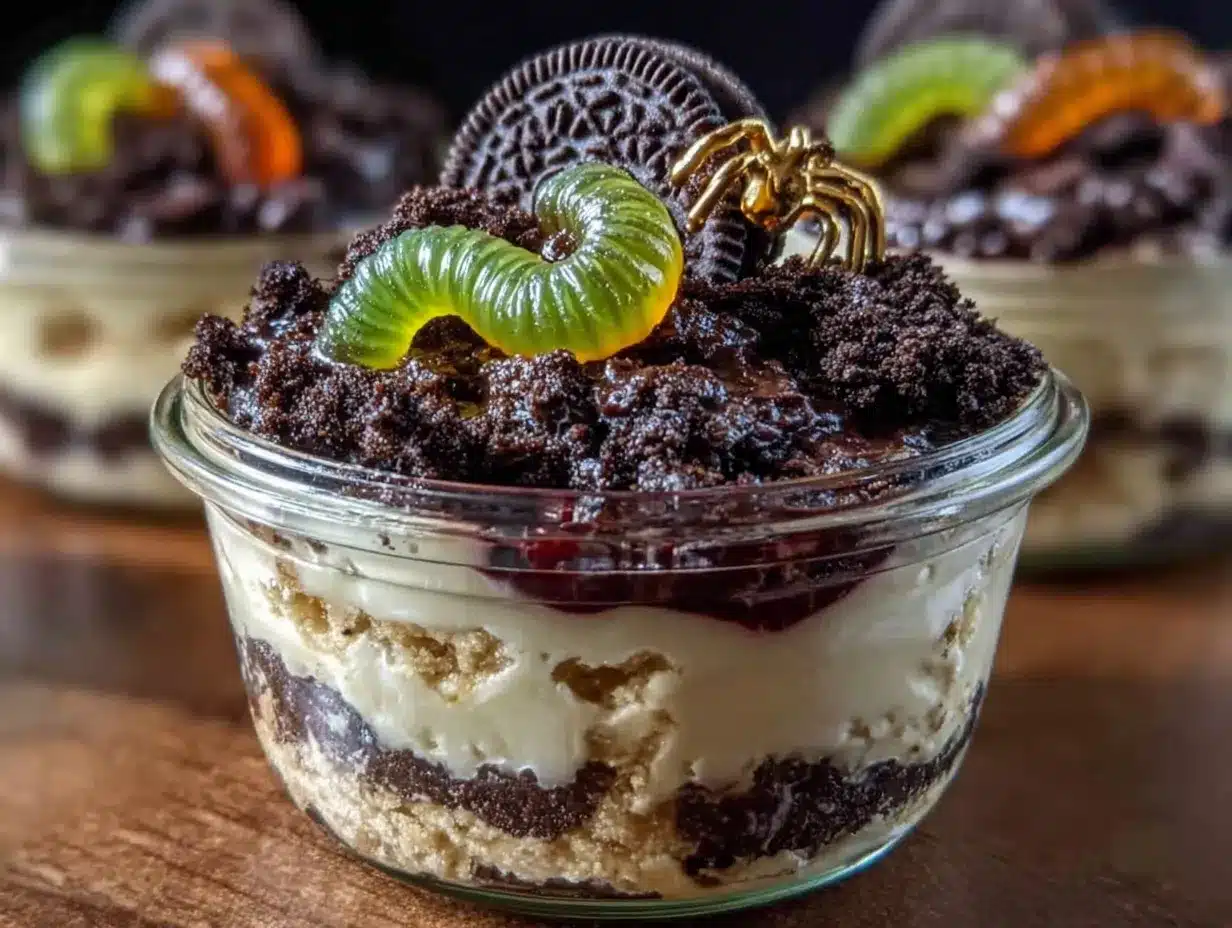
- 12 Oreo cookies (regular or reduced-fat; you can also use gluten-free chocolate sandwich cookies if needed)
- 2 tablespoons melted coconut oil or unsalted butter (helps the crumbs stick together a bit)
For the Topping and Decoration
- ¼ cup crushed graham crackers or chocolate wafer crumbs (adds texture variation)
- 12-15 gummy worms (any brand works; I like the sour ones for a little tangy contrast)
- Optional: 2 tablespoons mini chocolate chips (for extra crunch and chocolate flavor)
Ingredient Selection Tips: Look for small-curd cottage cheese for the smoothest blend. If you only have large-curd, just blend it a little longer. For the Oreos, I’ve found that the reduced-fat version actually crumbles better and doesn’t get as greasy. If you’re dairy-free, use a plant-based cream cheese and coconut yogurt in place of the Greek yogurt. The texture will be slightly different but still delicious.
Substitution Guidance: No cottage cheese? Use ½ cup cream cheese softened and ½ cup plain Greek yogurt. Need it nut-free? Check your chocolate sandwich cookies—some brands have nut contamination. Want it vegan? Use vegan cream cheese, plant-based yogurt, and dairy-free milk with a vegan pudding mix. The gummy worms should be checked too—some contain gelatin, but there are vegan versions available.
Equipment Needed
- Blender or food processor (I use my Ninja blender, but a hand immersion blender works too if you’re patient)
- 6-8 small clear plastic cups or glass jars (4-6 oz each; I love using mason jars for that rustic look)
- Mixing bowls (medium and small sizes)
- Whisk (for the pudding)
- Rolling pin or zip-top bag and a heavy pan (for crushing Oreos without making a mess)
- Measuring cups and spoons
- Spatula (for scraping every last bit of that creamy goodness)
- Small piping bag or zip-top bag with corner snipped (optional, for neat layering)
If you don’t have a blender, you can mash the cottage cheese through a fine-mesh sieve. It takes a bit of elbow grease, but it works. I’ve done it when my blender was in the dishwasher. For the cups, any clear container works—I’ve even used shot glasses for tiny party favors. Just make sure they’re food-safe.
One thing I learned the hard way: don’t use a cheap plastic bag for crushing Oreos. It’ll split and you’ll have crumbs everywhere. Use a freezer-weight bag or a clean kitchen towel. And if you’re using a rolling pin, put the bag on a cutting board, not your countertop. Trust me on that one.
Preparation Method
- Make the creamy base. Add the cottage cheese, Greek yogurt, and vanilla extract to your blender. Blend on high for 45-60 seconds until completely smooth. You want it silky, no lumps. Scrape down the sides halfway through. Set aside.
- Prepare the pudding. In a medium bowl, whisk together the pudding mix and cold milk for about 2 minutes until it starts to thicken. It should be slightly thicker than heavy cream. Let it sit for 2-3 minutes to set up a bit.
- Combine the mixtures. Pour the blended cottage cheese mixture into the pudding. Whisk gently until fully combined. It should be smooth, creamy, and a pale vanilla color. Taste it—it should be sweet but not cloying. If it’s too thick, add a tablespoon of milk and whisk again.
- Crush the Oreos. Place the Oreos in a zip-top bag. Seal it, then crush them with a rolling pin or the bottom of a heavy pan. You want a mix of fine crumbs and small chunks—not powder, not gravel. Aim for something between coarse sand and pebbles. Add the melted coconut oil and massage the bag to distribute it. This helps the crumbs hold together slightly.
- Prep your cups. Arrange your 6-8 cups on a small baking sheet (makes moving them to the fridge easier). If you’re using glass jars, make sure they’re completely dry inside.
- Layer the cups. Start with 2 tablespoons of the Oreo crumb mixture in the bottom of each cup. Press it down gently with the back of a spoon. Then add about ¼ cup of the pudding mixture. Repeat: another thin layer of crumbs, then more pudding, ending with a generous crumb layer on top. You want about 3 layers total.
- Add the gummy worms. Before you add the final crumb layer, press a gummy worm or two against the inside of the cup so it peeks out. Then top with the final crumbs. This makes it look like the worms are crawling out of the dirt. For extra effect, leave a worm half-buried on top.
- Chill. Cover each cup with plastic wrap or a lid. Refrigerate for at least 2 hours, preferably 4. This is crucial—the pudding needs time to set and the flavors need to meld. Overnight is even better. The texture becomes incredible after a full chill.
- Garnish before serving. Right before you serve, sprinkle the crushed graham crackers on top for that extra “dirt” texture. Add a few mini chocolate chips if you’re using them. Poke one more gummy worm into the center of each cup for the full effect.
Sensory Cues: When you blend the cottage cheese, it should go from grainy to completely smooth—listen for the sound to change from a rattle to a quiet hum. The pudding should be thick enough to coat the back of a spoon but still pourable. When you press the Oreo crumbs, they should hold together slightly when squeezed, like wet sand. The final cups should look like little terrariums of chocolate dirt with worms peeking out.
Personal Tip: I always make an extra cup just for testing. It’s not greed—it’s quality control. Also, if you’re short on time, you can skip the blender step and just whisk everything together. The texture won’t be as smooth, but it’ll still taste great. Done is better than perfect, especially on a busy Halloween week.
Cooking Tips & Techniques
Here’s where I share the stuff I learned the hard way so you don’t have to. First time I made these, I used fat-free cottage cheese and it turned out watery. The pudding never set right and the whole thing was a soupy mess. Lesson learned: full-fat or at least 2% cottage cheese gives you that thick, luxurious texture. The fat helps stabilize the pudding.
Common Mistake #1: Not chilling long enough. I know, you’re excited and the kids are bouncing off the walls. But if you serve these too soon, the layers will be runny and the crumbs will sink. Give them at least 2 hours. I’ve made them the night before a party and they were perfect.
Common Mistake #2: Over-blending the cottage cheese. It seems counterintuitive, but blending too long can make it thin and watery. Just 45-60 seconds is plenty. You want it smooth, not aerated.
Timing Strategy: Make the pudding base and crush the Oreos the night before. Store them separately in the fridge. Then assembly takes literally 10 minutes the day of the party. This is my go-to move for school events where I know morning chaos is guaranteed.
Consistency Tip: If your pudding mixture seems too thick after combining, whisk in a splash of milk. If it’s too thin, add a tablespoon of instant pudding mix and whisk vigorously. The pudding will continue to set as it chills, so don’t panic if it seems loose at first.
One thing I’ve noticed: the temperature of your milk matters. Cold milk helps the pudding set faster. If your milk is room temperature, the pudding will take longer to thicken. I keep my milk in the fridge specifically for this recipe.
Variations & Adaptations
These Lighter Halloween Oreo Dirt Cups with Gummy Worms are super flexible. Here are some ways I’ve tweaked them over the years:
Dairy-Free Version
Use dairy-free cream cheese (I like Kite Hill) and plain coconut yogurt. Swap the milk for unsweetened almond or oat milk. Use a vegan pudding mix—Simply Delish makes a good one. The texture will be slightly less creamy but still delicious. I made this for a friend with a dairy allergy and she said it was the best dessert she’d had in years.
Gluten-Free Option
Use gluten-free chocolate sandwich cookies (Kinnikinnick makes great ones) and certified gluten-free graham crackers. Everything else in the recipe is naturally gluten-free. Just double-check your pudding mix—most are, but some brands use wheat starch as a thickener.
Peanut Butter Dirt Cups
Add 2 tablespoons of peanut butter to the blender with the cottage cheese. It adds a rich, nutty flavor that pairs beautifully with the chocolate. Use peanut butter cookies instead of Oreos for the crumb layer. My kids beg for this version every year.
Pumpkin Spice Version
For a fall twist, add ¼ cup pumpkin puree and 1 teaspoon pumpkin pie spice to the pudding mixture. Use gingersnap cookies for the crumb layer instead of Oreos. Top with a dollop of coconut whipped cream. This one is amazing for Thanksgiving too.
Low-Carb/Keto Adaptation
Use a sugar-free pudding mix and full-fat cottage cheese. Replace the Oreos with crushed chocolate keto cookies (I like HighKey brand). Use allulose or monk fruit sweetener if you need extra sweetness. The gummy worms are tricky—look for sugar-free ones or just skip them and use chopped nuts for texture.
I’ve tried the pumpkin version myself and it was a hit at our neighborhood Halloween block party. The creaminess of the cottage cheese base actually works perfectly with the pumpkin spice flavors. Who knew?
Serving & Storage Suggestions
These are best served cold, straight from the fridge. The contrast between the cool, creamy pudding and the crunchy Oreo crumbs is everything. I like to serve them in clear cups so you can see the layers and the worms peeking out. It’s half the fun, honestly.
Presentation Ideas: Arrange the cups on a black or orange platter for Halloween. Add a few fake spiderwebs around the base. You can even put a small plastic spider on top of each cup for extra creep factor. For a classroom party, I’ve labeled each cup with a name tag so there’s no fighting over who gets which one.
Complementary Dishes: These pair perfectly with a warm apple cider or a pumpkin spice latte for adults. For kids, serve with a side of apple slices and caramel dip for a balanced treat. If you’re doing a full Halloween spread, they go great with mummy hot dogs and witch’s brew punch.
Storage: Keep covered in the refrigerator for up to 3 days. The pudding will stay creamy, but the Oreo crumbs will soften over time. That’s actually not a bad thing—some people prefer the softer texture. If you want to keep the crumbs crunchy, store the crumb mixture separately and add it just before serving.
Freezer Instructions: You can freeze these for up to 1 month. Assemble without the gummy worms, cover tightly, and freeze. Thaw in the refrigerator overnight. Add fresh gummy worms and crumb topping after thawing. The texture will be slightly icier, but still delicious.
Reheating: Don’t. These are meant to be eaten cold. If you somehow end up with warm dirt cups, just pop them back in the fridge for 30 minutes. They’ll be fine.
One thing I’ve noticed: the flavors actually get better after a day in the fridge. The vanilla and chocolate meld together, and the cottage cheese loses any lingering tang. So if you can make them a day ahead, do it. Your future self will thank you.
Nutritional Information & Benefits
Here’s the thing about these Lighter Halloween Oreo Dirt Cups with Gummy Worms—they’re actually not a total nutritional disaster. Each serving (1 cup, using the recipe as written) contains approximately:
- Calories: 185
- Protein: 9g
- Fat: 8g
- Carbohydrates: 22g
- Fiber: 1g
- Sugar: 12g
Health Benefits: The cottage cheese and Greek yogurt pack a serious protein punch, which helps keep you full and prevents that sugar crash. The protein also helps stabilize blood sugar, so your kids won’t be bouncing off the walls after eating these. The calcium from the dairy is great for bone health, and the vanilla extract has antioxidants.
Dietary Considerations: This recipe is naturally vegetarian. With the substitutions listed above, it can be made dairy-free, gluten-free, or low-carb. It’s nut-free as written (check your Oreos and gummy worms for cross-contamination if allergies are a concern).
Potential Allergens: Dairy, wheat (from the Oreos and graham crackers), and soy (sometimes in chocolate cookies). Always check labels if you’re serving to someone with allergies.
Look, I’m not saying this is health food. It’s still a treat. But compared to a traditional dirt cup that can have 300+ calories and 30g of sugar, this is a huge improvement. I feel good about giving these to my son, and he feels like he’s getting away with something. That’s a win-win in my book.
Conclusion
These Lighter Halloween Oreo Dirt Cups with Gummy Worms are proof that you don’t need to spend hours in the kitchen or load up on sugar to make something fun and delicious. They came out of a moment of panic in my kitchen, and now they’re a staple in our Halloween rotation. That’s the kind of recipe you hold onto.
I love that I can make these with my son without stressing about the mess or the sugar content. I love that they make people smile when they see the worms peeking out. And I really love that I don’t feel guilty eating two of them in one sitting. Honestly, that’s the dream, right?
So go ahead and make these for your next Halloween party, classroom celebration, or just because it’s Tuesday and you want something fun. Customize them however you like—swap the worms for spiders, use different cookie crumbs, add a layer of chocolate mousse. Make them your own. That’s what cooking is all about.
If you try these, I’d love to hear how they turned out. Drop a comment below and let me know your favorite variation. Did you add peanut butter? Did your kids try to eat the worms first? Share your dirt cup stories—I read every single one. And if you’re looking for another fun Halloween treat, check out my Halloween pumpkin patch brownies—they’re just as easy and just as good.
Happy Halloween, friends. May your treats be light, your worms be gummy, and your kitchen be full of laughter.
Frequently Asked Questions
Can I make these ahead of time for a party?
Absolutely! In fact, I recommend it. Assemble the cups up to 24 hours in advance and keep them covered in the refrigerator. Add the gummy worms and any crunchy toppings right before serving to keep them from getting soggy.
Can I use a different type of cookie for the dirt layer?
Yes, definitely. Chocolate wafer cookies, graham crackers, or even crushed chocolate chip cookies work great. For a gluten-free option, use gluten-free chocolate cookies. Just keep the total amount around 12 cookies to maintain the right texture.
How do I get the pudding to set properly?
Make sure your milk is cold and whisk the pudding mix for the full 2 minutes recommended on the package. Let it sit for 2-3 minutes before combining with the cottage cheese mixture. And don’t skip the chilling time—at least 2 hours, preferably 4. Patience is key here.
Can I use low-fat or non-fat cottage cheese?
You can, but I don’t recommend it. The fat in full-fat cottage cheese gives the pudding its creamy texture. Low-fat versions can make the final product watery. If you’re watching calories, use 2% cottage cheese and full-fat Greek yogurt for balance.
Are these safe for school parties with nut allergies?
They can be, but you need to check your ingredients carefully. Standard Oreos are made in a facility that processes peanuts, so check the packaging. Gummy worms can also be a concern—some brands are made on shared equipment. Always read labels and consider a note to parents about ingredients used.
Pin This Recipe!

Lighter Halloween Oreo Dirt Cups with Gummy Worms
These Lighter Halloween Oreo Dirt Cups with Gummy Worms are a quick, easy, and healthier Halloween treat. Made with a secret ingredient—cottage cheese—for a creamy, protein-packed pudding base, they’re a crowd-pleaser that comes together in under 20 minutes.
- Prep Time: 20 minutes
- Cook Time: 0 minutes
- Total Time: 2 hours 20 minutes (includes chilling)
- Yield: 6-8 servings 1x
- Category: Dessert
- Cuisine: American
Ingredients
- 1 cup cottage cheese (full-fat or low-fat)
- 1 package (3.4 oz) sugar-free vanilla instant pudding mix
- 1 ½ cups cold milk (any kind)
- ½ cup plain Greek yogurt
- 1 teaspoon vanilla extract
- 12 Oreo cookies (regular or reduced-fat)
- 2 tablespoons melted coconut oil or unsalted butter
- ¼ cup crushed graham crackers or chocolate wafer crumbs
- 12–15 gummy worms
- Optional: 2 tablespoons mini chocolate chips
Instructions
- Make the creamy base. Add the cottage cheese, Greek yogurt, and vanilla extract to your blender. Blend on high for 45-60 seconds until completely smooth. Set aside.
- Prepare the pudding. In a medium bowl, whisk together the pudding mix and cold milk for about 2 minutes until it starts to thicken. Let it sit for 2-3 minutes to set up a bit.
- Combine the mixtures. Pour the blended cottage cheese mixture into the pudding. Whisk gently until fully combined. It should be smooth, creamy, and a pale vanilla color.
- Crush the Oreos. Place the Oreos in a zip-top bag. Seal it, then crush them with a rolling pin or the bottom of a heavy pan. Aim for a mix of fine crumbs and small chunks. Add the melted coconut oil and massage the bag to distribute it.
- Prep your cups. Arrange 6-8 small clear cups or glass jars on a small baking sheet.
- Layer the cups. Start with 2 tablespoons of the Oreo crumb mixture in the bottom of each cup. Press it down gently. Then add about ¼ cup of the pudding mixture. Repeat: another thin layer of crumbs, then more pudding, ending with a generous crumb layer on top. You want about 3 layers total.
- Add the gummy worms. Before you add the final crumb layer, press a gummy worm or two against the inside of the cup so it peeks out. Then top with the final crumbs. For extra effect, leave a worm half-buried on top.
- Chill. Cover each cup with plastic wrap or a lid. Refrigerate for at least 2 hours, preferably 4. Overnight is even better.
- Garnish before serving. Right before you serve, sprinkle the crushed graham crackers on top. Add a few mini chocolate chips if using. Poke one more gummy worm into the center of each cup.
Notes
For best results, use full-fat or 2% cottage cheese to avoid a watery texture. Chill for at least 2 hours, preferably 4 or overnight, to allow the pudding to set properly. The flavors meld and improve after a day in the fridge. If you’re short on time, you can skip the blender step and whisk everything together, though the texture won’t be as smooth. Store covered in the refrigerator for up to 3 days. The Oreo crumbs will soften over time; if you prefer them crunchy, store the crumb mixture separately and add just before serving.
Nutrition
- Serving Size: 1 cup
- Calories: 185
- Sugar: 12
- Sodium: 280
- Fat: 8
- Saturated Fat: 3
- Carbohydrates: 22
- Fiber: 1
- Protein: 9
Keywords: Halloween, dirt cups, Oreo, gummy worms, lighter, healthier, no-bake, easy, kid-friendly, party treat


