Marta wasn’t trying to impress anyone. I’d stopped by to borrow a cup of brown sugar—a desperate Tuesday night baking crisis—and the smell hit me before I even got through the screen door. It was that warm, buttery, vanilla-kissed scent that makes you forget whatever you were stressed about. She just shrugged and said, “Oh, those? Just cookies. I’m testing a new recipe for the kid’s lunchbox.”
She handed me one, still warm, and honestly? I almost dropped it. It was heavy, perfectly domed, and the edges had that crinkly, golden look that promises a chewy center. I took a bite, and let me tell you, it was like the universe paused for a second. The outside had a delicate, buttery crisp, and the inside was so soft and thick it practically melted. It wasn’t a fancy bakery cookie. It was better. It was the kind of cookie you dream about on a rainy afternoon.
I stood there, mouth full, probably looking a little unhinged, and mumbled something like, “You can’t just… make these for a lunchbox.” She laughed and scribbled the recipe on a sticky note. That sticky note, smudged with butter and chocolate, is now a permanent fixture on my fridge. This is that recipe. The one that turns a regular Tuesday into something a little bit special. And the best part? You don’t need to be a professional baker to nail it. You just need a little patience and a whole lot of butter. Maybe you’ve been searching for that one perfect cookie recipe—the one that feels like a hug. Well, this is it.
Why You’ll Love This Recipe
I’ve tested this recipe more times than I care to count. I’ve tried chilling the dough for ten minutes versus overnight. I’ve experimented with different ratios of brown to white sugar. I’ve even, in a moment of madness, tried using margarine (don’t do it). This version is the gold standard. It’s the one I bring to potlucks where people fight over the last one, and the one I make on a Sunday just to have a little joy waiting for me on Monday morning.
- Thick & Chewy Perfection: These cookies don’t spread into flat, sad discs. They bake up tall, with a soft, dense center and a slightly crisp edge.
- Simple Pantry Ingredients: No weird flours, no specialty extracts. If you have butter, sugar, eggs, and flour, you’re already halfway there.
- Perfect for Cozy Evenings: This is the ultimate comfort food. The smell alone will make your house feel like a warm hug on a cold day.
- Crowd-Pleaser: I’ve yet to meet a single person who doesn’t love these. They’re the kind of cookie that makes kids and adults alike close their eyes in pure bliss.
- Unbelievably Delicious: The secret is in the technique—melting the butter and letting the dough rest. It creates a texture that’s next-level.
What makes this recipe different from all the others? It’s the combination of melted butter (for chewiness) and an extra egg yolk (for richness). It’s not just another chocolate chip cookie recipe. It’s the one that will ruin all other cookies for you. Honestly, it’s the kind of cookie that makes you feel like everything is going to be okay.
What Ingredients You Will Need
This recipe uses simple, humble ingredients, but the way they work together is pure magic. I’ve tested these with different brands and types, and I’ll share my personal favorites so you get the best result every time.
- Unsalted Butter (1 cup / 2 sticks / 226g): We’re melting this, which is the key to that chewy texture. I prefer Kerrygold for its rich, creamy flavor, but any good-quality unsalted butter will work. Melting the butter gives the cookies a denser, chewier texture than creaming cold butter.
- Light Brown Sugar (1 cup, packed / 200g): This is non-negotiable for moisture and that deep, caramel-like flavor. Make sure it’s packed firmly into the measuring cup. The molasses in brown sugar is what gives the cookies their soft, chewy center.
- Granulated Sugar (½ cup / 100g): This helps with spreading (just a little) and gives the edges that beautiful golden crisp.
- Large Eggs (2 whole + 1 yolk): Room temperature is best! The extra yolk adds fat and richness, making the cookies extra tender and soft. If you forget to take them out of the fridge, place them in a bowl of warm water for 5 minutes.
- Vanilla Extract (2 teaspoons): Use pure vanilla extract, not imitation. It makes a huge difference in the depth of flavor. I’m partial to Nielsen-Massey.
- All-Purpose Flour (2 ¼ cups / 280g): Spoon and level your flour! Scooping directly from the bag packs in too much flour and will give you dry, cakey cookies. Fluff the flour with a spoon, spoon it into the measuring cup, and level it off with a knife.
- Baking Soda (1 teaspoon): This helps the cookies spread just enough and gives them a little lift.
- Cornstarch (1 tablespoon): This is my secret weapon. It tenderizes the gluten, making the cookies incredibly soft and thick. Don’t skip it.
- Salt (½ teaspoon): Salt balances the sweetness and enhances the chocolate flavor. I use fine sea salt.
- Semi-Sweet Chocolate Chips (2 cups / 340g): I use a mix of semi-sweet chips and chopped dark chocolate (like a 70% cacao bar) for a more complex flavor. The chips melt evenly, while the chopped chocolate gives you pools of melty goodness. Guittard or Ghirardelli are my go-to brands.
Substitution Tip: For a gluten-free option, you can use a 1:1 gluten-free baking flour blend (like King Arthur Measure for Measure). The texture will be slightly different—a bit more tender—but still delicious.
Equipment Needed
You don’t need a fancy stand mixer for these, though it certainly helps. Here’s what I use and what you can swap in.
- Large Mixing Bowls: You’ll need one for the wet ingredients and one for the dry. I love a good set of nesting glass bowls.
- Whisk and Wooden Spoon (or Electric Mixer): A whisk is great for mixing the wet ingredients. A wooden spoon is perfect for folding in the dry ingredients and chocolate chips. If you have a hand mixer or stand mixer, it makes creaming the sugars and eggs a little easier, but it’s not necessary.
- Cookie Scoop (1.5 tablespoon size): This is the best tool for getting evenly sized cookies that bake uniformly. I use a #40 scoop. If you don’t have one, use two spoons to form the dough balls.
- Baking Sheets: Use light-colored, uncoated baking sheets. Dark pans can cause the bottoms of the cookies to burn. I love my Nordic Ware half-sheet pans.
- Parchment Paper or Silicone Baking Mat: This prevents sticking and promotes even browning. Parchment paper is cheaper and disposable, but a silicone mat is a great investment.
- Wire Cooling Rack: Essential for letting the cookies cool without getting soggy bottoms.
Preparation Method
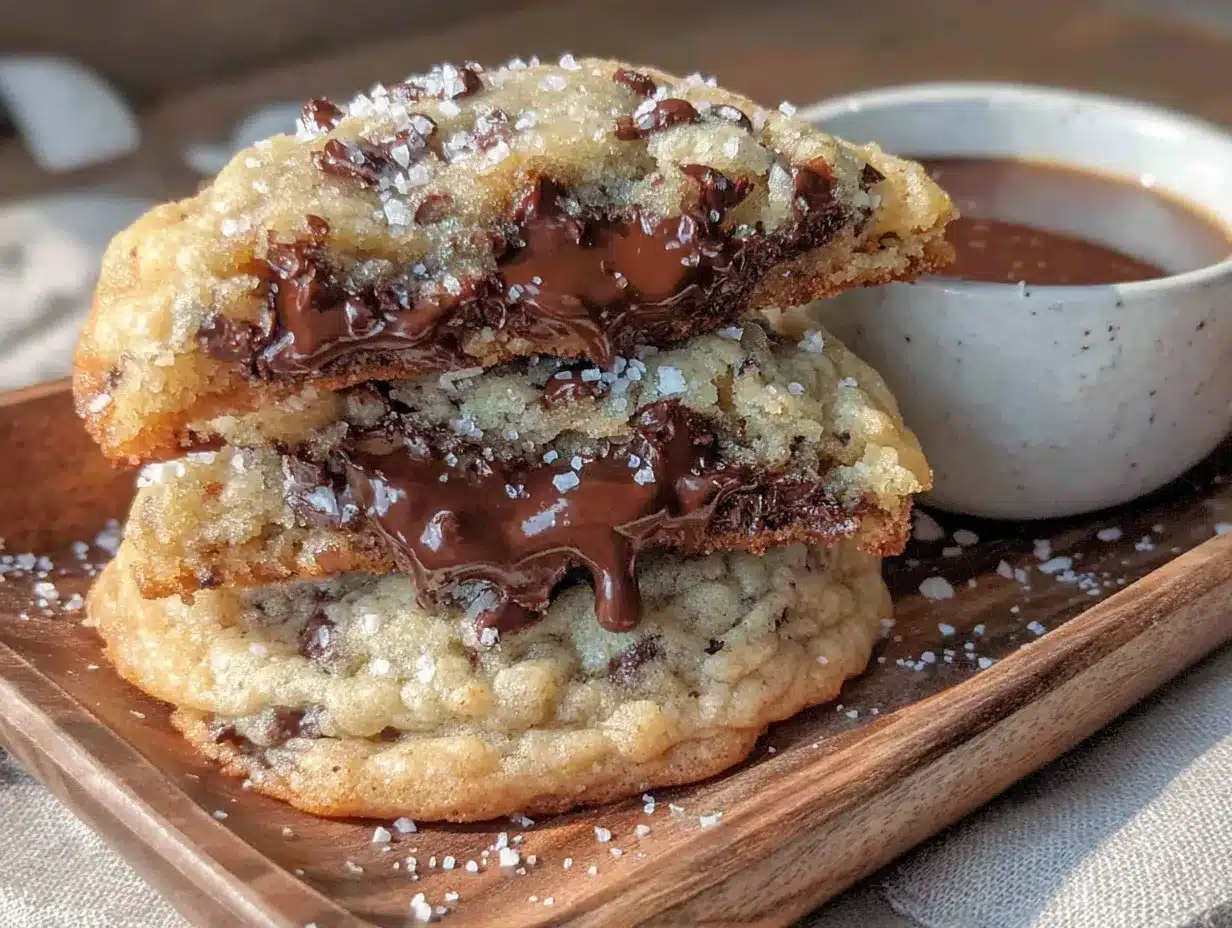
This is where the magic happens. Follow these steps carefully, and you’ll be rewarded with the best cookies of your life. I’ve added all my little tricks and time estimates to help you out.
-
Melt the Butter (5 minutes): In a medium saucepan or in a microwave-safe bowl, melt the 1 cup of butter. Let it cool for about 5 minutes. It shouldn’t be hot, just warm. If it’s too hot, it will scramble the eggs. (I learned this the hard way—what a mess!)
-
Mix the Wet Ingredients (5 minutes): In a large bowl, combine the melted butter with the 1 cup packed brown sugar and ½ cup granulated sugar. Whisk vigorously until the mixture is smooth and glossy, about 2 minutes. It should look like a thick, smooth paste. Add the 2 whole eggs and 1 egg yolk, one at a time, whisking well after each addition. Then, stir in the 2 teaspoons of vanilla extract. The mixture will be silky and light.
-
Combine the Dry Ingredients (3 minutes): In a separate bowl, whisk together the 2 ¼ cups all-purpose flour, 1 teaspoon baking soda, 1 tablespoon cornstarch, and ½ teaspoon salt. Whisking aerates the flour and ensures everything is evenly distributed.
-
Bring it Together (3 minutes): Gradually add the dry ingredients to the wet ingredients. Use a wooden spoon or a rubber spatula to fold them together. Mix until just combined—you should see a few streaks of flour remaining. Do not overmix! Overmixing develops the gluten and will make your cookies tough.
-
Add the Chocolate (2 minutes): Gently fold in the 2 cups of chocolate chips and chopped chocolate. Make sure they are evenly distributed throughout the dough. The dough will be thick and slightly sticky.
-
The Most Important Step: Chill the Dough (30 minutes to 72 hours): Cover the bowl with plastic wrap and refrigerate for at least 30 minutes. This is non-negotiable. Chilling the dough solidifies the butter, which prevents the cookies from spreading too much in the oven. It also allows the flavors to meld and deepen. I often make the dough the night before and bake the next day. The longer it chills, the better the flavor and texture. (My personal record is 48 hours, and they were transcendent.)
-
Preheat and Prep (15 minutes): When you’re ready to bake, preheat your oven to 350°F (175°C). Line two baking sheets with parchment paper.
-
Scoop the Dough (5 minutes): Use your cookie scoop to portion the dough into balls. Each ball should be about 1.5 tablespoons (about 35g). Place them about 2 inches apart on the prepared baking sheets. For an extra bakery-style look, press a few extra chocolate chips onto the tops of the dough balls.
-
Bake to Perfection (10-12 minutes): Bake one sheet at a time in the center of the oven. Bake for 10-12 minutes. The cookies are done when the edges are set and golden brown, but the centers still look slightly soft and underdone. They will continue to cook on the hot baking sheet as they cool.
-
Cool and Enjoy (15 minutes): Let the cookies cool on the baking sheet for 5 minutes. This is crucial for setting the structure. Then, transfer them to a wire cooling rack to cool completely. Or, you know, eat one while it’s still warm. I won’t judge.
Cooking Tips & Techniques
I’ve made a lot of mistakes in the kitchen so you don’t have to. Here are the things I’ve learned the hard way about these cookies.
- The Melted Butter Mistake: The first time I made these, I used butter that was too hot. The eggs curdled, and the dough was a greasy mess. Let your melted butter cool until it’s just warm to the touch. It should feel like a warm bath, not a hot shower.
- The Spreading Problem: If your cookies are turning into flat pancakes, your dough is too warm. Pop it back in the fridge for 15 minutes. Also, make sure your baking soda is fresh. Old baking soda won’t give the cookies enough lift.
- The Overbaking Trap: I used to bake cookies until they looked “done” in the oven. That’s a mistake. They will be dry and crunchy. Take them out when the edges are golden but the center is still pale and puffy. They will set as they cool, giving you that perfect chewy texture. Trust the process.
- Timing is Everything: While one sheet is baking, keep the other portioned dough balls in the fridge. This ensures they stay cold and don’t spread too much. This is a great multitasking trick for consistent results.
- For Extra Thickness: After scooping the dough balls, chill them on the baking sheet for an additional 10 minutes before baking. This extra chill guarantees a thicker, taller cookie.
Variations & Adaptations
This recipe is a fantastic base for all kinds of delicious experiments. Don’t be afraid to play around!
- Double Chocolate: Replace ¼ cup of the all-purpose flour with ¼ cup of unsweetened cocoa powder. Use white chocolate chips and dark chocolate chunks for a truly decadent treat.
- Nutty & Salty: Add 1 cup of toasted, chopped pecans or walnuts along with the chocolate. After baking, sprinkle the hot cookies with a tiny pinch of flaky sea salt (like Maldon). The salty-sweet combo is irresistible.
- Peanut Butter Swirl: Warm ¼ cup of creamy peanut butter in the microwave for 15 seconds. Drop small spoonfuls of the warm peanut butter over the scooped dough balls and gently swirl it in with a toothpick before baking.
- Gluten-Free Adaptation: As mentioned, use a 1:1 gluten-free flour blend. You may need to add an extra tablespoon of milk if the dough seems too dry. The texture will be slightly more tender and cake-like, but still deliciously thick.
- My Personal Favorite Variation: I love adding ½ cup of dried tart cherries and ½ cup of white chocolate chips along with the semi-sweet chips. The tartness of the cherries cuts through the sweetness perfectly. It’s like a fancy bakery cookie you’d pay five dollars for.
Serving & Storage Suggestions
These cookies are amazing at any temperature, but here’s how to make the most of them.
- Serving: Serve them slightly warm for the ultimate gooey experience. I like to pop a cookie in the microwave for 10 seconds if it’s from a previous batch. For a real treat, sandwich two cookies with a scoop of vanilla ice cream for an incredible ice cream sandwich.
- Complementary Dishes: These cookies are perfect with a tall glass of cold milk, a steaming mug of hot cocoa, or a strong cup of black coffee. They’re also wonderful alongside a bowl of fresh berries for a simple dessert plate.
- Storage: Store baked cookies in an airtight container at room temperature for up to 5 days. To keep them extra soft, add a slice of plain white bread to the container. The bread will absorb excess moisture and keep the cookies soft. (Replace the bread slice every day or two.)
- Freezing: You can freeze the baked cookies for up to 3 months. Layer them between sheets of parchment paper in a freezer-safe container. To reheat, bake them in a 300°F (150°C) oven for 5 minutes, or microwave for 15 seconds. You can also freeze the raw dough balls. Place them on a baking sheet and freeze until solid, then transfer to a freezer bag. Bake from frozen, adding 1-2 minutes to the baking time.
- Flavor Development: Honestly, these cookies are even better the next day. The flavors meld together, and the texture becomes even more perfectly chewy. If you can resist eating them all on day one, you’re in for a real treat on day two.
Nutritional Information & Benefits
Let’s be real—these are a treat, not a health food. But that doesn’t mean they can’t be part of a balanced life. Knowing what’s in them helps you enjoy them mindfully.
- Estimated Nutritional Values (per cookie, based on 24 cookies): Calories: 220, Fat: 12g, Saturated Fat: 7g, Cholesterol: 35mg, Sodium: 120mg, Carbohydrates: 28g, Fiber: 1g, Sugar: 18g, Protein: 3g.
- Health Benefits of Key Ingredients: Dark chocolate is rich in antioxidants and can be good for heart health in moderation. Butter, believe it or not, contains butyrate, a fatty acid that supports gut health. And eggs are a great source of protein and choline, which is important for brain function.
- Dietary Considerations: This recipe is vegetarian. It can be made gluten-free with the substitution mentioned above. It is not vegan, dairy-free, or low-carb. For a lower-sugar option, you can reduce the granulated sugar to ⅓ cup, but this will affect the texture slightly.
- Potential Allergens: This recipe contains dairy (butter), eggs, gluten (flour), and soy (may be present in chocolate chips). Always check your ingredient labels if you have allergies.
- My Personal Perspective: I believe in the 80/20 rule. Eat nourishing, whole foods 80% of the time, and enjoy the things you love—like these cookies—20% of the time. Food is about joy and connection, not just fuel. A warm cookie shared with a friend is good for the soul.
Conclusion
So there you have it. The cookie recipe that started with a borrowed cup of sugar and a sticky note. These Cozy Bakery-Style Thick and Chewy Chocolate Chip Cookies are more than just a dessert—they’re a little moment of peace in a busy world. They’re the smell that makes your house a home, the taste that brings back childhood memories, and the treat that makes any day feel a little bit special.
I really hope you give this recipe a try. Don’t be afraid to make it your own. Add your favorite nuts, swap the chocolate chips for butterscotch, or just follow the recipe exactly as written. The most important thing is to have fun and enjoy the process. And honestly? Don’t be shy about eating the dough. It’s the cook’s privilege.
If you make these, I’d love to hear about it! Drop a comment below and tell me how they turned out. Did you try a fun variation? Did you have to hide them from your family? Share your cookie stories with me. And if you loved this recipe, please share it with a friend who could use a little bit of cozy comfort. Happy baking, friend!
Frequently Asked Questions
Why did my cookies turn out flat?
The most common reason is that the dough was too warm. Make sure you chill the dough for at least 30 minutes. Also, check that your baking soda is fresh—it should fizz vigorously when mixed with a little vinegar.
Can I use salted butter instead of unsalted?
Yes, you can! Just reduce the added salt in the recipe to ¼ teaspoon. The cookies will have a slightly saltier flavor, which can be delicious, especially if you’re using semi-sweet chocolate.
How do I make my cookies even thicker?
For extra-thick cookies, chill the scooped dough balls on the baking sheet for an additional 10-15 minutes before baking. You can also try using a larger scoop (2 tablespoons) and baking for an extra minute or two.
Can I make the dough ahead of time?
Absolutely! The dough can be refrigerated for up to 72 hours. In fact, the flavor improves over time. You can also freeze the dough balls for up to 3 months. Bake from frozen, adding 1-2 minutes to the baking time.
My cookies are too dry. What went wrong?
This usually happens from overmeasuring the flour or overbaking. Make sure you’re spooning and leveling your flour. Also, take the cookies out of the oven when the centers still look slightly underdone. They will continue to cook on the hot baking sheet.
PrintCozy Bakery-Style Thick and Chewy Chocolate Chip Cookies
These thick and chewy chocolate chip cookies are the ultimate comfort food. With a perfectly crisp edge and a soft, dense center, they’re a crowd-pleaser that will make your house smell like a warm hug.
- Prep Time: 15 minutes
- Cook Time: 12 minutes
- Total Time: 57 minutes (includes 30 minutes chilling)
- Yield: 24 servings 1x
- Category: Dessert
- Cuisine: American
Ingredients
- 1 cup (2 sticks / 226g) unsalted butter, melted and cooled
- 1 cup (200g) packed light brown sugar
- ½ cup (100g) granulated sugar
- 2 large eggs + 1 egg yolk, room temperature
- 2 teaspoons pure vanilla extract
- 2 ¼ cups (280g) all-purpose flour, spooned and leveled
- 1 teaspoon baking soda
- 1 tablespoon cornstarch
- ½ teaspoon fine sea salt
- 2 cups (340g) semi-sweet chocolate chips (or a mix of chips and chopped dark chocolate)
Instructions
- Melt the butter in a saucepan or microwave-safe bowl. Let it cool for about 5 minutes until just warm.
- In a large bowl, whisk together the melted butter, brown sugar, and granulated sugar until smooth and glossy, about 2 minutes.
- Add the eggs and egg yolk one at a time, whisking well after each addition. Stir in the vanilla extract.
- In a separate bowl, whisk together the flour, baking soda, cornstarch, and salt.
- Gradually add the dry ingredients to the wet ingredients, folding with a wooden spoon or spatula until just combined. Do not overmix.
- Gently fold in the chocolate chips until evenly distributed. The dough will be thick and slightly sticky.
- Cover the bowl with plastic wrap and refrigerate for at least 30 minutes (up to 72 hours for best flavor).
- When ready to bake, preheat the oven to 350°F (175°C). Line two baking sheets with parchment paper.
- Scoop the dough into 1.5-tablespoon balls (about 35g each) and place them 2 inches apart on the prepared baking sheets. Optionally, press extra chocolate chips on top.
- Bake one sheet at a time in the center of the oven for 10-12 minutes, until the edges are golden and set but the centers still look slightly soft.
- Let the cookies cool on the baking sheet for 5 minutes, then transfer to a wire rack to cool completely.
Notes
Chilling the dough is essential for thick cookies. For extra thickness, chill the scooped dough balls on the baking sheet for an additional 10-15 minutes before baking. The dough can be refrigerated for up to 72 hours or frozen for up to 3 months. For a gluten-free option, use a 1:1 gluten-free baking flour blend.
Nutrition
- Serving Size: 1 cookie
- Calories: 220
- Sugar: 18
- Sodium: 120
- Fat: 12
- Saturated Fat: 7
- Carbohydrates: 28
- Fiber: 1
- Protein: 3
Keywords: chocolate chip cookies, thick cookies, chewy cookies, bakery-style cookies, easy cookie recipe, homemade cookies


