My brother claimed he hated chicken and rice for twenty-seven years. Twenty-seven years of pushing it around his plate at family dinners, of politely declining casseroles at potlucks, of making that little face people make when they think no one is watching. Then one rainy Tuesday last October, I caught him standing at my stove, spoon in hand, eating directly from the skillet I had just pulled from the oven. He didn’t even bother with a bowl.
“This doesn’t count,” he said, mouth full.
I just raised an eyebrow and went back to washing my cutting board. That moment — catching someone in the act of proving themselves wrong — is exactly what this one-pan garlic butter chicken and rice dinner is all about. It’s the kind of dish that sneaks up on you. You think you know what it is. Then you take one bite, and suddenly everything you thought you knew about chicken and rice gets rewritten.
Honestly, I get it. Most chicken and rice dishes are… fine. They’re reliable, sure. But they can also be dry, bland, or just plain sad looking. This version? It’s different. The rice stays creamy and fragrant, the chicken comes out impossibly tender, and that garlic butter situation in the pan turns into something close to magic. I’ve made it on busy weeknights when I had exactly zero energy left. I’ve made it for dinner guests who asked for the recipe before they finished eating. And every single time, someone says the same thing: “I didn’t know chicken and rice could taste like this.”
Maybe you’ve been there — skeptical of a dish that sounds too simple to be special. Or maybe you’re just looking for a meal that feels like a hug without requiring a sink full of dishes. Either way, this one’s for you. Let me show you how it’s done.
Why You’ll Love This Recipe
I’ve tested this recipe more times than I care to admit. There was the version where I added too much liquid and ended up with rice soup (not great). The version where I forgot the garlic entirely (tragic). The version where I tried to rush the browning and ended up with pale, sad chicken skin. But after all those trials, this is the version I keep coming back to. Here’s why it works:
- One Pan, Minimal Mess: You sear the chicken, cook the aromatics, and bake the rice all in the same skillet. That means less time scrubbing and more time actually enjoying your dinner.
- Pantry-Friendly Ingredients: Chicken thighs, rice, garlic, butter, broth — these are things you probably already have. No special trips required.
- Perfect for Cozy Nights: This is the meal you want on a cold evening, after a long day, or when you just need something warm and satisfying.
- Crowd-Pleasing Every Time: I’ve served this to picky eaters, foodie friends, and everyone in between. It gets the same reaction: quiet eating followed by requests for seconds.
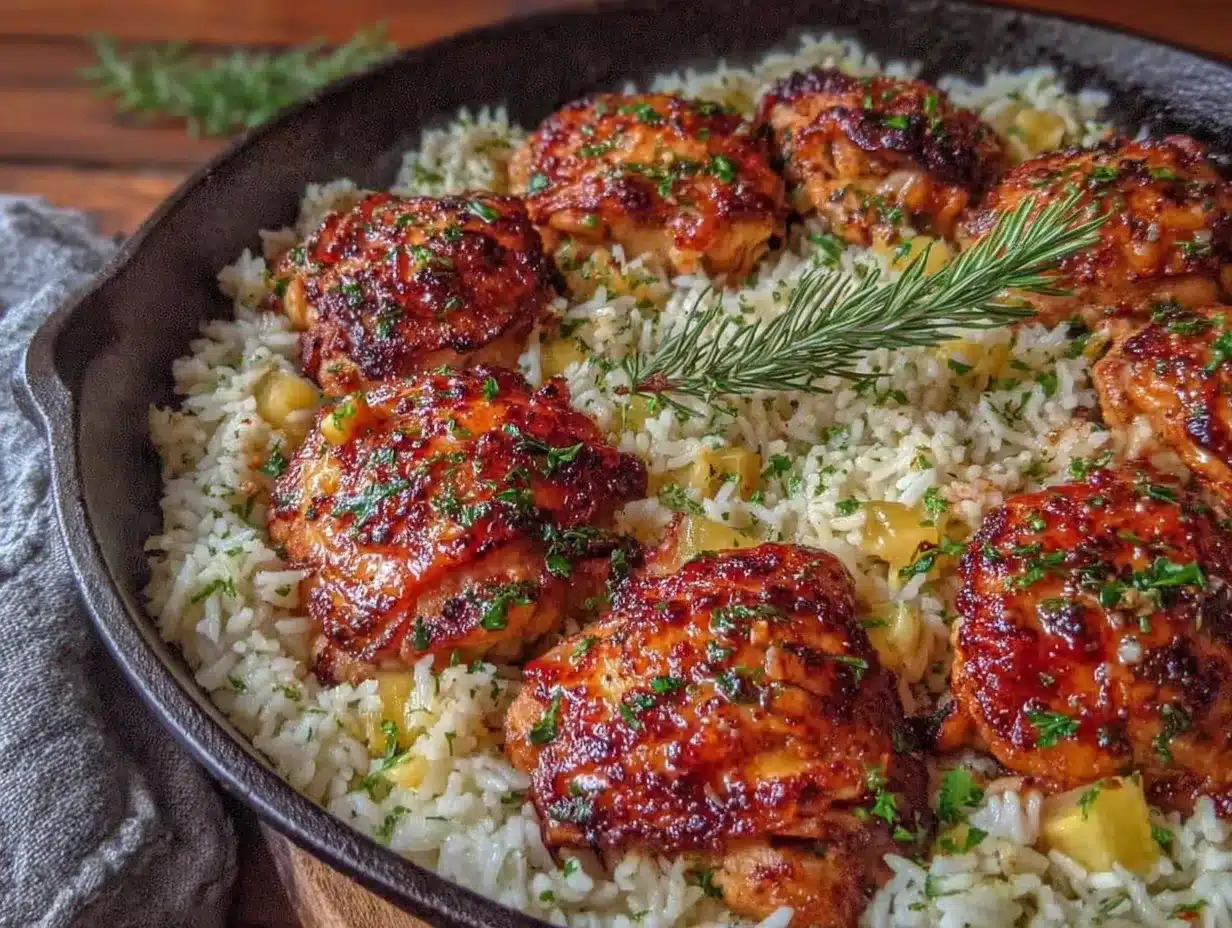
- Comfort Food That Delivers: The rice comes out creamy and infused with garlic butter flavor. The chicken stays juicy with crispy golden skin. It’s the kind of meal that makes you close your eyes after the first bite.
What makes this recipe different from the rest? It’s the technique. Most recipes dump everything in a pan and hope for the best. Here, we take a few extra minutes to brown the chicken properly, toast the rice in garlic butter, and let everything finish together in the oven. Those small steps make a huge difference. This isn’t just another chicken and rice recipe — it’s the one that converted my brother after twenty-seven years of refusal.
What Ingredients You Will Need
This recipe uses simple, wholesome ingredients to deliver bold flavor without the fuss. Most of these are pantry staples, which makes this perfect for those nights when you need dinner on the table without a trip to the store.
For the Chicken
- 4 bone-in, skin-on chicken thighs (about 1.5 pounds total) — The bone keeps the meat juicy, and the skin gets beautifully crispy. You can use boneless thighs if needed, but reduce cooking time by about 10 minutes.
- 1 teaspoon salt — I prefer kosher salt for its clean flavor and easy pinch-ability.
- ½ teaspoon black pepper — Freshly ground makes a difference here.
- ½ teaspoon paprika — Adds color and a subtle smoky warmth. Smoked paprika works beautifully too.
- ¼ teaspoon garlic powder — Just a little extra garlic love on the chicken itself.
For the Rice
- 1½ cups long-grain white rice — Basmati or jasmine work wonderfully. Avoid short-grain rice here as it can turn gummy.
- 2½ cups low-sodium chicken broth — You can use water in a pinch, but broth adds so much more flavor. I like Swanson’s unsalted chicken broth for consistency.
- 4 tablespoons unsalted butter — Divided. Two tablespoons for cooking the aromatics, two tablespoons to melt over the top before baking.
- 6 cloves garlic, minced — Yes, six. This is garlic butter chicken and rice, after all. Adjust down if you’re sensitive, but I promise it mellows as it cooks.
- 1 medium yellow onion, diced — About 1 cup. Adds sweetness and depth to the rice.
- 1 teaspoon dried thyme — Earthy and comforting. Fresh thyme works too — use 1 tablespoon of leaves.
- ½ teaspoon dried rosemary — Crush it between your fingers as you add it to release the oils.
- Salt and pepper to taste — The rice needs its own seasoning, so don’t skip this.
For the Garnish
- 2 tablespoons fresh parsley, chopped — A sprinkle of green makes everything look intentional. Flat-leaf parsley has the best flavor.
- Lemon wedges — Optional, but a squeeze of lemon right before eating brightens the whole dish.
Ingredient Note: If you’re using a different type of rice, you’ll need to adjust the liquid and cooking time. Brown rice, for example, needs about 45 minutes longer and an extra ½ cup of broth. I recommend sticking with white rice for the best results with this recipe.
Equipment Needed
The beauty of this recipe is that it mostly happens in one pan. Here’s what you’ll need:
- Large oven-safe skillet (10-12 inches) — Cast iron is ideal for its heat retention and even cooking. I use a 12-inch Lodge cast iron skillet and love it. A stainless steel or oven-safe nonstick pan works too. Just make sure the handle can handle oven temperatures up to 375°F.
- Cutting board and sharp knife — For dicing the onion and mincing the garlic.
- Measuring cups and spoons — Accuracy matters for the rice-to-liquid ratio.
- Wooden spoon or spatula — For stirring the rice and scraping up any browned bits from the pan.
- Aluminum foil — To cover the skillet while the rice finishes cooking.
- Oven mitts — That handle gets hot!
Budget-Friendly Tip: If you don’t have an oven-safe skillet, you can sear the chicken in a regular pan, then transfer everything to a baking dish or Dutch oven for the oven portion. It adds one extra dish to wash, but the results are the same.
Preparation Method
This recipe moves quickly once you start, so I recommend having all your ingredients measured and ready before you turn on the stove. Trust me — it makes everything smoother.
- Preheat your oven to 375°F (190°C). Position the rack in the middle. This gives the most even heat for the rice to cook through properly.
- Pat the chicken thighs dry with paper towels. This is non-negotiable — wet chicken won’t brown properly. Season both sides with salt, pepper, paprika, and garlic powder. Let them sit at room temperature while you prepare the other ingredients. About 15 minutes is perfect.
- Heat 1 tablespoon of butter in your skillet over medium-high heat. When the butter stops foaming and just starts to turn golden, carefully place the chicken thighs skin-side down. Don’t crowd them — if your skillet is smaller, work in batches. Let them cook without moving for 5-6 minutes. The skin should be deep golden brown and release easily from the pan. Flip and cook for another 3 minutes. Transfer the chicken to a plate. Don’t worry if it’s not cooked through yet — it will finish in the oven.
- Reduce the heat to medium. Add the remaining 1 tablespoon of butter to the skillet. Once melted, add the diced onion. Cook for 3-4 minutes, stirring occasionally, until the onion is soft and translucent. Scrape up any browned bits from the bottom of the pan — those are flavor gold.
- Add the minced garlic, dried thyme, and dried rosemary. Stir constantly for about 30 seconds until fragrant. Garlic burns quickly, so stay close. Your kitchen should smell amazing at this point.
- Add the rice to the skillet. Stir to coat every grain in the buttery, garlicky mixture. Cook for 2 minutes, stirring frequently. The rice will start to look slightly translucent at the edges — that’s what you want. This toasting step prevents the rice from turning mushy later.
- Pour in the chicken broth. Stir everything together, scraping the bottom of the pan one more time. Season with a pinch of salt and pepper. Bring the liquid to a gentle simmer — you should see small bubbles around the edges, not a rolling boil.
- Nestle the chicken thighs back into the rice, skin-side up. They should be sitting on top of the rice, not buried in it. This keeps the skin crispy. Dot the remaining 2 tablespoons of butter over the top of the rice and chicken. It melts into everything as it bakes.
- Cover the skillet tightly with aluminum foil. This traps steam and ensures the rice cooks evenly. Transfer to the preheated oven. Bake for 35-40 minutes. The rice should be tender and have absorbed most of the liquid. If it still looks wet, re-cover and bake for 5 more minutes.
- Remove from the oven and let it rest, covered, for 5 minutes. This is important — it allows the rice to finish absorbing steam and sets the texture. Uncover carefully (hot steam!), fluff the rice gently with a fork, and sprinkle with fresh parsley.
Visual Cue: When done, the rice should be fluffy and separate, not sticky or wet. The chicken skin should be crackling-crisp and deep golden brown. If you pierce the thickest part of a thigh, the juices should run clear.
Cooking Tips & Techniques
I’ve made this recipe more times than I can count, and I’ve learned a few things the hard way. Here’s what I wish someone had told me:
Don’t skip browning the chicken. I know it’s tempting to just throw everything in the pan and call it a day. But that golden, crispy skin isn’t just for looks — it adds a layer of flavor to the entire dish. Those browned bits stuck to the pan after searing? That’s called fond, and it’s the secret to deeply savory rice. If you rush this step, you’re leaving flavor behind.
Toast the rice properly. This was the step I used to skip, and my rice always turned out gummy. Taking two minutes to stir the raw rice in the hot butter and garlic transforms the texture. The grains become slightly translucent and start to smell nutty. That’s the starch beginning to cook, which helps each grain stay separate and fluffy instead of clumping together.
Watch your liquid ratio. Different pans evaporate liquid at different rates. A wide skillet will lose moisture faster than a deep Dutch oven. If you’re using a particularly wide pan (12 inches or more), check the rice at 30 minutes instead of 35. If the liquid has evaporated but the rice is still firm, add ¼ cup of hot broth and continue baking.
Let it rest. I know you’re hungry. I know the kitchen smells incredible. But those five minutes of resting time are non-negotiable. The rice continues to steam and absorb any remaining liquid. If you dig in right away, you’ll end up with a gummy, wet mess. Trust the process.
One mistake I made: The first time I made this, I used a nonstick skillet that wasn’t rated for oven temperatures. The handle started smoking halfway through baking. Now I always check my pan’s heat tolerance before starting. Cast iron and stainless steel are safe bets. If you’re unsure, wrap the handle in a double layer of foil as a precaution.
Variations & Adaptations
One of the things I love about this recipe is how adaptable it is. Here are a few ways to make it your own:
Vegetable-Packed Version
Add 1 cup of frozen peas and diced carrots to the rice before baking. They cook perfectly in the same time and add color and nutrients. I’ve also added a handful of fresh spinach stirred in during the last 5 minutes of baking — it wilts down beautifully.
Herb and Lemon Twist
Replace the dried thyme and rosemary with 2 tablespoons of fresh dill and the zest of one lemon. Add lemon slices on top of the chicken before baking. The bright, fresh flavor is perfect for spring or summer evenings when you want something cozy but lighter.
Creamy Mushroom Version
Sauté 8 ounces of sliced mushrooms along with the onion. Use 1 cup of broth and 1½ cups of heavy cream instead of all broth. The mushrooms add an earthy richness that pairs beautifully with the garlic butter. This version is dangerously good.
Dietary Adaptations
Dairy-free: Substitute the butter with a high-quality vegan butter or olive oil. Use a dairy-free broth. The flavor shifts slightly but remains delicious.
Gluten-free: This recipe is naturally gluten-free as written. Just double-check your chicken broth label to make sure there’s no hidden gluten.
Lower carb: Swap the rice for cauliflower rice, but reduce the broth to 1 cup and bake for only 20 minutes. The texture won’t be the same, but it’s a solid alternative.
Serving & Storage Suggestions
This dish is complete on its own, but a few thoughtful additions can turn it into a full meal experience.
Serving Temperature: Serve hot, straight from the skillet. The contrast between the hot, creamy rice and the cool parsley garnish is part of the magic. A squeeze of fresh lemon juice right before eating brightens everything up.
What to Serve With It: A simple green salad with a vinaigrette cuts through the richness perfectly. Roasted asparagus or steamed green beans also work beautifully. If you want to keep it cozy, serve with crusty bread to soak up any garlic butter left in the pan.
Storage: Leftovers keep well in an airtight container in the refrigerator for up to 4 days. The rice will absorb more liquid as it sits, so don’t be alarmed if it seems drier the next day. To reheat, add a splash of broth or water and microwave in 30-second intervals, stirring between each. Or reheat in a covered skillet over low heat with a tablespoon of water.
Freezing: This dish freezes surprisingly well. Portion into freezer-safe containers and freeze for up to 3 months. Thaw overnight in the refrigerator before reheating. The rice texture softens slightly after freezing, but the flavor remains excellent.
Flavor Development: Honestly, this dish tastes even better the next day. The flavors have time to meld, and the garlic butter infuses every grain of rice. I sometimes make a double batch just for the leftovers.
Nutritional Information & Benefits
Here’s an approximate nutritional breakdown per serving (based on 4 servings):
| Nutrient | Amount |
|---|---|
| Calories | 585 |
| Protein | 32g |
| Fat | 28g |
| Saturated Fat | 12g |
| Carbohydrates | 52g |
| Fiber | 1g |
| Sugar | 2g |
| Sodium | 720mg |
This meal provides a solid balance of protein, carbohydrates, and healthy fats. Chicken thighs are rich in B vitamins, selenium, and iron. Garlic offers immune-supporting compounds, and the butter provides fat-soluble vitamins A, D, E, and K. If you’re watching sodium, use unsalted broth and reduce the added salt.
From a wellness perspective, this is the kind of meal that nourishes more than just your body. There’s something deeply satisfying about a one-pan dinner that comes together without stress. It’s comfort food that doesn’t leave you feeling heavy or guilty — just content.
Conclusion
This one-pan garlic butter chicken and rice dinner is the recipe I turn to when I need a guaranteed win. It’s simple enough for a Tuesday night, impressive enough for guests, and cozy enough to fix just about any kind of day. The crispy-skinned chicken, the creamy garlic-infused rice, the way it all comes together in one pan — it’s comfort food at its finest.
I hope you make this your own. Add your favorite vegetables, swap in different herbs, or keep it exactly as written. However you make it, I’d love to hear how it turns out. Drop a comment below and let me know — did you convert anyone? Did you catch someone eating straight from the skillet? Those are my favorite stories.
Until next time, happy cooking. And remember — sometimes the best meals are the ones that prove us wrong.
Frequently Asked Questions
Can I use boneless, skinless chicken thighs?
Yes, but reduce the initial searing time to 3 minutes per side and the baking time to 25-30 minutes. Boneless thighs cook faster and won’t have the same crispy skin, but they’ll still be tender and flavorful.
Can I make this in a slow cooker or Instant Pot?
I don’t recommend it for this particular recipe. The oven method creates that crispy skin and perfectly textured rice that makes this dish special. A slow cooker would make the rice mushy and the skin soggy. If you’re short on time, the stovetop-to-oven method is actually faster than most pressure cooker recipes.
Why is my rice still crunchy after baking?
This usually happens if the liquid evaporated too quickly or the oven temperature was too high. Next time, make sure your skillet is tightly covered with foil and check your oven temperature with an oven thermometer. If it happens again, add ¼ cup of hot broth, re-cover, and bake for 10 more minutes.
Can I use brown rice instead of white rice?
You can, but you’ll need to adjust the liquid and time. Use 2¾ cups of broth instead of 2½, and bake for 55-60 minutes. Brown rice also benefits from a 10-minute soak in hot water before cooking to help it cook more evenly.
How do I prevent the chicken skin from getting soggy?
The key is keeping the chicken skin above the rice, not submerged in it. When you nestle the thighs back into the skillet, make sure the skin is exposed. Also, don’t skip the initial sear — that crispy foundation helps the skin stay crunchy even after baking.
PrintEasy One-Pan Garlic Butter Chicken and Rice

This one-pan garlic butter chicken and rice dinner features crispy-skinned chicken thighs and creamy, garlic-infused rice, all cooked together in a single skillet. It’s a cozy, crowd-pleasing meal that’s simple enough for a weeknight yet impressive enough for guests.
- Prep Time: 15 minutes
- Cook Time: 40 minutes
- Total Time: 55 minutes
- Yield: 4 servings 1x
- Category: Main Course
- Cuisine: American
Ingredients
- 4 bone-in, skin-on chicken thighs (about 1.5 pounds total)
- 1 teaspoon salt
- ½ teaspoon black pepper
- ½ teaspoon paprika
- ¼ teaspoon garlic powder
- 1½ cups long-grain white rice
- 2½ cups low-sodium chicken broth
- 4 tablespoons unsalted butter, divided
- 6 cloves garlic, minced
- 1 medium yellow onion, diced (about 1 cup)
- 1 teaspoon dried thyme
- ½ teaspoon dried rosemary
- Salt and pepper to taste
- 2 tablespoons fresh parsley, chopped
- Lemon wedges (optional)
Instructions
- Preheat your oven to 375°F (190°C). Position the rack in the middle.
- Pat the chicken thighs dry with paper towels. Season both sides with salt, pepper, paprika, and garlic powder. Let them sit at room temperature for about 15 minutes.
- Heat 1 tablespoon of butter in your skillet over medium-high heat. When the butter stops foaming and just starts to turn golden, carefully place the chicken thighs skin-side down. Cook without moving for 5-6 minutes until deep golden brown. Flip and cook for another 3 minutes. Transfer the chicken to a plate.
- Reduce the heat to medium. Add the remaining 1 tablespoon of butter to the skillet. Once melted, add the diced onion. Cook for 3-4 minutes, stirring occasionally, until soft and translucent. Scrape up any browned bits from the bottom of the pan.
- Add the minced garlic, dried thyme, and dried rosemary. Stir constantly for about 30 seconds until fragrant.
- Add the rice to the skillet. Stir to coat every grain in the buttery, garlicky mixture. Cook for 2 minutes, stirring frequently, until the rice starts to look slightly translucent at the edges.
- Pour in the chicken broth. Stir everything together, scraping the bottom of the pan. Season with a pinch of salt and pepper. Bring the liquid to a gentle simmer.
- Nestle the chicken thighs back into the rice, skin-side up. Dot the remaining 2 tablespoons of butter over the top of the rice and chicken.
- Cover the skillet tightly with aluminum foil. Transfer to the preheated oven. Bake for 35-40 minutes until the rice is tender and has absorbed most of the liquid.
- Remove from the oven and let it rest, covered, for 5 minutes. Uncover carefully, fluff the rice gently with a fork, and sprinkle with fresh parsley. Serve with lemon wedges if desired.
Notes
Don’t skip browning the chicken or toasting the rice—these steps add crucial flavor and texture. Let the dish rest for 5 minutes after baking to allow the rice to finish absorbing steam. If using a different type of rice, adjust liquid and cooking time accordingly.
Nutrition
- Serving Size: 1 serving
- Calories: 585
- Sugar: 2
- Sodium: 720
- Fat: 28
- Saturated Fat: 12
- Carbohydrates: 52
- Fiber: 1
- Protein: 32
Keywords: one-pan chicken and rice, garlic butter chicken, easy chicken dinner, skillet chicken and rice, comfort food


