I burned this Easy One Pan Cheesy Ground Beef Rice three times before I figured out what I was doing wrong. Not burned in the “oops, a little brown on the bottom” way, but in the “scraping charred bits into the trash and ordering pizza” kind of way. It was humbling, honestly, because I thought I knew my way around a skillet. But every time I tried to rush this dish, the rice would stick, the cheese would seize up, and I’d be left with a pan that looked like a crime scene.
Here’s the thing about one-pan dinners — they sound so simple in theory, right? Throw everything in, walk away, come back to magic. But rice is a diva. It needs the right amount of liquid, the right heat, and the right timing. And cheese? Cheese is even pickier. Get the heat too high and it breaks into a greasy mess. Too low and it never melts right.
So after those three failed attempts, I sat down and really thought about what was going wrong. I realized I was treating this like a dump-and-stir recipe when it actually needed a little finesse. The kind of finesse that comes from understanding why rice burns (starch settling on the bottom before it absorbs) and why cheese clumps (sudden temperature changes). I started testing with smaller batches, adjusting the liquid ratios, and paying attention to the order of operations.
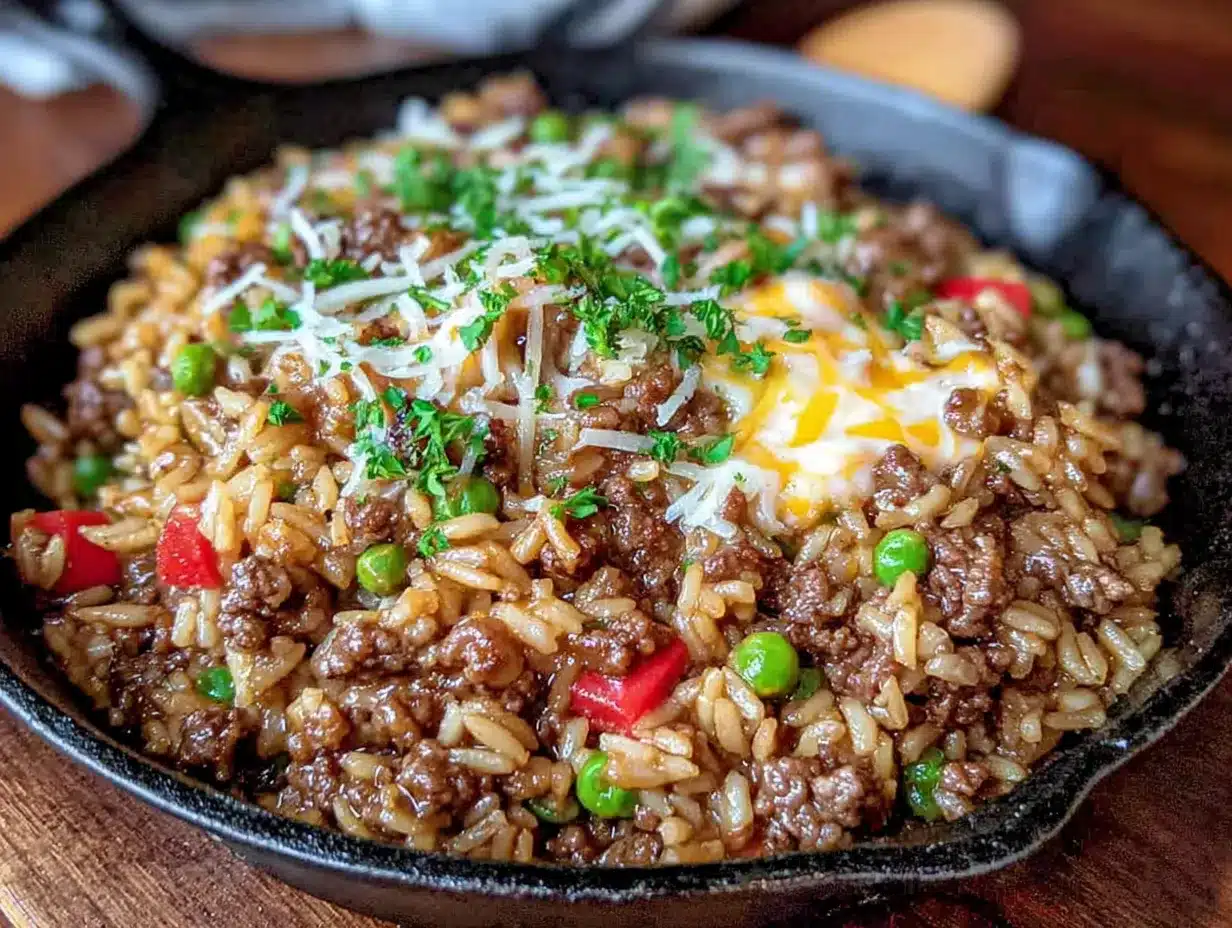
This version — the one I’m sharing with you now — is the result of all that trial and error. It’s the Easy One Pan Cheesy Ground Beef Rice that finally worked. The rice is tender, not mushy. The cheese is silky, not greasy. And the whole thing comes together in one skillet in about 30 minutes. No scraping, no salvaging, no pizza backup plan required.
Why You’ll Love This Recipe
This isn’t just another weeknight dinner recipe that sounds good on paper but disappoints in practice. I’ve tested this Easy One Pan Cheesy Ground Beef Rice more times than I care to count, and every single batch has taught me something about getting it right. Here’s why this one actually delivers:
- One Pan, Minimal Mess : Everything cooks in a single skillet from start to finish. No boiling rice separately, no draining pasta, no extra pots to wash. You dirty one pan and a cutting board — that’s it.
- 30 Minutes Flat : From the moment you turn on the stove to the moment you’re scooping it onto plates, you’re looking at about half an hour. That includes browning the meat, sautéing the aromatics, simmering the rice, and melting the cheese.
- Pantry-Friendly Ingredients : Ground beef, rice, canned tomatoes, broth, cheese, and a few spices. These are things I almost always have on hand, and they’re easy to find at any grocery store without a special trip.
- Kid-Approved and Adult-Enjoyed : My nephew calls this “the cheesy rice that tastes like a hug.” Adults appreciate that it’s filling without being heavy, and kids just appreciate the cheese factor.
- Budget-Friendly : Ground beef and rice are about as affordable as dinner gets. This recipe stretches those simple ingredients into a meal that feels way more expensive than it actually is.
What makes this recipe different from all the other cheesy rice dishes out there? It comes down to technique. I figured out that toasting the rice in the beef fat before adding liquid gives it a nutty flavor and helps keep the grains separate. And instead of dumping all the cheese in at once (which leads to clumping), I add it in two stages — some stirred in for creaminess, and some sprinkled on top for that gooey, melty finish. It’s a small change, but it makes a world of difference.
This is the kind of dinner that makes you close your eyes after the first bite. It’s comfort food, pure and simple, but it’s comfort food that actually works on a busy Tuesday night when you’re tired and hungry and just need something good to eat.
What Ingredients You Will Need
This recipe uses simple, everyday ingredients to create something that tastes like you spent way more effort than you actually did. Here’s what you’ll need and why each one matters:
For the Base
- Ground beef (1 lb / 450g) — I prefer 80/20 ground chuck for this recipe. It has enough fat to flavor the rice without making the dish greasy. If you use leaner beef (like 93/7), you may need to add a tablespoon of oil when browning.
- Yellow onion (1 medium, diced) — Adds sweetness and depth. I’ve tried this with white onions and red onions, and yellow gives the best balance of flavor without being too sharp.
- Garlic (3-4 cloves, minced) — Fresh garlic is non-negotiable here. The jarred stuff works in a pinch, but fresh garlic gives that punchy aroma that makes the whole kitchen smell amazing.
- Long-grain white rice (1 cup / 200g) — This is important. Do not use short-grain rice (too sticky) or brown rice (takes too long to cook). Long-grain rice like jasmine or basmati gives you fluffy, separate grains that hold up well in a one-pan dish.
For the Liquid and Flavor
- Beef broth (1.5 cups / 360ml) — Adds savory depth that water just can’t match. I use low-sodium broth so I can control the salt level myself. Swanson’s and Better Than Bouillon are my go-to brands.
- Diced tomatoes (1 can, 14.5 oz / 400g) — Fire-roasted diced tomatoes add a subtle smokiness that works beautifully with the beef. Regular diced tomatoes work too, but fire-roasted really does make a difference here.
- Tomato paste (2 tablespoons) — This concentrates the tomato flavor without adding extra liquid. It’s what gives the rice that rich, savory undertone.
- Worcestershire sauce (1 tablespoon) — Adds umami and depth. Don’t skip this — it’s the secret ingredient that makes the beef taste beefier.
For the Seasoning
- Chili powder (1 teaspoon) — Adds warmth, not heat. Feel free to adjust based on your tolerance.
- Smoked paprika (1 teaspoon) — Gives a subtle smoky flavor that complements the fire-roasted tomatoes.
- Garlic powder (½ teaspoon) — Yes, in addition to fresh garlic. The powder adds a different kind of garlic flavor that lingers in the background.
- Onion powder (½ teaspoon) — Same logic as the garlic powder. It rounds out the flavor profile.
- Salt and black pepper (to taste) — I start with ½ teaspoon of salt and ¼ teaspoon of pepper, then adjust at the end.
For the Cheese
- Sharp cheddar cheese (1.5 cups / 170g, shredded) — Sharp cheddar gives you the most flavor for your money. Pre-shredded cheese has anti-caking agents that prevent it from melting smoothly, so please shred your own. It takes two minutes and makes a huge difference.
- Monterey Jack cheese (½ cup / 55g, shredded) — This adds extra creaminess without overpowering the cheddar. You can use all cheddar if that’s what you have, but the Monterey Jack really does make the texture silkier.
For Garnish (Optional but Recommended)
- Fresh parsley or cilantro (chopped) — Adds a pop of color and freshness that cuts through the richness.
- Green onions (sliced) — A little sharpness to balance the cheesy goodness.
Equipment Needed
One of the best things about this recipe is how little equipment it requires. Here’s what you’ll need:
- Large skillet or Dutch oven (12-inch / 30cm with a lid) — A deep, wide skillet with a tight-fitting lid is ideal. I use a 12-inch cast iron skillet for this recipe because it holds heat evenly and gives the rice a nice crust on the bottom. A stainless steel or non-stick skillet works great too — just make sure it has a lid. If your skillet doesn’t have a lid, you can use a sheet of aluminum foil tightly sealed over the top.
- Wooden spoon or spatula — For breaking up the ground beef and stirring the rice. A flat-edged wooden spoon works best for scraping up any browned bits from the bottom of the pan.
- Cutting board and knife — For dicing the onion and mincing the garlic. A sharp chef’s knife makes this job go much faster.
- Measuring cups and spoons — Rice is one of those ingredients where eyeballing it can go wrong. Use proper measuring tools for consistent results.
- Box grater — For shredding your own cheese. I know it’s tempting to buy the pre-shredded bag, but trust me on this one. A box grater costs about ten bucks and will change your cheese game forever.
- Can opener — For the diced tomatoes and tomato paste.
If you don’t have a Dutch oven, any heavy-bottomed pot with a lid will work. The key is even heat distribution, which prevents hot spots that can burn the rice before it’s fully cooked.
Preparation Method
Let me walk you through this step by step. I’ve included time estimates and visual cues so you know exactly what to look for at each stage.
Step 1: Brown the Beef (5-7 minutes)
Place your skillet over medium-high heat and add the ground beef. Break it up with your wooden spoon into small crumbles. Let it cook undisturbed for about 2 minutes — this gives you nice browning instead of steaming the meat. Then start stirring and breaking it up further. Cook until the beef is fully browned and no longer pink, about 5-7 minutes total. If there’s more than about 2 tablespoons of rendered fat in the pan, spoon off the excess. You want enough fat to cook the aromatics in, but not so much that the dish becomes greasy.
Sensory cue: You should hear a steady sizzle, not a frantic spatter. The beef should smell rich and savory, with browned bits forming on the bottom of the pan.
Step 2: Sauté the Aromatics (2-3 minutes)
Reduce the heat to medium. Add the diced onion to the skillet with the beef and cook for about 2 minutes, stirring occasionally, until the onion becomes translucent and soft. Add the minced garlic and cook for another 30 seconds until fragrant — garlic burns fast, so keep stirring. Don’t walk away during this step.
Sensory cue: The onion should smell sweet, not sharp. The garlic should smell pungent and inviting, not bitter or burnt.
Step 3: Toast the Rice (2 minutes)
Add the uncooked rice to the skillet and stir it into the beef and onion mixture. Let it cook for about 2 minutes, stirring constantly. The rice will start to look slightly translucent at the edges and you’ll hear it clicking against the pan. This toasting step is what gives the rice that nutty flavor and helps it stay fluffy instead of mushy.
Pro tip from my failed attempts: Don’t skip this step. I used to dump the rice in with the liquid and wonder why it turned out gummy. Toasting it first changes everything.
Step 4: Add the Liquids and Seasonings (1 minute)
Stir in the tomato paste and cook for about 30 seconds, letting it darken slightly. Then pour in the beef broth, diced tomatoes (with their juices), Worcestershire sauce, chili powder, smoked paprika, garlic powder, onion powder, and a pinch of salt and pepper. Stir everything together until well combined. Scrape the bottom of the pan to release any browned bits — that’s flavor you don’t want to leave behind.
Sensory cue: The mixture should look like a thick, chunky soup. It will seem like too much liquid, but the rice will absorb it as it cooks.
Step 5: Simmer the Rice (15-18 minutes)
Bring the mixture to a boil, then immediately reduce the heat to low. Cover the skillet with a tight-fitting lid and let it simmer gently for 15 minutes. Do not lift the lid during this time — I know it’s tempting to peek, but you’re letting steam escape that the rice needs to cook properly. Set a timer and walk away.
Personal note: This is where I went wrong those first three times. I either had the heat too high (burning the bottom) or I lifted the lid too early (making the rice crunchy). Low and slow, lid on, timer set.
Step 6: Check the Rice (2 minutes)
After 15 minutes, remove the lid carefully (steam is hot!). Check the rice by tasting a few grains from the top. It should be tender but still have a slight bite to it — al dente, like pasta. If it’s still crunchy, add 2-3 tablespoons of water or broth, replace the lid, and cook for another 3-5 minutes. If it’s already tender, move on to the next step.
Step 7: Add the Cheese (2-3 minutes)
Remove the skillet from the heat. Sprinkle about 1 cup of the shredded cheddar and all of the Monterey Jack over the top of the rice mixture. Gently stir it in until the cheese is mostly melted and distributed throughout. Then sprinkle the remaining ½ cup of cheddar on top. Cover the skillet again and let it sit off the heat for 2-3 minutes — the residual heat will melt the top cheese into a beautiful, gooey layer.
Sensory cue: The cheese should be fully melted and stretchy when you lift the spoon. If it looks greasy or separated, the heat was too high.
Step 8: Garnish and Serve (1 minute)
Sprinkle chopped parsley or cilantro and sliced green onions over the top. Serve hot, straight from the skillet. The rice will continue to absorb liquid as it sits, so this dish is best enjoyed right away.
Cooking Tips & Techniques
After making this Easy One Pan Cheesy Ground Beef Rice more times than I’d like to admit (including those three burnt failures), I’ve picked up some tricks that make a real difference:
Use the right rice. Long-grain white rice is your best friend here. Jasmine rice gives a slightly floral aroma that works beautifully with the beef and tomatoes. Basmati works too, but it’s a bit more delicate. Never use instant rice — it turns to mush. Never use brown rice — it takes 40+ minutes to cook and will burn before it’s done.
Don’t rush the browning. Let the beef sit in the pan for a couple of minutes before you start breaking it up. That contact with the hot pan creates the Maillard reaction — those browned bits on the bottom are pure flavor. If you stir constantly, you’re steaming the meat instead of browning it.
Measure your liquid carefully. Rice to liquid ratio is critical in a one-pan dish because there’s no draining. For long-grain white rice, the ratio is roughly 1 cup of rice to 1.5 cups of liquid (plus the liquid from the tomatoes). Too much liquid and you get mushy rice. Too little and you get crunchy rice with a burnt bottom.
Resist the urge to peek. Every time you lift that lid, you release steam. Steam is what cooks the rice. If you peek three times during cooking, you’ve probably added an extra 5-7 minutes to the cooking time. Set a timer and trust the process.
Shred your own cheese. I know I keep saying this, but it really matters. Pre-shredded cheese is coated in cellulose (wood pulp) and potato starch to prevent clumping. Those same anti-caking agents prevent the cheese from melting smoothly. Your cheese sauce will be grainy instead of silky. Just shred it yourself — it takes two minutes.
Let it rest before serving. Those 2-3 minutes off the heat with the lid on aren’t just for melting the cheese. They also give the rice time to absorb any remaining liquid and settle into the perfect texture. If you serve it immediately, it might be a little soupy.
Variations & Adaptations
One of the things I love about this recipe is how flexible it is. Here are some variations I’ve tried and loved:
Spicy Southwest Version
Add 1 diced jalapeño (seeds removed if you want less heat) along with the onion. Swap the chili powder for ancho chili powder and add ½ teaspoon of cumin. Use pepper jack cheese instead of Monterey Jack. Top with fresh cilantro and a squeeze of lime juice before serving. This version is my personal favorite when I’m craving something with a kick.
Vegetarian Option
Swap the ground beef for 1 lb of plant-based ground meat substitute (I like Impossible or Beyond for this) or 2 cans of black beans (rinsed and drained). If using plant-based meat, cook it the same way you would beef. If using beans, add them with the liquid in Step 4. Use vegetable broth instead of beef broth. The texture will be slightly different, but the flavor is still fantastic.
Cheesy Ground Beef Rice Casserole
If you want a baked version, transfer the finished dish to a 9×13 baking dish, top with extra cheese and crushed tortilla chips, and bake at 375°F for 10-15 minutes until bubbly and golden on top. This is great for feeding a crowd or meal prepping for the week.
Low-Carb Adaptation
Swap the rice for cauliflower rice (about 3 cups). Sauté the cauliflower rice in the skillet after cooking the beef and aromatics, then add the tomatoes, broth, and seasonings. Cook for about 5-7 minutes until the cauliflower is tender but not mushy. Add the cheese as directed. This version is surprisingly satisfying and cuts the carbs significantly.
Add More Vegetables
I often add 1 cup of frozen corn and 1 cup of diced bell peppers when I’m trying to sneak more veggies into dinner. Add them along with the rice in Step 3 so they have time to cook through. You can also stir in a handful of fresh spinach at the very end — it wilts down into the cheesy rice beautifully.
Serving & Storage Suggestions
Serving: This dish is best served hot, straight from the skillet. I like to set the skillet right on a trivet in the middle of the table and let everyone serve themselves — it’s casual and keeps the cheese melty. Scoop it into bowls and let people add their own toppings: extra cheese, hot sauce, sour cream, or fresh avocado slices.
What to serve with it: A simple side salad with a bright vinaigrette is perfect for cutting through the richness. I also love serving this with easy one pan honey garlic chicken and vegetables on the side for a heartier meal. If you’re feeding a crowd, creamy loaded baked potato salad makes an excellent companion dish. For a lighter option, fresh watermelon feta mint salad adds a refreshing contrast to the warm, cheesy rice.
Storage: Leftovers keep well in an airtight container in the refrigerator for up to 4 days. The rice will continue to absorb moisture as it sits, so the texture will be slightly softer on day two — but honestly, I think it’s even better the next day when the flavors have had time to meld.
Reheating: The best way to reheat this is in a skillet over medium-low heat with a splash of water or broth. Cover and let it steam for about 5 minutes, stirring occasionally. You can also microwave it in 30-second bursts, stirring between each, until heated through. Add a sprinkle of fresh cheese on top before reheating to refresh the melty factor.
Freezing: This dish freezes surprisingly well. Let it cool completely, then transfer to a freezer-safe container. It will keep for up to 3 months. Thaw overnight in the refrigerator and reheat in a skillet as described above. The texture won’t be quite as perfect as fresh, but it’s still delicious — especially on a night when you don’t feel like cooking.
Nutritional Information & Benefits
Here’s the approximate nutritional breakdown for one serving (based on 6 servings):
- Calories: 485
- Protein: 28g
- Fat: 22g
- Carbohydrates: 42g
- Fiber: 3g
- Sugar: 5g
- Sodium: 680mg
- Calcium: 320mg
- Iron: 4mg
Health benefits: This dish provides a solid amount of protein from the beef and cheese, which helps keep you full and satisfied. The tomatoes are rich in lycopene, an antioxidant linked to heart health. Rice provides easily digestible carbohydrates for quick energy. And the onions and garlic offer anti-inflammatory compounds that support immune health.
Dietary considerations: This recipe is naturally gluten-free (just double-check your Worcestershire sauce and broth labels). It’s not low-carb due to the rice, but the cauliflower rice variation works well for lower-carb diets. For a dairy-free version, use plant-based cheese alternatives — just know that the texture won’t be quite as creamy.
Potential allergens: This recipe contains dairy (cheese). It’s free of nuts, eggs, soy, and shellfish. If you have celiac disease, ensure your Worcestershire sauce and broth are certified gluten-free, as some brands contain wheat derivatives.
Conclusion
This Easy One Pan Cheesy Ground Beef Rice has become my go-to answer for every “what’s for dinner?” crisis in my house. It’s the recipe I make when I’m tired, when I’m busy, when I’ve forgotten to thaw anything, and when I just need something comforting and reliable. It’s not fancy — and that’s exactly the point.
What I love most about this dish is how forgiving it is once you know the basic technique. You can swap in different vegetables, change up the cheese, add heat or take it away, and it still works. It’s a template for good dinners, not just a single recipe.
I’d love to hear how this turns out for you. Did you add your own twist? Did your kids ask for seconds? Did you burn it like I did the first three times? (No judgment if you did — we’ve all been there.) Drop a comment below and let me know. And if you share it on social media, tag me — I want to see your cheesy, beefy, one-pan masterpieces.
Here’s to easy dinners that actually taste good. You’ve got this.
Frequently Asked Questions
Can I use ground turkey or chicken instead of beef?
Absolutely. Ground turkey or chicken works great in this recipe. Just keep in mind that leaner meats may need a tablespoon of oil added to the pan when browning to prevent sticking. The flavor will be milder, so you might want to add an extra pinch of smoked paprika or a splash more Worcestershire sauce to compensate.
Why is my rice still crunchy after 15 minutes?
A few things could be going on. Your heat might be too low — the liquid needs to maintain a gentle simmer, not just sit there warm. Or your lid might not be tight enough, letting steam escape. Or you might have peeked too many times (we all do it, but try to resist). If your rice is still crunchy, add 2-3 tablespoons of water, replace the lid, and cook for another 5 minutes. Check again and repeat if needed.
Can I make this in a slow cooker or Instant Pot?
I’ve tested this in both. For the Instant Pot, use the sauté function to brown the beef and aromatics, then add the rice, liquids, and seasonings. Pressure cook on high for 5 minutes with a natural release. Stir in the cheese after releasing the pressure. For a slow cooker, brown everything first in a skillet, then transfer to the slow cooker. Cook on low for 2-3 hours — but honestly, the texture isn’t as good as the stovetop version. The rice tends to get mushy.
How do I prevent the cheese from getting clumpy or greasy?
Two things: shred your own cheese (pre-shredded has anti-caking agents that cause clumping) and add the cheese off the heat. If you add cheese while the pan is still on a hot burner, the fat can separate from the solids, leaving you with greasy, grainy cheese. Take the pan off the heat, stir the cheese in gently, and let residual heat do the work.
Can I double this recipe?
You can, but you’ll need a larger pan — at least a 14-inch skillet or a Dutch oven. The biggest challenge with doubling is that the rice needs more surface area to cook evenly. If your pan is too crowded, the rice will steam instead of simmer, and you’ll end up with unevenly cooked grains. If you’re feeding a crowd, I recommend making two batches in separate skillets rather than trying to cram everything into one pan.
Pin This Recipe!

Easy One Pan Cheesy Ground Beef Rice (Best 30-Minute Dinner)

This Easy One Pan Cheesy Ground Beef Rice is a quick, comforting weeknight dinner that comes together in one skillet in about 30 minutes. Tender rice, savory ground beef, and a silky cheese topping make it a family favorite.
- Prep Time: 10 minutes
- Cook Time: 20 minutes
- Total Time: 30 minutes
- Yield: 6 servings 1x
- Category: Main Course
- Cuisine: American
Ingredients
- 1 lb (450g) ground beef (80/20 ground chuck recommended)
- 1 medium yellow onion, diced
- 3–4 cloves garlic, minced
- 1 cup (200g) long-grain white rice (jasmine or basmati)
- 1.5 cups (360ml) low-sodium beef broth
- 1 can (14.5 oz / 400g) fire-roasted diced tomatoes (with juices)
- 2 tablespoons tomato paste
- 1 tablespoon Worcestershire sauce
- 1 teaspoon chili powder
- 1 teaspoon smoked paprika
- ½ teaspoon garlic powder
- ½ teaspoon onion powder
- Salt and black pepper to taste (start with ½ tsp salt, ¼ tsp pepper)
- 1.5 cups (170g) sharp cheddar cheese, shredded
- ½ cup (55g) Monterey Jack cheese, shredded
- Fresh parsley or cilantro, chopped (for garnish, optional)
- Green onions, sliced (for garnish, optional)
Instructions
- Brown the beef: Place a large skillet (12-inch with lid) over medium-high heat. Add ground beef and break into small crumbles. Cook undisturbed for 2 minutes, then stir and continue cooking until fully browned, about 5-7 minutes. Spoon off excess fat if more than 2 tablespoons remain.
- Sauté aromatics: Reduce heat to medium. Add diced onion and cook for 2 minutes until translucent. Add minced garlic and cook for 30 seconds until fragrant.
- Toast the rice: Add uncooked rice to the skillet and stir constantly for 2 minutes until edges look translucent and rice clicks against the pan.
- Add liquids and seasonings: Stir in tomato paste and cook for 30 seconds. Pour in beef broth, diced tomatoes (with juices), Worcestershire sauce, chili powder, smoked paprika, garlic powder, onion powder, salt, and pepper. Stir well, scraping up any browned bits from the bottom.
- Simmer the rice: Bring mixture to a boil, then reduce heat to low. Cover with a tight-fitting lid and simmer for 15 minutes. Do not lift the lid during this time.
- Check the rice: Remove lid carefully. Taste a few grains from the top; they should be tender but still have a slight bite. If still crunchy, add 2-3 tablespoons water or broth, cover, and cook 3-5 more minutes.
- Add the cheese: Remove skillet from heat. Sprinkle 1 cup of shredded cheddar and all of the Monterey Jack over the rice mixture. Gently stir until mostly melted. Sprinkle remaining ½ cup cheddar on top. Cover and let sit off heat for 2-3 minutes until cheese is fully melted and gooey.
- Garnish and serve: Sprinkle with chopped parsley or cilantro and sliced green onions. Serve hot straight from the skillet.
Notes
Toast the rice in beef fat before adding liquid for nutty flavor and fluffy texture. Add cheese in two stages: some stirred in for creaminess, some on top for gooey finish. Shred your own cheese for best melting. Do not lift the lid during simmering. Let rest off heat for 2-3 minutes before serving.
Nutrition
- Serving Size: 1 serving (based on
- Calories: 485
- Sugar: 5
- Sodium: 680
- Fat: 22
- Saturated Fat: 10
- Carbohydrates: 42
- Fiber: 3
- Protein: 28
Keywords: cheesy ground beef rice, one pan dinner, 30 minute meal, easy weeknight dinner, ground beef recipe, cheesy rice, one skillet meal


