My niece stared at the baking sheet, her face lit by the oven light. “They look like actual ghosts,” she whispered. I’d been testing meringue recipes for weeks, trying to get the perfect puffy shape that held its form without cracking. That night, with a piping bag in one hand and a bag of mini chocolate chips in the other, I finally cracked it. The cookies came out pale, delicate, and just slightly imperfect — exactly like little spirits floating on the tray.
Honestly, I wasn’t trying to make something spooky at first. I just wanted a light, airy cookie that wouldn’t weigh down the dessert table at our family Halloween party. But the moment I added those tiny chocolate chip eyes, something clicked. They looked so silly and sweet — not scary at all. My sister-in-law grabbed one before they even cooled and said, “These are going to be the only ghosts I’m happy to see in my kitchen.”
These Spooky Ghost Meringue Cookies with Chocolate Chip Eyes have become our go-to Halloween treat. They’re naturally gluten-free, surprisingly simple to make, and they disappear faster than any candy I’ve ever put out. There’s something about that crisp exterior giving way to a soft, marshmallowy center that keeps people coming back for more. And the best part? You don’t need any fancy decorating skills to make them look adorable — the imperfections are what give each ghost its personality.
I’ve made these for three Halloweens now, and every time someone asks for the recipe before the plate is empty. That’s how I know I stumbled onto something worth sharing.
Why You’ll Love This Recipe
Let me tell you why these ghost cookies have earned a permanent spot in my Halloween rotation. First off, they’re ridiculously easy. If you can whip egg whites and fold in sugar, you can make these. No complicated piping techniques, no food coloring disasters, no melting chocolate that seizes up at the worst moment.
- Quick & Easy: From start to finish, you’re looking at about 2 hours total — but most of that is hands-off baking time. The actual prep takes maybe 15 minutes.
- Simple Ingredients: You probably already have everything in your pantry right now. Egg whites, sugar, vanilla, cream of tartar, and chocolate chips. That’s it.
- Perfect for Halloween Parties: These are the kind of treats that make people stop and take photos before they eat them. They’re conversation starters and crowd-pleasers all in one.
- Naturally Gluten-Free: No special flour blends or substitutions needed. These are safe for most dietary restrictions without sacrificing flavor.
- Unbelievably Delicious: That crackly exterior that shatters when you bite into it, followed by the soft, chewy center studded with melty chocolate — it’s pure magic.
What makes these different from other meringue cookies I’ve tried is the technique. I spent weeks testing ratios and temperatures to get that perfect ghost shape without the meringue deflating or turning brown in the oven. The secret is in the low, slow bake and the way you pipe the meringue to create those wispy edges. Trust me, I’ve had my fair share of flat, sad meringue blobs before I figured this out.
These cookies aren’t just good — they’re the kind that make you close your eyes after the first bite. They’re light enough that you can eat three without feeling guilty, which is exactly what happens at every party I bring them to.
What Ingredients You Will Need
This recipe uses simple, everyday ingredients that come together to create something truly special. Here’s what you’ll need to gather before you start:
For the Meringue Ghosts
- 4 large egg whites, room temperature (cold eggs won’t whip properly — trust me on this one)
- 1 cup (200g) granulated sugar (I prefer regular white sugar for the cleanest flavor)
- 1/2 teaspoon cream of tartar (this stabilizes the meringue and helps it hold its shape)
- 1 teaspoon vanilla extract (pure vanilla, not imitation — it makes a difference in the final flavor)
- Pinch of salt (just a tiny bit to balance the sweetness)
For the Ghost Faces
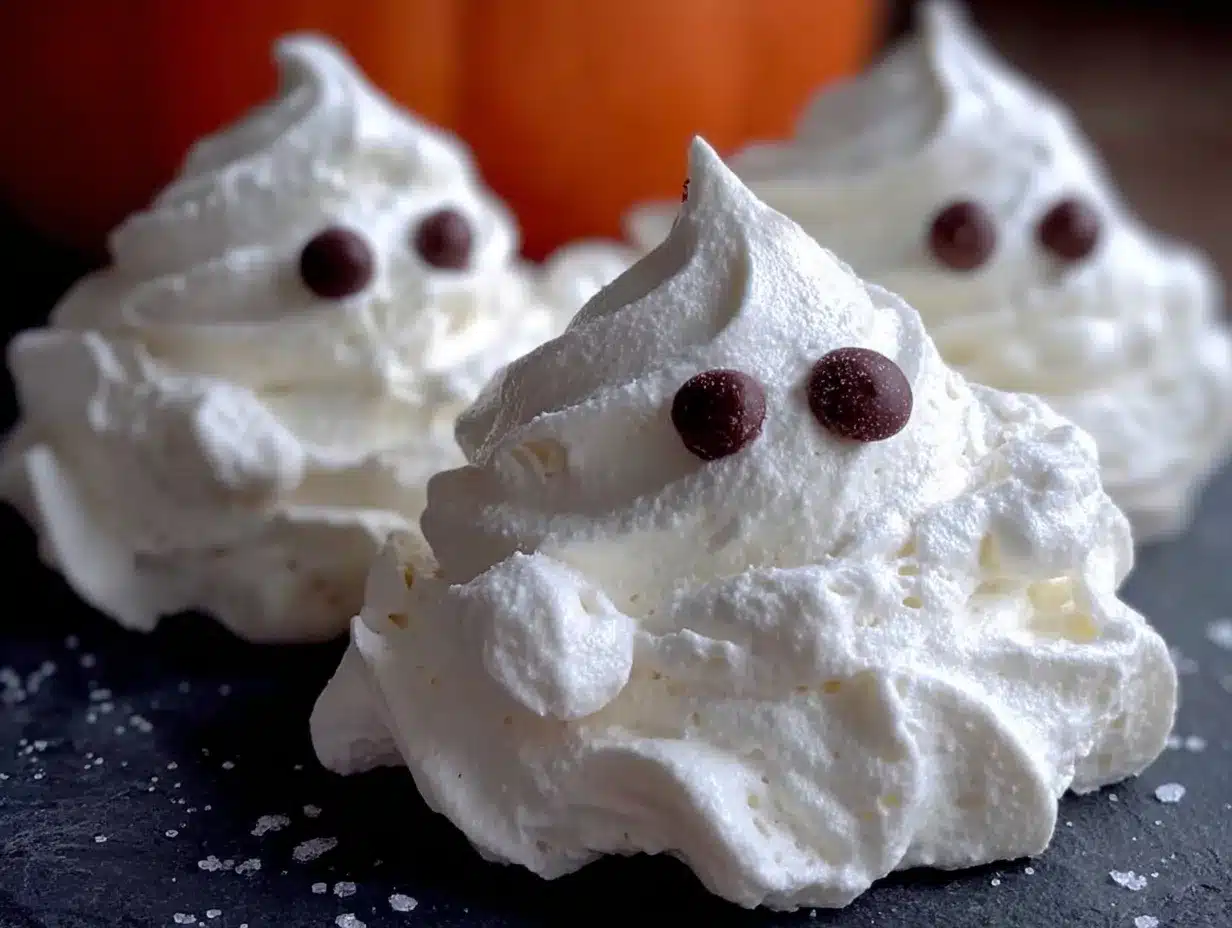
- 1/4 cup mini chocolate chips (regular size works too, but mini chips look cuter and stay put better)
The beauty of this recipe is how few ingredients you need. But don’t let the simplicity fool you — each one plays a crucial role. The egg whites create that light, airy structure when whipped properly. The sugar doesn’t just sweeten; it stabilizes the meringue and gives it that signature crisp exterior. Cream of tartar is your secret weapon against deflated meringue — it’s acidic, which helps the egg whites hold onto air bubbles longer.
I’ve tested this with different sugars, and I have to say, granulated white sugar works best. Superfine sugar dissolves more quickly, which is great, but regular granulated works perfectly fine if you give it enough time to dissolve. Avoid powdered sugar here — it contains cornstarch that can make the meringue gummy.
For the chocolate chips, I recommend Ghirardelli or Enjoy Life brand for the best flavor and melt quality. Mini chips are ideal because they’re small enough to look like cute little eyes without weighing down the delicate meringue. If you only have regular chips, just press them in gently and they’ll work fine.
Equipment Needed
You don’t need a professional bakery setup for these ghost cookies, but a few key tools will make your life much easier:
- Stand mixer or hand mixer: Whipping egg whites by hand is possible, but your arm will hate you. A stand mixer with the whisk attachment is ideal, but a hand mixer works perfectly too.
- Large mixing bowl: Make sure it’s completely clean and dry — any grease residue will prevent your egg whites from whipping properly.
- Piping bag with round tip: A large piping bag fitted with a 1/2-inch round tip gives you the best control for shaping ghosts. No piping bag? A zip-top bag with the corner snipped off works in a pinch.
- Baking sheets: Two large baking sheets lined with parchment paper. The parchment is non-negotiable — meringue sticks to everything else.
- Kitchen scale: Not required, but highly recommended for accuracy. Meringue is finicky, and precise measurements help.
- Cooling rack: For letting the ghosts cool completely after baking.
I’ve made these with just a hand mixer and a plastic bag before, and they turned out great. Don’t let a lack of fancy equipment stop you. The most important thing is having a clean bowl and fresh egg whites.
Preparation Method
Alright, let’s get to the fun part. Here’s how to make these adorable ghost cookies step by step:
- Preheat your oven to 200°F (95°C). Yes, that’s low. Meringue bakes low and slow to dry out without browning. Line two baking sheets with parchment paper.
- Separate your eggs while they’re cold — it’s much easier to separate yolks from whites when they’re straight from the fridge. Then let the whites come to room temperature in your mixing bowl, about 20 minutes. Room temperature whites whip up higher and fluffier.
- Add the cream of tartar and salt to the egg whites. Start whipping on medium speed until the mixture becomes frothy and starts to form soft peaks — this takes about 2-3 minutes with a stand mixer.
- Gradually add the sugar, about 1 tablespoon at a time, while the mixer runs on medium-high speed. This slow addition is crucial — dumping all the sugar in at once can deflate the meringue. Keep whipping until all the sugar is added and the mixture looks thick and glossy.
- Test for doneness: Rub a tiny bit of the meringue between your fingers. If it feels gritty, keep whipping. The meringue is ready when it’s smooth and forms stiff peaks that stand up straight when you lift the whisk. This usually takes 7-10 minutes total.
- Add the vanilla extract and whip for another 30 seconds until combined. The meringue should be so thick that it doesn’t slide around in the bowl when you tilt it.
- Transfer the meringue to your piping bag fitted with the round tip. If you’re using a zip-top bag, snip about 1/2 inch off one corner.
- Pipe the ghosts: Hold the piping bag straight up and down, about 1 inch above the parchment. Squeeze gently to create a round base about 2 inches wide, then slowly lift the bag while continuing to squeeze to create a tall, tapered body. Release pressure and pull straight up to create a little peak on top. The ghosts should be about 2-3 inches tall.
- Add the eyes: While the meringue is still wet, gently press two mini chocolate chips into each ghost for eyes. Don’t push too deep — you want them to stay visible. Space them about 1/2 inch apart near the top of each ghost.
- Bake for 60-75 minutes at 200°F (95°C). The ghosts are done when they’re dry to the touch and easily lift off the parchment. They should be pale white or very lightly ivory — any browning means your oven was too hot.
- Turn off the oven and leave the ghosts inside with the door slightly ajar for another 30 minutes. This helps them dry out completely and ensures that perfect crisp texture.
- Cool completely on the baking sheets on a wire rack before handling. They’ll be fragile when warm, so patience is key here.
One thing I learned the hard way: don’t try to pipe perfect, uniform ghosts. The charm of these cookies is in their quirky, uneven shapes. Some will be tall and skinny, others short and round. That’s what makes them look like a real ghostly gathering!
Cooking Tips & Techniques
After making these ghost cookies more times than I can count, I’ve picked up a few tricks that make a real difference:
The clean bowl rule is real. I once made meringue in a bowl that looked clean but had a tiny smear of butter residue. The egg whites never whipped past the frothy stage. Wash your bowl and whisk with hot, soapy water, then wipe them down with a little white vinegar to remove any trace of grease.
Weather matters. Meringue is notoriously finicky on humid days. If it’s raining or muggy outside, your meringue might not whip up as well, and the finished cookies can turn sticky. Save this recipe for a dry day if possible. If you must make them in humidity, add an extra 1/4 teaspoon of cream of tartar for stability.
Don’t overbake. I ruined my first batch by leaving them in too long at a slightly higher temperature. They turned golden brown and looked more like toasted marshmallows than ghosts. The low temperature is non-negotiable — 200°F max. If your oven runs hot, consider dropping it to 190°F.
The chocolate chip trick. If you find the chips falling off after baking, try this: dip the tip of each chip in a tiny bit of melted chocolate before pressing it into the meringue. It acts like glue. I only do this when I’m making them for a party where presentation matters; for everyday baking, pressing them in gently works fine.
Make ahead tip: These cookies actually get better after a day or two. Store them in an airtight container at room temperature, and they’ll stay crisp for up to a week. Just don’t refrigerate them — the moisture will make them sticky.
Variations & Adaptations
One of the best things about this recipe is how easy it is to customize. Here are some variations I’ve tried and loved:
Spooky Flavor Twist: Add 1/2 teaspoon of peppermint extract along with the vanilla for a minty ghost that tastes like a thin mint cookie. My nephew declared these “the best cookies ever” at last year’s Halloween party.
Colorful Ghosts: If you want to add a subtle color, use a toothpick to swipe a tiny bit of gel food coloring along the inside of your piping bag before filling it. This creates a stripe of color on each ghost without fully coloring the meringue. Purple, green, or orange work great for Halloween.
Different Eye Options: Not a fan of chocolate chips? Use mini M&Ms, candy eyeballs, or even small sprinkles. For a black-and-white look, press in black sesame seeds instead. My kids love making “rainbow ghosts” with assorted colored candies for eyes.
Dairy-Free & Vegan Version: Traditional meringue relies on egg whites, but you can make a vegan version using aquafaba — the liquid from a can of chickpeas. Use 1/2 cup of aquafaba (about the liquid from one can) in place of the egg whites. The texture is slightly different, but it works surprisingly well.
Mini Ghost Bites: Pipe smaller ghosts about 1 inch tall and reduce baking time to 45-55 minutes. These are perfect for snacking or adding to Halloween treat bags.
I once made a batch with lavender extract instead of vanilla, and they were surprisingly elegant — like something you’d serve at a fancy Halloween tea party. Don’t be afraid to experiment!
Serving & Storage Suggestions
These ghost cookies are best served at room temperature, right off the baking sheet or arranged on a platter. They make a wonderful addition to any Halloween dessert table alongside other treats like creamy classic deviled eggs with crispy bacon crumbles for a sweet-and-savory spread.
For presentation, I like to arrange them on a dark plate or black serving tray to make the white ghosts pop. Add a few fake spiderwebs or plastic spiders around the plate for extra spooky vibes. If you’re serving them at a party, consider placing them in a clear glass jar tied with orange or black ribbon — they make adorable take-home favors.
Storage: Store your ghost cookies in an airtight container at room temperature. They’ll stay crisp for up to 7 days. Do not refrigerate them — the moisture in the fridge will make them soft and sticky. If you live in a humid climate, add a food-safe silica gel packet to the container to absorb excess moisture.
Freezing: These freeze beautifully! Place the cooled ghosts in a single layer in a freezer-safe container with parchment between layers. They’ll keep for up to 3 months. Thaw at room temperature for about 30 minutes before serving. Don’t microwave them — the chocolate chips will melt and the meringue will get chewy.
Re-crisping: If your ghosts lose their crunch (it happens in humid weather), pop them in a 200°F oven for 10-15 minutes. Let them cool completely, and they’ll be crisp again. I’ve done this rescue mission more times than I’d like to admit!
These cookies also pair beautifully with a hot cup of coffee or a glass of cold milk. For an adult Halloween gathering, try serving them alongside a refreshing boozy bomb pop popsicle for a fun dessert duo.
Nutritional Information & Benefits
Per serving (2 ghost cookies):
- Calories: 85
- Total Fat: 1.5g
- Saturated Fat: 0.8g
- Cholesterol: 0mg
- Sodium: 25mg
- Total Carbohydrates: 17g
- Dietary Fiber: 0g
- Sugars: 16g
- Protein: 2g
These ghost cookies are naturally gluten-free, making them a safe option for guests with celiac disease or gluten sensitivity. They’re also low in fat compared to traditional cookies, since meringue contains no butter or oil.
The egg whites provide a good source of protein — about 2 grams per serving — which helps balance out the sugar content. Egg whites are also rich in riboflavin and selenium, important nutrients for energy metabolism and immune function.
If you’re watching your sugar intake, you can reduce the sugar to 3/4 cup, though the texture will be slightly less crisp. The cookies will still be sweet enough, I promise.
One thing I appreciate about these cookies is that they’re portion-controlled. Because they’re so light and airy, you naturally eat fewer than you would with a dense, buttery cookie. Well, that’s the theory anyway. I’ve definitely eaten six in one sitting before.
Conclusion
These Spooky Ghost Meringue Cookies with Chocolate Chip Eyes have become a Halloween tradition in my house, and I have a feeling they’ll become one in yours too. They’re proof that you don’t need complicated techniques or fancy ingredients to create something truly memorable.
What I love most about this recipe is how it brings people together. There’s something about shaping these little ghosts that makes everyone smile — from the kids who help press in the chocolate chip eyes to the adults who can’t resist grabbing one off the tray. They’re simple enough for a beginner baker but impressive enough to steal the show at any Halloween gathering.
I’d love to hear how your ghosts turn out! Did you try any fun variations? Did your kids come up with their own ghost designs? Drop a comment below and share your spooky creations. And if you’re looking for more Halloween party ideas, don’t miss my festive firework-themed Rice Krispie treats on sticks — they’re another crowd-pleaser that’s perfect for celebrations.
Happy haunting, and happy baking!
Frequently Asked Questions
Can I make these ghost cookies without a piping bag?
Absolutely! If you don’t have a piping bag, simply transfer the meringue to a sturdy zip-top plastic bag, snip off about 1/2 inch from one corner, and pipe away. The shapes won’t be as precise, but they’ll still look adorable. You can also use a spoon to drop dollops of meringue onto the parchment and gently shape them into ghost forms with the back of the spoon.
Why did my meringue turn out flat and runny?
This usually happens for one of three reasons: your bowl wasn’t completely clean and grease-free, there was a tiny bit of egg yolk mixed in with the whites, or you didn’t whip the meringue long enough. Make sure your bowl and whisk are spotless, separate your eggs carefully, and whip until the meringue forms stiff peaks that hold their shape when you lift the whisk.
Can I use liquid egg whites from a carton?
I don’t recommend it. Liquid egg whites from cartons are pasteurized, which changes the protein structure and makes them much harder to whip into stable meringue. Fresh egg whites from whole eggs give you the best volume and stability. Save the carton egg whites for scrambled eggs or omelets.
How do I know when the ghost cookies are done baking?
The ghosts are done when they’re dry to the touch and easily lift off the parchment paper without sticking. They should be pale white or very light ivory in color. If they’ve turned golden or brown, your oven was too hot. The cookies should feel light and hollow when you pick them up.
Can I double this recipe?
Yes, you can easily double or even triple this recipe. Just make sure you have enough oven space to bake all the cookies at once, or work in batches. Meringue can deflate if it sits too long in the piping bag, so work quickly once your meringue is ready. If doubling, use two piping bags or have a helper to speed things along.
Pin This Recipe!
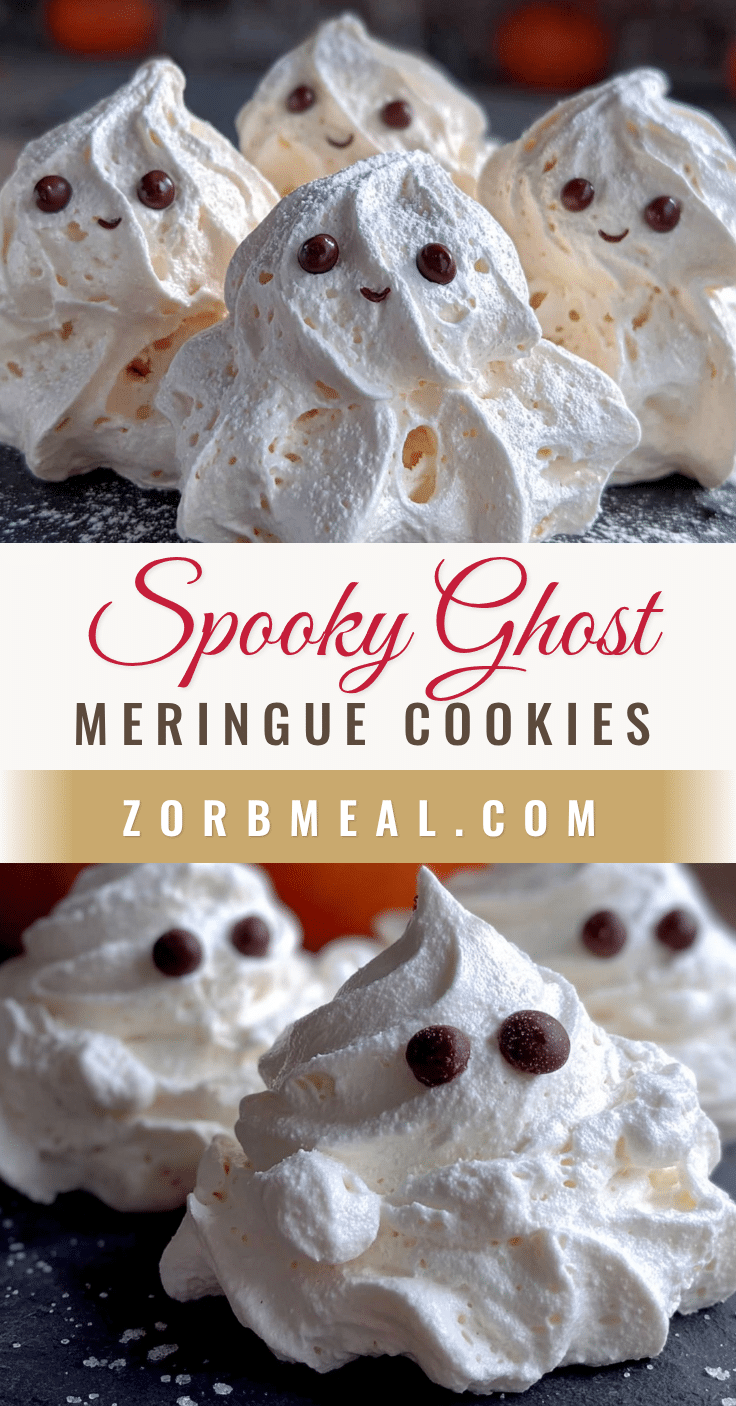
Spooky Ghost Meringue Cookies with Chocolate Chip Eyes
These adorable ghost meringue cookies are light, airy, and naturally gluten-free. With a crisp exterior and marshmallowy center, they’re the perfect Halloween treat that’s surprisingly simple to make.
- Prep Time: 15 minutes
- Cook Time: 60-75 minutes
- Total Time: 2 hours
- Yield: 24 cookies (12 servings of 2 cookies each) 1x
- Category: Dessert
- Cuisine: American
Ingredients
- 4 large egg whites, room temperature
- 1 cup (200g) granulated sugar
- 1/2 teaspoon cream of tartar
- 1 teaspoon vanilla extract
- Pinch of salt
- 1/4 cup mini chocolate chips
Instructions
- Preheat your oven to 200°F (95°C). Line two baking sheets with parchment paper.
- Separate your eggs while they’re cold, then let the whites come to room temperature in your mixing bowl, about 20 minutes.
- Add the cream of tartar and salt to the egg whites. Start whipping on medium speed until the mixture becomes frothy and starts to form soft peaks, about 2-3 minutes with a stand mixer.
- Gradually add the sugar, about 1 tablespoon at a time, while the mixer runs on medium-high speed. Keep whipping until all the sugar is added and the mixture looks thick and glossy.
- Test for doneness: Rub a tiny bit of the meringue between your fingers. If it feels gritty, keep whipping. The meringue is ready when it’s smooth and forms stiff peaks that stand up straight when you lift the whisk, usually 7-10 minutes total.
- Add the vanilla extract and whip for another 30 seconds until combined. The meringue should be so thick that it doesn’t slide around in the bowl when you tilt it.
- Transfer the meringue to your piping bag fitted with the round tip. If using a zip-top bag, snip about 1/2 inch off one corner.
- Pipe the ghosts: Hold the piping bag straight up and down, about 1 inch above the parchment. Squeeze gently to create a round base about 2 inches wide, then slowly lift the bag while continuing to squeeze to create a tall, tapered body. Release pressure and pull straight up to create a little peak on top. The ghosts should be about 2-3 inches tall.
- Add the eyes: While the meringue is still wet, gently press two mini chocolate chips into each ghost for eyes. Don’t push too deep — space them about 1/2 inch apart near the top of each ghost.
- Bake for 60-75 minutes at 200°F (95°C). The ghosts are done when they’re dry to the touch and easily lift off the parchment. They should be pale white or very lightly ivory.
- Turn off the oven and leave the ghosts inside with the door slightly ajar for another 30 minutes to dry out completely.
- Cool completely on the baking sheets on a wire rack before handling.
Notes
Use room temperature egg whites for best volume. Ensure bowl and whisk are completely clean and grease-free. Avoid making on humid days. For vegan version, use 1/2 cup aquafaba instead of egg whites. Store in airtight container at room temperature for up to 7 days. Freeze for up to 3 months.
Nutrition
- Serving Size: 2 cookies
- Calories: 85
- Sugar: 16
- Sodium: 25
- Fat: 1.5
- Saturated Fat: 0.8
- Carbohydrates: 17
- Protein: 2
Keywords: Halloween cookies, ghost meringue, meringue cookies, gluten-free cookies, Halloween dessert, spooky treats, chocolate chip meringue


