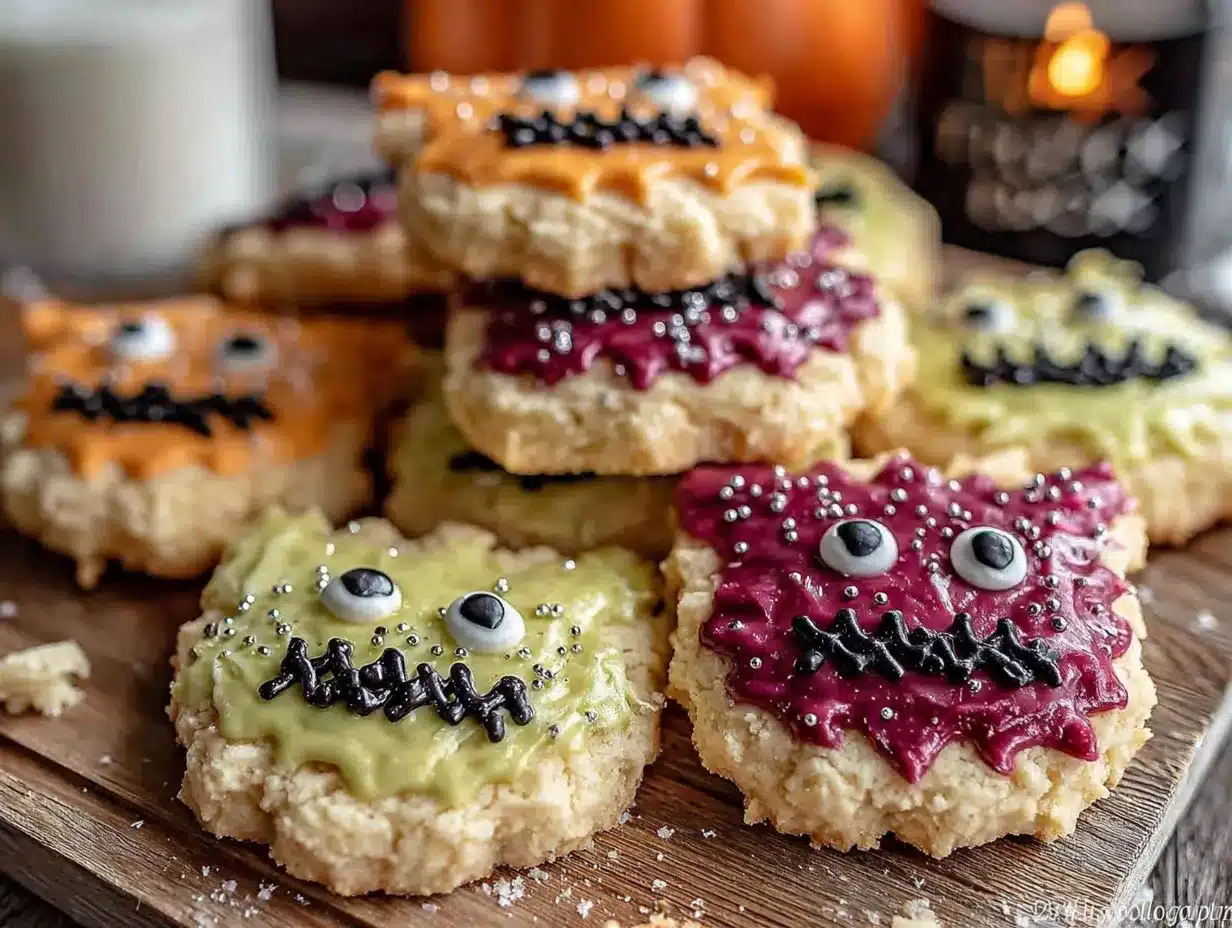
My six-year-old nephew, Leo, looked up from the kitchen table with frosting smeared across his cheek and said, “Auntie, these monsters look like they’re having a party in my mouth.” I had to stop what I was doing—just for a second—because that’s exactly the kind of reaction you hope for when you’re elbow-deep in powdered sugar and food coloring. He’d been asking to make “scary but not too scary” cookies for three days straight, and honestly, I wasn’t sure these would land. But there he was, grinning with a lopsided purple creature in his hand, and I knew we’d stumbled onto something good. These spooky Halloween monster sugar cookies with royal icing aren’t just about the creepy factor—they’re about the moment someone takes a bite and forgets everything else for a minute. The kind of cookie that makes you feel like a kid again, even if you’re the one doing all the baking.
I’ve made a lot of sugar cookies in my time, from buttery rounds to intricately decorated snowflakes, but these monsters are different. They’re not fussy. They’re not trying to be perfect. They’re meant to be a little wild, a little messy, and a whole lot of fun. The royal icing sets up just right—crisp on the outside, soft underneath—and the cookie itself is sturdy enough to hold all that color without crumbling. If you’ve ever wanted to make Halloween cookies that actually look like something from a monster movie (but still taste like pure comfort), this is the recipe. Let me show you how it’s done.
Why You’ll Love This Recipe
I’ve tested this recipe through four batches, two frosting disasters, and one memorable incident involving neon green gel that stained my counter for a week. Here’s what I learned: these cookies are forgiving. They’re meant for real people with real kitchens, not professional bakeries.
- Quick & Easy: The dough comes together in about 15 minutes, and the chilling time is just 30 minutes. You can have decorated cookies in under two hours.
- Simple Ingredients: You probably already have butter, sugar, flour, and eggs in your pantry. No fancy extracts or hard-to-find stabilizers.
- Perfect for Halloween Parties: Whether you’re hosting a costume party or sending treats to school, these monsters stand out on any dessert table.
- Crowd-Pleaser: Kids love decorating them, and adults love eating them. I’ve seen grown-ups fight over the last frosted eyeball.
- Unbelievably Delicious: The cookie itself is soft-centered with slightly crisp edges—exactly what a sugar cookie should be. The royal icing adds sweetness without being cloying.
What makes this recipe different from every other sugar cookie out there? It’s the technique. I blend the butter and sugar a little longer than usual, which gives the cookies a tender crumb that holds up to heavy decorating. And the royal icing—I use a secret ratio of meringue powder to water that creates the perfect consistency for flooding without running off the edges. This isn’t just another version of a Halloween cookie. It’s the version I’ve perfected through trial and error, so you don’t have to make the same mistakes I did.
These cookies make you close your eyes after the first bite. I’m not kidding. There’s something about that combination of buttery vanilla cookie and sweet, set icing that hits a nostalgic spot you didn’t know was there. It’s comfort food that looks like it belongs in a haunted house.
What Ingredients You Will Need
This recipe uses simple, wholesome ingredients to deliver bold flavor and satisfying texture without the fuss. Most of these are pantry staples, so you might already have everything you need.
For the Sugar Cookies
- 1 cup (226 g) unsalted butter, softened – I prefer Land O’Lakes for consistent results. Make sure it’s at room temperature, not melted.
- 1 cup (200 g) granulated sugar – Regular white sugar works best. Don’t substitute brown sugar; it changes the texture too much.
- 1 large egg, room temperature – Cold eggs can cause the batter to separate. Let it sit out for 30 minutes.
- 1 teaspoon vanilla extract – Pure vanilla extract, not imitation. It makes a real difference in flavor.
- ½ teaspoon almond extract – This is optional, but it adds a subtle nutty note that makes these cookies taste bakery-quality.
- 2 ½ cups (312 g) all-purpose flour – Spoon and level your flour. Scooping directly from the bag packs it down and makes cookies dry.
- ½ teaspoon baking powder – Helps the cookies spread just enough without puffing up.
- ¼ teaspoon salt – Fine sea salt or table salt. It balances the sweetness.
For the Royal Icing
- 4 cups (480 g) powdered sugar – Sift it if it’s lumpy. Trust me on this one.
- 3 tablespoons meringue powder – I use Wilton brand. It stabilizes the icing and gives it that smooth, professional finish.
- 6-8 tablespoons warm water – Start with 6 and add more as needed. The consistency should be like thick glue.
- Gel food coloring – Neon colors work best for monsters. I recommend Americolor or Wilton gel colors. Avoid liquid food coloring; it thins the icing too much.
For Decoration
- Edible googly eyes – You can find these at craft stores or online. They come in different sizes.
- Black decorating gel – For drawing mouths, scars, and stitches.
- Sprinkles – Halloween-themed sprinkles add texture and fun. I like the ones shaped like bones and pumpkins.
- Piping bags and tips – Small round tips (size 2 or 3) work best for outlining and flooding. If you don’t have piping bags, use zip-top bags with a tiny corner snipped off.
For the cookies, I recommend using a high-quality butter like Kerrygold if you can find it. It has a higher fat content, which makes the cookies richer. For the meringue powder, I’ve tried generic brands, and they just don’t whip up the same way. Stick with a trusted brand for best results.
If you’re making these for someone with an egg allergy, you can substitute the egg in the cookie dough with a flax egg (1 tablespoon ground flaxseed mixed with 3 tablespoons water, left to sit for 5 minutes). The texture will be slightly denser but still delicious. For the royal icing, meringue powder is already egg-free, so you’re good there.
Equipment Needed
You don’t need a professional bakery setup to make these cookies, but a few key tools will make your life a lot easier.
- Stand mixer or hand mixer – A stand mixer with a paddle attachment is ideal, but a hand mixer works perfectly. I’ve made these cookies with both.
- Rolling pin – A standard rolling pin is fine. If you have adjustable rolling rings, they help you get even thickness every time.
- Cookie cutters – Monster-shaped cutters are fun, but round or gingerbread-man shapes work too. You can always decorate them to look like monsters.
- Parchment paper or silicone baking mats – Silpat mats are my favorite. They prevent sticking and help cookies bake evenly.
- Cooling racks – Essential for letting cookies cool completely before icing. If you ice warm cookies, the icing will melt and slide right off.
- Piping bags and tips – I recommend getting a set of small round tips. Size 2 for outlining and size 3 for flooding.
- Toothpicks or scribe tools – For popping air bubbles in the icing and spreading it into corners.
- Small bowls or cups – For mixing different colors of icing. I use ramekins.
If you don’t have monster cookie cutters, don’t worry. I’ve made these with a simple round biscuit cutter and just decorated them to look like cyclops monsters. Get creative. The imperfections are what make them charming.
Preparation Method
- Make the cookie dough. In a stand mixer fitted with the paddle attachment, cream the softened butter and granulated sugar together on medium speed for 3-4 minutes until light and fluffy. Scrape down the sides of the bowl. Add the egg, vanilla extract, and almond extract, and beat on low until combined. The mixture might look slightly curdled at this point—that’s normal.
- Mix the dry ingredients. In a separate bowl, whisk together the flour, baking powder, and salt. Gradually add the dry mixture to the wet mixture, mixing on low speed. Stop as soon as the dough comes together. Don’t overmix, or the cookies will be tough.
- Chill the dough. Divide the dough into two discs, wrap each in plastic wrap, and refrigerate for at least 30 minutes. Chilling prevents the cookies from spreading too much during baking. If you’re in a hurry, you can pop them in the freezer for 15 minutes.
- Preheat and prepare. Preheat your oven to 350°F (175°C). Line two baking sheets with parchment paper or silicone mats.
- Roll and cut. On a lightly floured surface, roll out one disc of dough to about ¼-inch thickness. Cut out your monster shapes and place them 2 inches apart on the prepared baking sheets. Gather the scraps, re-roll, and cut again. You should get about 24 cookies, depending on the size of your cutters.
- Bake. Bake for 8-10 minutes, rotating the pans halfway through. The edges should be lightly golden, but the centers should still look pale. Let the cookies cool on the baking sheet for 5 minutes, then transfer them to a wire rack to cool completely. This is crucial—if you try to ice them while they’re warm, the icing will turn into a sticky mess.
- Make the royal icing. In a stand mixer fitted with the whisk attachment, combine the powdered sugar and meringue powder. Add 6 tablespoons of warm water and mix on low speed until combined. Increase the speed to medium-high and whip for 5-7 minutes until the icing is thick, glossy, and holds stiff peaks. If it’s too thick, add water one teaspoon at a time. If it’s too thin, add more powdered sugar.
- Divide and color. Separate the icing into small bowls. Add gel food coloring to each bowl and stir until the color is even. I usually make purple, green, orange, and neon pink. For each color, reserve about ¼ cup for outlining (stiffer consistency) and thin the rest with a few drops of water for flooding (runs off a spoon in a smooth ribbon).
- Outline the cookies. Fit a piping bag with a small round tip (size 2). Fill it with the stiff icing and outline the edges of each cookie. Let the outlines dry for about 10 minutes. This creates a dam that holds the flood icing in place.
- Flood the cookies. Switch to a larger tip (size 3) or snip a slightly larger hole in a zip-top bag. Fill the outlined area with the thinned icing. Use a toothpick to spread the icing into corners and pop any air bubbles. Work quickly—the icing starts to set after a few minutes.
- Add decorations. While the flood icing is still wet, press edible googly eyes into the icing. Add sprinkles around the edges. Use black decorating gel to draw mouths, scars, or stitches. Get creative—no two monsters should look the same.
- Let the icing set. Allow the cookies to dry at room temperature for at least 4 hours, preferably overnight. The icing should be completely hard to the touch before you stack or store them.
One thing I learned the hard way: don’t rush the drying process. I once tried to speed things up by putting the cookies in the refrigerator, and the icing got all sticky and weird. Just be patient.
Cooking Tips & Techniques
I’ve made plenty of mistakes with sugar cookies, and I’m happy to share them so you don’t have to repeat them. Here are the things I wish someone had told me.
Don’t overwork the dough. The first time I made these, I kept kneading the scraps together until the dough got warm and sticky. The cookies came out tough and misshapen. Now I gather the scraps gently and re-roll them only once. If the dough gets too warm, I pop it back in the fridge for 10 minutes.
Check your oven temperature. Ovens lie. I burned an entire batch because I trusted the display. Get an oven thermometer—they’re cheap and worth every penny. Your cookies should be pale with just a hint of gold around the edges. If they’re browning, your oven is too hot.
Royal icing consistency is everything. The outlining icing should be thick enough to hold its shape when piped—think toothpaste. The flooding icing should flow like honey. If it runs off the cookie like water, it’s too thin. Add more powdered sugar a tablespoon at a time. If it won’t spread, it’s too thick. Add water a drop at a time.
Work in an assembly line. Outline all the cookies first, then go back and flood them. This gives the outlines time to set slightly, which makes flooding easier. I usually outline 6 cookies, then flood 6, then move on to the next batch.
Use a scribe tool or toothpick. When you’re flooding, you’ll get air bubbles. Pop them with a toothpick immediately. Also, use the toothpick to guide the icing into tight corners or around the edges. It gives you way more control than just piping.
Keep a damp paper towel over your icing bowls. Royal icing dries out fast. If you leave it uncovered, it will crust over and become unusable. Cover each bowl with a damp paper towel or plastic wrap when you’re not using it.
Variations & Adaptations
One of the best things about this recipe is how easy it is to change up. Here are some variations I’ve tried and loved.
Gluten-Free Version: Substitute the all-purpose flour with a 1:1 gluten-free baking flour blend. I’ve used King Arthur’s Measure for Measure blend with great results. Add an extra tablespoon of butter to compensate for the drier texture. The cookies will be slightly more crumbly, but they still taste amazing.
Vegan Version: Use vegan butter (I like Miyoko’s) and substitute the egg with a flax egg. For the royal icing, meringue powder is already vegan, so you’re good there. The cookies won’t be quite as tender, but they’ll still hold up to decorating.
Chocolate Monster Cookies: Replace ¼ cup of the flour with unsweetened cocoa powder. The chocolate flavor pairs beautifully with the sweet royal icing. I made a batch of chocolate monsters with bright green icing, and they looked like something from a swamp.
Spiced Halloween Cookies: Add 1 teaspoon of pumpkin pie spice to the dry ingredients. It gives the cookies a subtle fall flavor that’s perfect for Halloween. I topped these with orange icing and cinnamon-sugar sprinkles.
Different Icing Flavors: Add a few drops of peppermint extract to the royal icing for a minty twist. Or use lemon extract for a bright, citrusy flavor that cuts through the sweetness. Just don’t add too much—a little goes a long way.
Air Fryer Method: If you don’t want to heat up your oven, you can bake these in an air fryer. Preheat to 325°F (163°C) and cook for 5-6 minutes. Keep an eye on them; air fryers run hot. The cookies won’t spread as much, so they’ll be slightly thicker.
My personal favorite variation is the chocolate version with neon green icing and red googly eyes. They look genuinely creepy, but they taste like a brownie-sugar cookie hybrid. I brought them to a Halloween party once, and they disappeared in 20 minutes.
Serving & Storage Suggestions
These cookies are best served at room temperature. The royal icing should be completely set—hard to the touch but not brittle. If you’re serving them at a party, arrange them on a platter with some fake spiderwebs or plastic spiders for a spooky effect. They make a great centerpiece for a Halloween dessert table.
For drinks, these cookies pair beautifully with a cold glass of milk, a warm mug of apple cider, or even a pumpkin spice latte. If you’re serving adults, a glass of dark rum or bourbon complements the sweetness nicely. I’ve also served them alongside a creamy buffalo chicken dip for a sweet-and-savory Halloween spread that always gets rave reviews.
To store, place the cookies in an airtight container at room temperature. Layer them between sheets of parchment paper to prevent the icing from sticking. They’ll stay fresh for up to 5 days. Do not refrigerate them—the humidity in the fridge can make the icing sticky and cause the cookies to soften.
You can freeze the undecorated cookies for up to 3 months. Just bake and cool them completely, then wrap them tightly in plastic wrap and place them in a freezer bag. When you’re ready to decorate, thaw them at room temperature for about an hour. Do not freeze decorated cookies—the icing can crack and separate during thawing.
For reheating, pop a cookie in the microwave for about 10 seconds. It won’t be warm, but it’ll soften slightly and taste freshly baked. I do this when I want a little comfort on a chilly October evening.
The flavors actually improve after a day or two. The cookie softens slightly, and the icing sets perfectly. I’ve found that these cookies taste best on day two or three—if they last that long.
Nutritional Information & Benefits
Let’s be real: these are sugar cookies with royal icing. They’re a treat, not a health food. But here’s the estimated nutritional breakdown per cookie (based on 24 cookies):
- Calories: 185
- Fat: 8g
- Carbohydrates: 28g
- Protein: 2g
- Sugar: 18g
That said, there are a few silver linings. The butter in these cookies provides a small amount of vitamin A and healthy fats. The egg adds protein and B vitamins. And if you use natural food colorings (like beet powder for pink or spirulina for green), you can skip the artificial dyes.
If you’re watching your sugar intake, you can reduce the sugar in the cookie dough by ¼ cup without affecting the texture too much. The royal icing is harder to adjust—it needs the powdered sugar for structure. But you can use less icing per cookie by doing a thinner flood layer.
These cookies are not gluten-free, dairy-free, or vegan as written, but I’ve included substitutions above for those with dietary restrictions. They do contain eggs and dairy, so keep that in mind for allergies.
For a slightly healthier option, try making these alongside some fresh watermelon feta mint salad for a balanced Halloween spread. The sweetness of the cookies pairs beautifully with the salty, refreshing salad.
Conclusion
These spooky Halloween monster sugar cookies with royal icing are more than just a dessert—they’re an experience. They’re the kind of recipe that brings people together, whether it’s kids fighting over who gets to pipe the purple icing or adults sneaking one off the platter when they think no one’s looking. I’ve made these for three Halloweens now, and they’ve become a tradition I look forward to every year.
Don’t be afraid to experiment with the decorations. Make them as scary or as silly as you want. Add extra googly eyes. Draw crooked teeth. Give one a top hat. The beauty of monster cookies is that there are no rules. The weirder they look, the better they are.
I’d love to see what you come up with. Tag me in your photos, leave a comment below telling me about your favorite monster design, or share your own variations. Did you try the chocolate version? Did you add sprinkles that glow in the dark? I want to hear about it. These cookies are meant to be shared, and your ideas might inspire someone else’s Halloween baking adventure.
So preheat that oven, get out your rolling pin, and make some monsters. Your kitchen is about to get a little spooky, a little silly, and a whole lot delicious.
Frequently Asked Questions
Can I make the dough ahead of time?
Absolutely. You can prepare the dough up to 3 days in advance and keep it wrapped tightly in the refrigerator. You can also freeze the dough discs for up to 3 months. Just thaw them in the fridge overnight before rolling and cutting.
Why did my royal icing turn out runny?
You probably added too much water. Royal icing is finicky that way. To fix it, add more powdered sugar a tablespoon at a time and whip until it reaches the right consistency. It should hold a stiff peak when you lift the whisk.
Can I use liquid food coloring instead of gel?
I don’t recommend it. Liquid food coloring adds too much water to the icing, which thins it out and can cause it to run off the cookies. Gel colors are more concentrated and don’t affect the consistency as much. Plus, they give you brighter, more vibrant colors.
How do I prevent the cookies from spreading too much?
Chill your dough thoroughly before baking. I recommend at least 30 minutes in the fridge. Also, make sure your butter isn’t too soft. If your kitchen is warm, you might need to chill the shaped cookies on the baking sheet for 10 minutes before they go in the oven.
Can I use this recipe for other holidays?
Definitely. The sugar cookie recipe is versatile enough for any occasion. Just swap out the monster cutters for holiday shapes—hearts for Valentine’s Day, stars for the Fourth of July, trees for Christmas. The royal icing recipe works the same way. I’ve used this exact recipe to make patriotic desserts and holiday-themed treats all year round.
Pin This Recipe!

Spooky Halloween Monster Sugar Cookies | Easy Royal Icing Recipe

These spooky Halloween monster sugar cookies with royal icing are fun, forgiving, and perfect for parties. The buttery vanilla cookie is soft-centered with crisp edges, and the royal icing sets up perfectly for decorating with googly eyes and sprinkles.
- Prep Time: 15 minutes
- Cook Time: 10 minutes
- Total Time: 1 hour 55 minutes (including 30 minutes chilling and 1 hour decorating/setting)
- Yield: 24 cookies 1x
- Category: Dessert
- Cuisine: American
Ingredients
- 1 cup (226 g) unsalted butter, softened
- 1 cup (200 g) granulated sugar
- 1 large egg, room temperature
- 1 teaspoon vanilla extract
- ½ teaspoon almond extract (optional)
- 2 ½ cups (312 g) all-purpose flour
- ½ teaspoon baking powder
- ¼ teaspoon salt
- 4 cups (480 g) powdered sugar
- 3 tablespoons meringue powder
- 6–8 tablespoons warm water
- Gel food coloring (neon colors recommended)
- Edible googly eyes
- Black decorating gel
- Halloween-themed sprinkles
- Piping bags and tips (size 2 and 3)
Instructions
- Make the cookie dough: In a stand mixer fitted with the paddle attachment, cream the softened butter and granulated sugar together on medium speed for 3-4 minutes until light and fluffy. Scrape down the sides of the bowl. Add the egg, vanilla extract, and almond extract, and beat on low until combined.
- Mix the dry ingredients: In a separate bowl, whisk together the flour, baking powder, and salt. Gradually add the dry mixture to the wet mixture, mixing on low speed. Stop as soon as the dough comes together. Don’t overmix.
- Chill the dough: Divide the dough into two discs, wrap each in plastic wrap, and refrigerate for at least 30 minutes.
- Preheat and prepare: Preheat your oven to 350°F (175°C). Line two baking sheets with parchment paper or silicone mats.
- Roll and cut: On a lightly floured surface, roll out one disc of dough to about ¼-inch thickness. Cut out monster shapes and place them 2 inches apart on the prepared baking sheets. Gather scraps, re-roll, and cut again. You should get about 24 cookies.
- Bake: Bake for 8-10 minutes, rotating the pans halfway through. The edges should be lightly golden, but the centers should still look pale. Let cool on the baking sheet for 5 minutes, then transfer to a wire rack to cool completely.
- Make the royal icing: In a stand mixer fitted with the whisk attachment, combine the powdered sugar and meringue powder. Add 6 tablespoons of warm water and mix on low speed until combined. Increase speed to medium-high and whip for 5-7 minutes until thick, glossy, and holds stiff peaks. Adjust consistency as needed.
- Divide and color: Separate the icing into small bowls. Add gel food coloring to each bowl and stir until even. For each color, reserve about ¼ cup for outlining (stiffer consistency) and thin the rest with a few drops of water for flooding.
- Outline the cookies: Fit a piping bag with a small round tip (size 2). Fill with stiff icing and outline the edges of each cookie. Let outlines dry for about 10 minutes.
- Flood the cookies: Switch to a larger tip (size 3) or snip a larger hole in a zip-top bag. Fill the outlined area with thinned icing. Use a toothpick to spread icing into corners and pop air bubbles.
- Add decorations: While the flood icing is still wet, press edible googly eyes into the icing. Add sprinkles around the edges. Use black decorating gel to draw mouths, scars, or stitches.
- Let the icing set: Allow cookies to dry at room temperature for at least 4 hours, preferably overnight, until icing is completely hard to the touch.
Notes
Don’t rush the drying process. Avoid refrigerating the cookies to set the icing; it can make the icing sticky. For best results, let the icing set at room temperature overnight. The dough can be made up to 3 days ahead and refrigerated, or frozen for up to 3 months. Undecorated cookies can be frozen for up to 3 months.
Nutrition
- Serving Size: 1 cookie
- Calories: 185
- Sugar: 18
- Fat: 8
- Carbohydrates: 28
- Protein: 2
Keywords: Halloween cookies, monster cookies, sugar cookies, royal icing, spooky cookies, easy Halloween recipe, decorated cookies


